Determining bike size for child involves understanding their inseam measurement and matching it to the bike’s seat height, ensuring a comfortable and safe riding experience; at usabikers.net, we provide expert guidance to help you choose the perfect fit. This ensures enhanced control, safety, and confidence on the road. Let’s explore the essential aspects of bike fitting for children, covering everything from measuring inseam to selecting the right wheel size and adjusting seat height with biker precision.
1. Why Inseam Matters for Bike Sizing
Most kids’ bike size charts rely on height and wheel size, often ignoring inseam measurements, and size recommendations can vary among brands, leading to confusion when selecting the ideal fit. Inseam measurement is crucial as it directly correlates with the rider’s ability to comfortably reach the pedals and maintain control.
- Provides Accurate Fit: Measuring inseam ensures the bike’s seat height is appropriate.
- Enhances Safety: A properly sized bike enables better balance and control.
- Increases Comfort: Riding becomes more enjoyable when the bike fits well.
2. Measuring Your Child’s Inseam: A Step-by-Step Guide
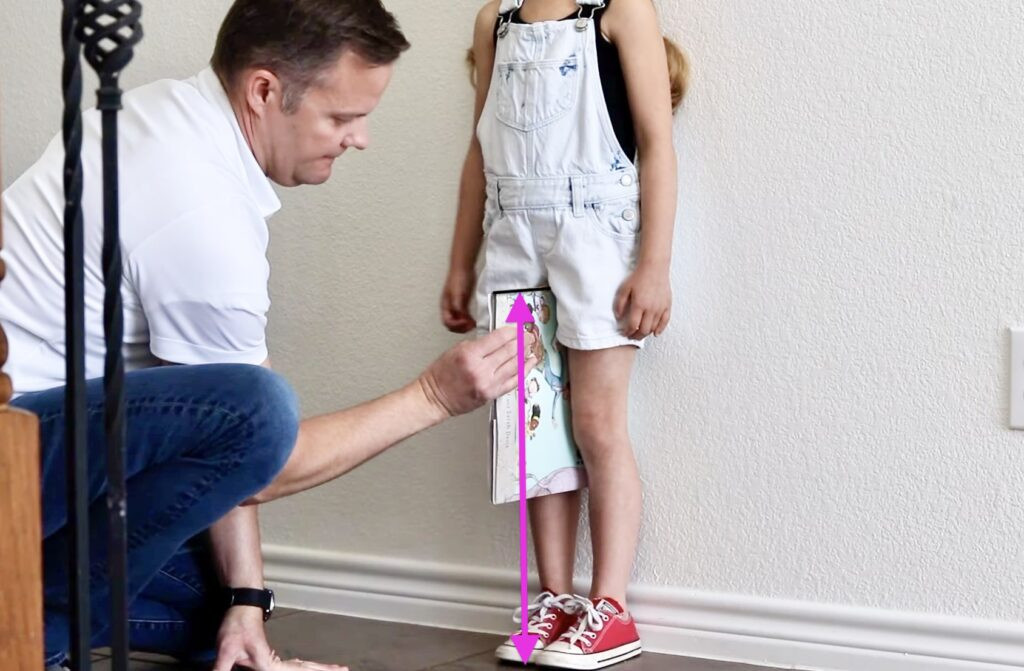
Measuring your child’s inseam accurately is the first step in determining the right bike size; follow these simple steps to get it right. This method ensures you’re equipped with the precise measurement needed to find the perfect bike.
- Prepare: Have your child wear shoes they typically use for biking.
- Position: Have them stand against a wall with their back and heels flush against it.
- Use a Book: Place a hardbound book between their legs, raising it until the spine presses firmly against their crotch.
 Child getting her inseams measured for a bike by using the book method
- Measure: Ensure the book is level, then measure from the ground up to the top of the book’s spine.
- Record: Note this measurement; it’s your child’s inseam, vital for bike sizing.
3. Using Inseam to Determine Wheel Size
Using your child’s inseam measurement, determine the appropriate wheel size using the following chart. Choosing the right wheel size can significantly impact a child’s ability to handle and enjoy their bike.
| Wheel Size | Age | Inseam | Height |
|---|---|---|---|
| 12″ | 2 to 3 | 15 – 18″ | 36 – 39″ |
| 14″ | 2 to 4 | 15 – 20″ | 37 – 44″ |
| 16″ | 4 to 6 | 16 – 22″ | 41 – 48″ |
| 20″ | 5 to 8 | 19 – 25″ | 45 – 54″ |
| 24″ | 8 to 11 | 23 – 28″ | 49 – 59″ |
| 26″ | 10 + | 25″ + | 56″ + |
4. Adjusting Seat Height for Optimal Riding
Adjusting the seat height based on your child’s riding ability ensures they can comfortably and safely operate their bike. This is a crucial aspect of bike fitting that enhances control and reduces the risk of accidents.
4.1. Guidelines for Seat Height Adjustment
- Balance Bike Riders: Seat height should be 0.5″ to 1.5″ below inseam.
- Training Wheels: Seat height should be equal to or up to 3″ above inseam.
- First-Time Pedal Bike Riders: Set the seat height equal to their inseam for stability.
- Experienced Riders: Seat height can be 2″ to 4″ above inseam for pedaling efficiency.
4.2. Why Proper Seat Height Matters
- Balance Bike Riders: Promotes efficient running and balance.
- Training Wheels: Allows for stable learning with ground contact.
- First-Time Pedal Bike Riders: Provides stability and confidence.
- Experienced Riders: Maximizes pedaling efficiency and reduces strain.
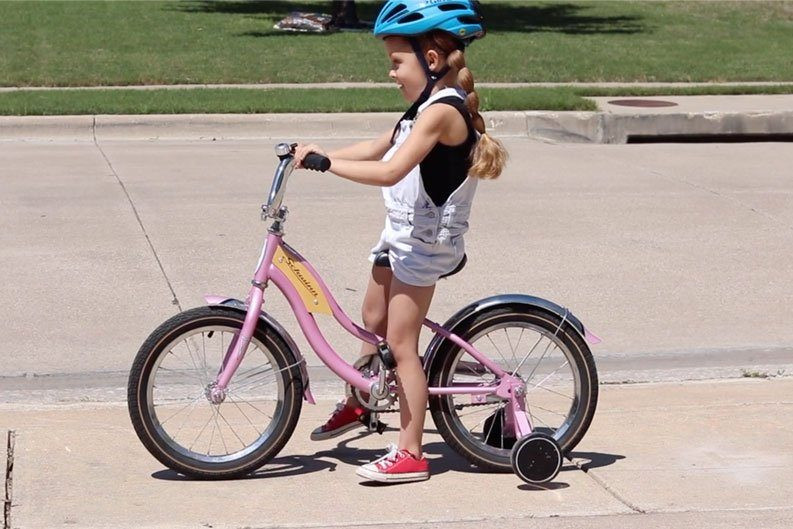
 5 year old standing next to her bike. Arrows indicating inseam measurement and bike seat height measurement
5. Selecting the Right Bike Size
When you’re ready to find a bike that fits, aim for bikes where the minimum seat height aligns with your child’s ideal seat height. Proper sizing optimizes the bike’s usability as they grow.
| Inseam | Ideal Seat Height | Bike | Bike’s Seat Height |
|---|---|---|---|
| 13″ | 11.5” to 12.5” | Retrospec Cub Plus | 11.5” – 15” |
| 16″ | 16” to 19” | Biky 14 | 15.5” – 21” |
| 16″ | 16” | Woom 2 | 16” – 19.1” |
| 16″ | 18” to 20” | Guardian 16 | 18.25” – 22.6” |
6. What a Properly Fitting Bike Looks Like
Here’s a look at what a properly fitting bike looks like for each riding stage, ensuring your child’s comfort and safety on two wheels. This guide helps visualize the ideal fit, making the selection process easier and more effective.
6.1. Balance Bike Riders
The seat should be set 0.5 – 1.5” below the child’s inseam, allowing for a slight knee bend when seated with feet flat on the ground. This setup promotes efficient running and balance.
 toddler riding a green balance bike
6.2. Bike with Training Wheels
The seat should be set 0 – 3” above the child’s inseam, enabling them to touch the ground with their tip toes while seated. This ensures they can stop with their feet, especially while learning.
 5 year old rider sitting on her bike with training wheels. Feet touching the ground on her tip toes
6.3. First Pedal Bike (After Balance Bike or Training Wheels)
The seat should be set at the same height as the child’s inseam, allowing their entire foot to touch the ground while seated, for easy starts and stops. As they gain confidence, the seat can be raised for better leg extension.
 5 year old bike rider with feet flat on ground
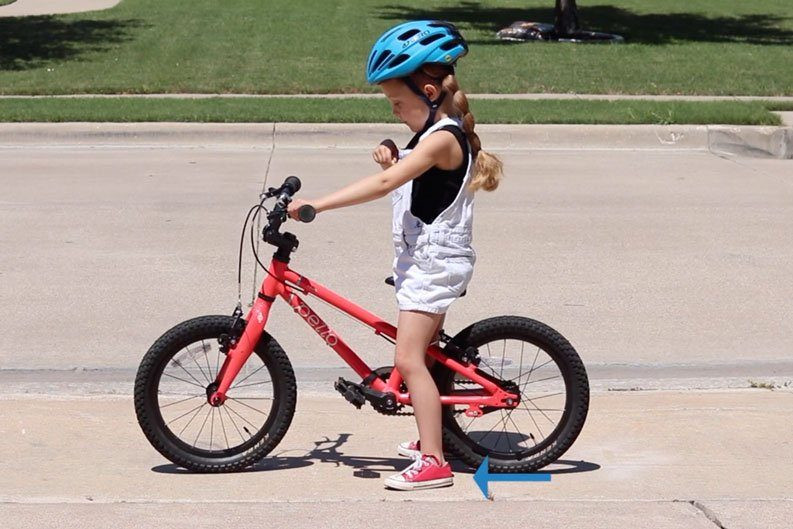
6.4. Experienced Riders
The seat can be set 2 – 4” above their inseam, with them able to touch the ground with only their tip toes. This higher seat position allows for proper leg extension, maximizing pedaling efficiency.
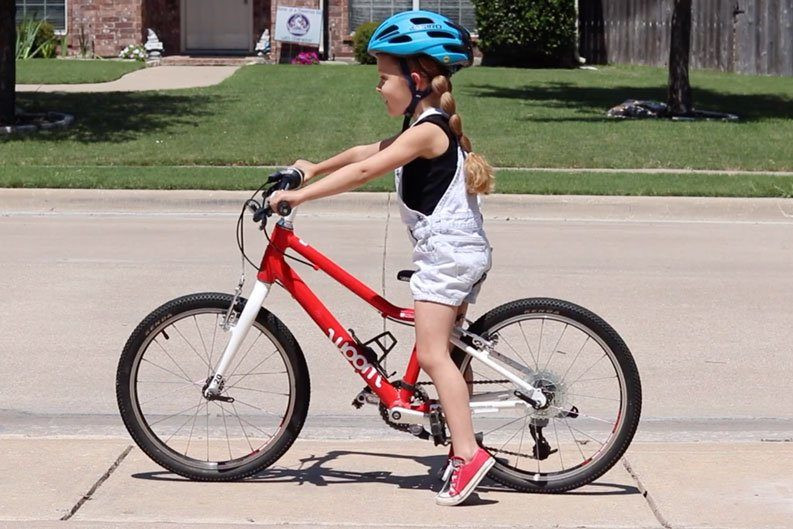 5 year old rider sitting on her bike with her feet touching the ground on her tip toes
7. Comprehensive Bike Selection Guide
Selecting the right bike size for your child requires a comprehensive approach that considers not just their height, but also their inseam and riding experience. By following the steps outlined in this guide, you can ensure a comfortable, safe, and enjoyable riding experience for your child. Remember, a well-fitted bike boosts confidence, improves control, and enhances safety, setting the stage for a lifelong love of biking.
8. Expert Tips for Choosing the Right Bike
When determining the right bike size for a child, consider these expert tips to ensure the best fit and riding experience:
- Measure Inseam Accurately: As emphasized, accurate inseam measurement is critical.
- Consider Riding Experience: Adjust seat height based on their skill level.
- Check Seat Height Range: Look for bikes with adjustable seat heights.
- Test Ride if Possible: Have the child test ride the bike for comfort.
- Consult Professionals: Seek advice from bike shop experts.
- Use Online Tools: Leverage online bike finder tools for guidance.
9. Resources for Finding the Perfect Bike
Utilize these resources to simplify finding the perfect bike for your child:
- Bike Finder Tools: Use online tools for personalized recommendations.
- Bike Reviews: Consult reviews for detailed information on various models.
- Local Bike Shops: Visit local shops for expert advice and test rides.
- Online Communities: Engage in online forums for shared experiences.
- Brand Websites: Check official websites for product details.
10. Additional Biking Resources
Explore additional biking resources to enhance your child’s riding experience and safety:
- Guardian Bikes RideSizer: A proprietary tool that recommends the best bike size based on age and height.
- Woom Bikes Size Finder: Simplifies finding the right size Woom bike with an easy-to-use tool.
- Best Kids Bikes: The Authoritative Buying Guide: Offers detailed information on features to look for when shopping for a bike.
- Why a Balance Bike Should be the First Bike for Your Toddler: Explains the benefits of balance bikes for young children.
11. The Importance of Bike Maintenance
Maintaining your child’s bike is crucial for ensuring safety and prolonging its lifespan; regularly check the brakes, tires, and chain to keep the bike in top condition. Proper maintenance prevents accidents and ensures smooth, enjoyable rides.
11.1. Key Maintenance Tasks
- Brake Inspection: Ensure brakes are responsive and properly adjusted.
- Tire Check: Maintain proper inflation and inspect for wear.
- Chain Lubrication: Keep the chain clean and lubricated for smooth pedaling.
- Bolt Tightening: Regularly tighten all bolts and screws.
- Frame Inspection: Check for any signs of damage or rust.
11.2. Benefits of Regular Maintenance
- Enhanced Safety: Reduces the risk of accidents due to mechanical failure.
- Extended Lifespan: Prevents wear and tear, prolonging the bike’s life.
- Improved Performance: Ensures smooth and efficient riding.
- Cost Savings: Prevents costly repairs by addressing issues early.
- Peace of Mind: Provides confidence in the bike’s reliability.
12. Safety Gear Essentials
Equipping your child with the right safety gear is essential for protecting them while biking; a helmet is the most important item, followed by knee and elbow pads. Proper gear minimizes the risk of injuries during falls and accidents.
12.1. Must-Have Safety Items
- Helmet: Choose a properly fitted helmet that meets safety standards.
- Knee Pads: Provide protection against knee injuries during falls.
- Elbow Pads: Offer similar protection for elbows.
- Gloves: Enhance grip and protect hands from scrapes.
- Reflective Gear: Increase visibility in low-light conditions.
12.2. Benefits of Using Safety Gear
- Reduces Injury Risk: Minimizes the severity of injuries during accidents.
- Enhances Confidence: Makes children feel more secure while riding.
- Promotes Safe Habits: Encourages responsible behavior.
- Provides Peace of Mind: Alleviates parental concerns.
- Sets a Good Example: Shows the importance of safety to others.
13. Addressing Common Bike Sizing Concerns
Many parents have questions about bike sizing; addressing these concerns can help ensure a confident and informed decision. Understanding the nuances of bike sizing can lead to a better fit and more enjoyable riding experience.
13.1. Common Concerns
- “My child is between sizes; which one should I choose?”: Opt for the smaller size for better control.
- “Can I buy a bigger bike so my child can grow into it?”: Avoid this as it compromises safety and control.
- “How often should I check the bike size?”: Check every few months as children grow quickly.
- “What if my child is uncomfortable on the bike?”: Adjust the seat and handlebar height.
- “Is it okay to buy a used bike?”: Ensure it fits properly and is in good condition.
13.2. Expert Solutions
- In-Between Sizes: The smaller size allows for better control and confidence, especially for beginner riders.
- Growing Into Bikes: A bike that’s too large can be difficult to handle and potentially dangerous. It’s best to choose a bike that fits properly at the time of purchase.
- Regular Checks: Children grow quickly, so it’s important to check the bike fit every few months.
- Addressing Discomfort: Adjusting the seat and handlebar height can make a significant difference in comfort.
- Used Bikes: A used bike can be a great option, but make sure it fits properly and is in good condition.
14. Engaging Your Child in the Selection Process
Involving your child in the bike selection process can make them more excited about riding; let them choose the color and style, and explain why a good fit is important. This collaborative approach fosters enthusiasm and responsibility.
14.1. How to Involve Your Child
- Let Them Choose: Allow them to pick the color and style.
- Explain the Fit: Show them why a good fit is important for safety.
- Test Ride Together: Go for a test ride and get their feedback.
- Set Goals: Discuss biking goals, such as learning new tricks.
- Celebrate Success: Acknowledge their progress and achievements.
14.2. Benefits of Involvement
- Increased Enthusiasm: Makes them more excited about riding.
- Greater Responsibility: Encourages them to take care of their bike.
- Enhanced Learning: Helps them understand the importance of safety.
- Improved Communication: Fosters open discussion about biking.
- Stronger Bonds: Creates shared experiences and memories.
15. Riding Safely: Essential Tips
Teach your child essential safety tips to ensure they ride safely; always wear a helmet, follow traffic rules, and be aware of surroundings. Safety education promotes responsible biking habits.
15.1. Key Safety Rules
- Wear a Helmet: Always wear a properly fitted helmet.
- Follow Traffic Rules: Obey traffic signals and signs.
- Be Aware: Pay attention to surroundings and potential hazards.
- Use Hand Signals: Indicate turns and stops.
- Ride Defensively: Anticipate the actions of others.
15.2. The Impact of Safety Education
- Reduces Accidents: Minimizes the risk of collisions and falls.
- Promotes Awareness: Enhances understanding of potential dangers.
- Encourages Responsibility: Fosters safe biking habits.
- Builds Confidence: Makes children feel more secure.
- Protects Against Injury: Minimizes the severity of injuries.
16. The Role of Bike Fitters
Professional bike fitters can provide expert guidance in selecting the right bike size; they assess individual needs and make precise adjustments to ensure optimal comfort and performance. A professional fitting is an investment in your child’s biking future.
16.1. What Bike Fitters Do
- Assess Needs: Evaluate individual riding style and goals.
- Measure Body: Take precise body measurements.
- Adjust Bike: Make adjustments to the seat, handlebars, and pedals.
- Provide Guidance: Offer advice on bike maintenance and safety.
- Optimize Comfort: Ensure the bike is comfortable for long rides.
16.2. Benefits of Professional Fitting
- Enhanced Comfort: Reduces discomfort and fatigue.
- Improved Performance: Maximizes pedaling efficiency.
- Reduced Injury Risk: Minimizes strain and prevents injuries.
- Optimal Control: Ensures better handling of the bike.
- Increased Enjoyment: Makes riding more pleasurable.
17. Legal Requirements for Biking
Be aware of the legal requirements for biking in your area; many states have laws regarding helmet use, traffic rules, and equipment standards. Compliance with these laws promotes safety and responsibility.
17.1. Common Legal Requirements
- Helmet Laws: Many states require helmet use for children.
- Traffic Laws: Bicycles must follow the same traffic rules as cars.
- Equipment Standards: Bikes must have working brakes and lights.
- Registration: Some areas require bike registration.
- Sidewalk Riding: Some cities prohibit riding on sidewalks.
17.2. Consequences of Non-Compliance
- Fines: Violations can result in fines.
- Legal Liability: Non-compliance can lead to legal liability in accidents.
- Safety Risks: Ignoring laws increases the risk of accidents and injuries.
- Parental Responsibility: Parents are responsible for ensuring their children comply with biking laws.
- Educational Value: Teaching children about biking laws promotes responsible behavior.
18. How to Choose a Bike Shop
Selecting a reputable bike shop is crucial for getting expert advice and quality products; look for shops with knowledgeable staff, a wide selection of bikes, and a commitment to customer service. The right bike shop can make all the difference in your biking experience.
18.1. Key Features of a Good Bike Shop
- Knowledgeable Staff: Staff should be able to answer questions and offer advice.
- Wide Selection: The shop should offer a variety of bikes to choose from.
- Customer Service: The shop should be committed to customer satisfaction.
- Repair Services: The shop should offer repair and maintenance services.
- Community Involvement: The shop should be involved in the local biking community.
18.2. Benefits of Choosing the Right Shop
- Expert Advice: You’ll get knowledgeable guidance in selecting the right bike.
- Quality Products: You’ll have access to high-quality bikes and accessories.
- Reliable Service: You’ll receive reliable repair and maintenance services.
- Community Support: You’ll be supporting a local business that cares about biking.
- Long-Term Relationships: You’ll build a lasting relationship with a trusted bike shop.
19. Organizing Fun Bike Rides for Kids
Organizing fun bike rides can make biking an enjoyable activity for kids; plan routes that are safe and engaging, and incorporate games and activities along the way. Fun bike rides promote physical activity and create lasting memories.
19.1. Tips for Planning Fun Rides
- Choose Safe Routes: Select routes that are free from traffic and hazards.
- Make it Engaging: Incorporate games and activities along the way.
- Set Realistic Goals: Avoid long distances for beginners.
- Provide Breaks: Schedule regular breaks for rest and hydration.
- Celebrate Achievements: Acknowledge milestones and accomplishments.
19.2. Benefits of Fun Bike Rides
- Promotes Physical Activity: Encourages children to be active and healthy.
- Creates Lasting Memories: Fosters positive experiences and bonds.
- Enhances Learning: Teaches children about safety and the environment.
- Builds Confidence: Makes children feel more capable and secure.
- Encourages Exploration: Allows children to discover new places and adventures.
20. Resources for Biking in the USA
Many organizations and websites provide valuable resources for biking in the USA; these resources include information on bike trails, safety tips, and advocacy efforts. Accessing these resources can enhance your biking experience and promote safety.
20.1. Key Resources
- Adventure Cycling Association: Offers maps and resources for long-distance bike touring.
- Rails-to-Trails Conservancy: Works to convert former railroad lines into bike trails.
- League of American Bicyclists: Advocates for cyclist rights and promotes safety.
- PeopleForBikes: Provides resources for promoting biking in communities.
- Local Bike Clubs: Offer group rides and support for cyclists.
20.2. Benefits of Using Resources
- Access to Trails: Find safe and enjoyable bike trails.
- Safety Information: Learn about essential safety tips.
- Advocacy Support: Stay informed about efforts to promote biking.
- Community Connections: Connect with other cyclists and groups.
- Educational Opportunities: Enhance your knowledge about biking.
At usabikers.net, we’re dedicated to providing the information and resources you need to make informed decisions about your child’s biking experience. Explore our site for more articles, reviews, and community discussions to help you and your family enjoy biking safely and confidently.
FAQ: Determining Bike Size for Child
How do I measure my child’s inseam for bike sizing?
Measure your child’s inseam by having them stand against a wall with a book between their legs, then measure from the top of the book to the floor.
What wheel size is best for my child based on their inseam?
Refer to a bike size chart that correlates inseam measurements with appropriate wheel sizes for children’s bikes.
How should I adjust the seat height on my child’s bike?
Adjust the seat height so that when seated, your child can comfortably reach the pedals with a slight bend in their knee at the bottom of the pedal stroke.
What safety gear is essential for my child when riding a bike?
Essential safety gear includes a properly fitted helmet, knee and elbow pads, gloves, and reflective clothing for visibility.
How often should I check the bike size for my growing child?
Check the bike size every few months, as children grow quickly, ensuring the bike remains a comfortable and safe fit.
What if my child is between bike sizes?
Choose the smaller size for better control and maneuverability, especially for beginner riders.
Can I buy a bike that is too big so my child can grow into it?
No, it is not recommended, as it can compromise their control and safety, making it difficult to handle the bike.
What are some tips for teaching my child how to ride a bike safely?
Start in a safe, traffic-free area, teach them to balance first, and gradually introduce pedaling while emphasizing the importance of wearing a helmet.
Are there any legal requirements for kids riding bikes in the US?
Yes, many states have helmet laws for children and require bikes to have working brakes and reflectors for safety.
Where can I find more resources for safe biking practices for kids?
You can find valuable resources on the usabikers.net website, as well as the Adventure Cycling Association and Rails-to-Trails Conservancy for safe biking tips and locations.
Ready to discover the perfect bike and gear for your young rider? Visit usabikers.net now to explore our detailed guides, community forums, and expert reviews, and let’s make every ride a safe and thrilling adventure together Address: 801 Sturgis Main St, Sturgis, SD 57785, United States. Phone: +1 (605) 347-2000.