
Taking your bike apart for travel might seem daunting, but it’s a straightforward process that can save you money on oversized baggage fees and protect your bike during transit. Knowing how to disassemble your bike chain, along with other key components, is essential for safe and compact packing. This guide will walk you through the steps to disassemble your bike, focusing on chain management, to prepare it for travel.
Before you begin, gather your tools and prepare your bike. It’s helpful to remove any accessories like saddlebags, bike computers, and water bottles. Shift your chain to the smallest cog on the rear cassette; this reduces tension and simplifies rear wheel removal. You’ll also want to deflate your tires slightly to decrease the risk of damage during packing and air travel.
-
Remove the Pedals: Using a pedal wrench, remove your bike’s pedals. Remember the thread direction: the right pedal loosens counter-clockwise (standard thread), and the left pedal loosens clockwise (reverse thread). It’s a good idea to pack your wrench and pedals in your carry-on luggage if flying.
-
Detach the Saddle: Loosen the seatpost clamp and remove the saddle and seatpost assembly. Before removing it, use a marker to note your saddle height on the seatpost. This will make reassembly much easier.
-
Handlebar Removal and Securing: Carefully loosen the stem bolts and detach the handlebars. Without disconnecting cables, turn the handlebars parallel to the frame. Use painter’s tape (it’s gentle and residue-free) to secure them to the bike frame, preventing them from swinging around and causing damage. Bring some extra tape for reassembling your bike box later.
-
Wheel Removal: Remove both the front and rear wheels. Place the skewers in a safe bag to prevent loss – consider keeping them with your carry-on as well.
-
Rear Derailleur and Chain Management: This is where chain disassembly or careful management comes in. Unscrew the rear derailleur from the frame and carefully wrap it in bubble wrap or place it in a padded bag to protect it from impacts. Now, address the chain. While you don’t always need to completely remove the chain, securing it is crucial. You have a few options:
-
Option 1: Securing the Chain (Without Disassembly): Wrap the chain with bubble wrap or foam tubing to protect the frame from scratches. You can then gently secure the chain to the chainstay with tape or zip ties to minimize movement during transit. This is often sufficient for packing without full disassembly.
-
Option 2: Partial Chain Disassembly (Using a Master Link if equipped): If your chain has a master link (also known as a quick link), this is the easiest way to partially disassemble the chain. Locate the master link (it looks slightly different from other links). Use master link pliers or carefully use regular pliers to open the master link and separate the chain. This relieves tension and allows for easier derailleur packing. Keep the master link in a safe place to reassemble the chain later.
-
Option 3: Full Chain Disassembly (Using a Chain Tool): For complete removal, use a chain tool to push out a pin and break the chain. This provides the most flexibility for packing but requires a chain tool for both disassembly and reassembly (unless you use a master link for reassembly). If you fully remove the chain, clean it and wrap it separately to protect it.
For most travel packing scenarios, Option 1 or Option 2 (if you have a master link) are sufficient and recommended for simplicity and speed. Full chain removal (Option 3) is generally only needed for deep cleaning or maintenance, not just for travel packing.
-
-
Wheel Bagging: Place each wheel in a dedicated wheel bag. Ensure all air is let out of the tires to comply with air travel regulations and prevent tire or tube damage due to pressure changes.
-
Packing the Bike Box: Now, carefully pack your bike frame and components into your bike box or travel case. Use ample bubble wrap and padding to fill any void spaces and protect all parts from shifting and impacts during transport. Pay special attention to protecting vulnerable areas like the frame tubes, dropouts, and derailleur hanger.
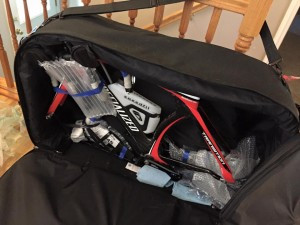 bike bag bike inside
Preparing your bike for travel by carefully packing it in a bike bag, ensuring protection and efficient use of space.
Reassembling Your Bike After Travel
Reassembling your bike is essentially the reverse of disassembly.
- Unpack and Unwrap: Carefully unpack all components and remove all protective wrapping.
- Reattach Rear Derailleur: Reattach the rear derailleur to the frame, ensuring it’s properly aligned.
- Replace Wheels and Skewers: Reinstall the wheel skewers and mount the wheels. It’s often easier to install the rear wheel first, then the front after the handlebars are in place. If you are unfamiliar with rear wheel installation, especially with derailleur alignment, consider watching a video tutorial on rear wheel installation for bikes with derailleurs.
- Handlebar Reinstallation: Reattach the handlebars to the stem and tighten the stem bolts to the correct torque. Ensure they are straight and in your preferred riding position.
- Saddle Replacement: Reinstall the saddle and seatpost assembly, using the mark you made earlier to return it to your correct height. Tighten the seatpost clamp.
- Inflate Tires and Check Function: Inflate your tires to the correct pressure. Thoroughly check the function of your brakes and gears, ensuring there is no rubbing or binding.
- Pedal Reinstallation: Reinstall the pedals, remembering “right is right, left is wrong” for thread direction. Tighten them securely with your pedal wrench.
- Reattach Accessories: Put back your saddlebag, bento box, bike computer, and any other accessories.
- Test Ride and Adjust: Take your bike for a short test ride in a safe area. Make any necessary adjustments to saddle height, handlebar position, brakes, and gears.
- Enjoy Your Ride! With your bike reassembled and checked, you’re ready to enjoy your cycling adventures!
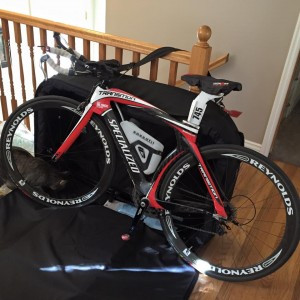 bike back together
A fully reassembled bicycle, ready for riding after being unpacked from its travel case, highlighting the ease of putting it back together.
By following these steps, including proper chain management or disassembly, you can confidently pack your bike for travel, knowing it will be protected and ready for your next ride.