Understanding your bike’s measurements is crucial, whether you’re considering buying a new bicycle, renting one for a ride, or simply aiming to fine-tune your current setup. Knowing How To Measure Bike geometry ensures you select a frame that fits you perfectly and matches your riding style. Bike frame measurements are not standardized across all manufacturers, making it essential to understand the fundamental dimensions to make accurate comparisons.
This guide will walk you through the key bike geometry measurements for both road and mountain bikes, ensuring you can confidently assess any bicycle frame. Understanding these measurements is the first step towards achieving optimal bike fit and performance.
Why Bike Geometry Matters
Bike geometry dictates how a bike handles, feels, and fits. It impacts everything from your comfort on long rides to your efficiency when pedaling uphill and your stability on descents. Understanding bike geometry helps you:
- Choose the Right Size: Ensuring the frame size is appropriate for your body proportions is paramount for comfort and injury prevention.
- Optimize Comfort: A well-measured bike minimizes strain and discomfort, allowing for longer and more enjoyable rides.
- Enhance Performance: Correct geometry contributes to efficient power transfer and better control, maximizing your riding performance.
- Compare Different Bikes: Geometry charts, while sometimes overwhelming, become understandable when you know what each measurement represents and how to verify them.
Tools You’ll Need to Measure Your Bike
Before you start measuring, gather these simple tools:
- Tape Measure: Essential for measuring linear distances on the bike frame. A standard retractable tape measure will work perfectly.
- Clinometer App (Smartphone): These apps use your phone’s sensors to measure angles. Search for a free clinometer or angle finder app in your smartphone’s app store.
- Long Spirit Level (or Straight Edge with Clinometer App): Needed to ensure horizontal and vertical measurements are accurate, especially for top tube length and reach. A long spirit level is ideal, but a straight piece of wood or metal paired with the clinometer app works too.
- Plumb Line (or String and Weight): Used to establish a vertical reference point for reach and stack measurements. You can easily create a plumb line by tying a small weight (like a nut or bolt) to a piece of string. Blu Tack can help secure the string.
While metric units are the standard for bike measurements, especially for modern bikes, some manufacturers might still use inches, particularly for mountain bike frame sizes. For consistency and ease of comparison, it’s best to stick with metric units (centimeters or millimeters). If needed, you can convert centimeters to inches by dividing by 2.54.
Geometry charts from bike manufacturers are usually the most accurate source of frame measurements for current models. If your bike is a recent model, check the manufacturer’s website for its geometry chart as a reliable reference point.
How to Measure Top Tube Length
 Measuring the top tube length of a bicycle frame
The top tube length is a fundamental measurement. While traditionally bikes had horizontal top tubes, many modern bikes feature sloping top tubes. For consistent comparison, we measure the effective top tube length (also known as virtual top tube length). This is the horizontal distance between the center of the head tube and the center of the seatpost.
Steps to measure top tube length:
- Identify the center of the head tube and seatpost.
- Use the spirit level (or straight edge with clinometer app) to ensure a horizontal line. Place it from the center of the head tube towards the seatpost area.
- Measure the horizontal distance from the center of the head tube to the point where a vertical line from the center of the seatpost would intersect the horizontal line you’ve established with the spirit level.
Manufacturers often use top tube length to size road bikes. However, mountain bikes and some road bikes are sized using S, M, L, etc., which can vary significantly between brands. A size S from one brand might have a different top tube length compared to a size S from another. Even virtual top tube length measurements can be interpreted differently by brands. For instance, Colnago measures to the top of the seat tube, not accounting for seatpost setback, which results in smaller numbers compared to brands that include the seatpost setback in their measurements.
How to Measure Seat Tube Length
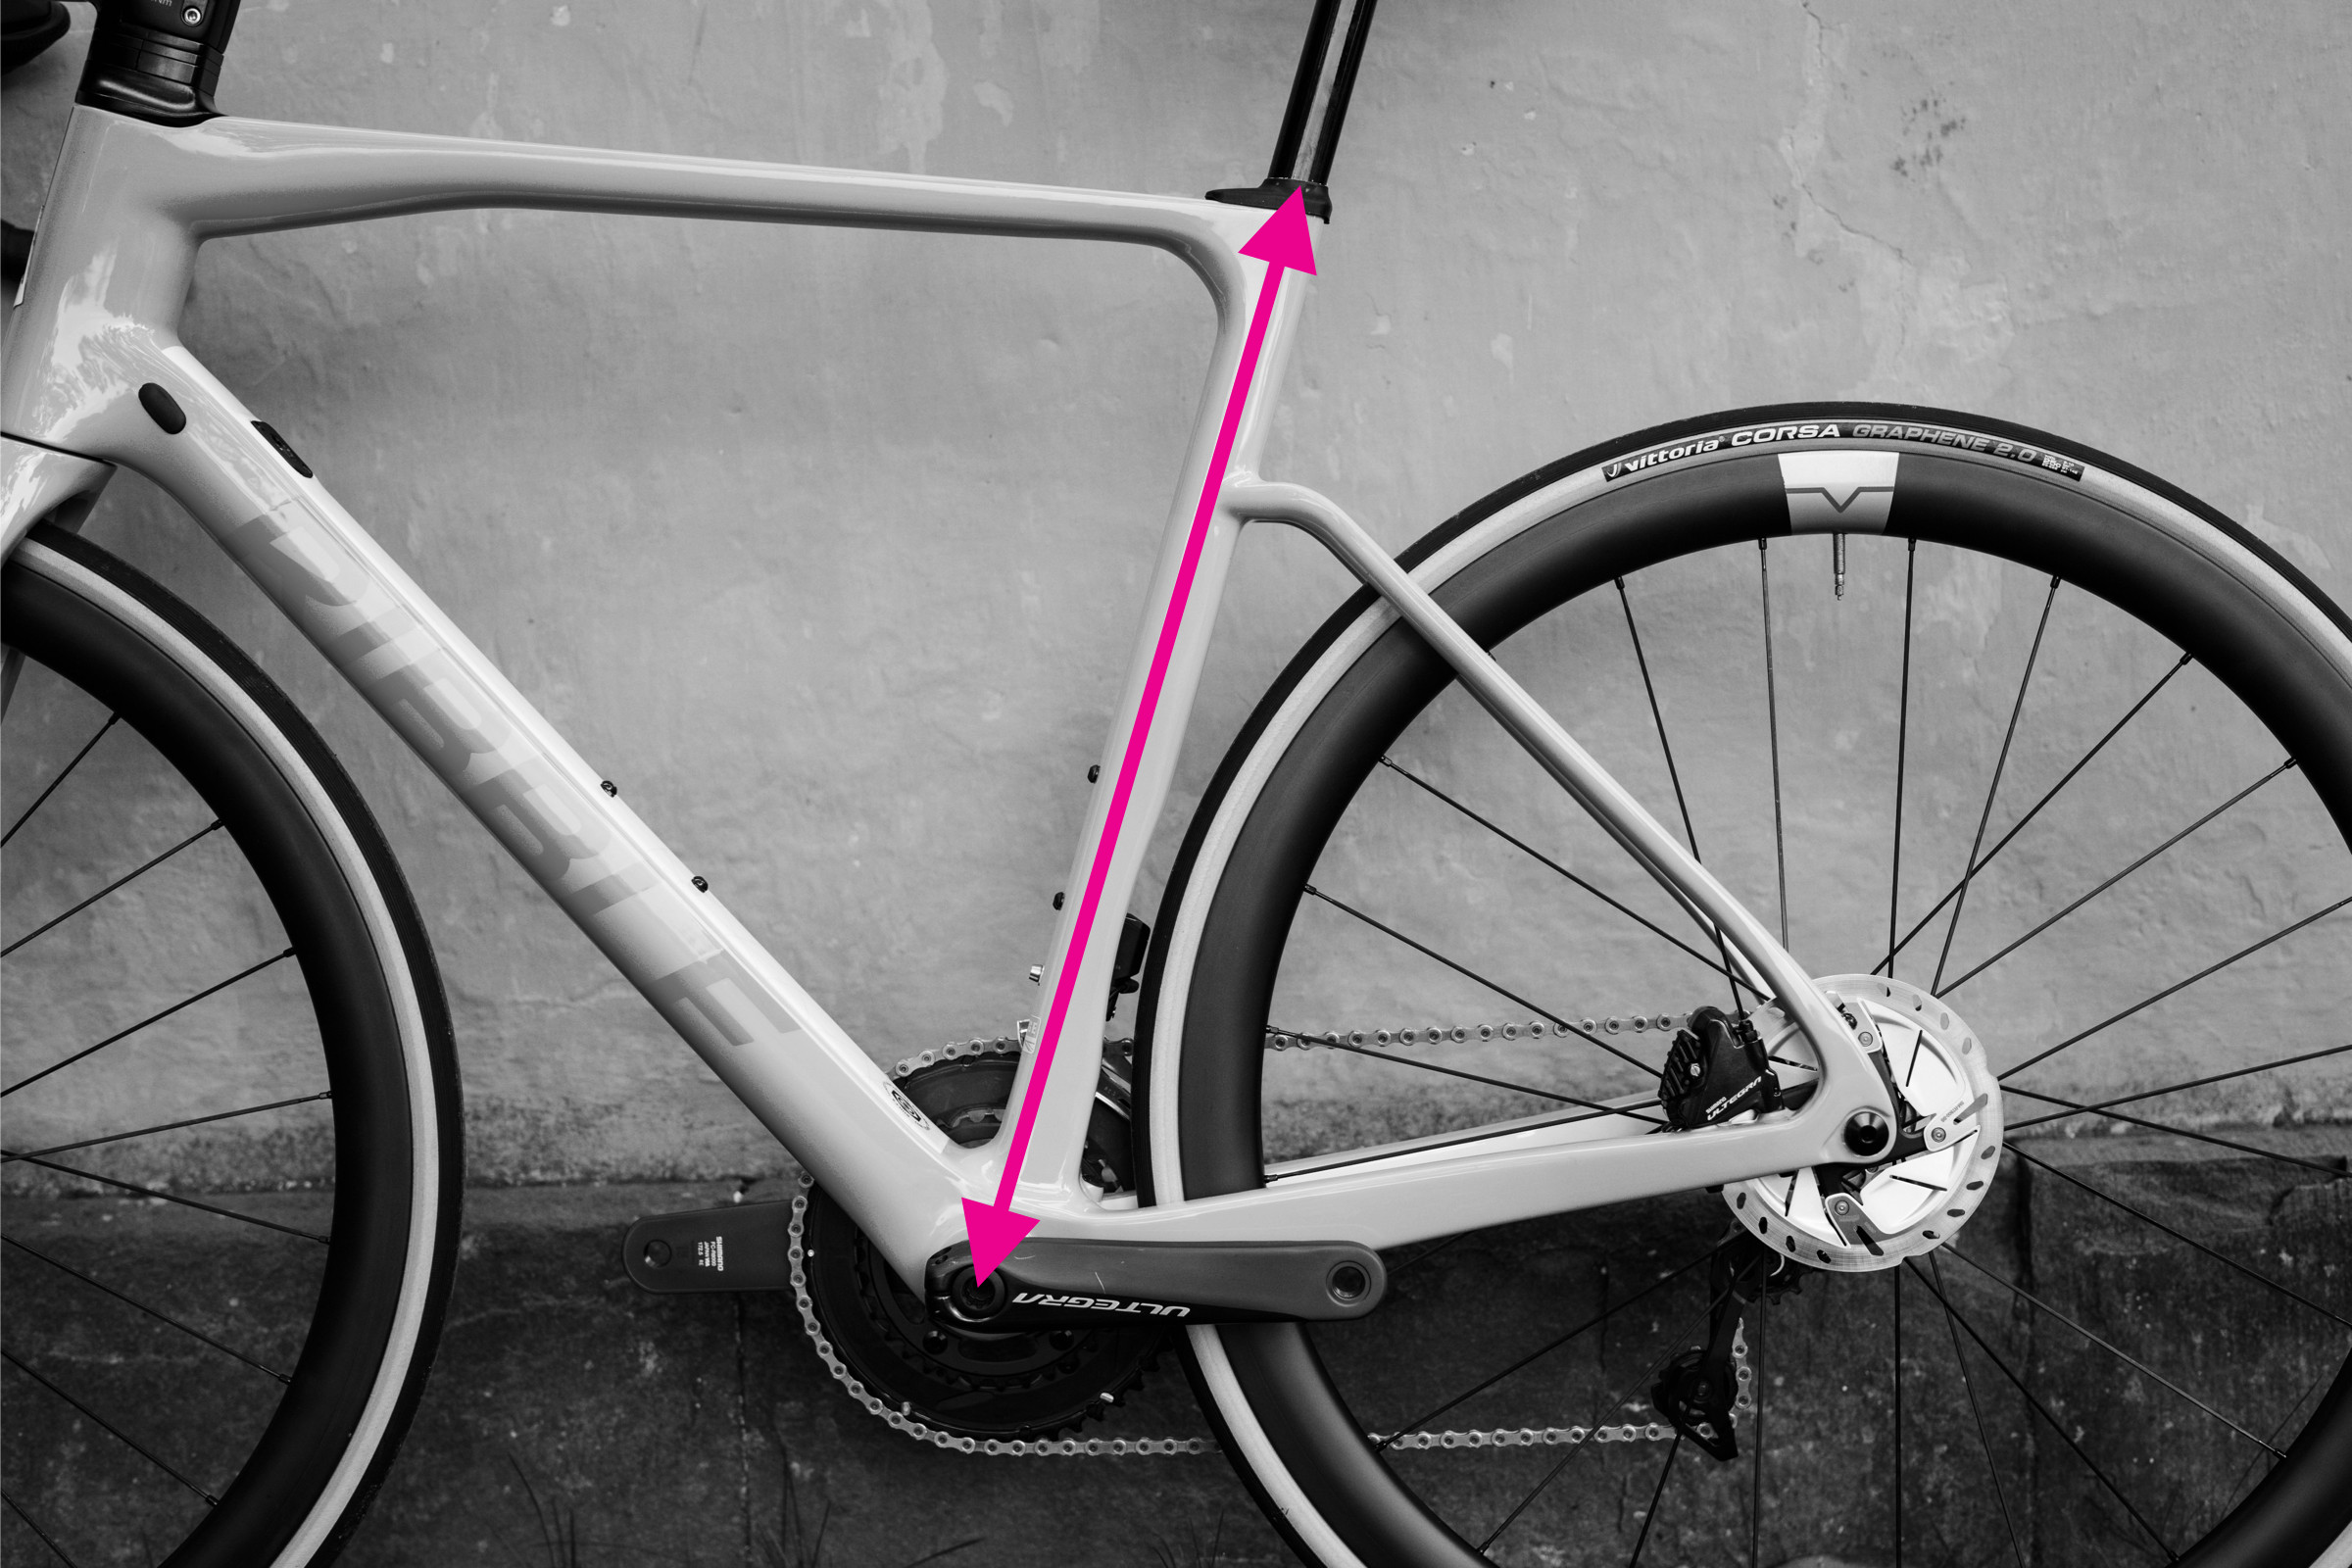 Illustration of seat tube measurement on a bike frame
Seat tube length is the distance from the center of the bottom bracket to the top of the seat tube. However, measuring seat tube length can be complex due to variations in bike designs. Some bikes have seat tubes extending significantly above the top tube junction, like the Trek Madone, while others use seatmasts. Mountain bikes often have kinks in their seat tubes, meaning you should not measure along the tube itself as it will be longer than the actual straight-line distance.
Steps to measure seat tube length:
- Locate the center of the bottom bracket.
- Identify the top of the seat tube. This is generally the point where the seatpost clamp is located or the top of the seatmast.
- Use a straight edge to create a direct line from the bottom bracket center to the top of the seat tube, bypassing any kinks or curves in the seat tube.
- Measure the straight-line distance along this line.
How to Measure Reach and Stack
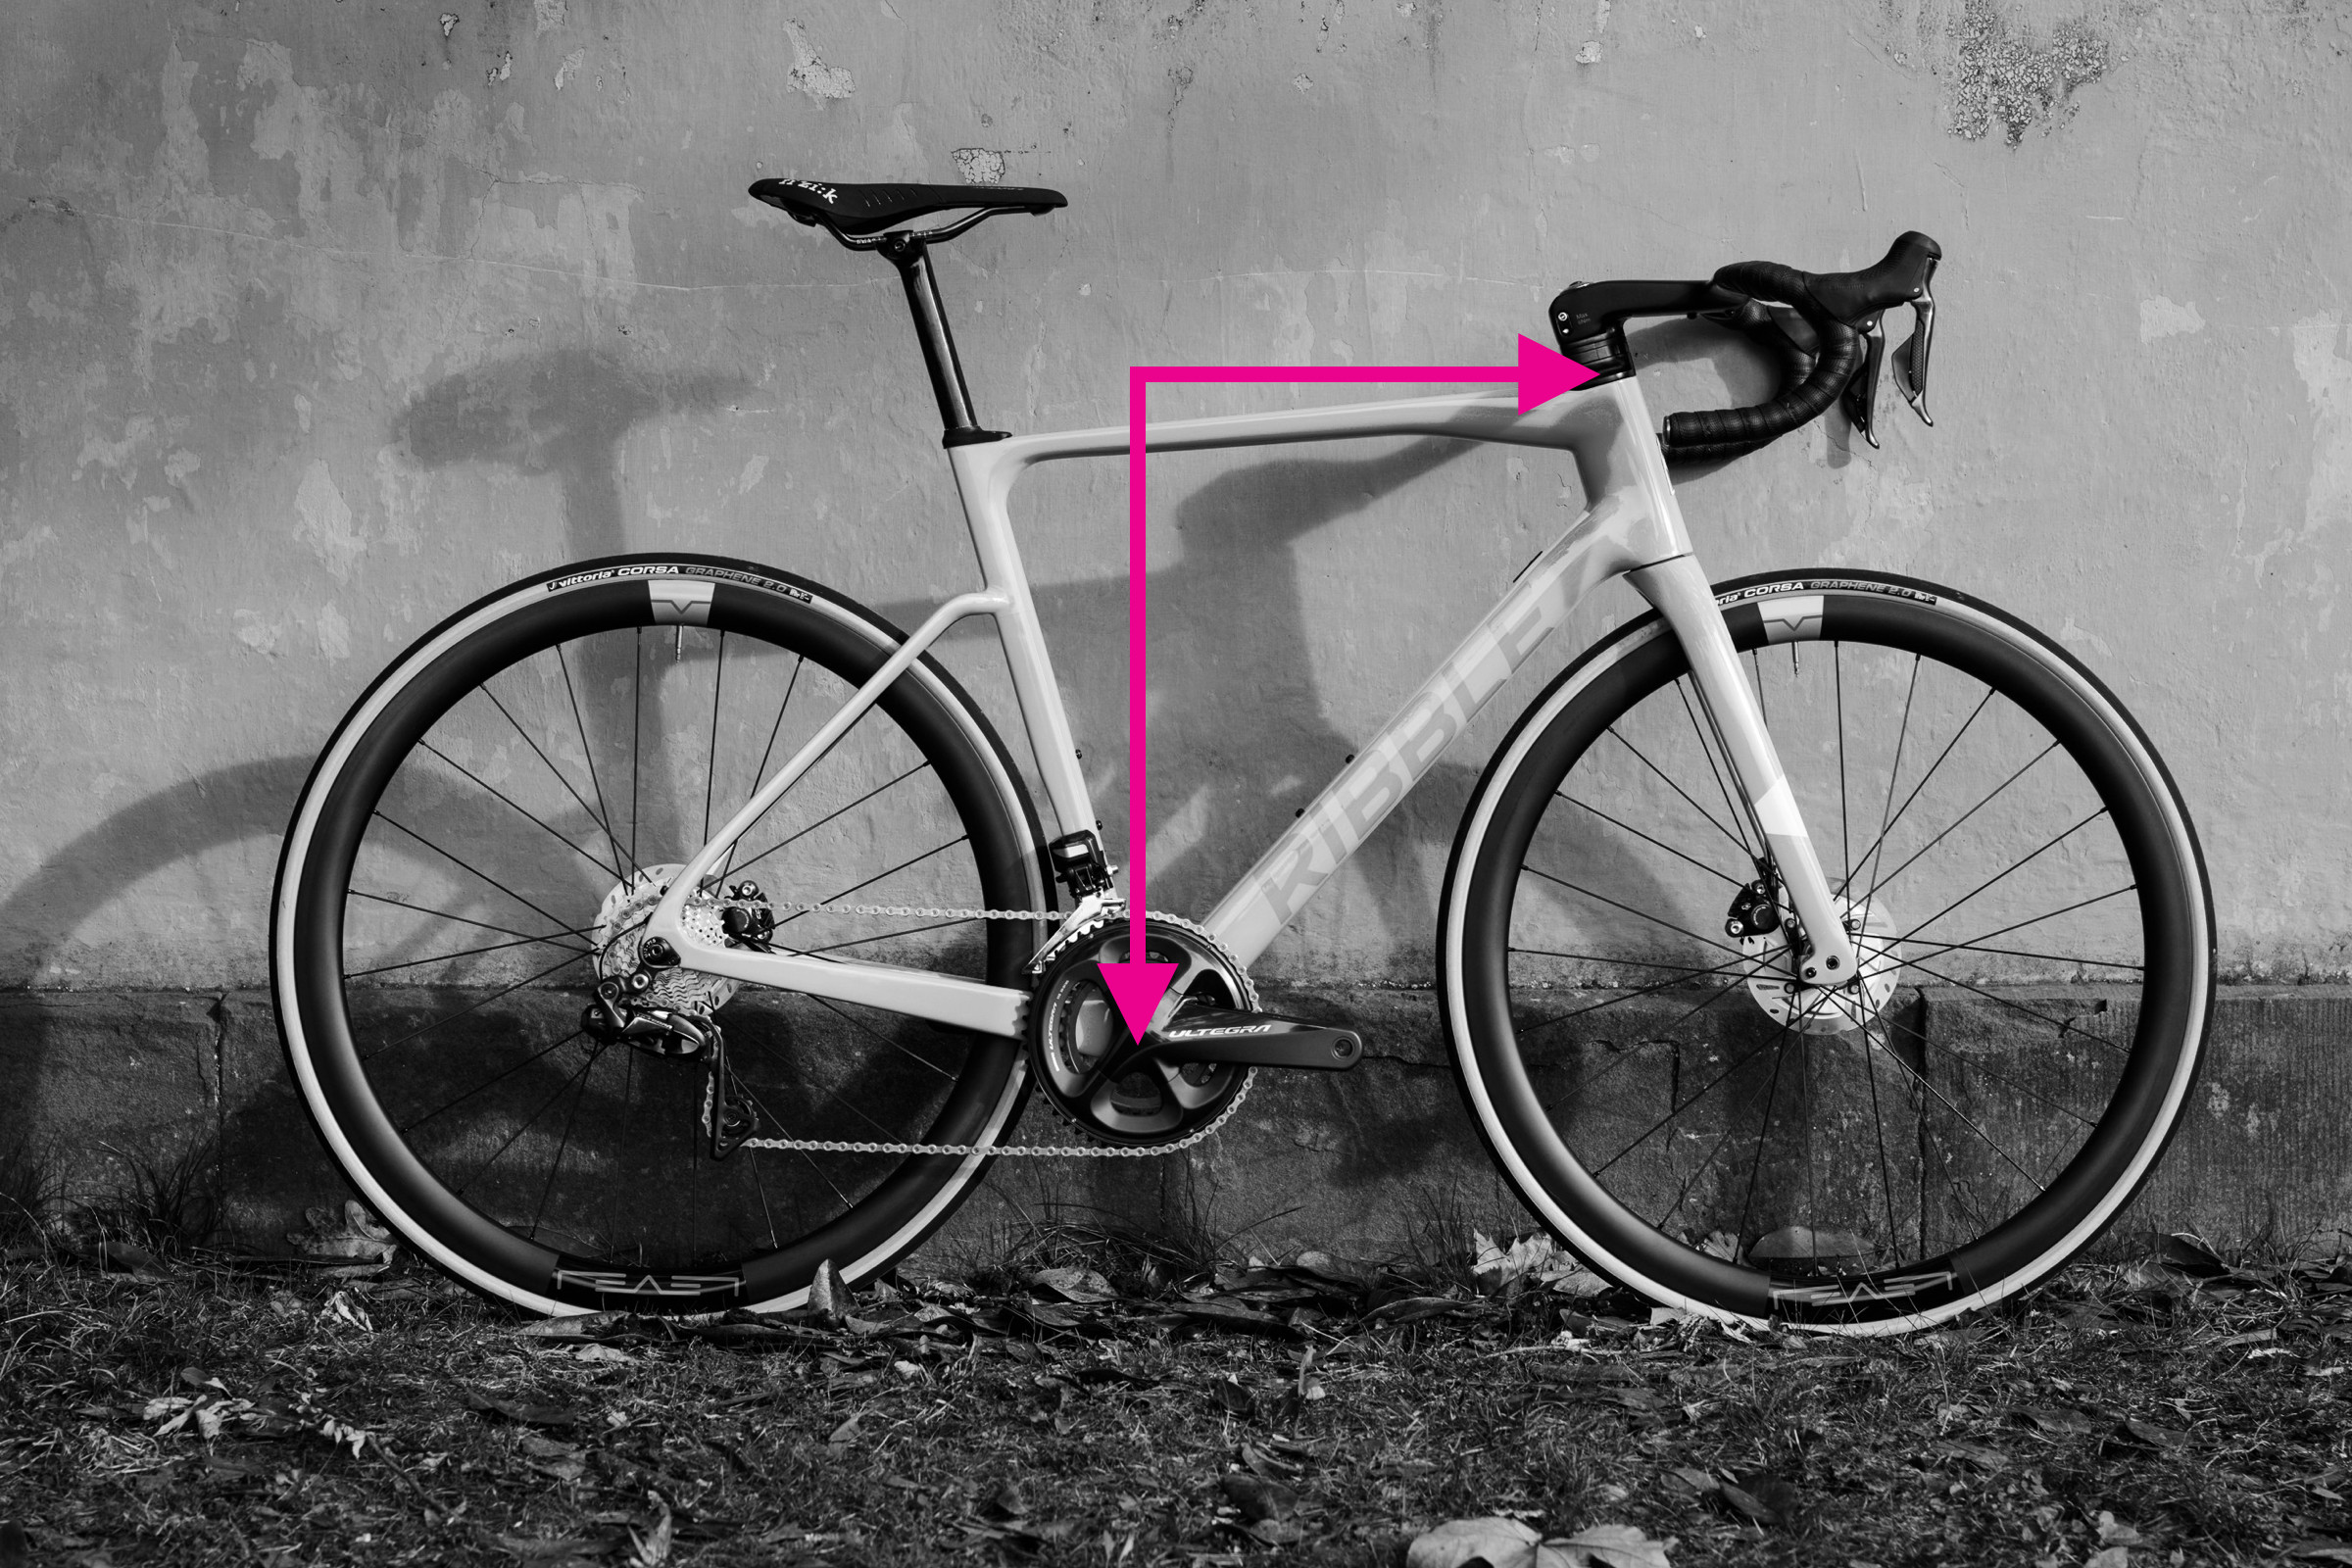 Demonstrating stack and reach measurements on a bicycle
Reach and stack provide more consistent measurements for comparing bike frames compared to top tube and seat tube lengths. They are independent of frame angles and designs, measuring the perpendicular distances between the bottom bracket and the top of the head tube – two critical contact points on a bike. Reach is the horizontal distance, and stack is the vertical distance.
Steps to measure reach:
- Position the bike upright on a level surface.
- Use the spirit level and plumb line. Align the spirit level horizontally with the top of the head tube. Attach the plumb line to the level, letting it hang down.
- Adjust the level until the plumb line intersects with the center of the bottom bracket spindle.
- Measure the horizontal distance (reach) from the top of the head tube to the plumb line.
Steps to measure stack:
- Maintain the setup from measuring reach. The plumb line should still be hanging from the spirit level, intersecting the bottom bracket.
- Measure the vertical distance (stack) from the bottom bracket (where the plumb line intersects) up to the spirit level at the height of the top of the head tube.
Alternatively, for reach, you can position the bike against a wall, measure the horizontal distance from the wall to the top of the head tube, and then to the bottom bracket. The difference is the reach. For stack, measure the vertical distance from the ground to the top of the head tube and subtract the height of the bottom bracket from the ground.
Reach and stack measurements can be tricky to get perfectly accurate. It’s helpful to have someone assist you and to repeat measurements to ensure consistency.
How to Measure Wheelbase
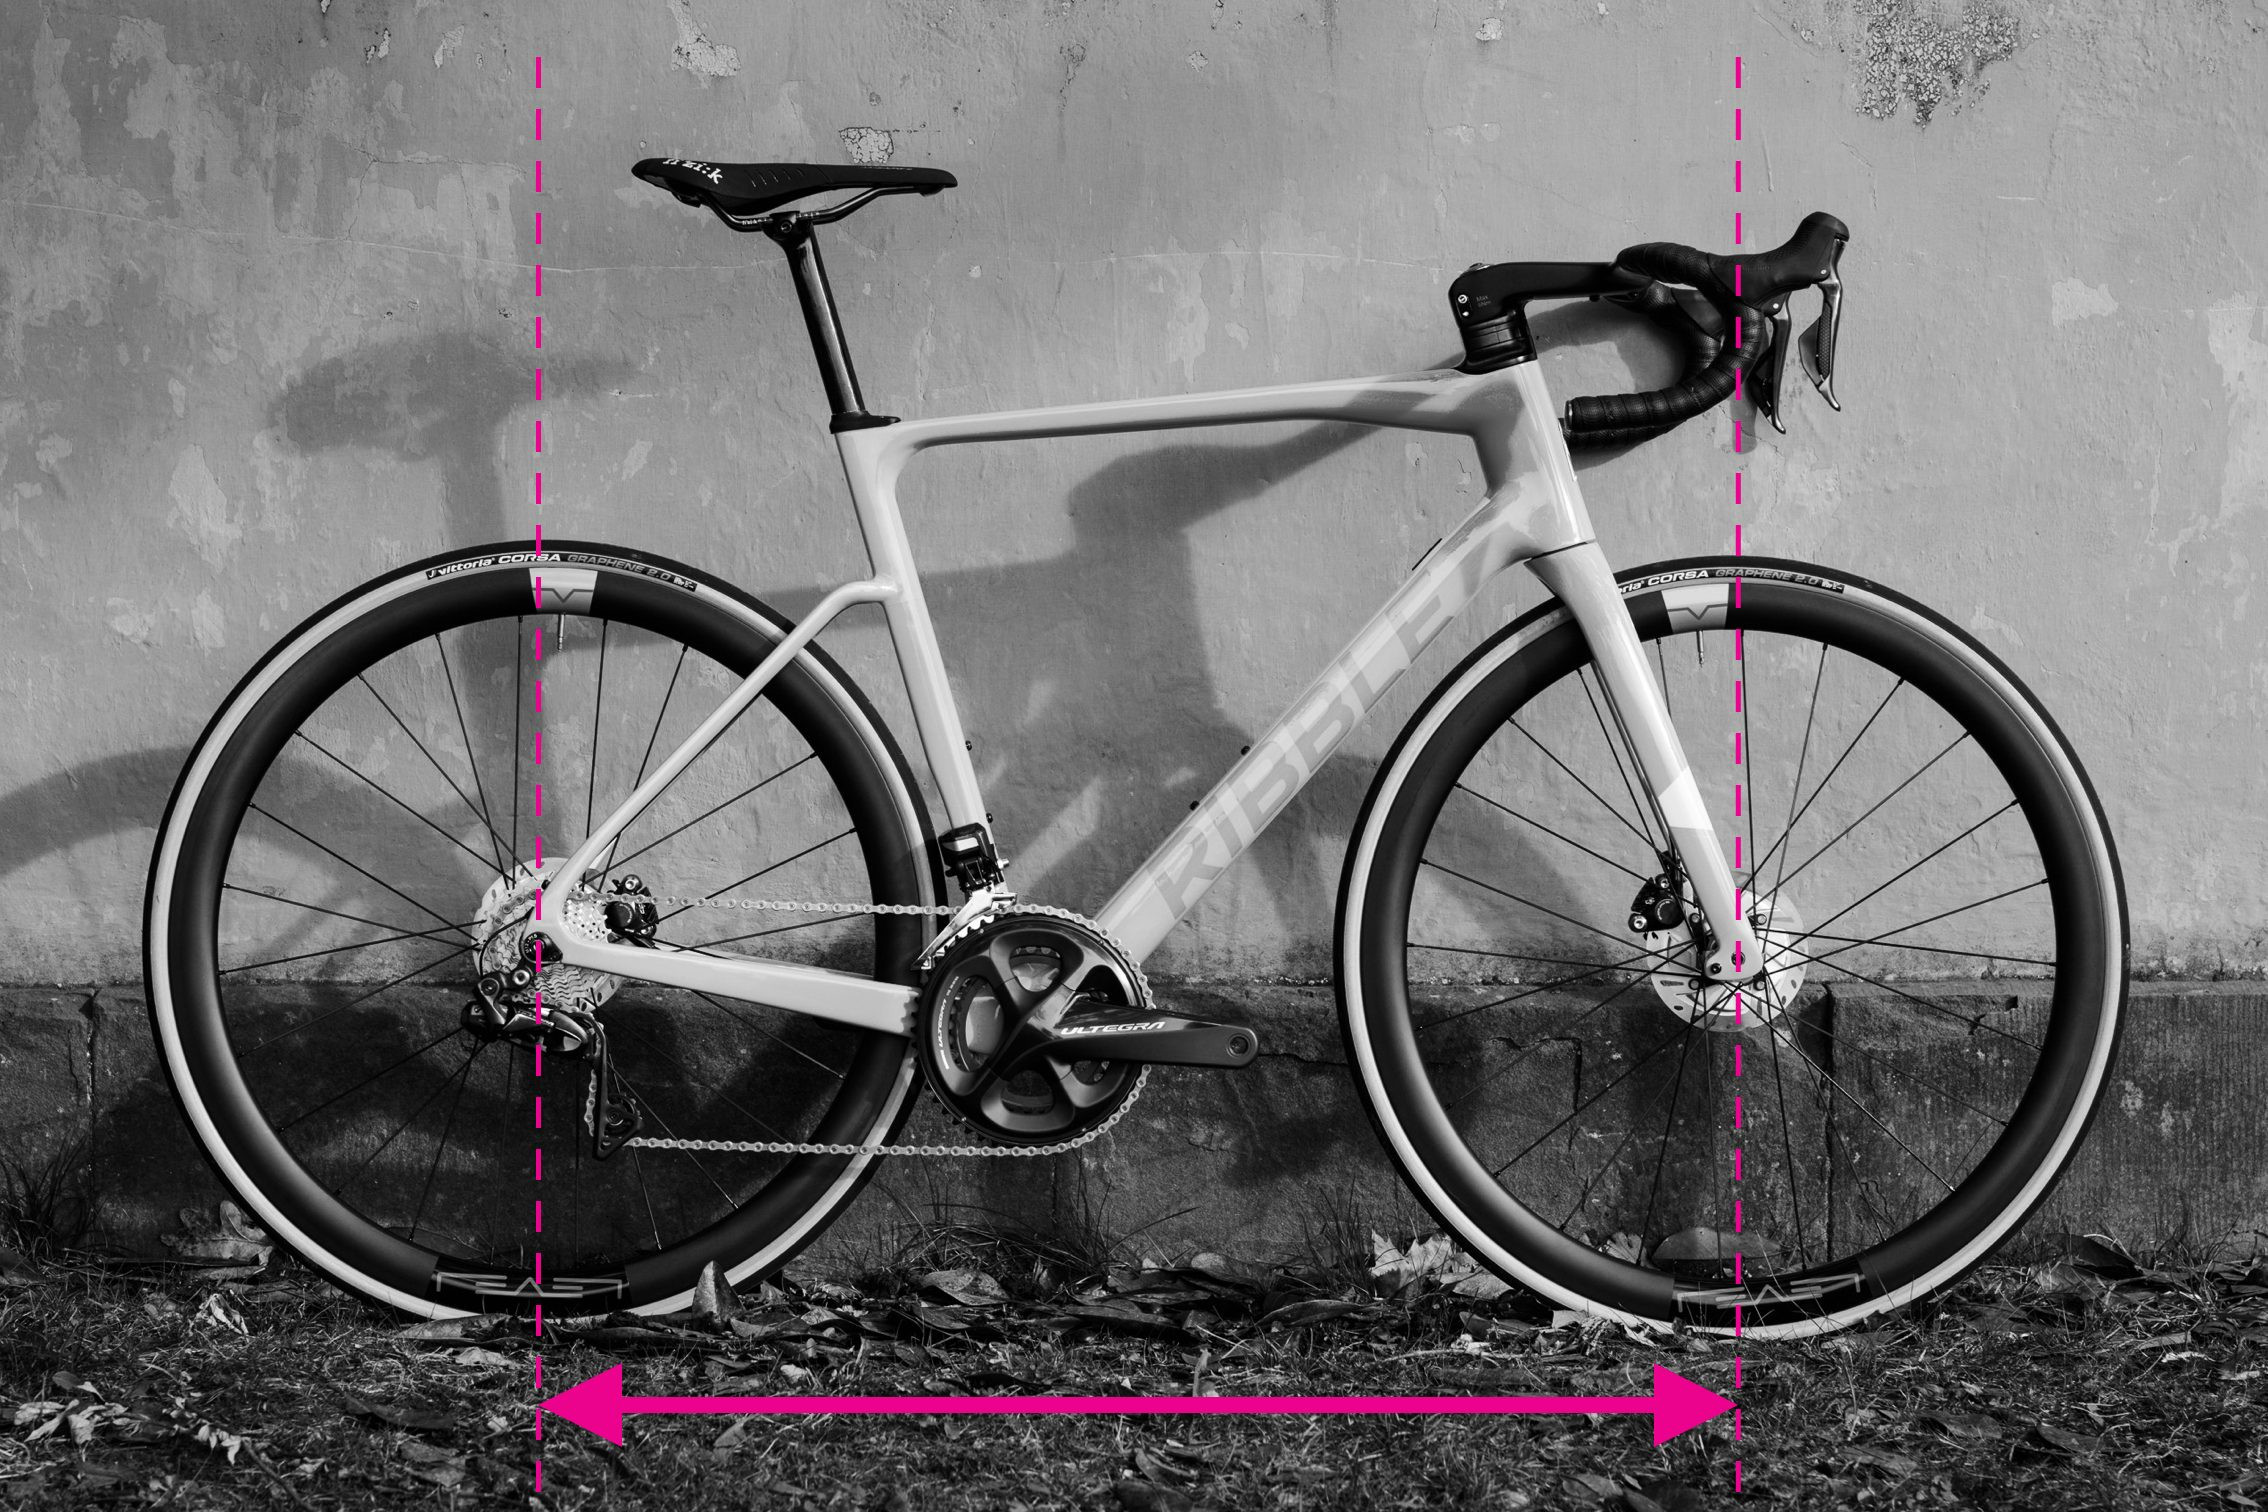 Wheelbase measurement on a bicycle for frame sizing
The wheelbase is the distance between the front and rear axle. It significantly influences a bike’s ride quality and varies with frame size. A longer wheelbase generally provides more stability, while a shorter wheelbase can make a bike feel more agile.
Steps to measure wheelbase:
- Ensure the front fork is straight. Align the front wheel perfectly straight ahead.
- Measure the distance from the center of the front axle to the center of the rear axle.
- Repeat the measurement a few times to ensure accuracy. Measuring both sides and averaging can compensate for slight fork misalignment.
How to Measure Chainstay Length
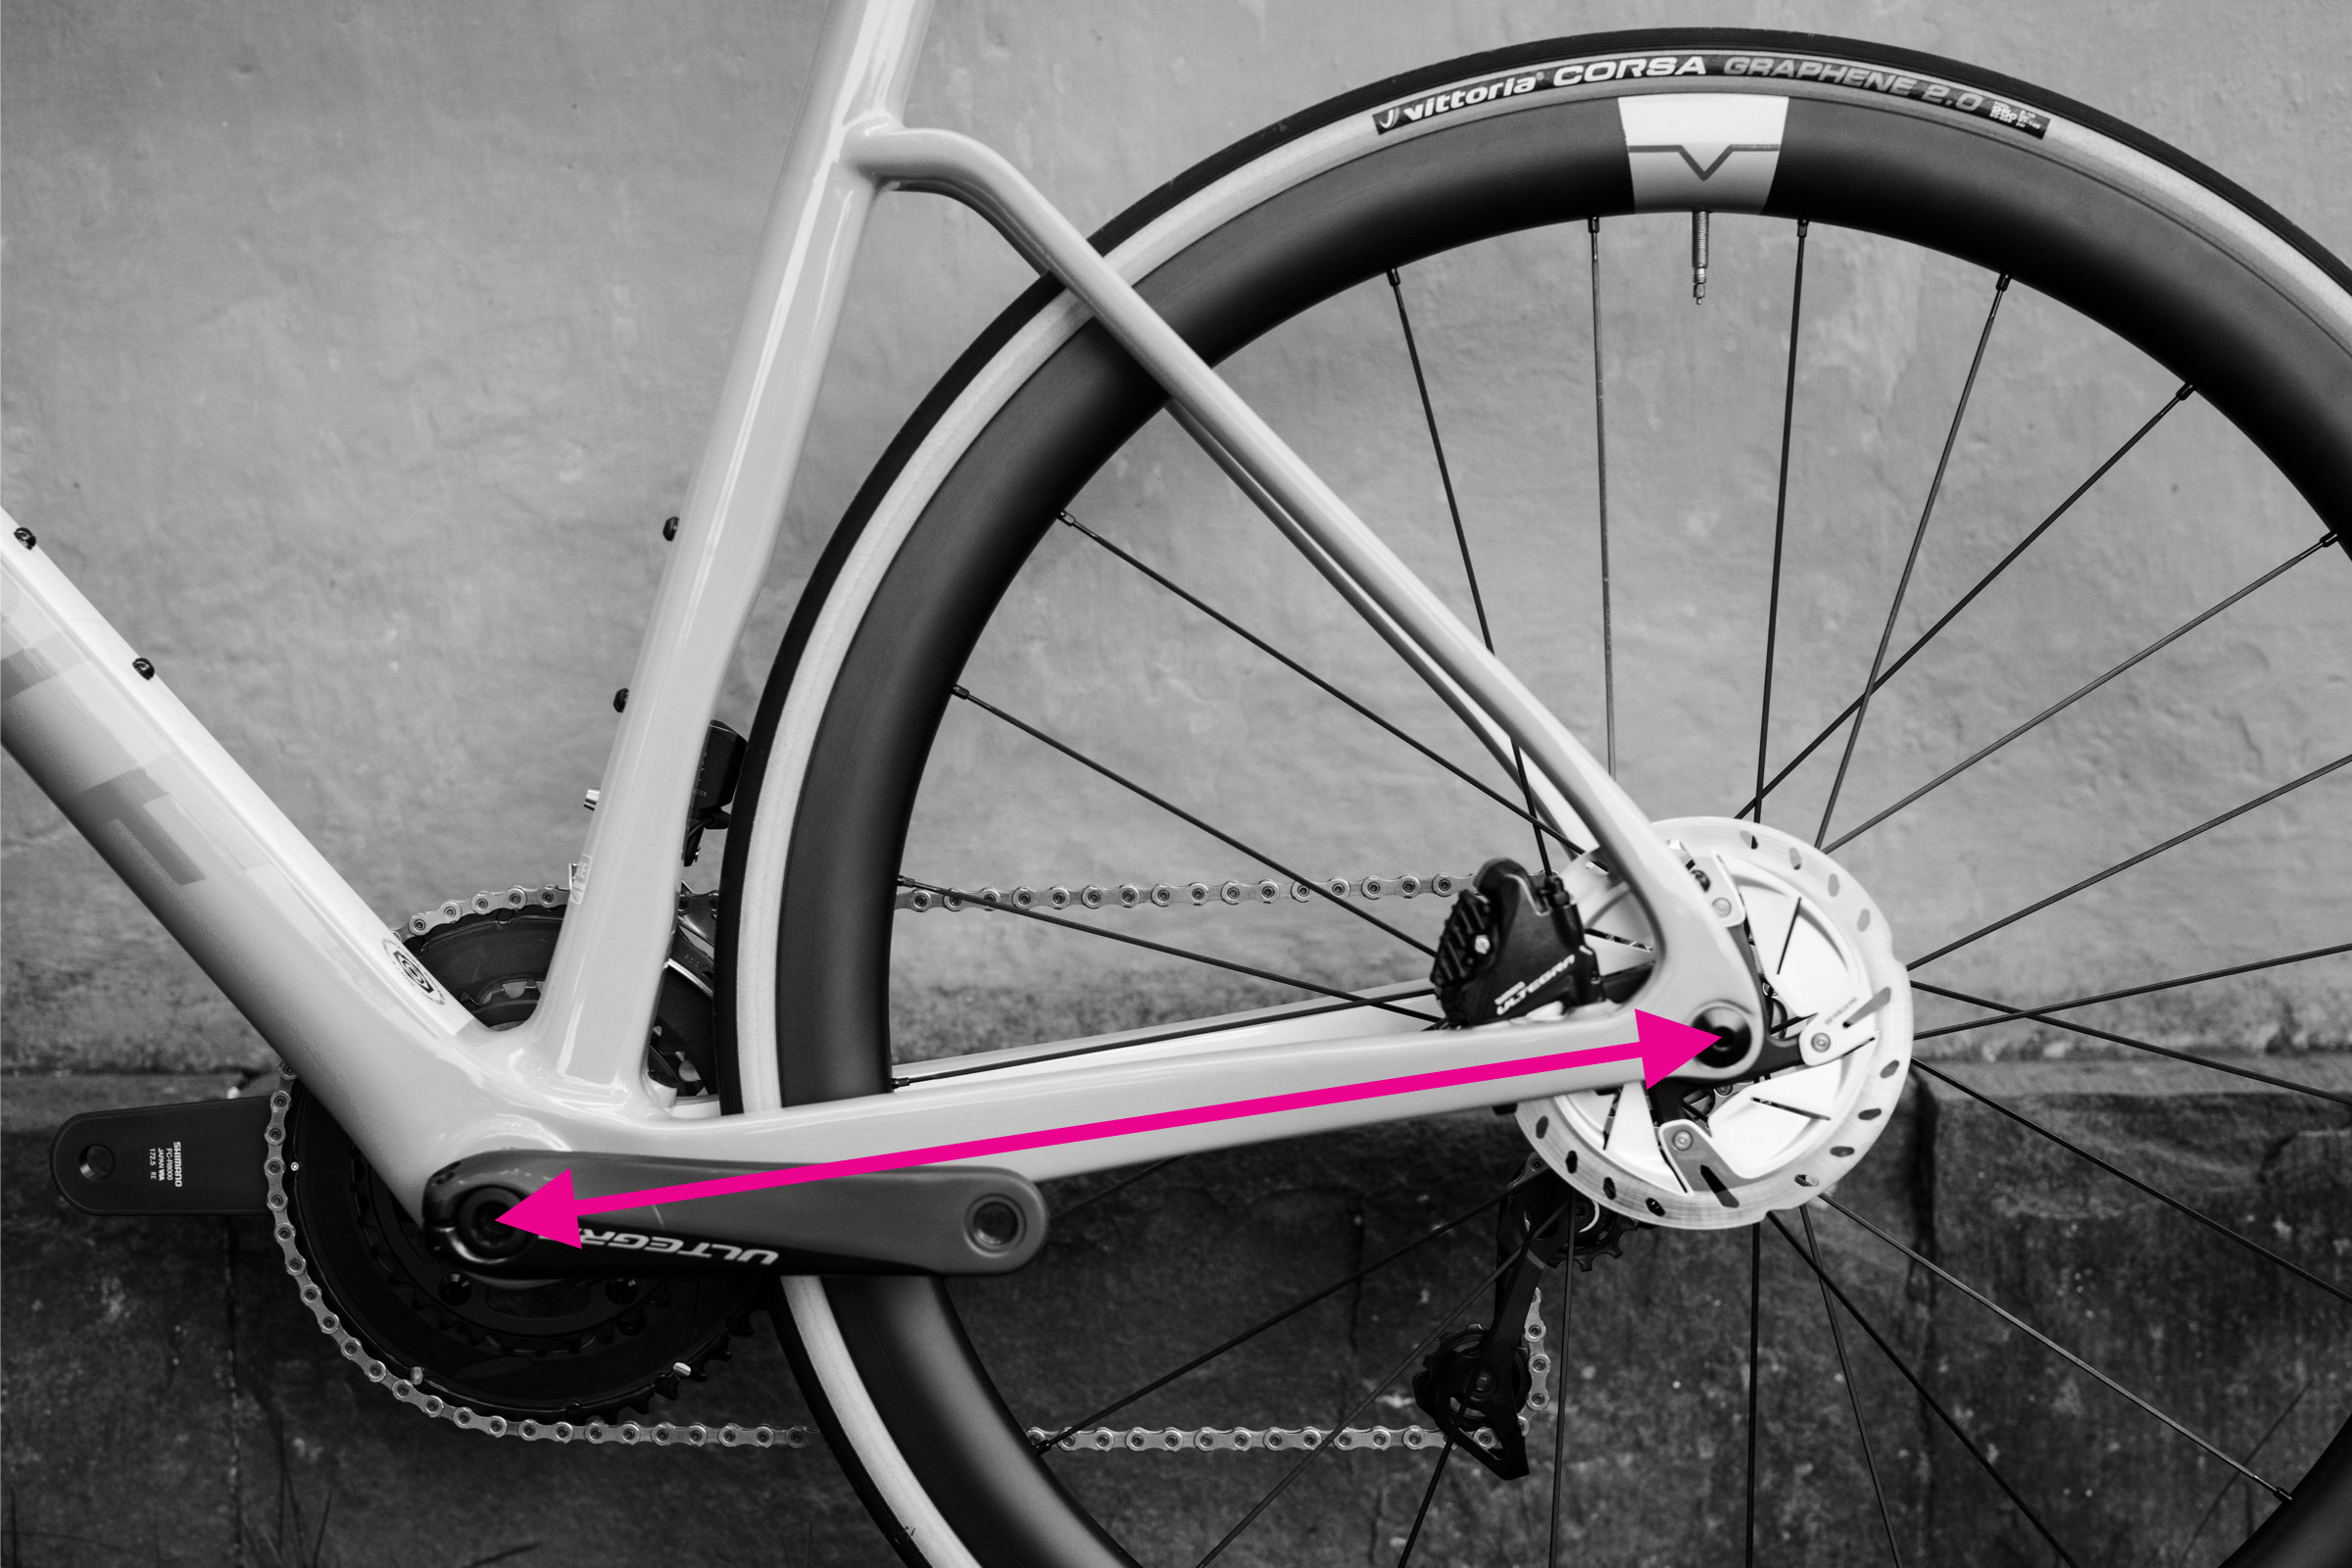 Measuring chainstay length on a bicycle frame
Chainstay length is the distance from the center of the bottom bracket axle to the center of the rear dropout. It’s a key factor in bike handling; shorter chainstays often result in a more responsive and lively feel, while longer chainstays can enhance stability.
Steps to measure chainstay length:
- Locate the center of the bottom bracket axle.
- Identify the center of the rear dropout. This is where the rear wheel axle sits in the frame.
- Measure the straight-line distance between these two points.
How to Measure Front Center
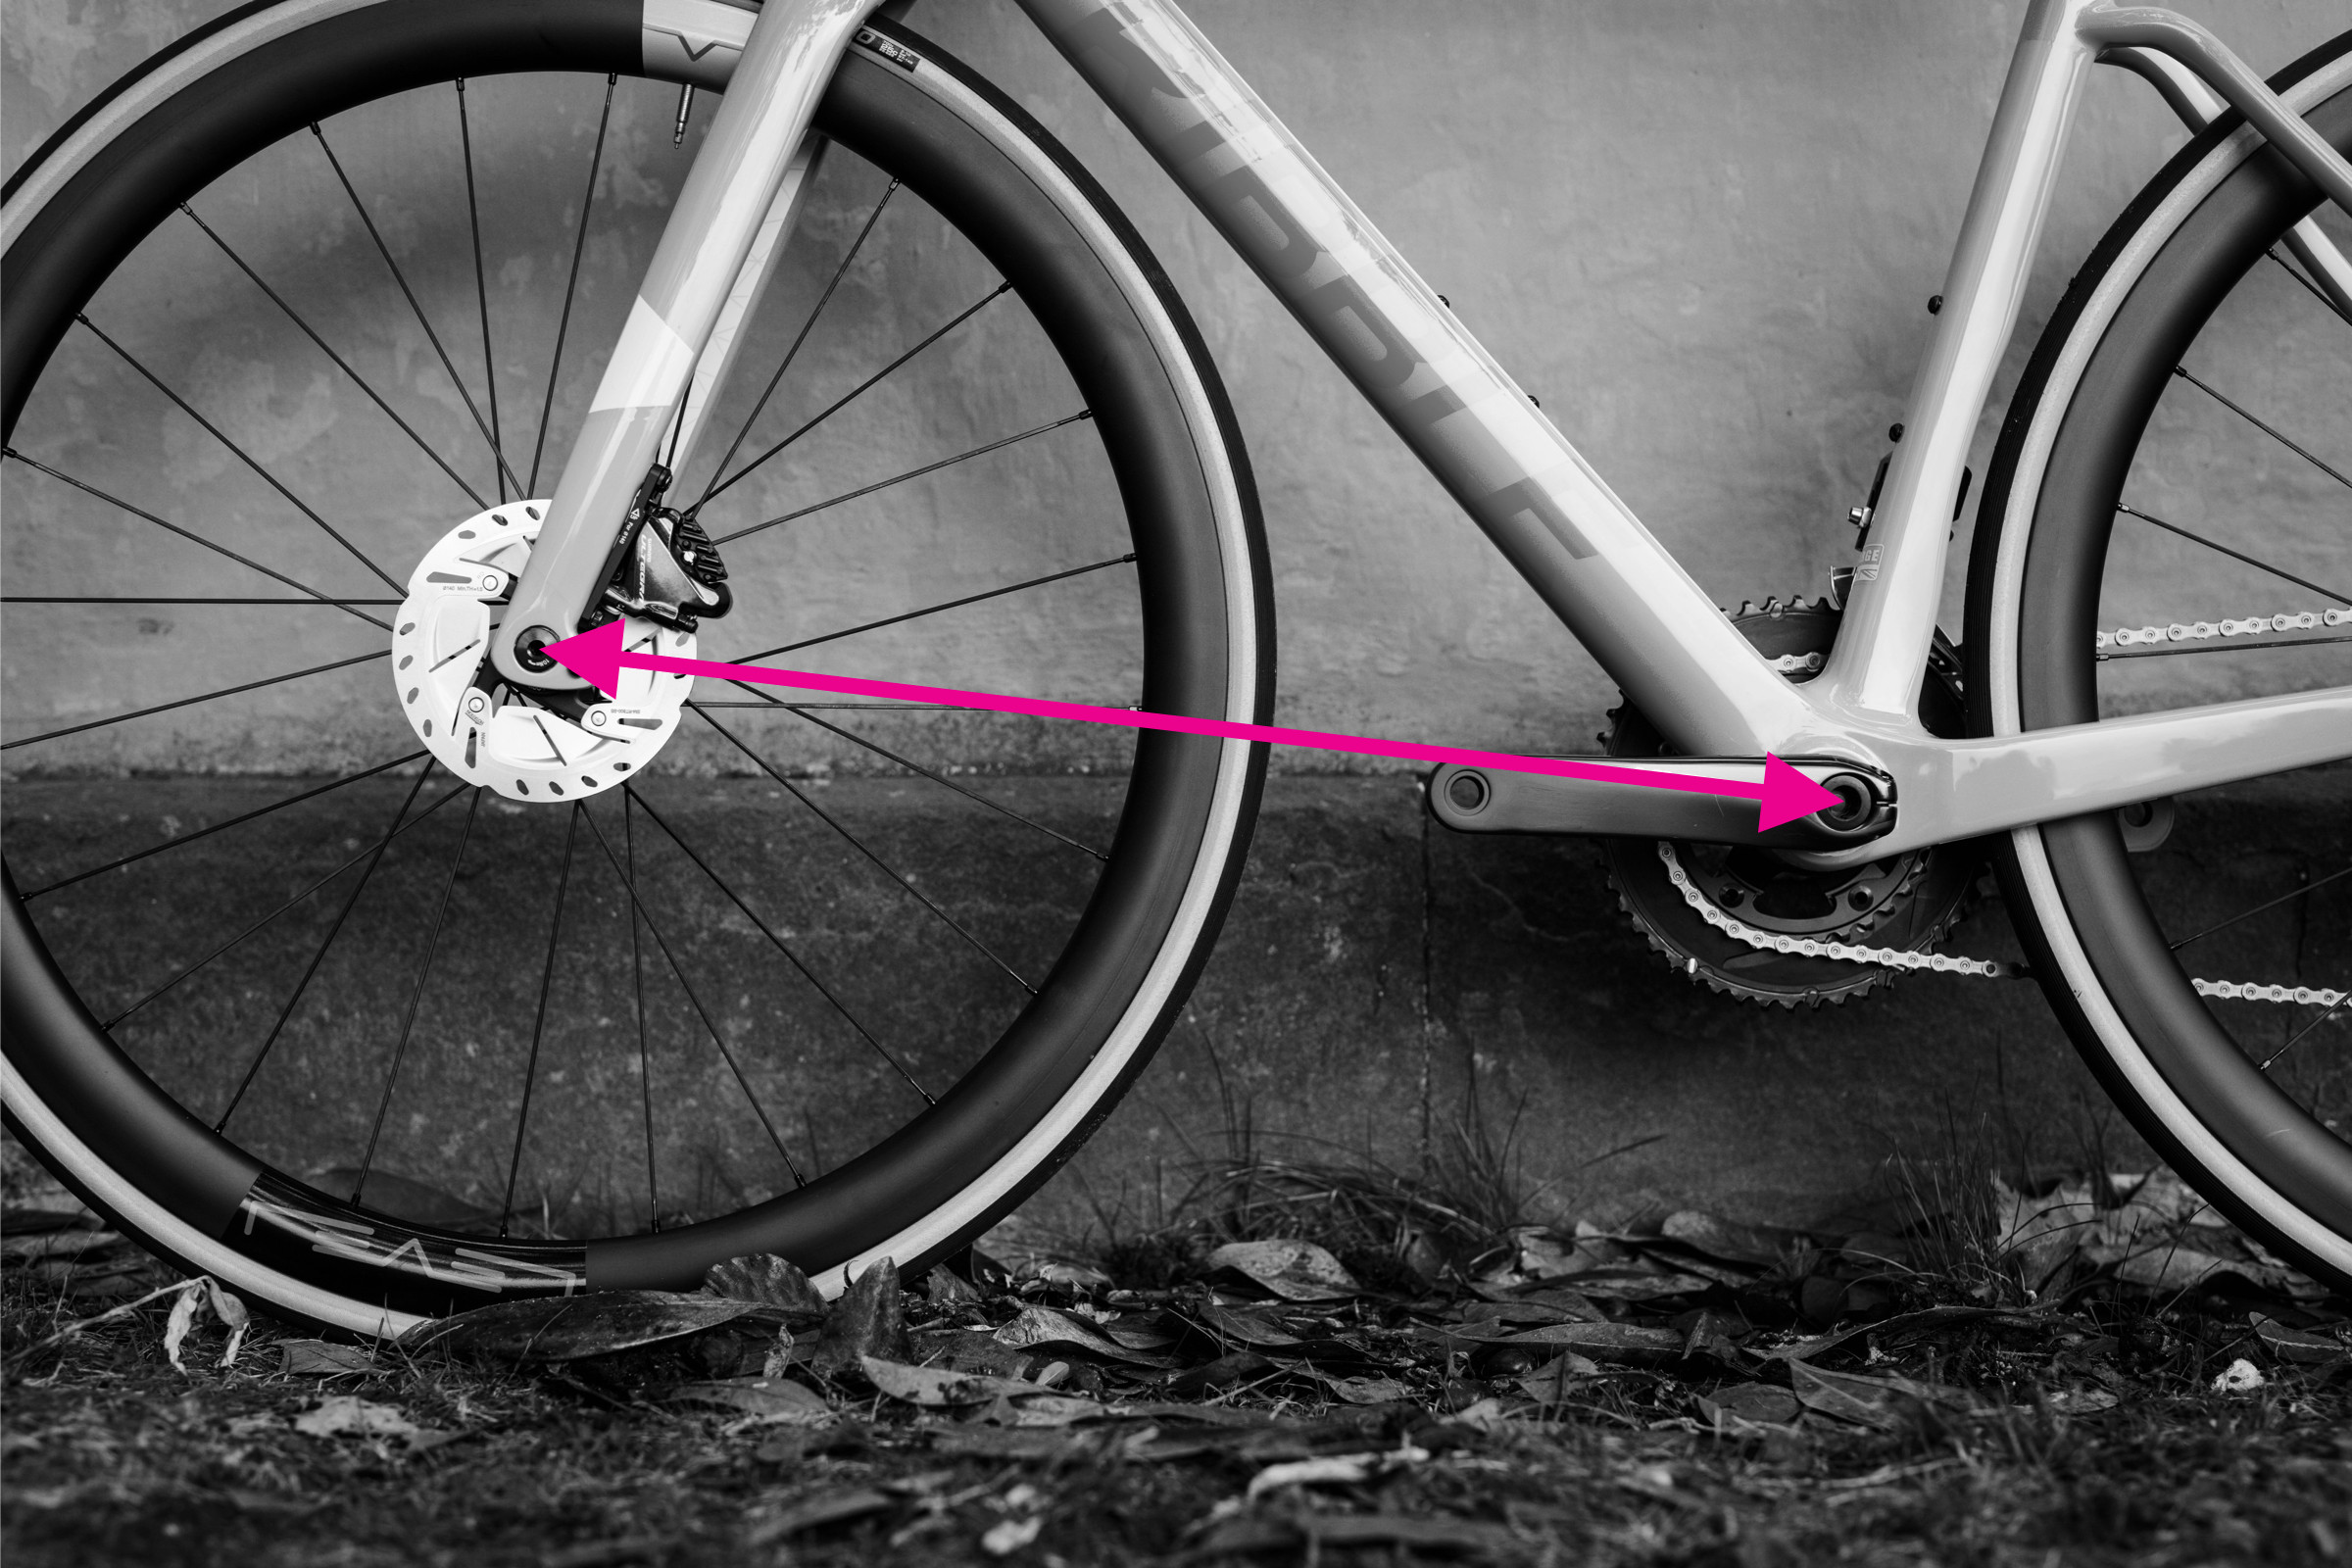 How to measure front center on a bicycle frame
Front center is the distance from the center of the bottom bracket axle to the center of the front dropout. Along with chainstay length, it contributes to the wheelbase and influences handling, particularly regarding toe overlap (where your foot might hit the front wheel in tight turns). While less commonly listed in geometry charts, brands like BMC do include it.
Steps to measure front center:
- Locate the center of the bottom bracket axle.
- Identify the center of the front dropout. This is where the front wheel axle sits in the fork.
- Measure the straight-line distance between these two points.
Note that the wheelbase is not simply the sum of chainstay length and front center because these measurements are not taken horizontally but along the frame tubes.
How to Measure Seat Tube and Head Tube Angles
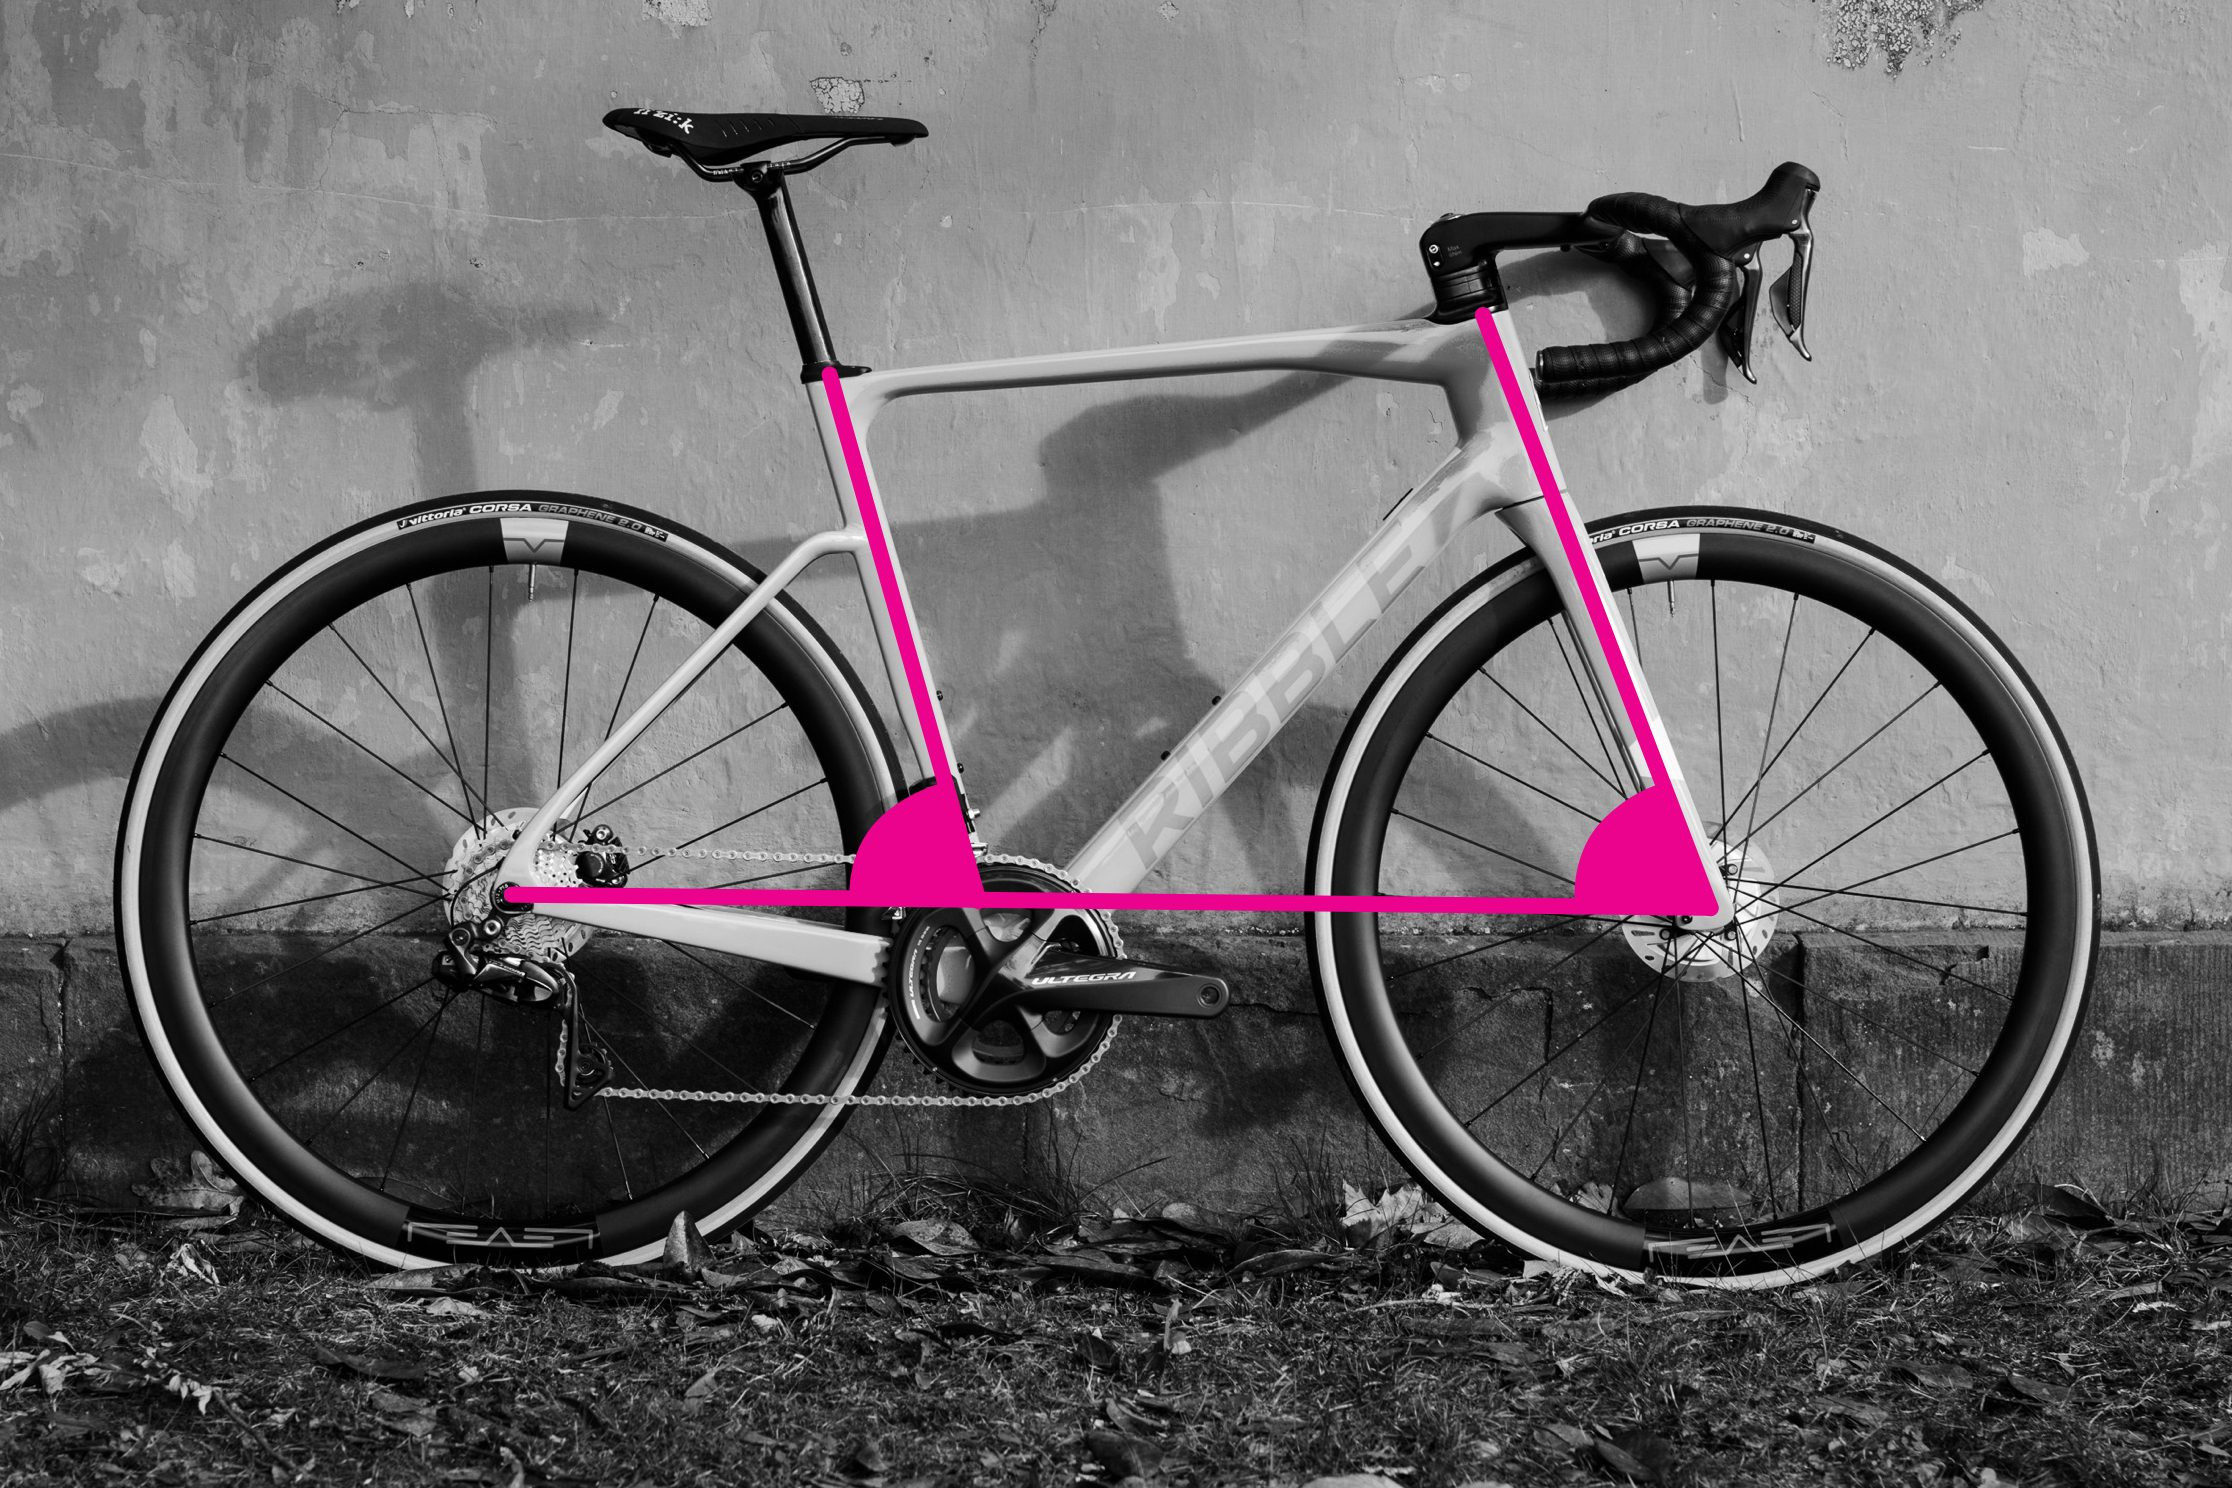 Measuring seat tube and head tube angles on a bicycle
Seat tube angle and head tube angle are crucial for determining a bike’s handling characteristics. Steeper angles (closer to 90 degrees) generally lead to quicker, more nimble handling. Your clinometer app is essential for measuring these angles.
Steps to measure seat tube angle:
- Ensure the bike is vertical and on a level surface.
- Place your smartphone with the clinometer app against the seat tube. If the seat tube is straight, align the phone directly against it.
- If there’s a kink in the seat tube, use a straight edge along the line from the bottom bracket shell to the top of the seat tube, and place your phone against the straight edge.
- Read the angle from the clinometer app. The seat tube angle is typically measured relative to the horizontal plane (ground).
Steps to measure head tube angle:
- Keep the bike vertical.
- For tapered head tubes, which are common on modern bikes, the angle of the front face might differ from the centerline angle. To approximate the centerline angle, align a straight edge from the top to the bottom center of the head tube and place your phone against it.
- Alternatively, if your fork has straight legs, the fork leg angle is the same as the head tube angle. You can measure the angle of the fork leg using the clinometer app.
- Another method is to measure the angle of the steerer tube extension above the head tube.
- Read the angle from the clinometer app. The head tube angle is also typically measured relative to the horizontal plane.
How to Measure Bottom Bracket Drop
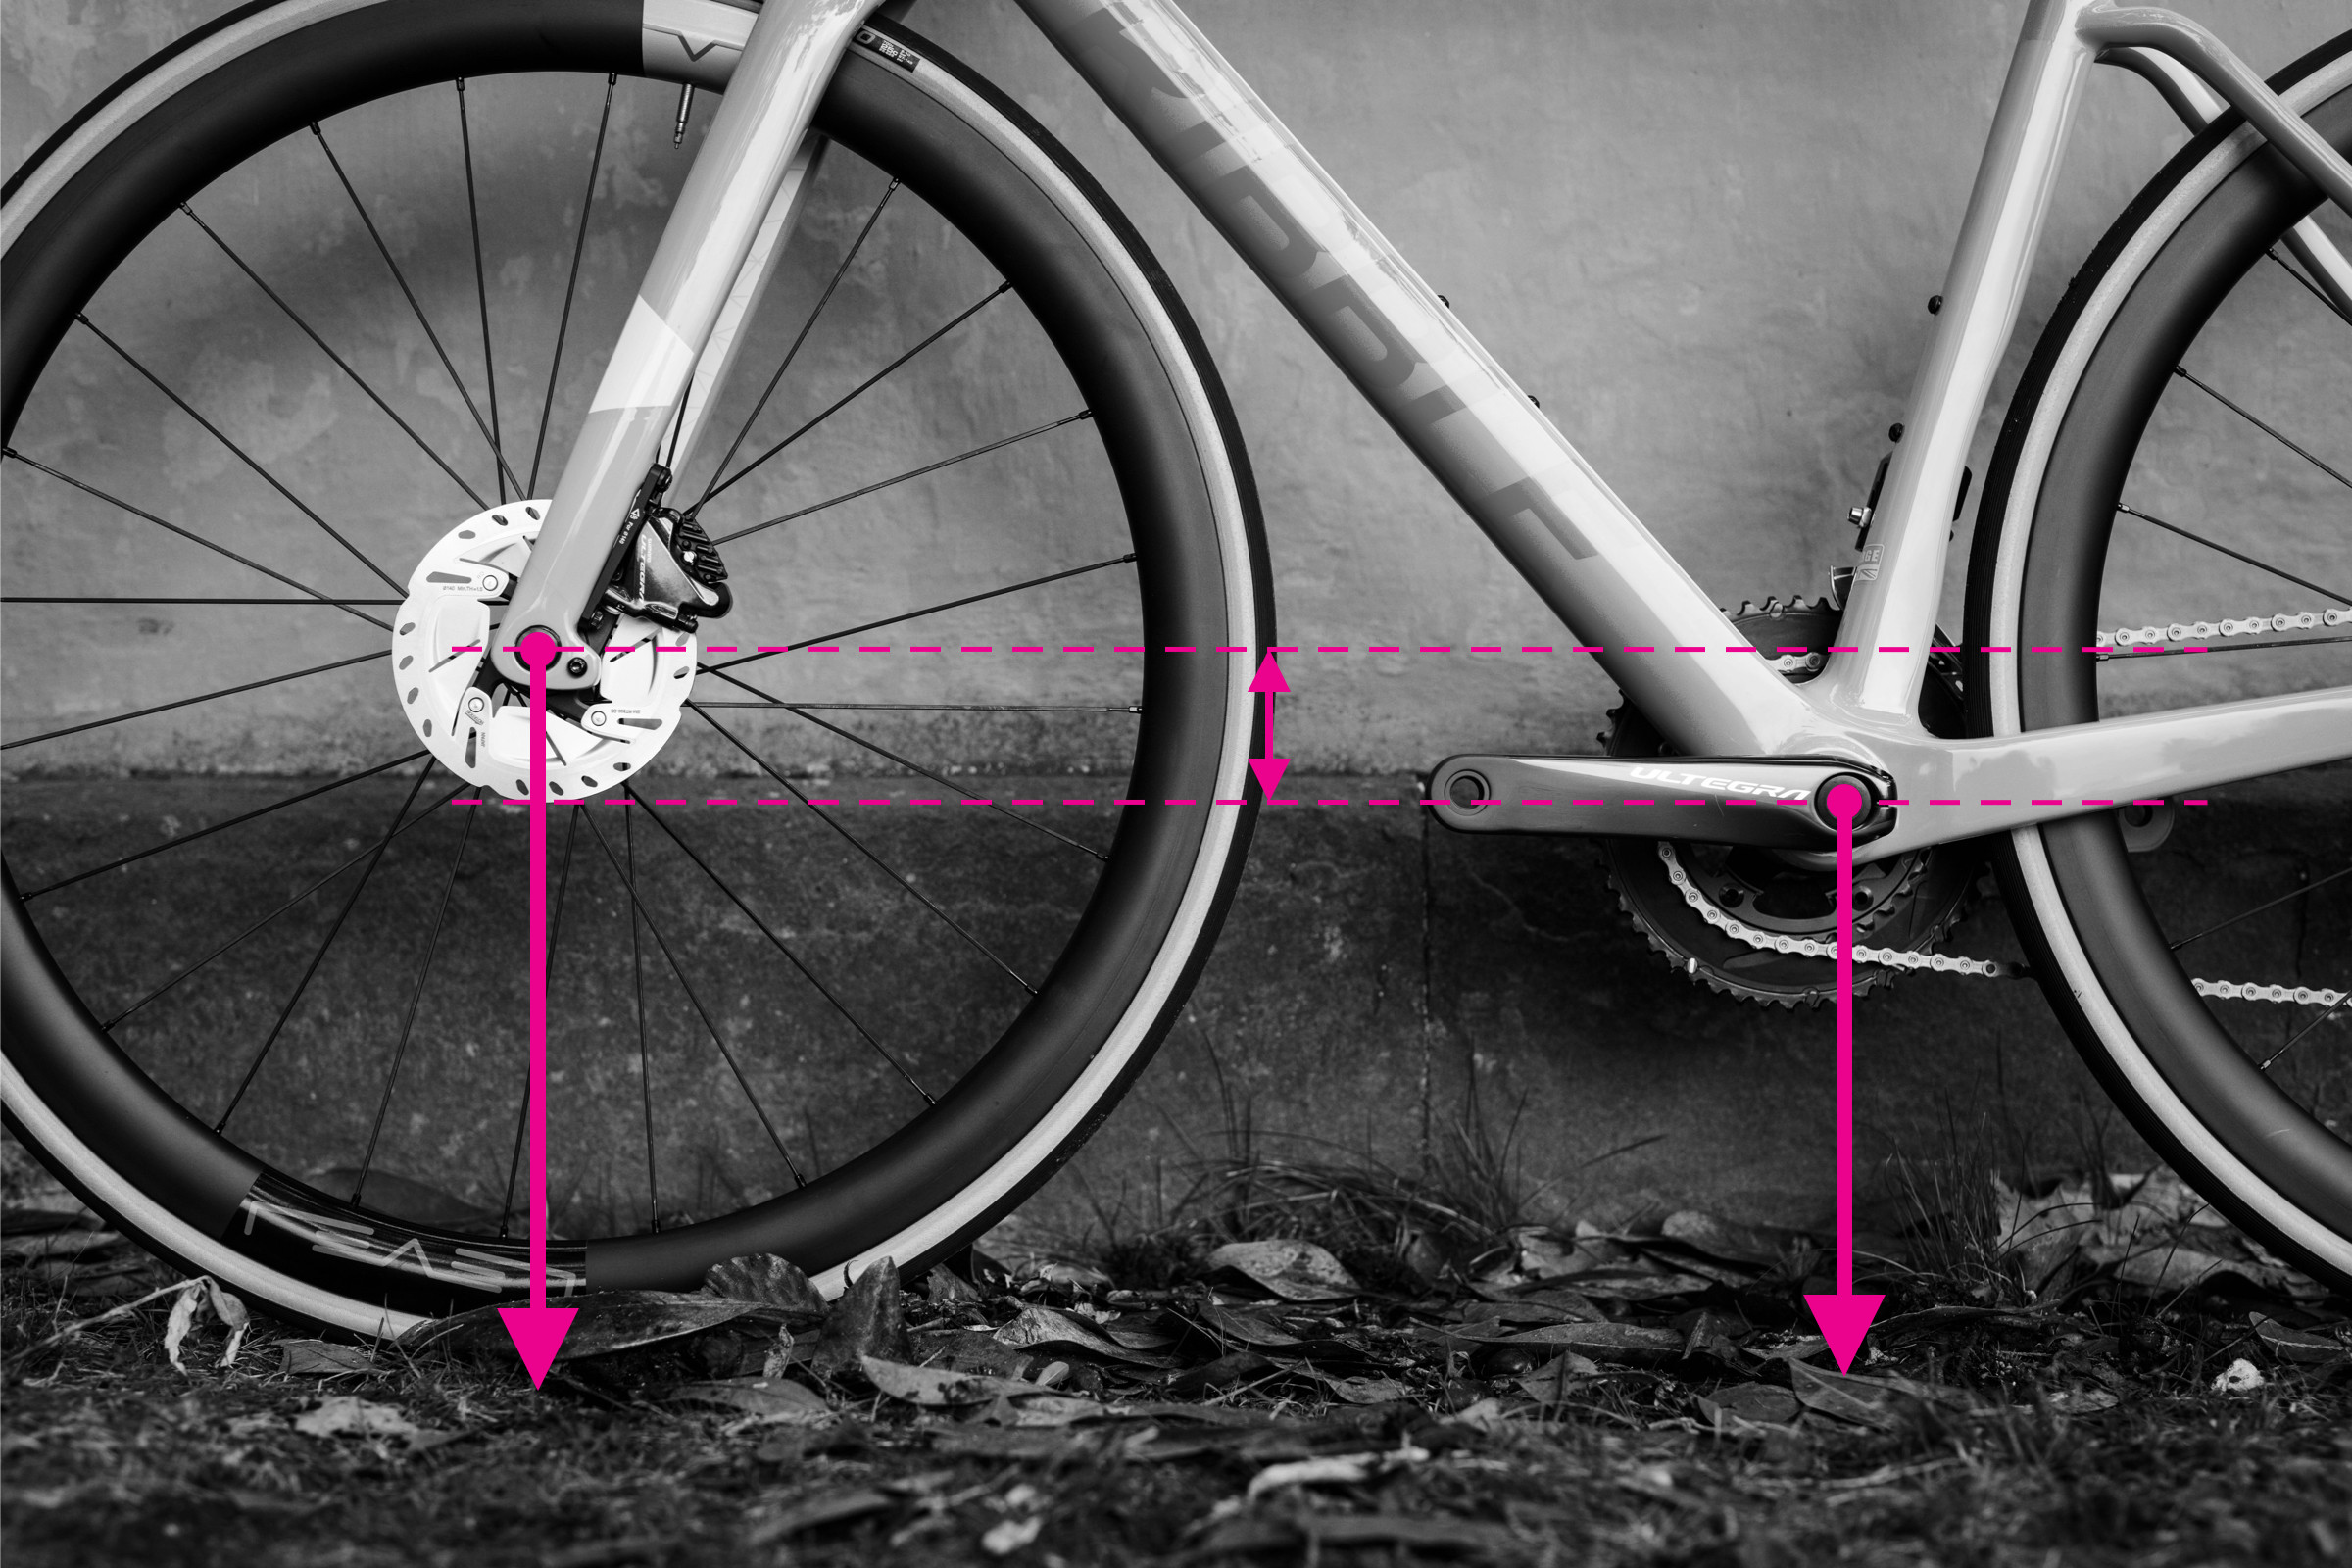 Illustration of bottom bracket drop measurement on a bike frame
Bottom bracket drop is the vertical distance between the wheel axles and the center of the bottom bracket axle. It affects stability and cornering ability. A larger bottom bracket drop generally lowers the center of gravity, enhancing stability.
Steps to measure bottom bracket drop:
- Measure the height of the rear wheel axle from the ground.
- Measure the height of the bottom bracket center from the ground.
- Subtract the bottom bracket height from the rear wheel axle height. This difference is the bottom bracket drop.
How to Measure Bottom Bracket Height
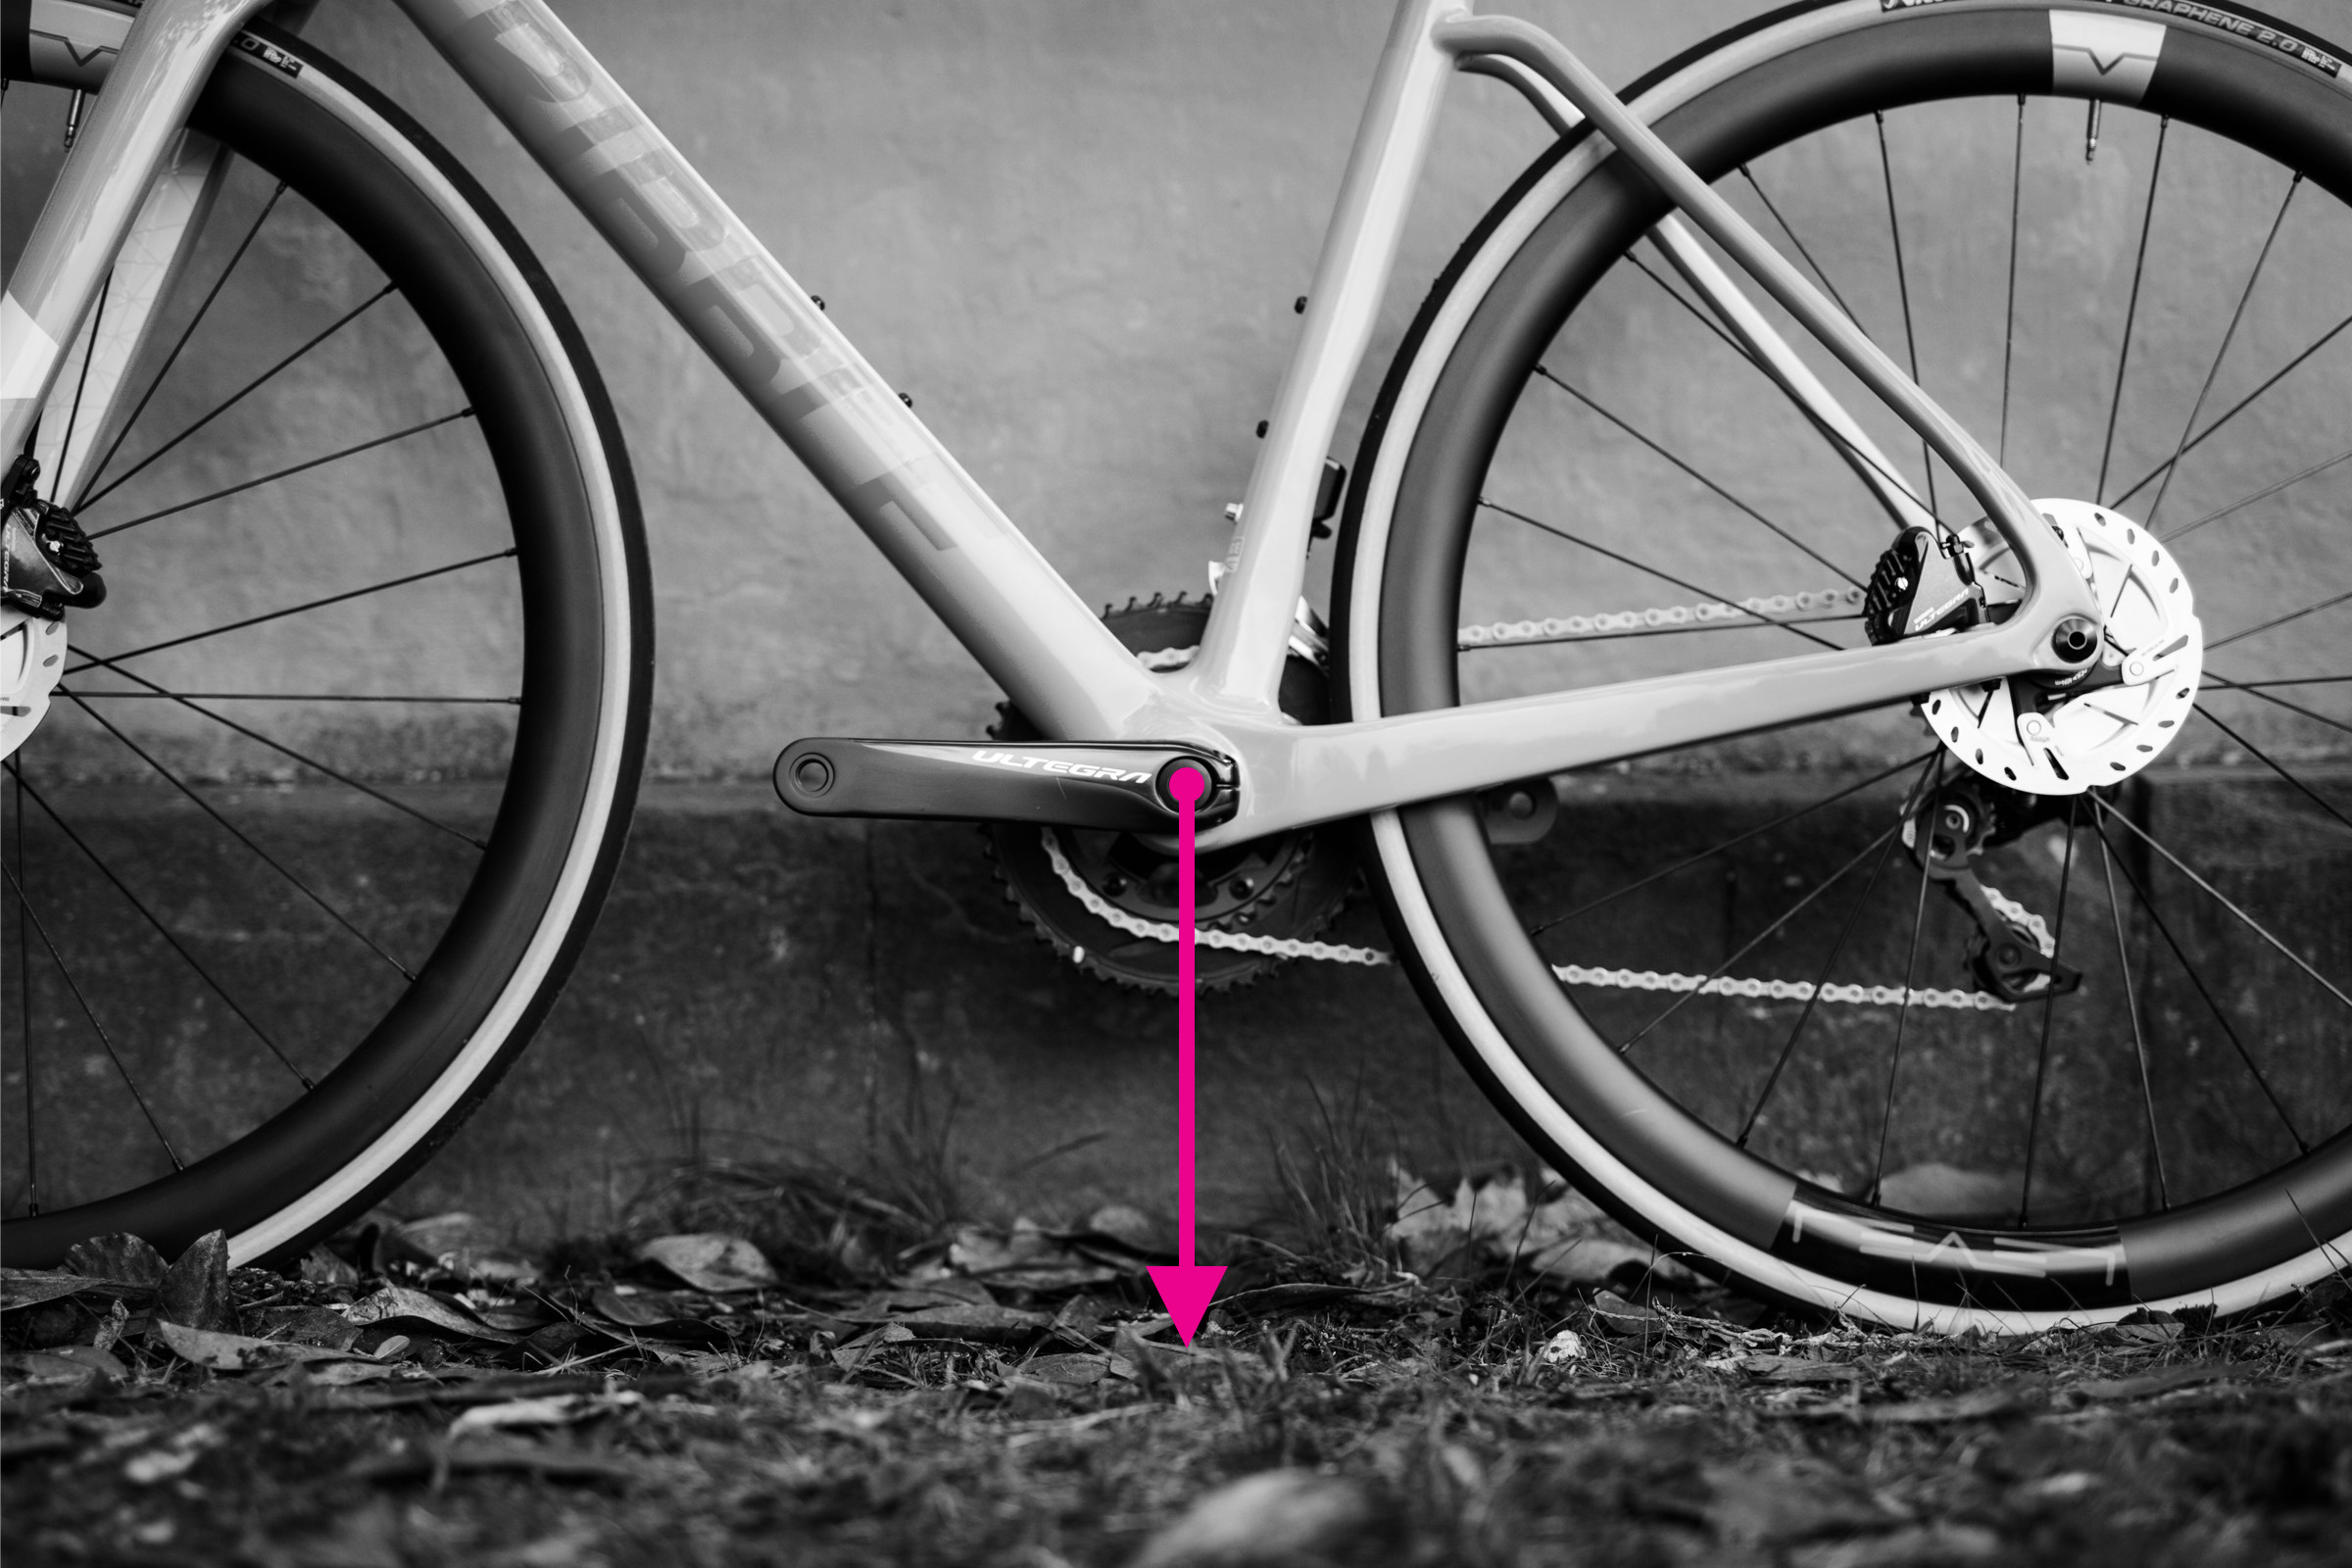 Measuring bottom bracket height on a bicycle frame
Bottom bracket height is simply the distance from the ground to the center of the bottom bracket shell. It influences ground clearance and, to a lesser extent, stability.
Steps to measure bottom bracket height:
- Ensure the bike is upright.
- Measure the vertical distance from the ground to the center of the bottom bracket shell.
- Ensure your tires are inflated to your typical riding pressure, as tire pressure slightly affects this measurement.
By taking these measurements, you’ll have a comprehensive understanding of your bike’s geometry. This knowledge is invaluable when making purchasing decisions, whether for a new bike, a second-hand bike, a commuting bike, or a gravel bike. Keep these measurements recorded for future reference – you’ll be glad you have them!