Measuring your bike chain size correctly is crucial for smooth shifting and preventing premature wear. At usabikers.net, we provide expert guidance to ensure you get the perfect fit, enhancing your riding experience. This detailed guide offers several methods to accurately measure your bike chain, whether you’re replacing an old one or upgrading your drivetrain.
1. Understanding Bike Chain Basics
Before diving into the measurement process, let’s cover some fundamental aspects of bike chains.
1.1. What Are The Different Types of Bike Chains?
There are two main types of multi-speed bicycle chains: master link chains and connecting rivet chains.
- Master Link Chains: These chains use two removable outer plates to connect the chain, making them easy to install and remove with master link pliers.
- Connecting Rivet Chains: These chains use a special rivet to connect the chain. A chain tool is needed to install and remove connecting rivet chains.
 Master link (L) and connecting rivet (R) chains
Alt text: Master link versus connecting rivet bike chains for easy identification.
1.2. Why Is Chain Size Important?
The correct chain size ensures efficient power transfer and smooth shifting, and can also extend the life of your drivetrain components. According to research from the Motorcycle Safety Foundation (MSF), in July 2025, a properly sized chain reduces the risk of chain breakage and improves overall ride quality.
1.3. What Tools Will I Need To Measure A Bike Chain?
To measure your bike chain, you’ll typically need:
- A chain tool
- Master link pliers (if applicable)
- Measuring tape or ruler
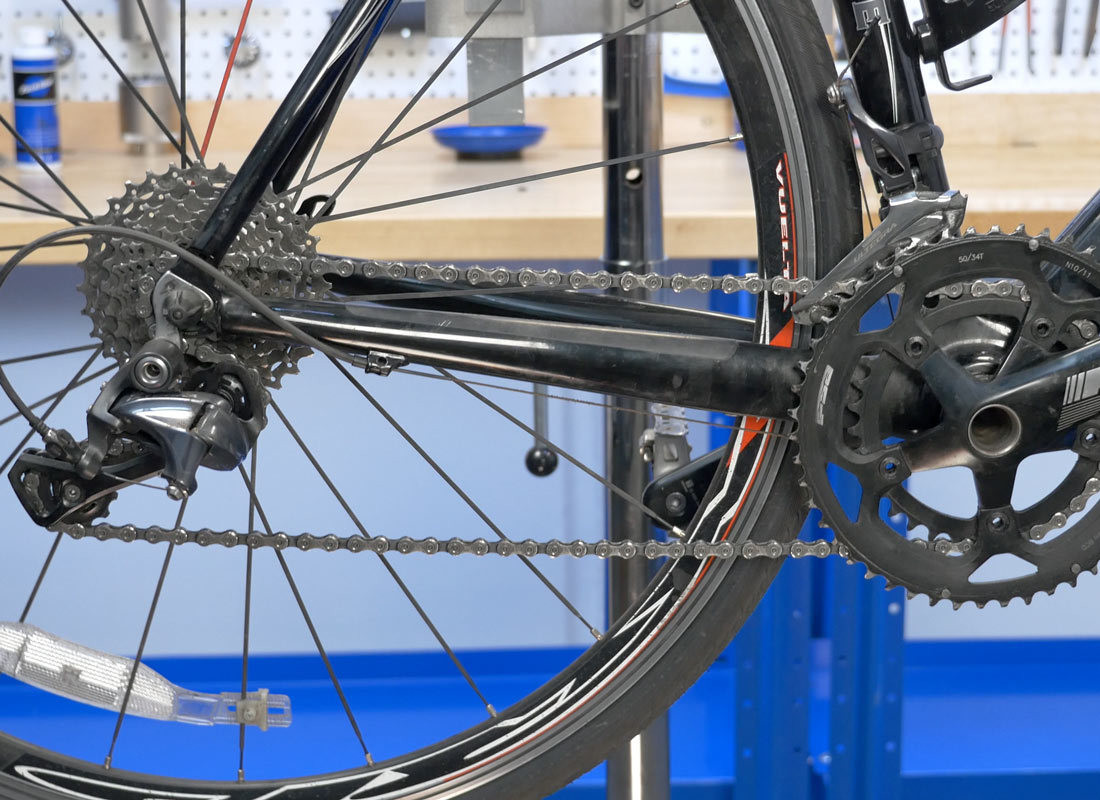
2. Initial Chain Check And Removal
Before you remove your old chain, verify it is the correct length.
2.1. How To Verify The Chain Length?
- Largest Chainring and Largest Cog: Shift the bike into the largest chainring and the largest rear cog. The chain should be long enough to make this shift with slight bends at each pulley of the rear derailleur.
- Smallest Chainring and Smallest Sprocket: Shift to the smallest chainring and sprocket. There should be no slack in the chain, and the derailleur should not pull so far back that the chain contacts itself.
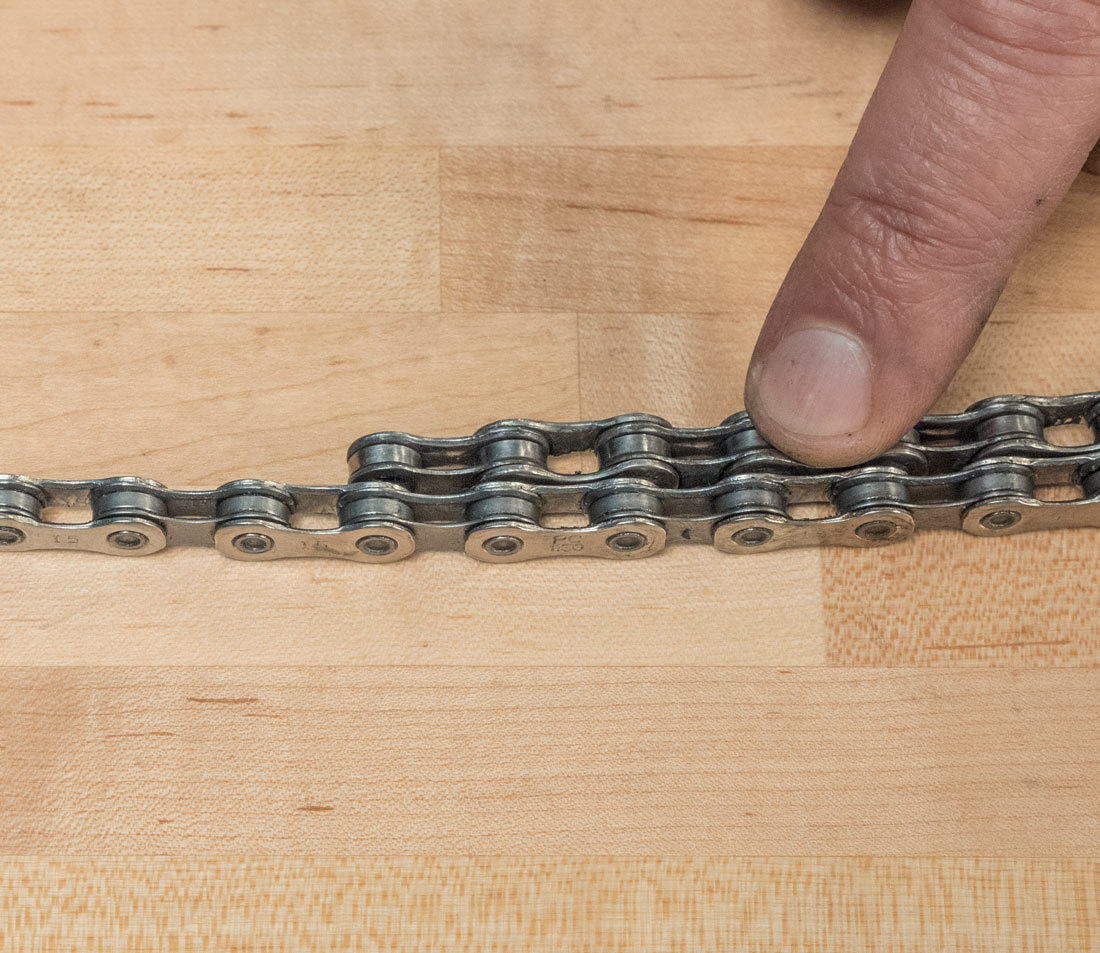
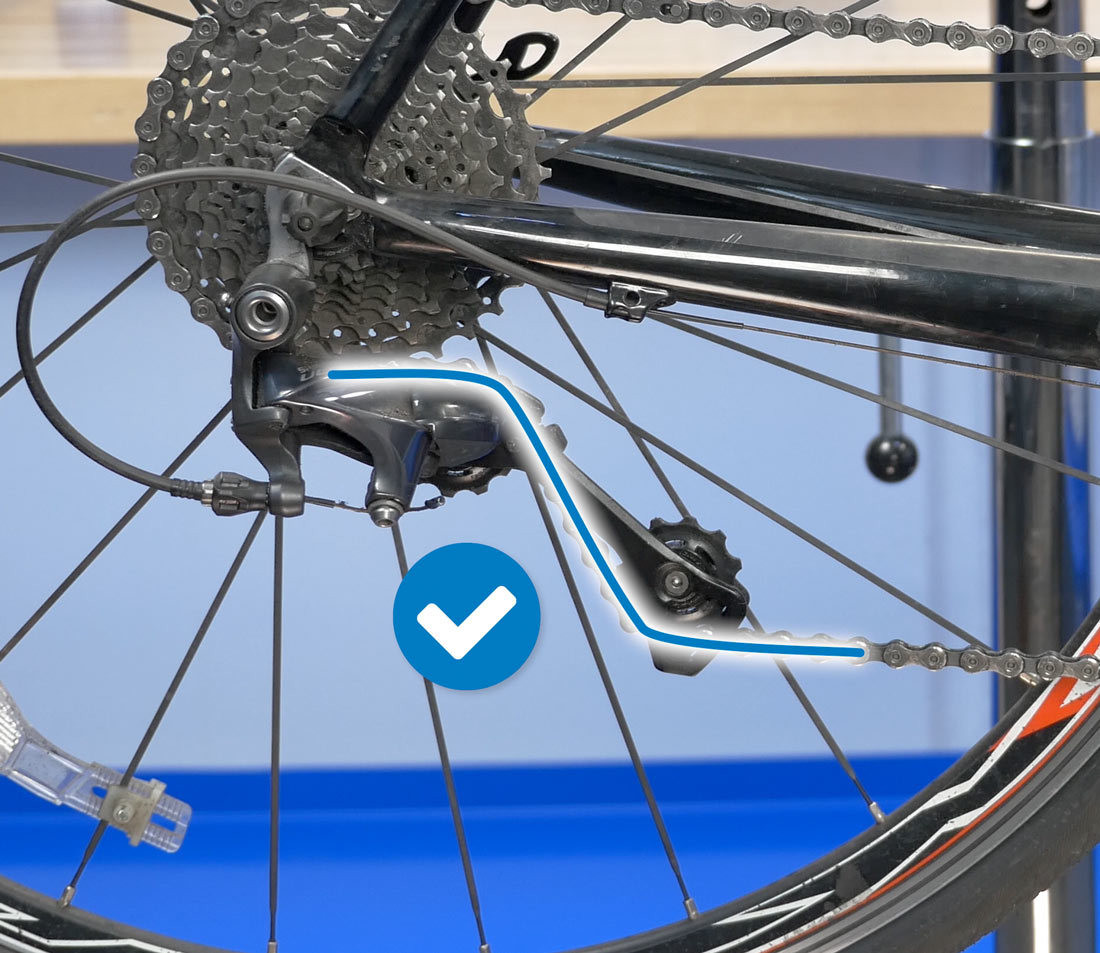 Slight bend at each pulley
Alt text: Visual check of chain length, ensuring slight bends at each rear derailleur pulley.
 Correct derailleur position and chain tension
Alt text: Checking derailleur position and chain tension to confirm proper chain length.
2.2. How To Remove The Rear Wheel To Inspect The Chain?
Remove the rear wheel to take tension off the chain, giving you better access.
2.3. How To Identify A Master Link?
Inspect the chain for a master link, which is visually distinct from other links.
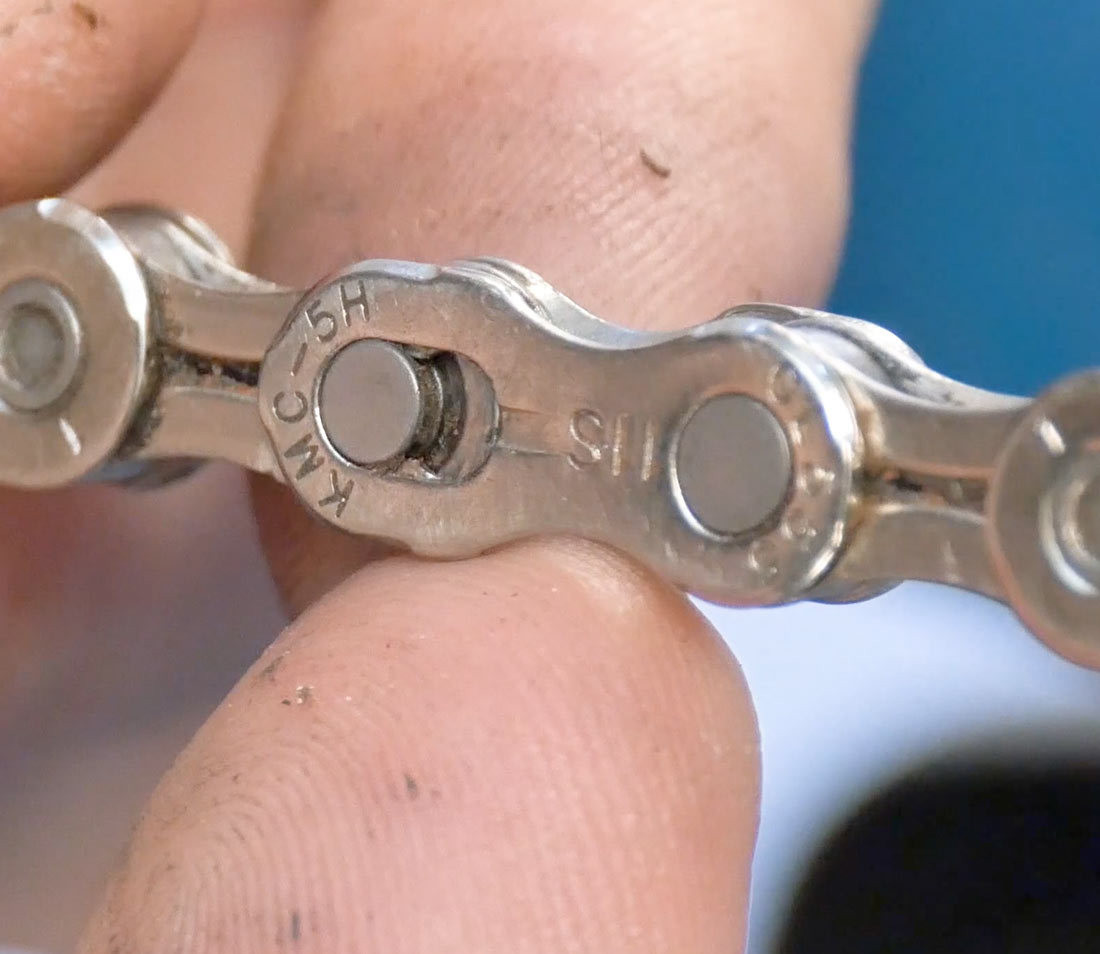 Master link
Alt text: Close-up of a master link on a bike chain for easy identification.
2.4. How To Disengage A Master Link Chain?
If a master link is present, use master link pliers, such as the Park MLP-1.2, to disengage the link.
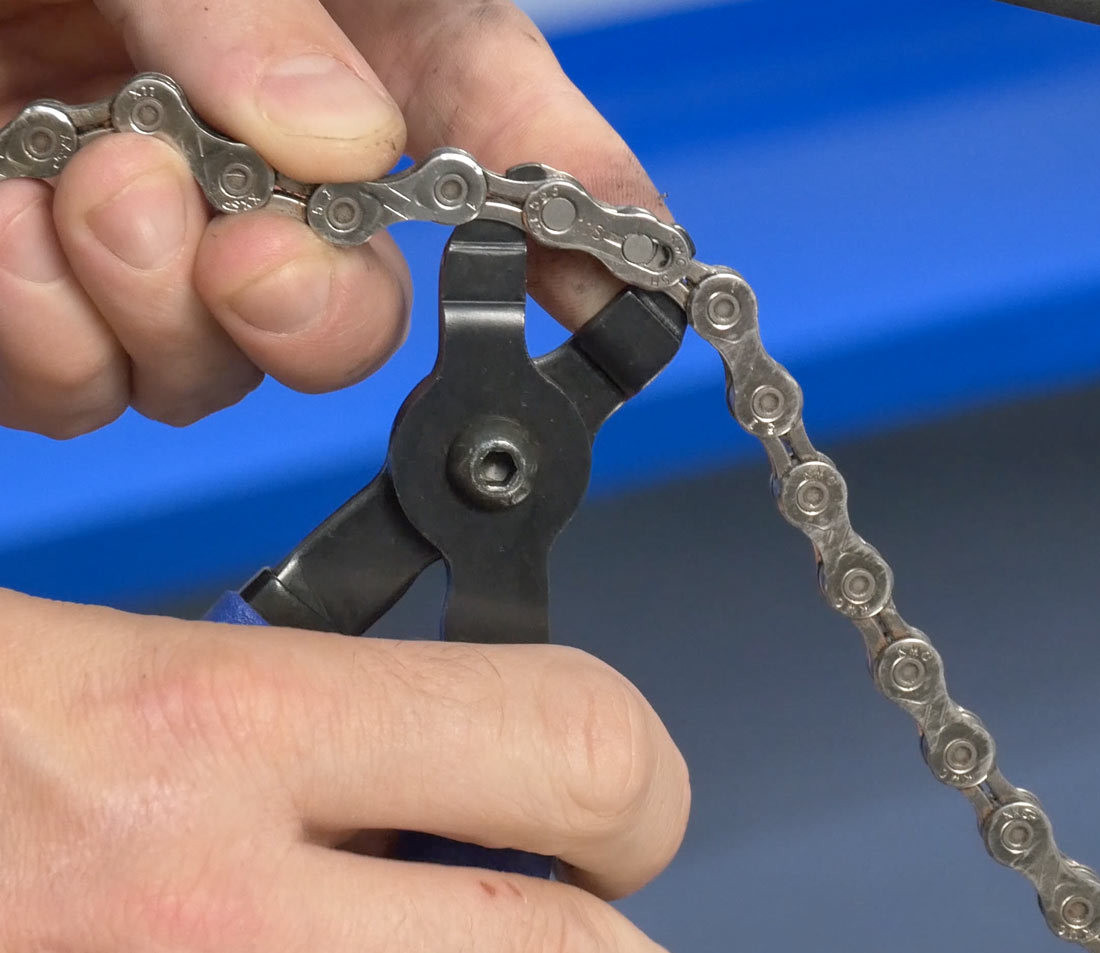 Disengage the master link using the MLP-1.2
Alt text: Using master link pliers (MLP-1.2) to safely disengage the bike chain’s master link.
2.5. How To Remove A Connecting Rivet Chain?
Connecting rivets will look different from other rivets. When selecting a rivet to break, ensure it is at least a couple of links away from any connecting rivet already installed in the chain. Install the chain tool and bring the driving pin into contact with the connecting rivet. Turn the handle with force to drive out the rivet, then remove the chain.
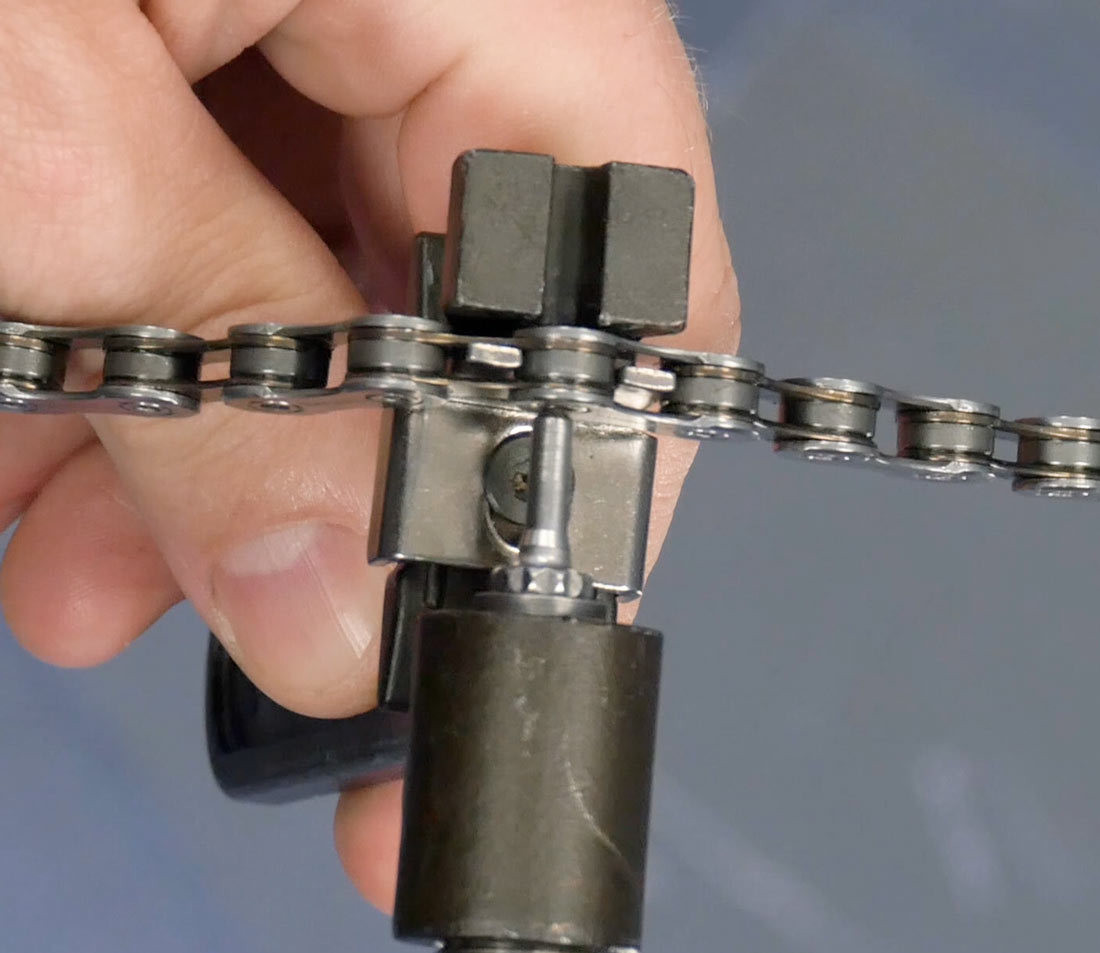 Bring tool into contact with rivet
Alt text: Aligning the chain tool to drive out a bike chain rivet.
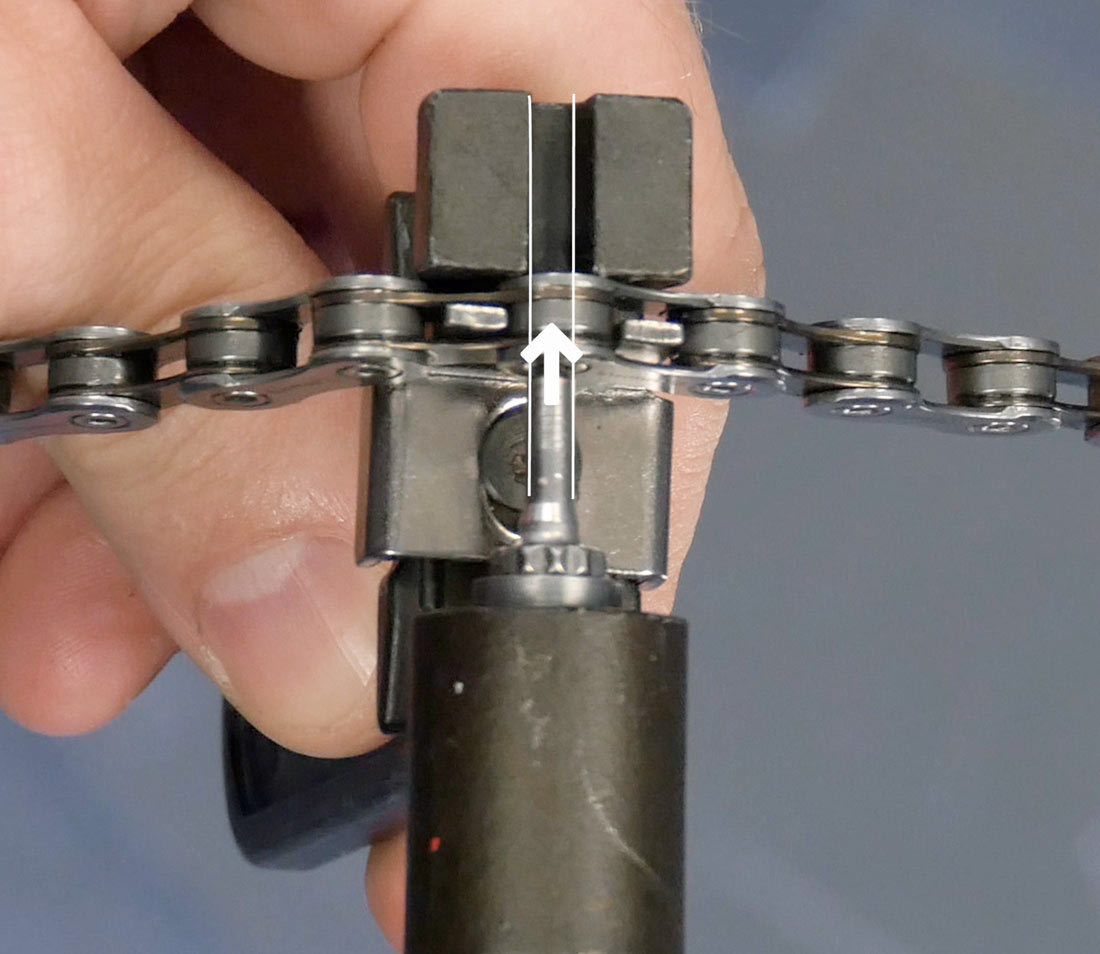 Closeup of chain tool with arrow demonstrating driving a chain rivet with the pin straight and centered
Alt text: Close-up showing the correct alignment of a chain tool driving pin centered on a chain rivet.
3. How To Size A Bike Chain To The Original Chain?
If the old chain is an acceptable length, you can use it as a guide for sizing the new chain.
3.1. How To Compare The Old Chain To The New Chain?
Lay the old chain next to the new chain, aligning outer plates with outer plates or inner plates with inner plates.
3.2. How To Insert A Master Link For Comparison?
Insert the master link, if applicable, to get a true side-by-side comparison, matching them rivet by rivet. Remember that old chains will lengthen as they wear.
 Add master link for comparison
Alt text: Inserting a master link to accurately compare old and new bike chains.
 Match rivets on used chain to new chain
Alt text: Aligning rivets on used and new bike chains for accurate length comparison.
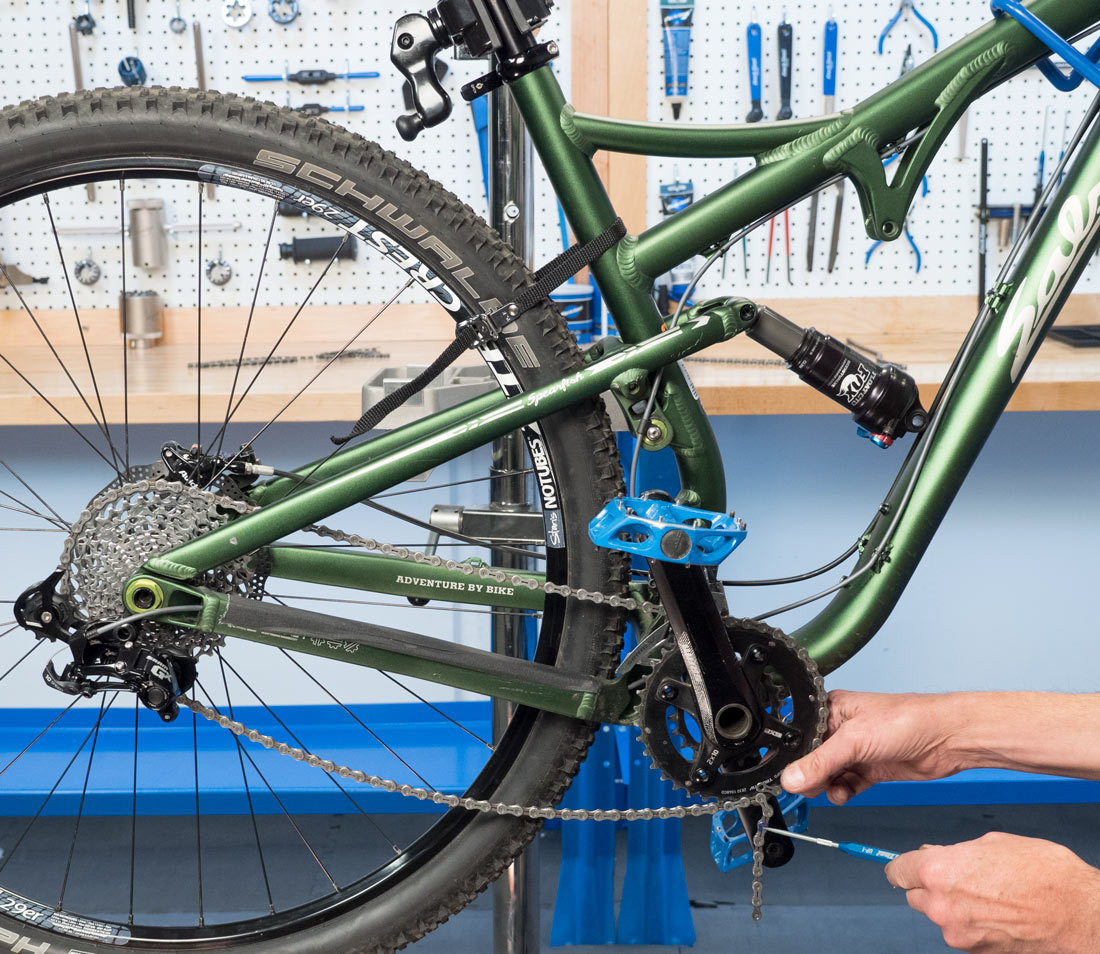
4. Measuring Bike Chain Size Using The Largest Cog & Largest Chainring Method
To measure a chain from scratch, especially when changing drivetrain components, use the largest rear sprocket and largest front ring as a reference.
4.1. When Should I Use This Method?
This method is commonly used for bikes with rear sprockets that have a maximum of 36 teeth or smaller.
4.2. How To Prepare The Bike For Measurement?
Shift the front derailleur over the largest chainring and the rear derailleur to the smallest cog to move it out of the way.
4.3. How To Route The Chain Around The Largest Cog?
Begin by wrapping the chain around the largest rear cog. If the new chain has one end with an outer plate, route it toward the front chainring.
4.4. How To Pass The Chain Through The Front Derailleur?
Pass the chain end through the front derailleur cage onto the largest front chainring and hold it at about the five o’clock position.
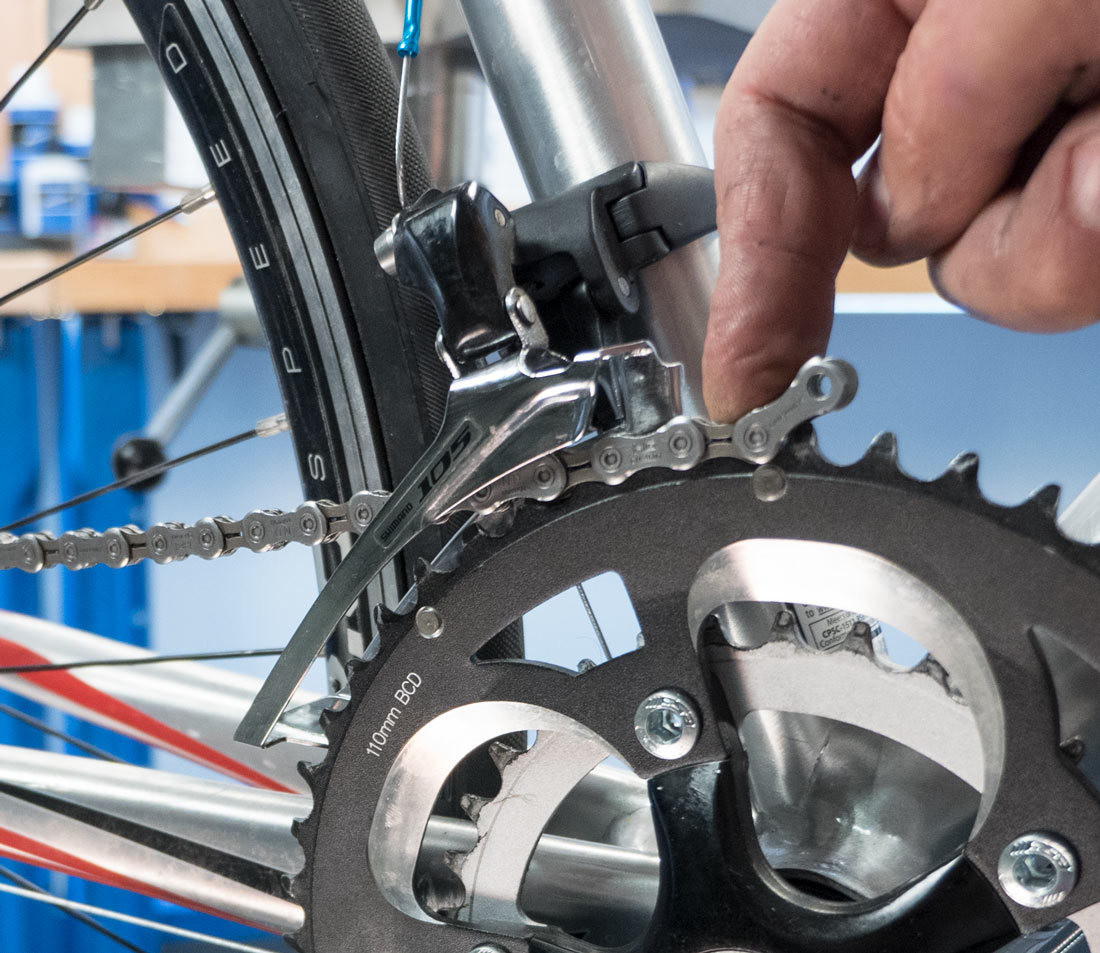 Pass chain through front derailleur
Alt text: Passing the bike chain through the front derailleur cage.
 Hold at five o
Alt text: Holding the bike chain at the five o’clock position on the largest front chainring.
4.5. How To Install Half Of The Master Link?
If the chain uses a master link, install half of it to account for the extra half-inch it provides.
4.6. How To Engage The Chain On The Front Chainring?
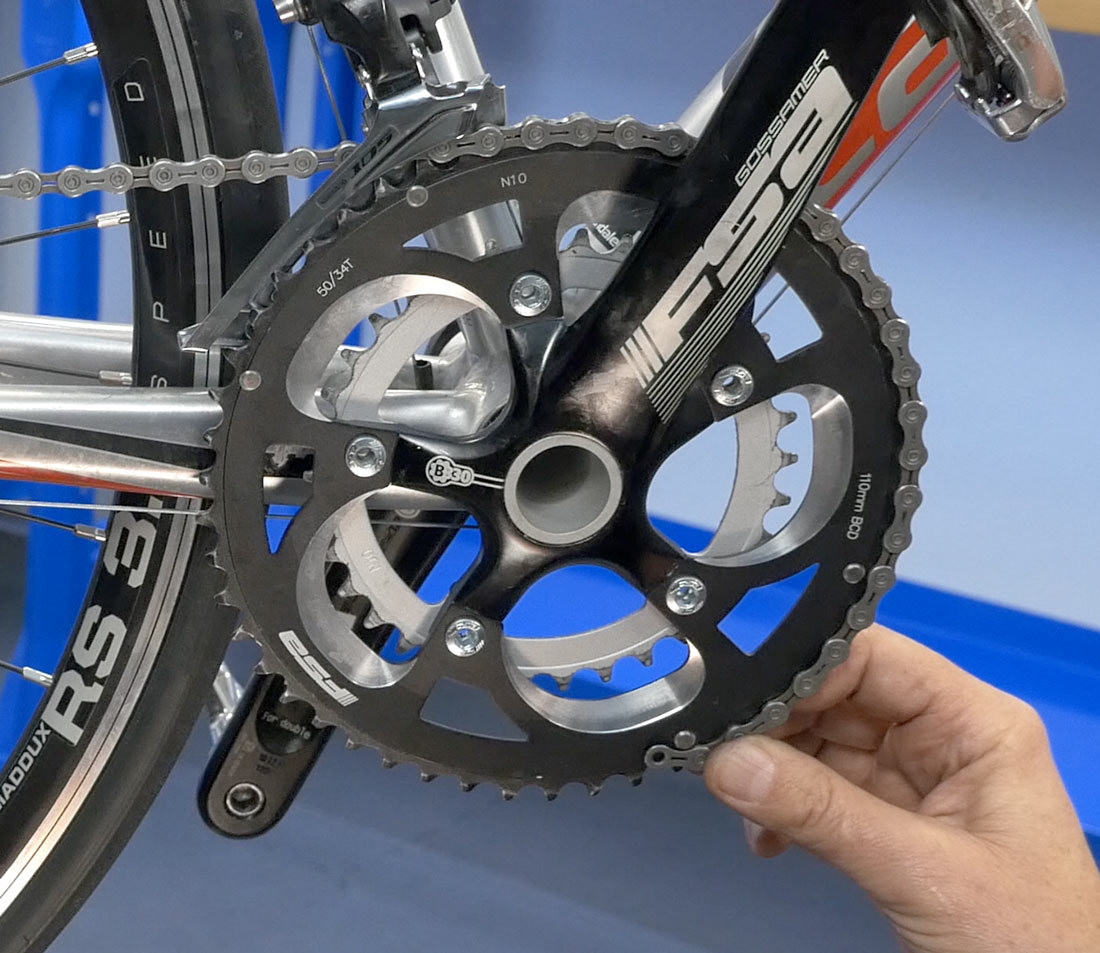
Pull the lower section of chain snug and engage it on the front chainring.
 Pull lower section snug
Alt text: Pulling the lower section of the bike chain snug on the front chainring.
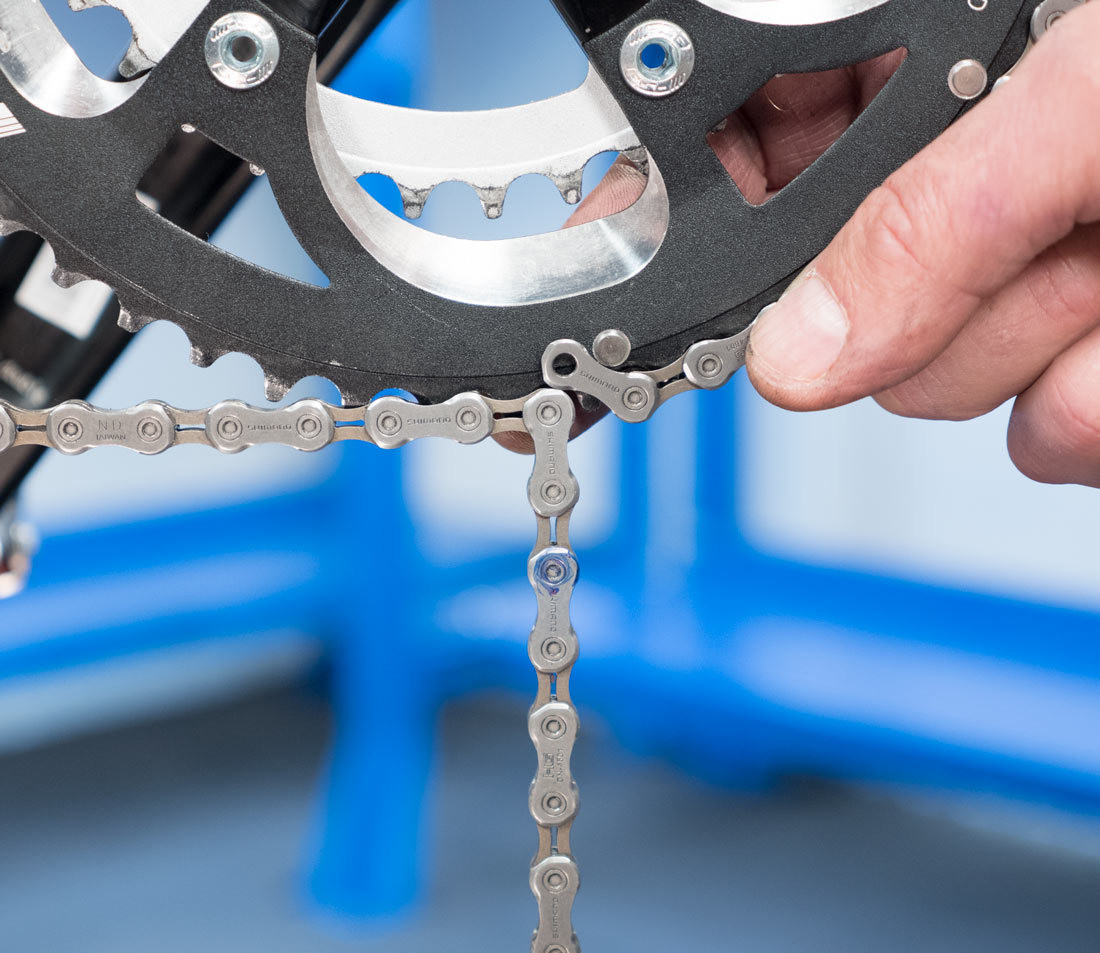
4.7. How To Find The Reference Rivet?
Ensure the chain is fully engaged on the largest rear cog for accurate sizing. Bypass the rear derailleur entirely for this step. Find the closest rivet where the two chain ends could be joined (inner plates to outer plates). This is the reference rivet.
4.8. How Many Rivets Should I Add From The Reference Rivet?
From the reference rivet, add two additional rivets. This is the cutting point for your chain.
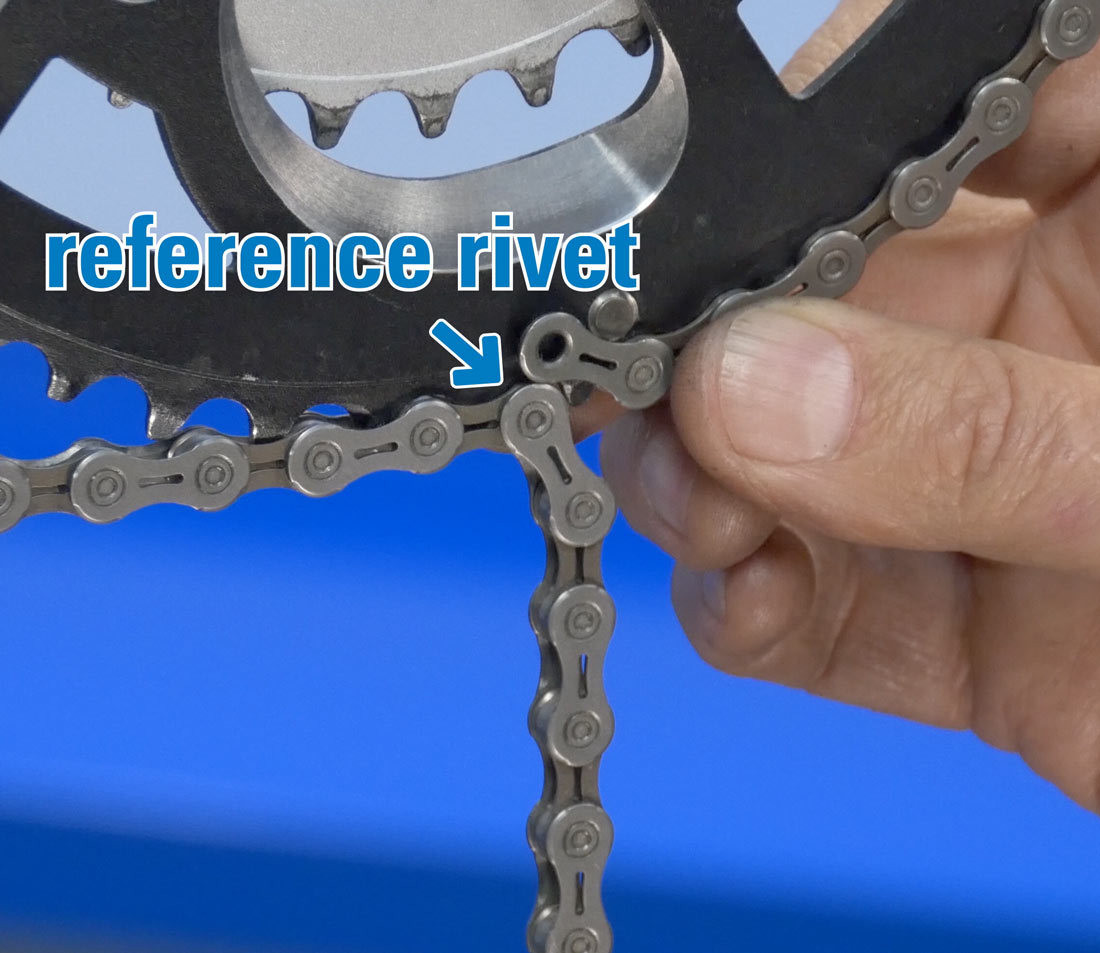 Reference rivet – note that inner plate joins to outer plate
Alt text: Identifying the reference rivet on a bike chain, where inner and outer plates connect.
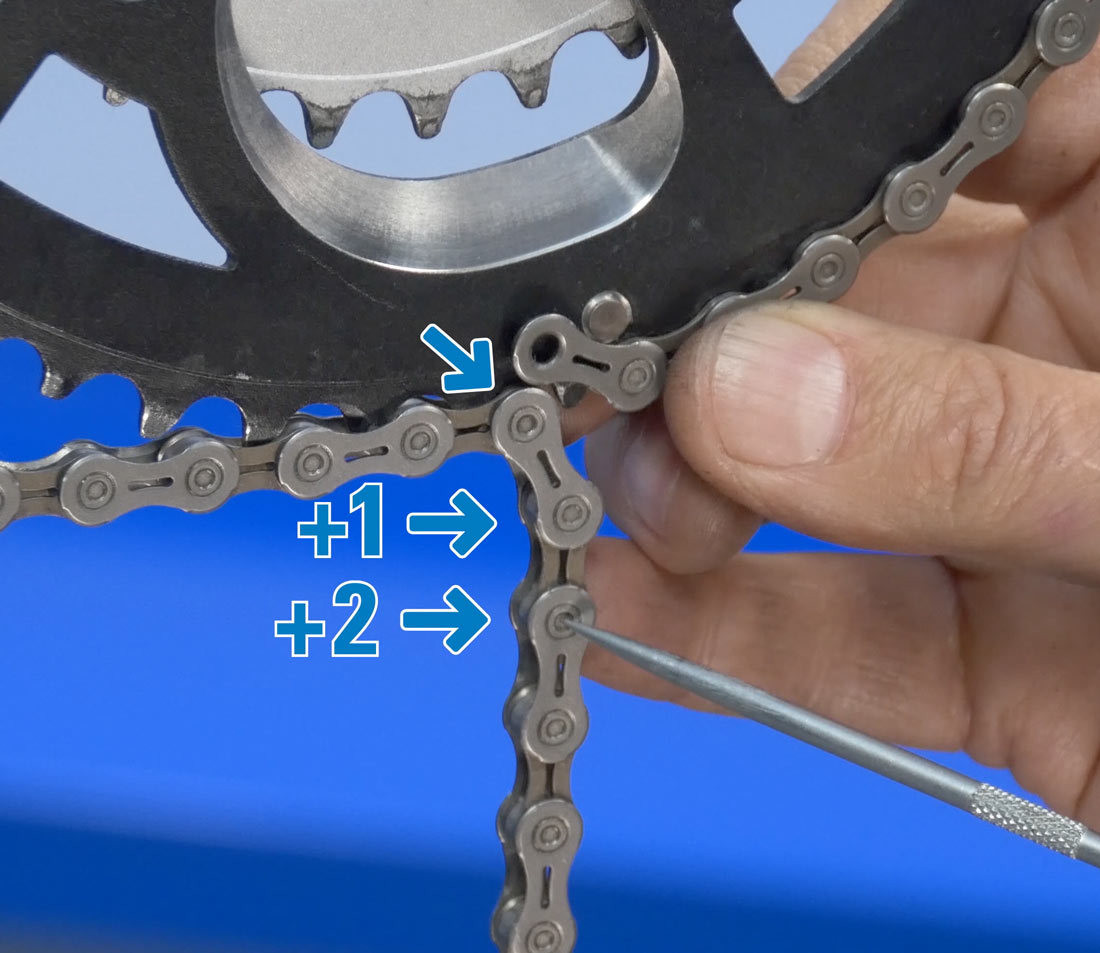 Add two rivets
Alt text: Adding two rivets to the reference point for accurate bike chain sizing.
5. How To Measure Bike Chain Size For Drivetrains With Large Rear Cogs?
Dedicated 1X systems use a single front ring in combination with extra-wide range rear sprockets — 42 teeth and larger. These systems need a longer chain than bikes with a narrower range.
5.1. What Are Dedicated 1X Systems?
These systems use a single front ring combined with extra-wide range rear sprockets — 42 teeth and larger.
 Dedicated 1X shifting system
Alt text: Dedicated 1X shifting system illustration.
5.2. How To Route The Chain?
Without passing through the rear derailleur, route the chain over the front ring and the largest rear sprocket.
5.3. How To Determine The Shortest Length?
Determine the shortest length where a chain would connect inner and outer plates.
5.4. How Many Rivets Should I Add?
From this rivet, count four additional rivets to determine the position to shorten the chain.
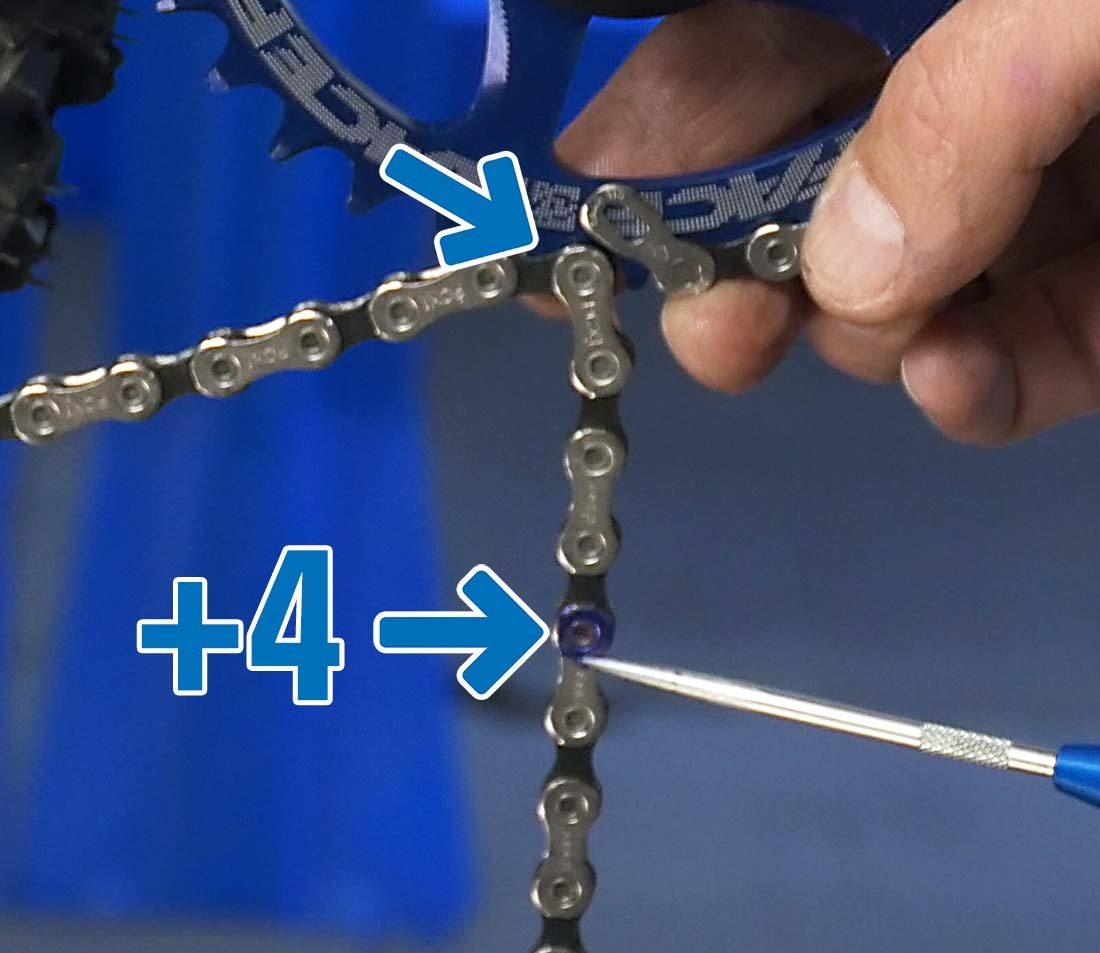 Sizing 1x add 4
Alt text: Adding four rivets for bike chain sizing.
6. Bike Chain Size Exceptions & Considerations
Consider chain guides and rear suspension when determining chain length.
6.1. What About Chain Guides?
If the bike uses a chain guide, make sure the chain is routed through the system before determining chain length. The process remains the same.
 Route chain through guide
Alt text: Routing a bike chain through a chain guide.
6.2. How To Handle Rear Suspension?
The distance between the rear cogs and front chainrings changes as the suspension compresses. To account for that, disconnect the shock and compress the linkage so that it is bottomed out.
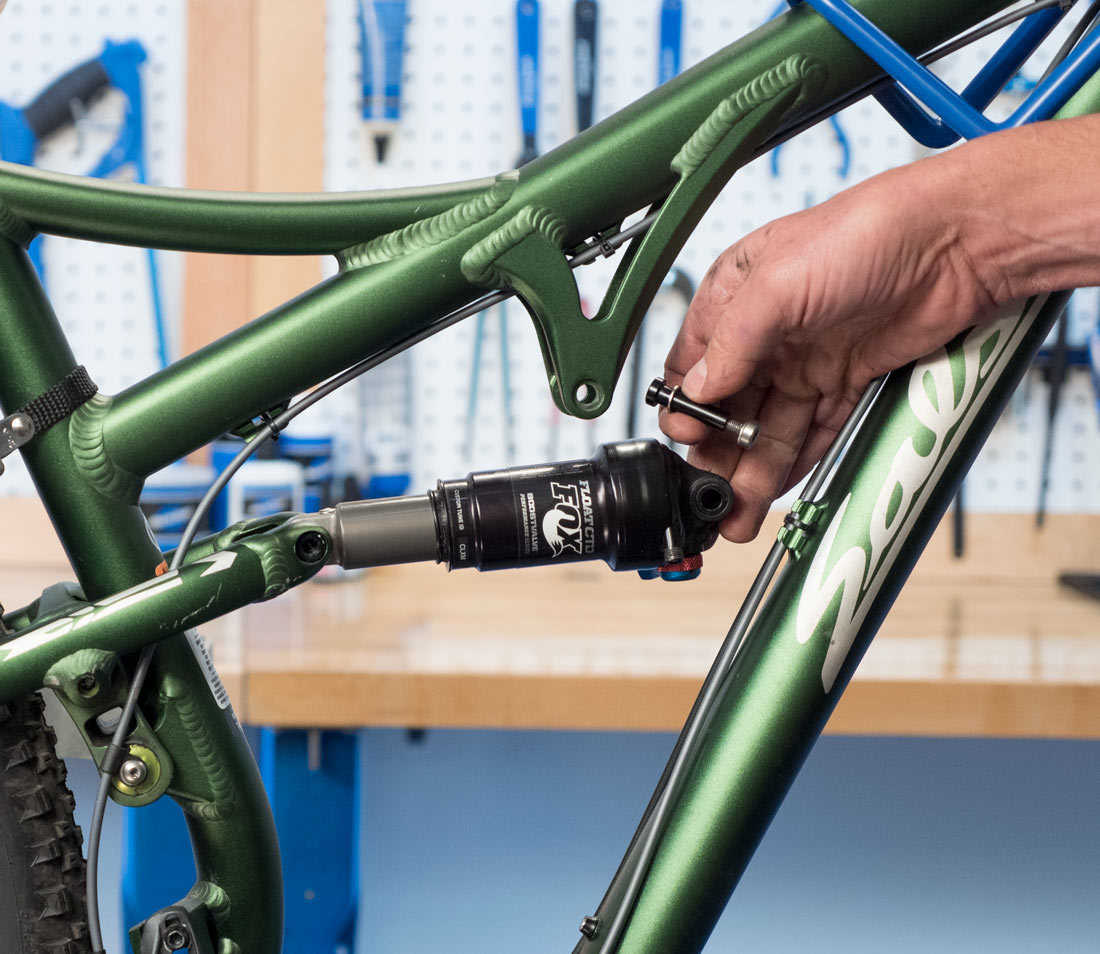 Disconnect shock
Alt text: Disconnecting the shock on a bike’s rear suspension.
 Compress linkage
Alt text: Compressing the linkage on a bike to account for rear suspension.
7. Optimizing Your Bike Chain For Peak Performance
Ensuring your bike chain is the correct size is just one aspect of maintaining optimal performance. Regular maintenance and timely replacements are equally important.
7.1. What Are The Benefits Of A Properly Sized Chain?
- Improved Shifting Performance: A correctly sized chain ensures smooth and precise gear changes.
- Extended Drivetrain Life: Proper chain length reduces stress on other components, such as the cassette and chainrings.
- Reduced Risk of Damage: Prevents the chain from being too tight or too loose, which can cause damage or breakage.
7.2. How Often Should I Replace My Bike Chain?
The lifespan of a bike chain depends on various factors, including riding conditions and maintenance. However, a general guideline is to replace your chain every 2,000 to 3,000 miles.
According to the American Motorcyclist Association (AMA), regular chain maintenance extends the life of your bike and improves safety.
7.3. How To Maintain Your Bike Chain?
- Regular Cleaning: Clean your chain regularly to remove dirt and grime.
- Proper Lubrication: Use a high-quality chain lubricant to keep it running smoothly.
- Check for Wear: Use a chain checker tool to monitor chain wear and replace it when necessary.
8. Troubleshooting Common Bike Chain Problems
Even with a properly sized chain, issues can arise. Here are some common problems and how to address them.
8.1. Chain Skipping
- Cause: Often due to a worn chain or cassette.
- Solution: Replace the worn components.
8.2. Chain Squeaking
- Cause: Usually due to lack of lubrication.
- Solution: Clean and lubricate the chain.
8.3. Chain Breaking
- Cause: Can be caused by a worn chain, improper installation, or excessive stress.
- Solution: Replace the chain and ensure proper installation.
9. Bike Chain Size: Real-World Examples And Scenarios
To further illustrate the importance of proper chain sizing, let’s look at some real-world examples and scenarios.
9.1. The Commuter Bike
- Scenario: A commuter bike used daily for short trips in the city.
- Chain Needs: A durable chain that can withstand frequent use and varying weather conditions. Proper sizing ensures smooth shifting in urban environments.
9.2. The Mountain Bike
- Scenario: A mountain bike used for off-road trails with steep inclines and rough terrain.
- Chain Needs: A robust chain that can handle the stress of off-road riding. Proper sizing is critical to prevent chain breakage during challenging climbs.
9.3. The Road Bike
- Scenario: A road bike used for long-distance rides and competitive racing.
- Chain Needs: A lightweight chain that offers efficient power transfer. Precise sizing ensures optimal performance and minimizes energy loss.
10. FAQ: Your Bike Chain Size Questions Answered
10.1. How Do I Know What Size Bike Chain I Need?
Determine your bike’s drivetrain configuration (number of gears) and follow the measurement methods outlined above.
10.2. Can I Use A Longer Chain Than Necessary?
No, a longer chain can cause poor shifting and increase the risk of chain slap.
10.3. Can I Use A Shorter Chain Than Necessary?
No, a shorter chain can damage your derailleur and other drivetrain components.
10.4. What Happens If My Chain Is Too Tight?
A chain that’s too tight can put excessive stress on the drivetrain and cause premature wear.
10.5. What Happens If My Chain Is Too Loose?
A chain that’s too loose can lead to poor shifting and increase the risk of the chain derailing.
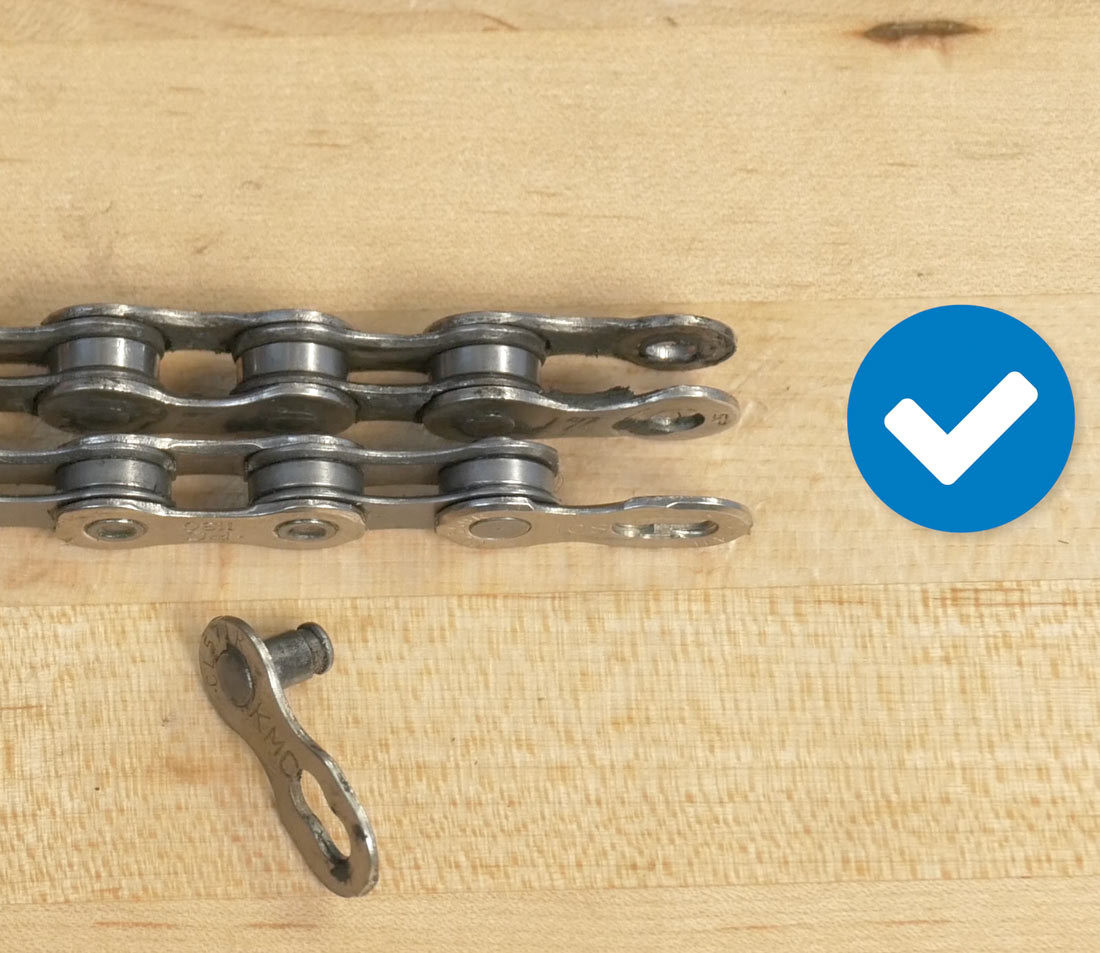
10.6. Is It Okay To Join A Chain With A Missing Link?
A missing link, or master link, is a safe way to join a chain if it’s the correct type and properly installed.
10.7. How Do I Break A Bike Chain Without A Tool?
Breaking a bike chain without a tool is not recommended, as it can damage the chain and be unsafe. Always use a chain tool for proper chain breaking.
10.8. What Is The Best Chain Tool To Use?
The best chain tool depends on your budget and needs. Park Tool and Pedro’s offer high-quality chain tools that are durable and easy to use.
10.9. How Often Should I Clean My Bike Chain?
Clean your bike chain every few rides, or more often if you ride in dirty or wet conditions.
10.10. What Kind Of Lube Should I Use On My Bike Chain?
Use a bike-specific chain lubricant that is appropriate for your riding conditions. Wet lubes are best for wet conditions, while dry lubes are better for dry conditions.
11. Call to Action: Join the usabikers.net Community
Ready to take your biking experience to the next level? At usabikers.net, we offer a wealth of information, resources, and a vibrant community of fellow motorcycle enthusiasts. Whether you’re looking for detailed guides, expert advice, or just a place to share your passion, we’ve got you covered.
Visit usabikers.net today to explore our extensive collection of articles, participate in our lively forums, and connect with bikers from around the USA. For any questions or more information, reach out to us at:
Address: 801 Sturgis Main St, Sturgis, SD 57785, United States
Phone: +1 (605) 347-2000
Website: usabikers.net
Join us now and become part of the usabikers.net family. Let’s ride together!
By understanding the importance of proper bike chain sizing and following our comprehensive guide, you can ensure a smoother, safer, and more enjoyable riding experience. Happy biking from all of us at usabikers.net!