
Choosing the right bike size is paramount for comfort, performance, and injury prevention, whether you’re buying your first bicycle or upgrading to a new model. Understanding bike frame measurements ensures you get a machine that fits your body and suits your riding style. This guide will walk you through the essential steps on How To Measure The Size Of A Bike, ensuring you can confidently select the perfect ride, whether you’re purchasing or renting.
Understanding Key Bike Geometry Measurements
Before diving into the measuring process, it’s crucial to familiarize yourself with the fundamental measurements that define a bike frame’s geometry. These dimensions dictate how a bike will feel and handle. Here’s a rundown of the key terms you’ll encounter:
- Top Tube Length (Effective): This is the horizontal distance from the center of the head tube to the center of the seat post. It’s a crucial measurement for reach and overall bike size.
- Seat Tube Length: Measured from the center of the bottom bracket to the top of the seat tube, this dimension often dictates frame size, especially in older bikes, though less relevant in modern designs.
- Reach: The horizontal distance from the bottom bracket to the top of the head tube. Reach is a critical factor in determining the bike’s cockpit length and rider position.
- Stack: The vertical distance from the bottom bracket to the top of the head tube. Stack height influences the bike’s front end height and rider posture.
- Wheelbase: The distance between the front and rear axle. Wheelbase affects stability and handling; longer wheelbases are generally more stable.
- Chainstay Length: The distance between the bottom bracket and the rear axle. Chainstay length impacts the bike’s responsiveness and climbing ability. Shorter chainstays often result in a more agile feel.
- Front Center: The distance from the bottom bracket to the front axle. Front center, along with chainstay length, contributes to the wheelbase and overall bike geometry.
- Seat Tube Angle: The angle of the seat tube relative to the ground. This angle influences pedaling efficiency and weight distribution.
- Head Tube Angle: The angle of the head tube relative to the ground. Head tube angle significantly impacts steering responsiveness and handling. Slacker angles are common in mountain bikes for downhill stability, while steeper angles are found in road bikes for quicker handling.
- Bottom Bracket Drop: The vertical distance the bottom bracket sits below the wheel axles. Bottom bracket drop affects stability and cornering ability. A lower BB drop generally increases stability.
- Bottom Bracket Height: The distance from the ground to the center of the bottom bracket. Bottom bracket height affects ground clearance and stability.
Tools You’ll Need to Measure Your Bike Frame
To accurately measure your bike frame and understand its dimensions, you’ll need a few simple tools. Gathering these beforehand will streamline the process of learning how to measure the size of a bike:
- Tape Measure: A standard tape measure, preferably metric, is essential for measuring lengths.
- Clinometer or Smartphone App: A clinometer measures angles. Many free smartphone apps can perform this function, making it readily accessible.
- Spirit Level (or Straight Edge with Clinometer App): A long spirit level ensures horizontal and vertical measurements. Alternatively, use a straight piece of wood or metal combined with a clinometer app.
- Plumb Line (or String and Weight): A plumb line creates a vertical reference. You can improvise with string and a small weight like a bolt or even Blu Tack.
While metric units are the standard for bike measurements, especially for modern bikes, some manufacturers, particularly in mountain biking, might still use inches. For consistency and ease of comparison, it’s best to stick to metric units (centimeters and millimeters). If needed, you can convert centimeters to inches by dividing by 2.54.
Before you start measuring, it’s worth checking the manufacturer’s website for geometry charts specific to your bike model and size. These charts often provide accurate measurements and can be a valuable reference point.
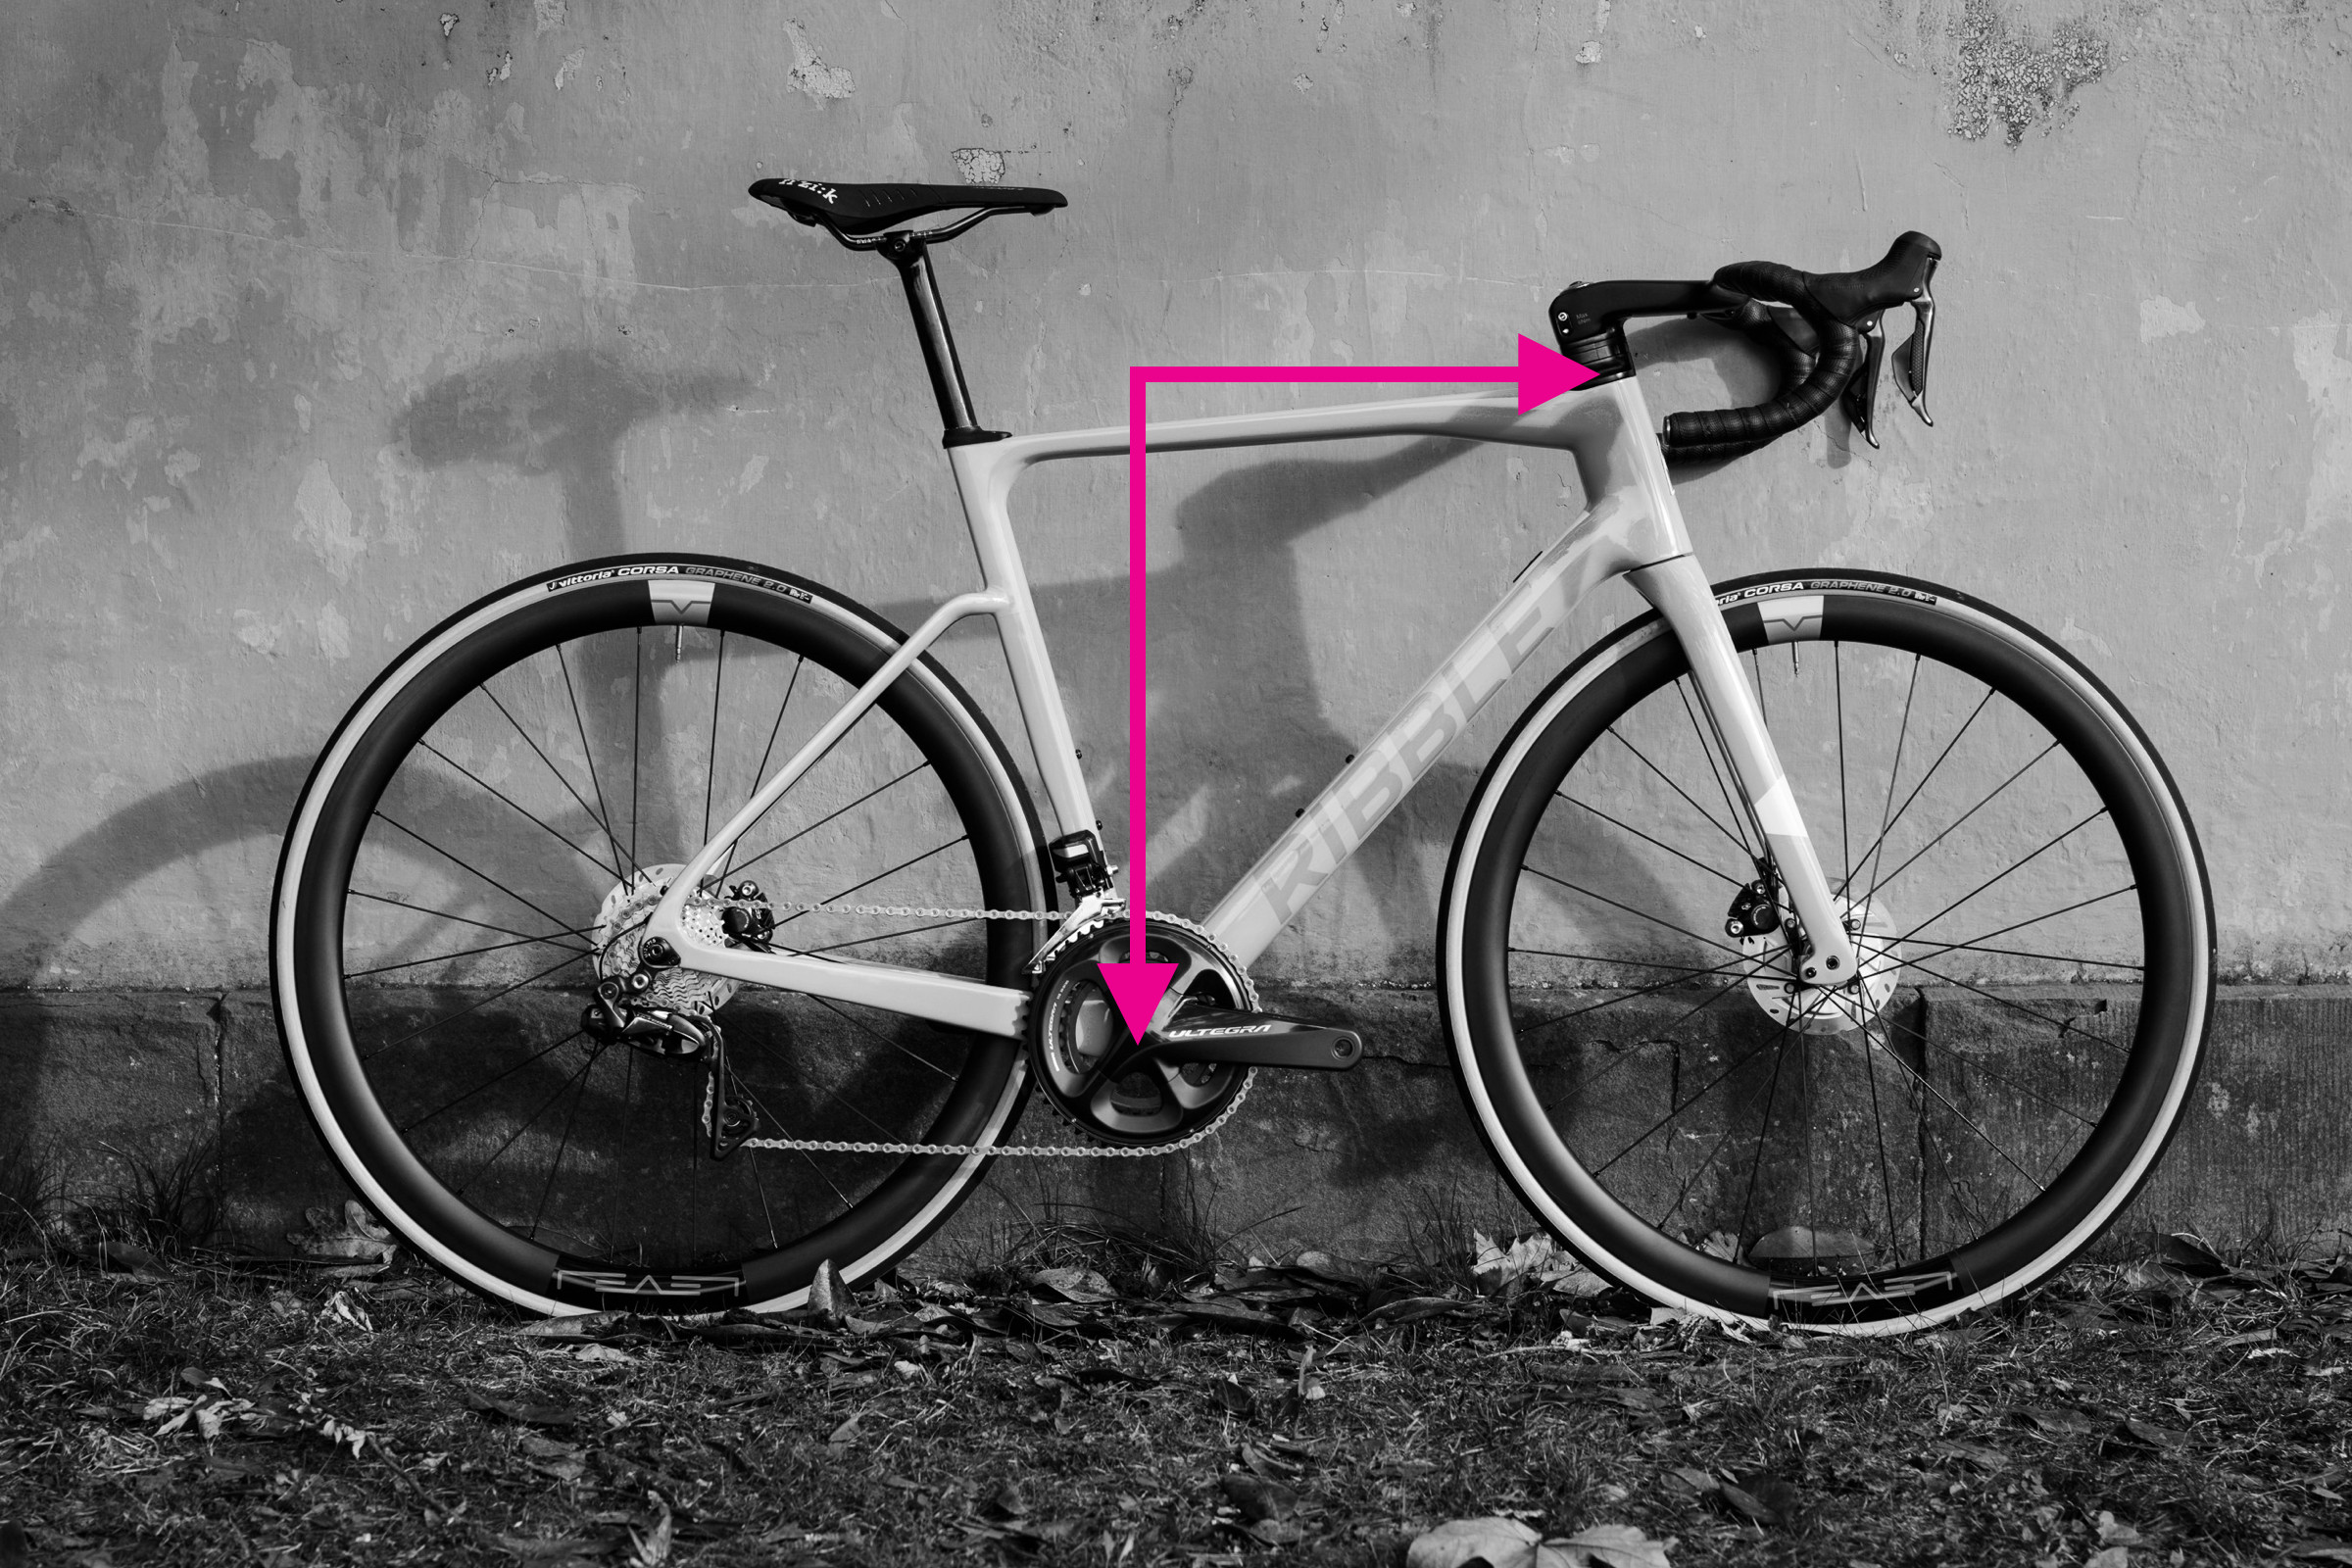
Step-by-Step Guide: How to Measure Top Tube Length
 Top tube measurement demonstrated on a bike frame
In the past, most bikes featured horizontal top tubes. However, modern bike designs frequently incorporate sloping top tubes. When discussing bike geometry, the effective top tube length or virtual top tube length is the standard measurement. This measurement provides a consistent way to compare bikes regardless of top tube slope.
To measure the effective top tube length, you need to determine the horizontal distance between the centerline of the head tube and the centerline of the seat post. Using your spirit level or clinometer app is crucial to ensure your measurement is perfectly horizontal.
- Position the Bike: Ensure your bike is on a level surface and standing upright.
- Locate Centerlines: Identify the center of your head tube and the center of your seat post.
- Horizontal Measurement: Place the spirit level horizontally from the center of the head tube towards the seat post.
- Measure Distance: Measure the horizontal distance from the center of the head tube to an imaginary vertical line extending upwards from the center of the seat post. This is your effective top tube length.
Road bikes are often sized based on top tube length by manufacturers. While mountain bikes are typically sized using S, M, L, etc., or sometimes in inches, top tube length remains a key geometry figure. It’s important to note that sizing conventions can vary significantly between brands. A size S frame from one brand might have a top tube length equivalent to a size M from another. Even virtual top tube length measurements can be interpreted slightly differently across brands, so always consider this measurement in the context of the manufacturer’s geometry chart.
Step-by-Step Guide: How to Measure Seat Tube Length
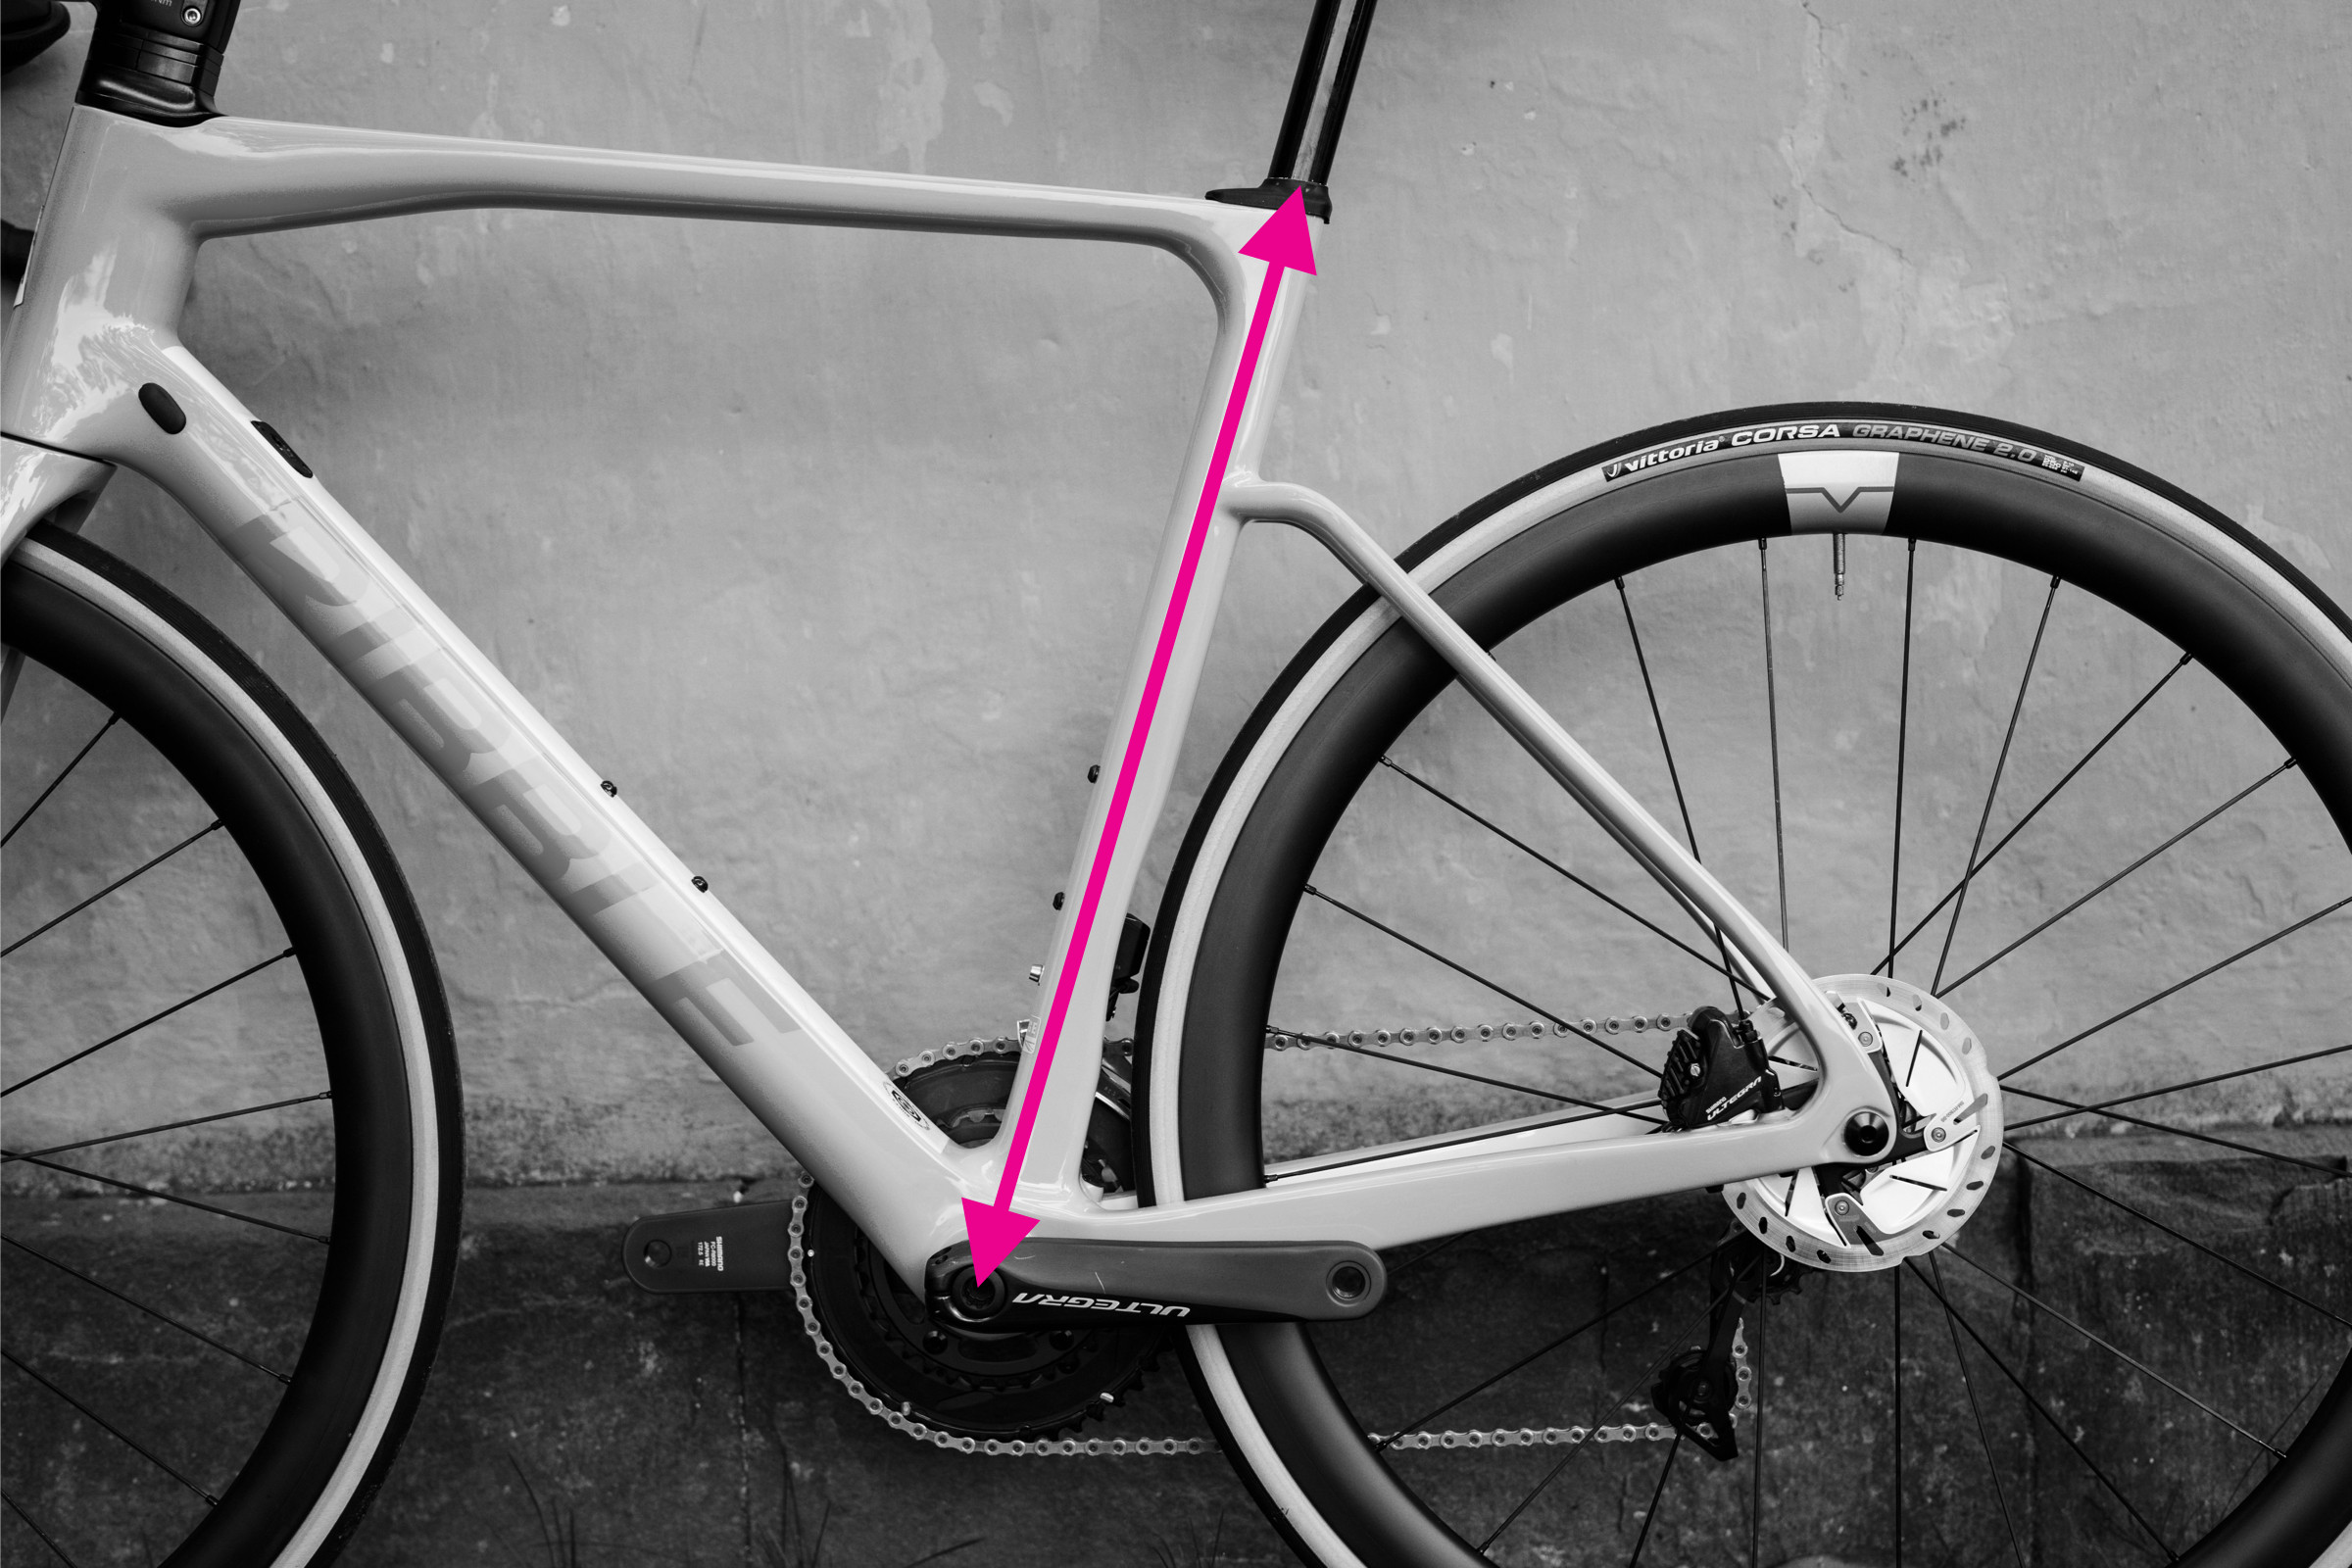 Seat tube measurement demonstrated on a bicycle frame
Seat tube length is measured as the straight-line distance from the center of the bottom bracket to the top of the seat tube. Although seemingly straightforward, certain bike designs can make this measurement less direct.
Bikes like the Trek Madone, for example, have seat tubes that extend significantly above the top tube junction. Others utilize a seatmast, making direct comparisons challenging. Mountain bikes often feature kinks or bends in the seat tube, meaning you shouldn’t measure along the tube itself, as this will result in an inaccurate, longer measurement.
To measure seat tube length accurately:
- Position the Bike: Ensure the bike is upright on a level surface.
- Straight Edge Alignment: Align your straight edge from the center of the bottom bracket to the top of the seat tube.
- Measure the Distance: Measure the straight-line distance along the straight edge from the center of the bottom bracket to the top of the seat tube. This is your seat tube length.
Step-by-Step Guide: How to Measure Reach and Stack
 Stack and reach measurement demonstrated on a bike frame
Reach and stack have become increasingly important measurements for comparing bike frames, offering more consistency than top tube and seat tube lengths alone. They are independent of frame design and measure the perpendicular distances between the bottom bracket and the top of the head tube, two key contact points for the rider.
Reach, the horizontal distance, and stack, the vertical distance, provide a clearer picture of how a bike will fit and feel.
Measuring Reach:
- Set up Spirit Level and Plumb Line: Attach a plumb line to one end of your spirit level. Ensure the string hangs straight and the weight is stable.
- Align with Head Tube: Align the top edge of the spirit level with the centerline of the top of the head tube.
- Find Bottom Bracket Intersection: Adjust the level until the plumb line intersects with the center of the bottom bracket spindle.
- Measure Reach: Measure the horizontal distance from the top of the plumb line to the head tube. This is your reach measurement.
Measuring Stack:
- Maintain Setup: Keep the spirit level and plumb line in the same position used for measuring reach.
- Measure Stack: Measure the vertical distance along the plumb line from the spirit level down to the center of the bottom bracket. This is your stack measurement.
Alternatively, to measure stack, you can measure the vertical distance from the ground to the top of your head tube and then subtract the height of your bottom bracket from the ground. Measuring reach and stack can be a bit tricky, especially with the plumb line method, so having a second person to assist can be helpful. Repeating the measurements ensures consistency and accuracy.
Step-by-Step Guide: How to Measure Wheelbase
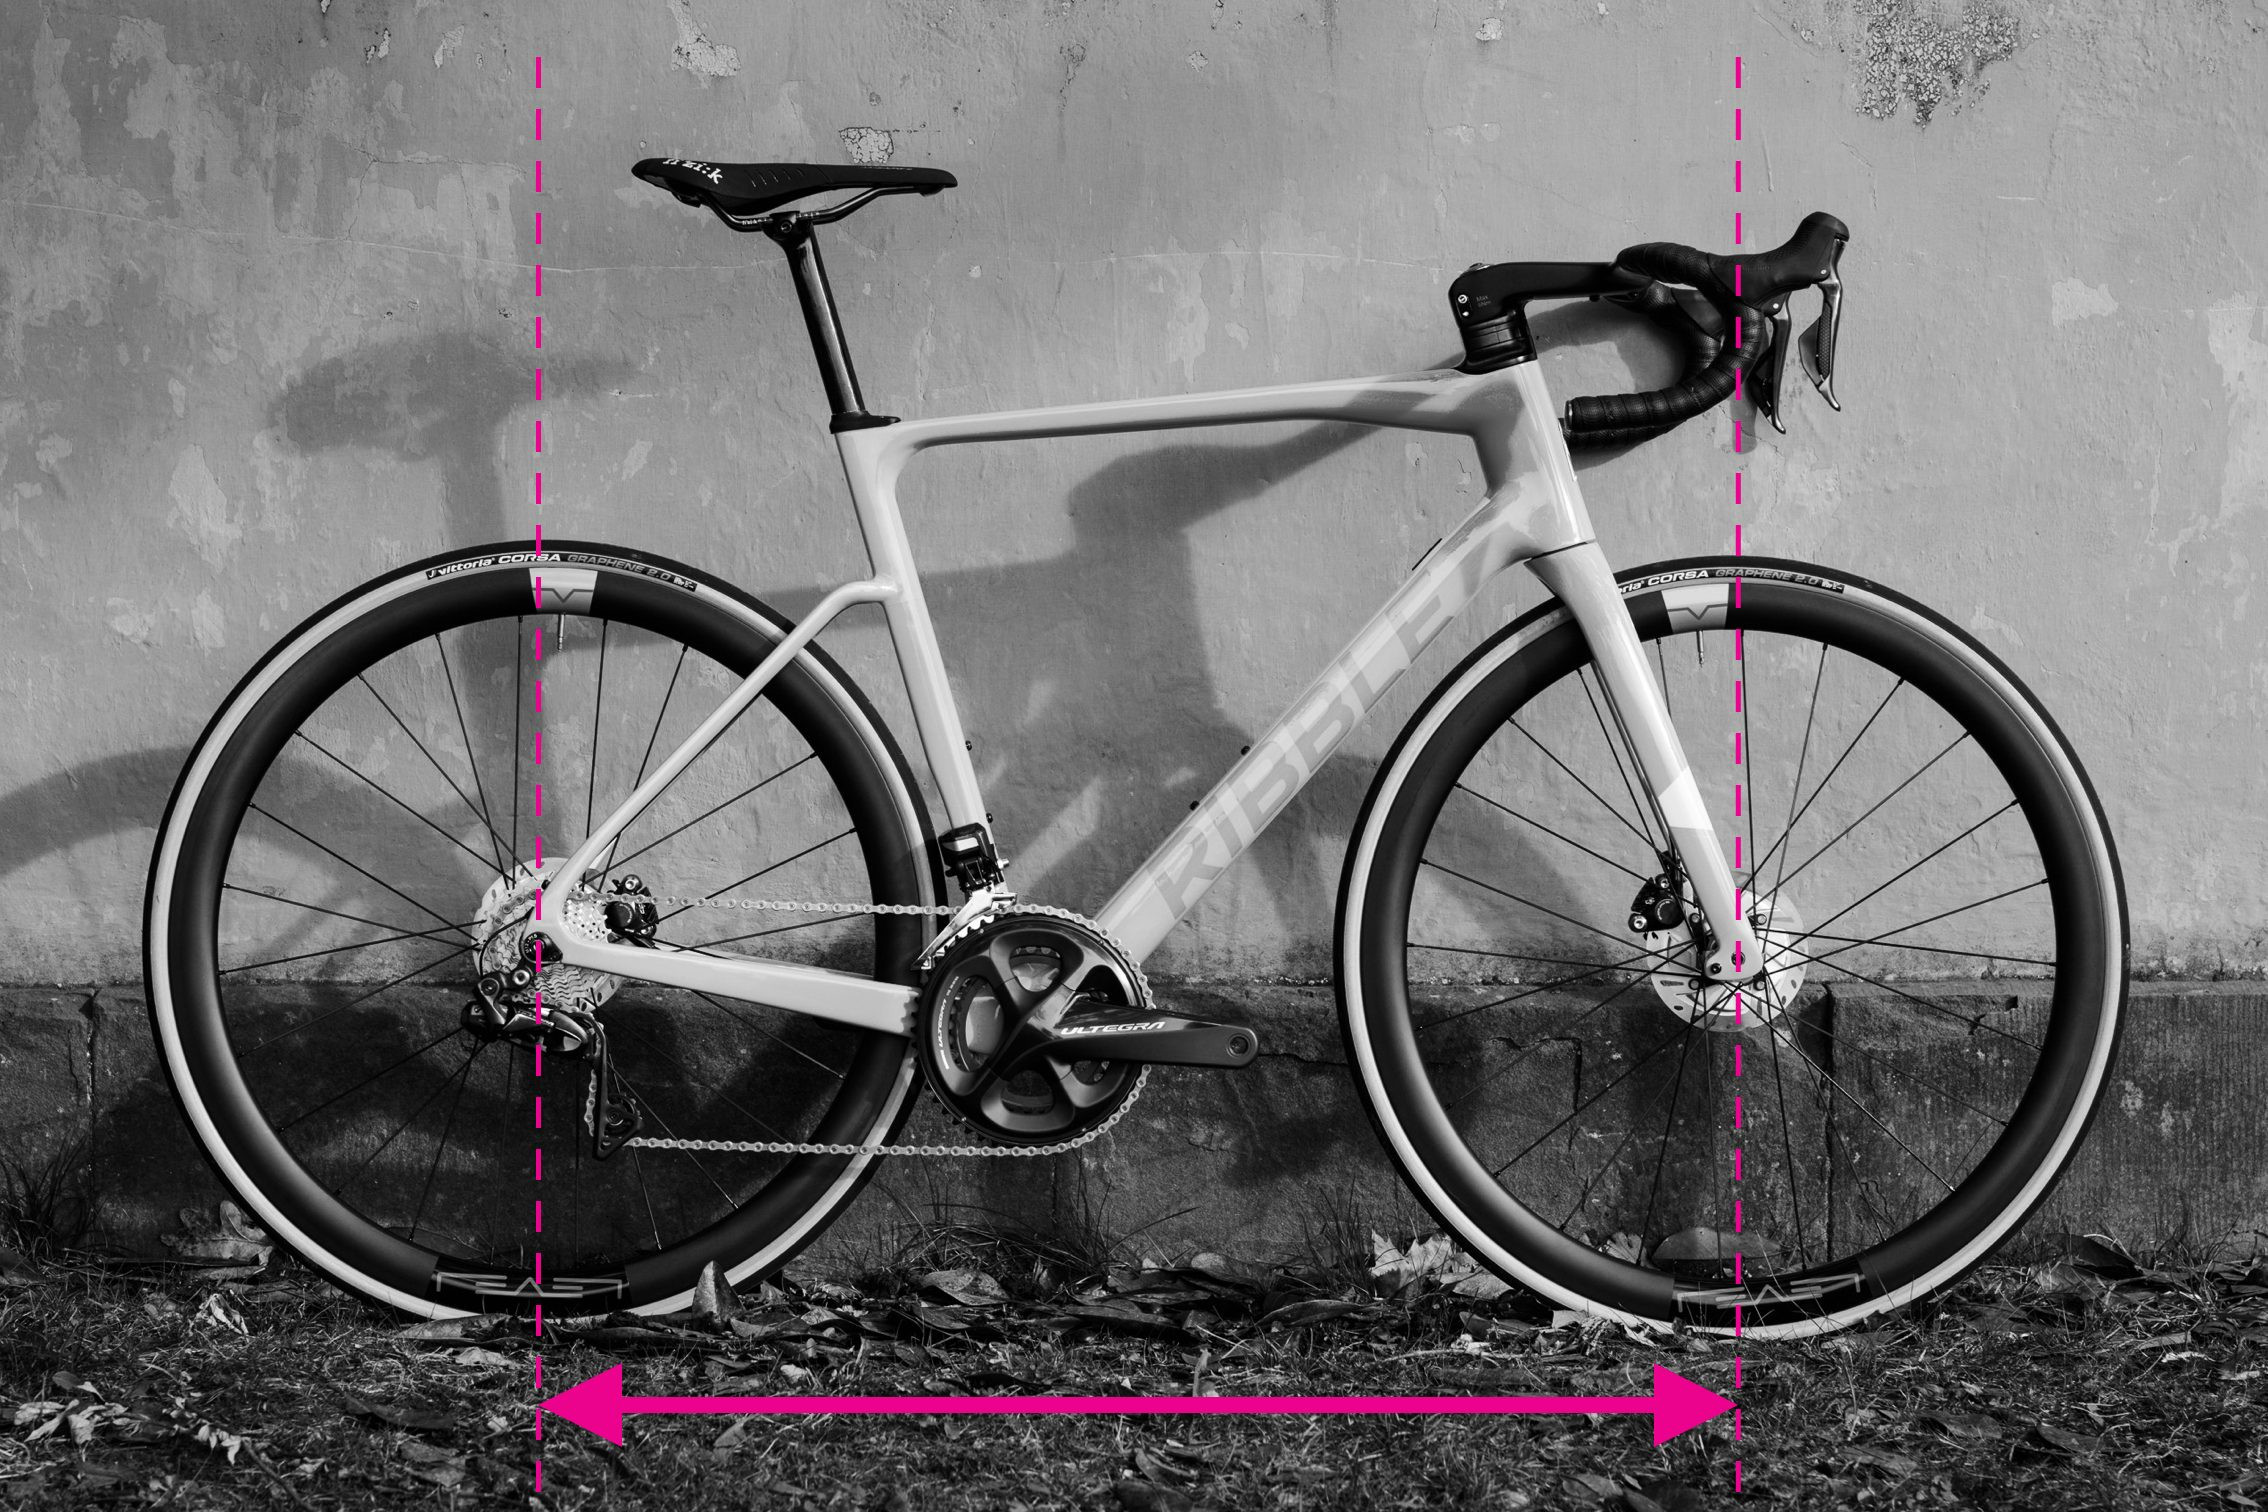 Wheelbase measurement demonstrated on a bike frame
Wheelbase, the distance between the front and rear axles, significantly influences a bike’s ride quality and varies with frame size. It contributes to the overall stability and handling characteristics of the bike.
Measuring wheelbase is relatively simple:
- Straighten the Fork: Ensure the bike’s fork is pointing straight ahead. An incorrect fork alignment will lead to inaccurate measurements.
- Measure Axle-to-Axle Distance: Use your tape measure to measure the distance from the center of the front axle to the center of the rear axle. This is your wheelbase measurement.
For increased accuracy, measure the wheelbase on both sides of the bike and calculate the average. This helps compensate for any slight misalignment of the fork.
Step-by-Step Guide: How to Measure Chainstay Length
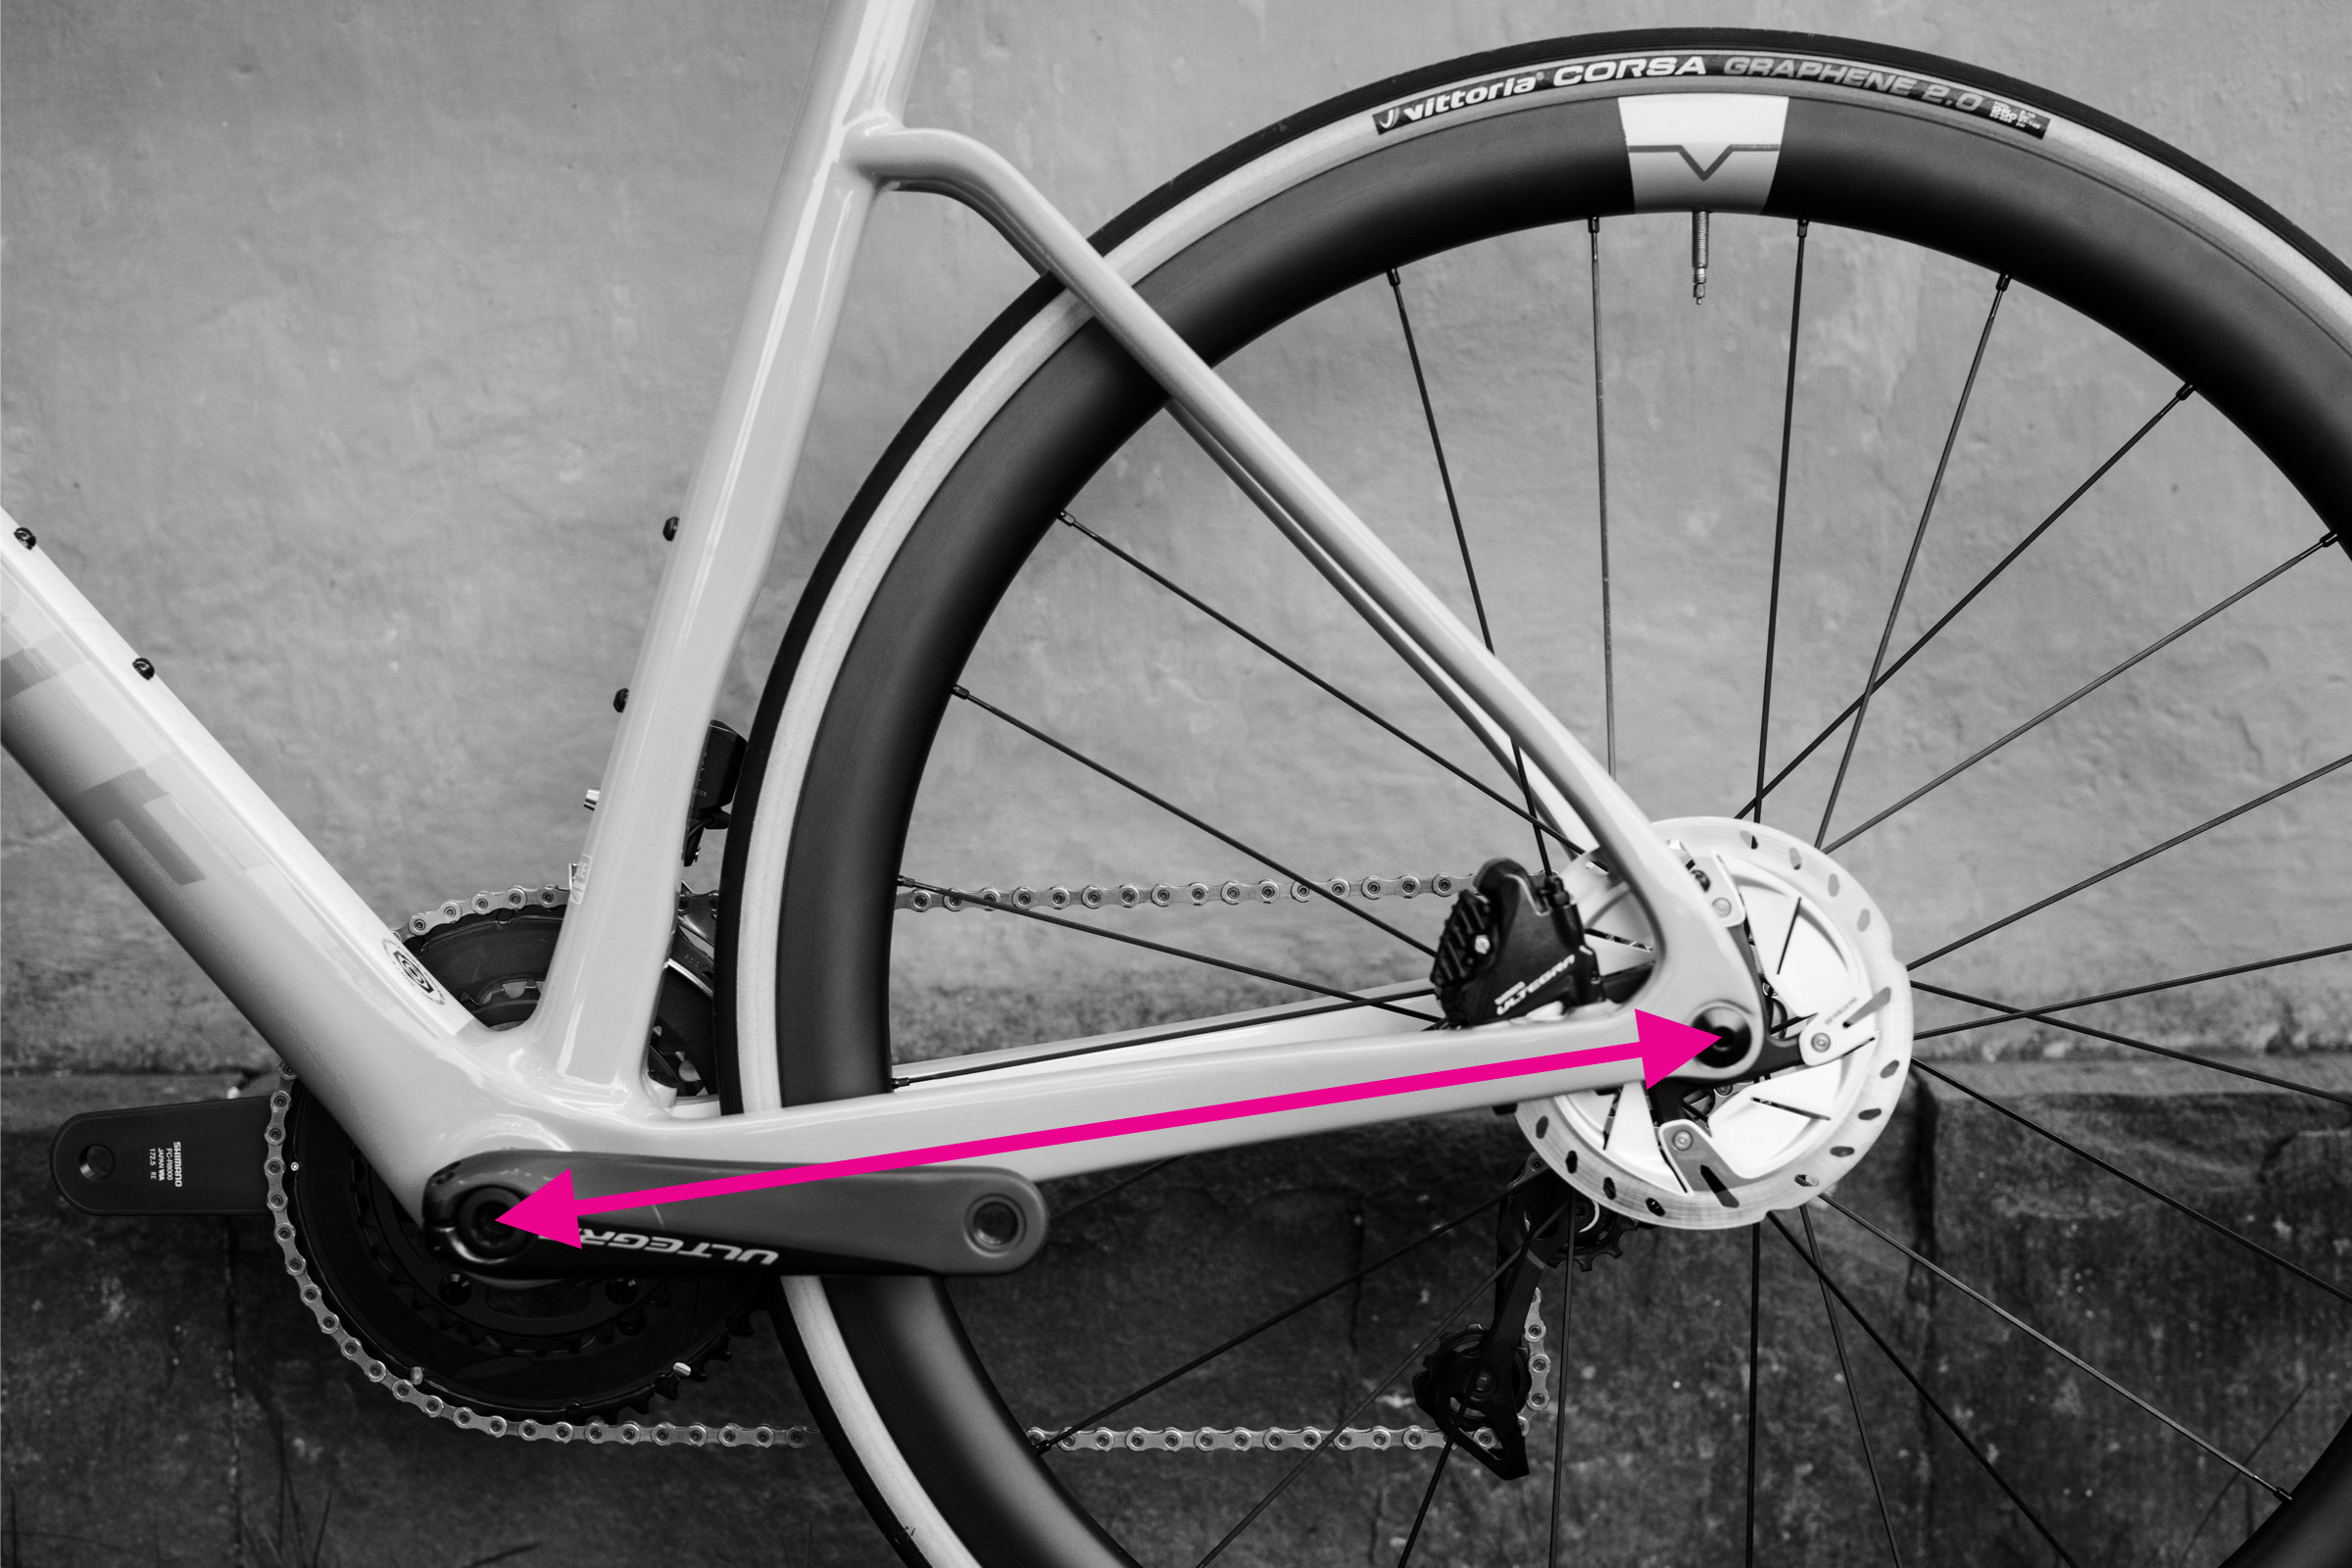 Chainstay length measurement demonstrated on a bike frame
Chainstay length is a component of the wheelbase and plays a crucial role in a bike’s handling. Shorter chainstays often result in a bike that feels more responsive and nimble, while longer chainstays can offer more stability.
To measure chainstay length:
- Locate Measurement Points: Identify the center of the bottom bracket axle and the center of the rear dropout.
- Measure Straight Distance: Use your tape measure to measure the straight-line distance between these two points. This is your chainstay length.
Step-by-Step Guide: How to Measure Front Center
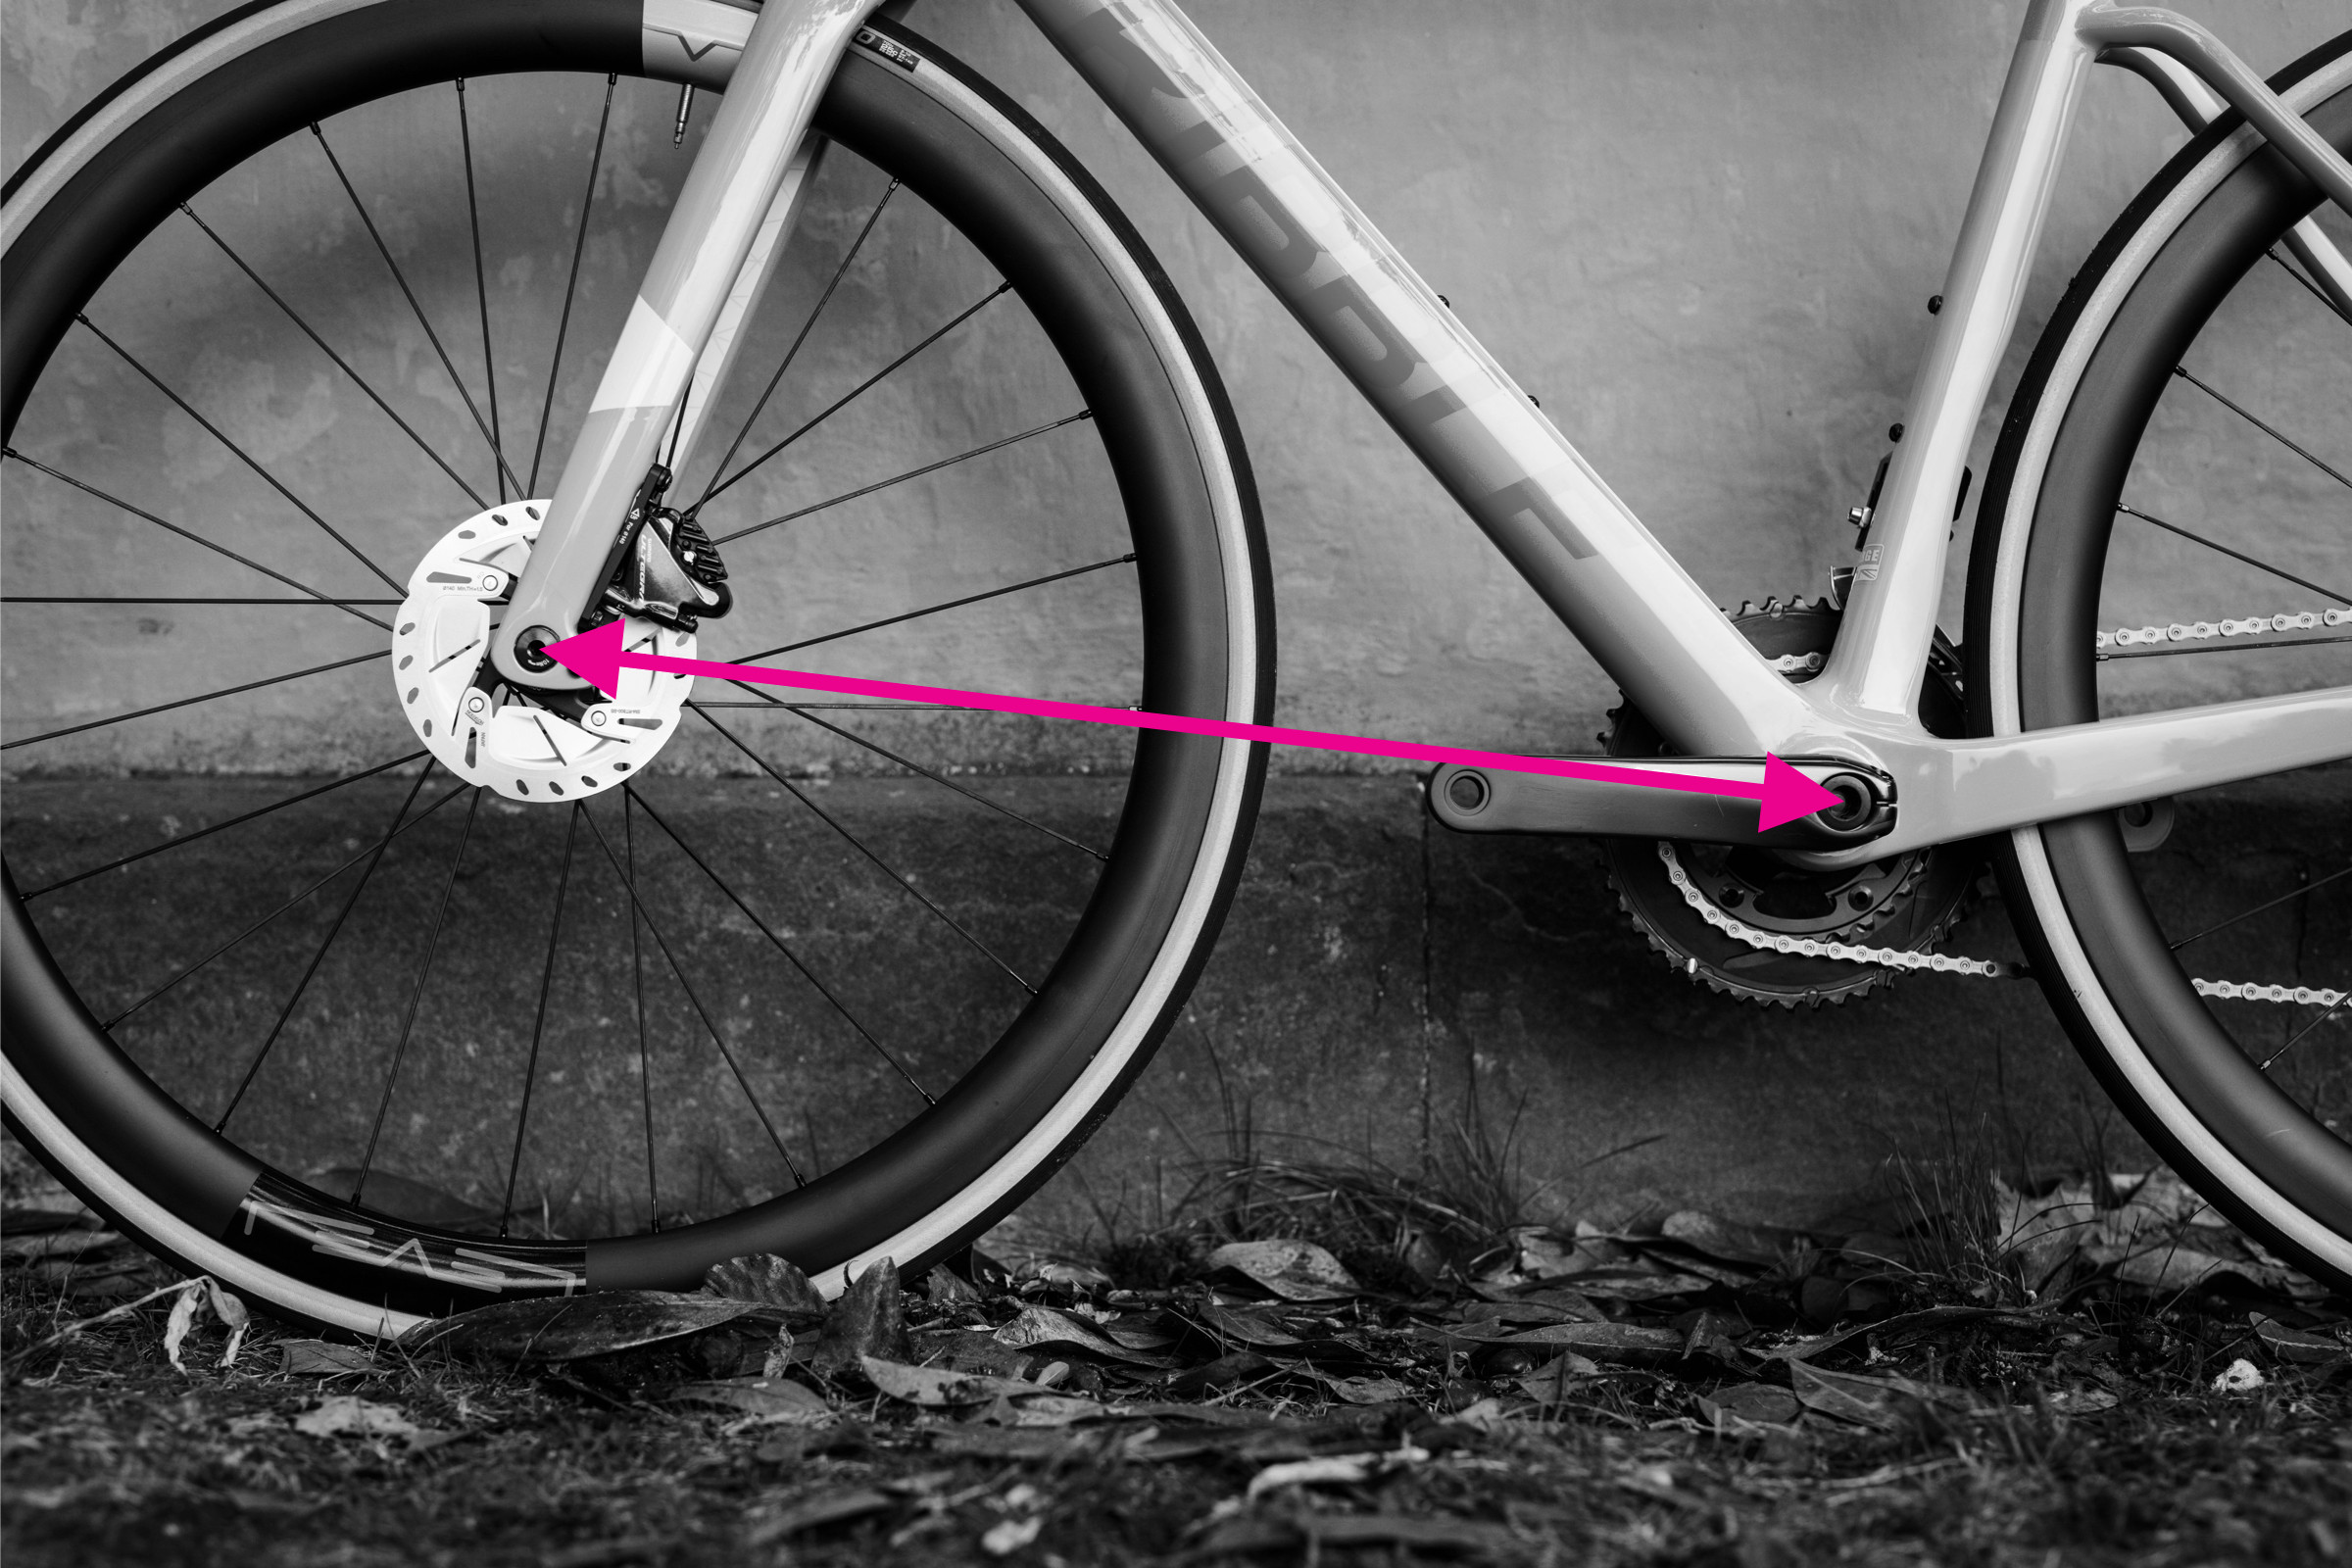 Front centre measurement demonstrated on a bike frame
Front center is the other component of the wheelbase, analogous to chainstay length but measured to the front dropout. It influences handling and also affects toe overlap—the potential for your foot to hit the front wheel during tight turns.
Although less frequently listed by manufacturers compared to other measurements, front center is still a relevant aspect of bike geometry.
- Locate Measurement Points: Identify the center of the bottom bracket axle and the center of the front dropout.
- Measure Straight Distance: Use your tape measure to measure the straight-line distance between these points. This is your front center measurement.
It’s important to remember that the wheelbase is not simply the sum of chainstay length and front center because these measurements are not taken horizontally. They contribute to the wheelbase in a more complex geometric relationship.
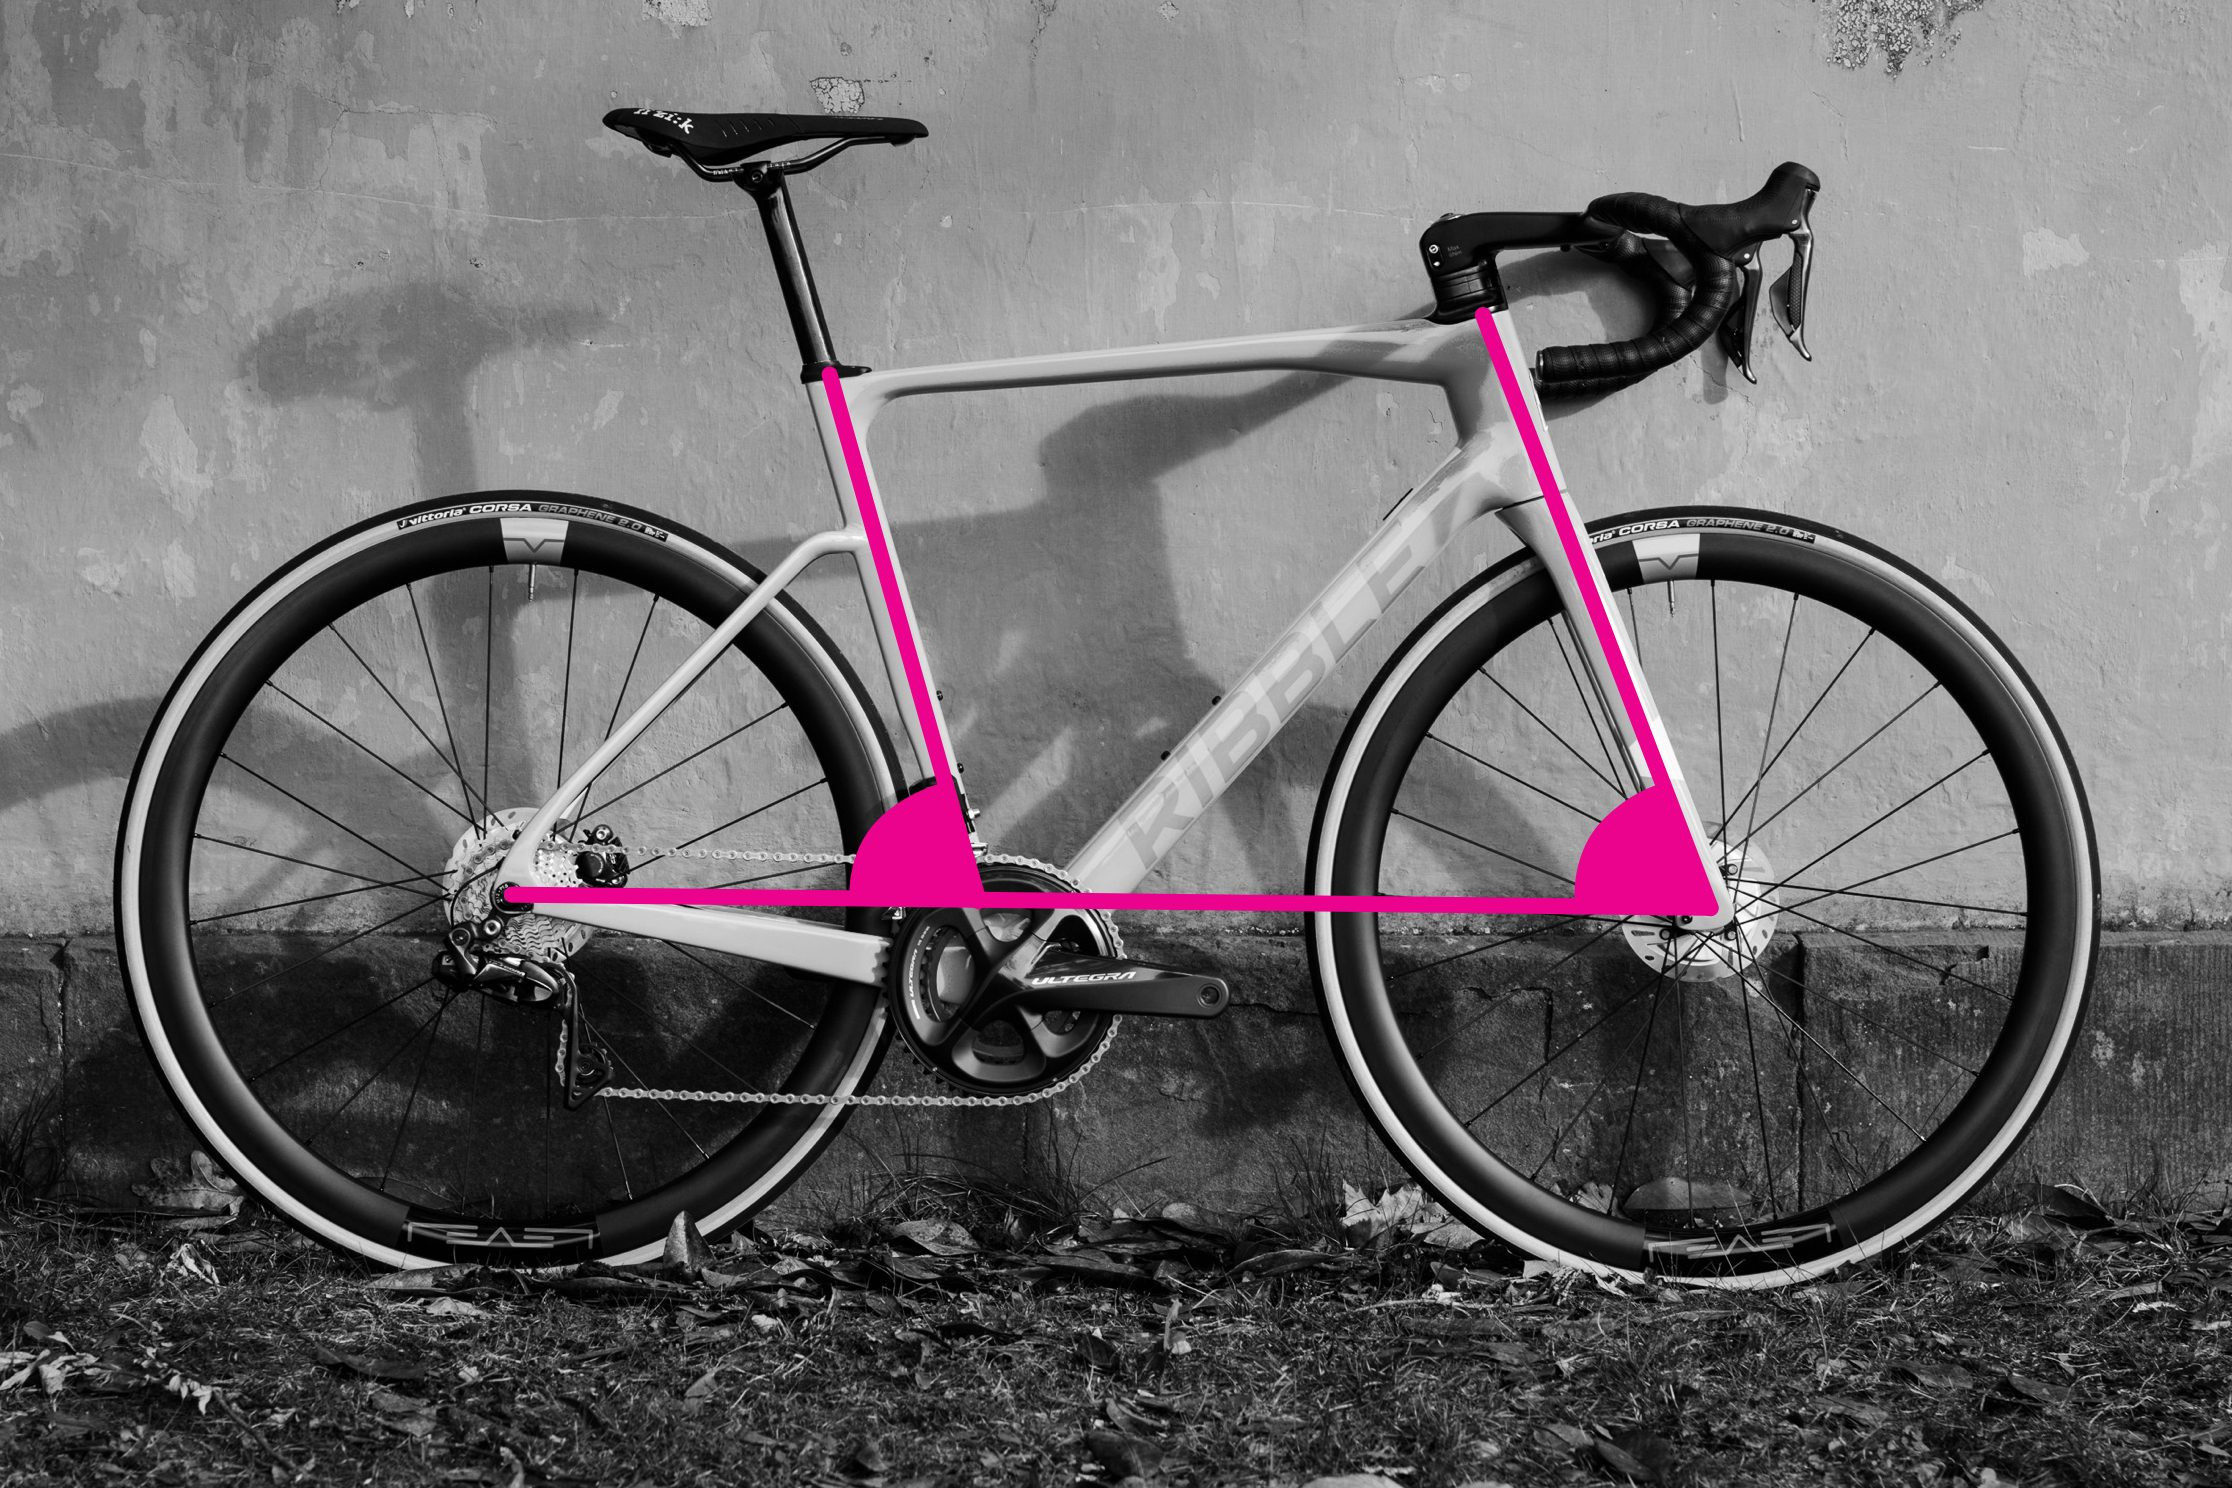
Step-by-Step Guide: How to Measure Seat Tube and Head Tube Angles
 Seat and head tube measurements demonstrated on a bike frame
Seat tube and head tube angles are critical determinants of a bike’s handling characteristics. Steeper angles generally lead to quicker, more nimble handling, while slacker angles provide more stability, especially at higher speeds. Your clinometer app is essential for these measurements.
Measuring Seat Tube Angle:
- Vertical Bike Position: Ensure the bike is vertical and on a level horizontal surface for an accurate reading.
- Align Clinometer: Place your smartphone with the clinometer app against the seat tube. If the seat tube is straight, align the phone directly against it.
- Account for Kinks: If there’s a kink in the seat tube, use a straight edge to create a line from the bottom bracket shell to the top of the seat tube. Align your phone with this straight edge.
- Read Angle: Read the angle from your clinometer app. This is your seat tube angle.
Measuring Head Tube Angle:
- Vertical Bike Position: Again, the bike must be vertical.
- Tapered Head Tubes: Modern bikes often have tapered head tubes. The angle of the front of the head tube may differ from the angle of its centerline.
- Align with Centerline or Straight Edge: To approximate the centerline angle, try to align your phone with the visual center of the head tube or use a straight edge aligned with the centers of the top and bottom of the head tube and place your phone against it.
- Straight Fork Legs (Alternative Method): If your bike has straight fork legs without an angle at the crown, the angle of the fork legs will be the same as the head tube angle. You can measure the angle of the fork legs instead.
- Steerer Extension (Alternative Method): You can also measure the head tube angle by aligning the clinometer with the steerer extension above the head tube.
- Read Angle: Read the angle from the clinometer app. This is your head tube angle.
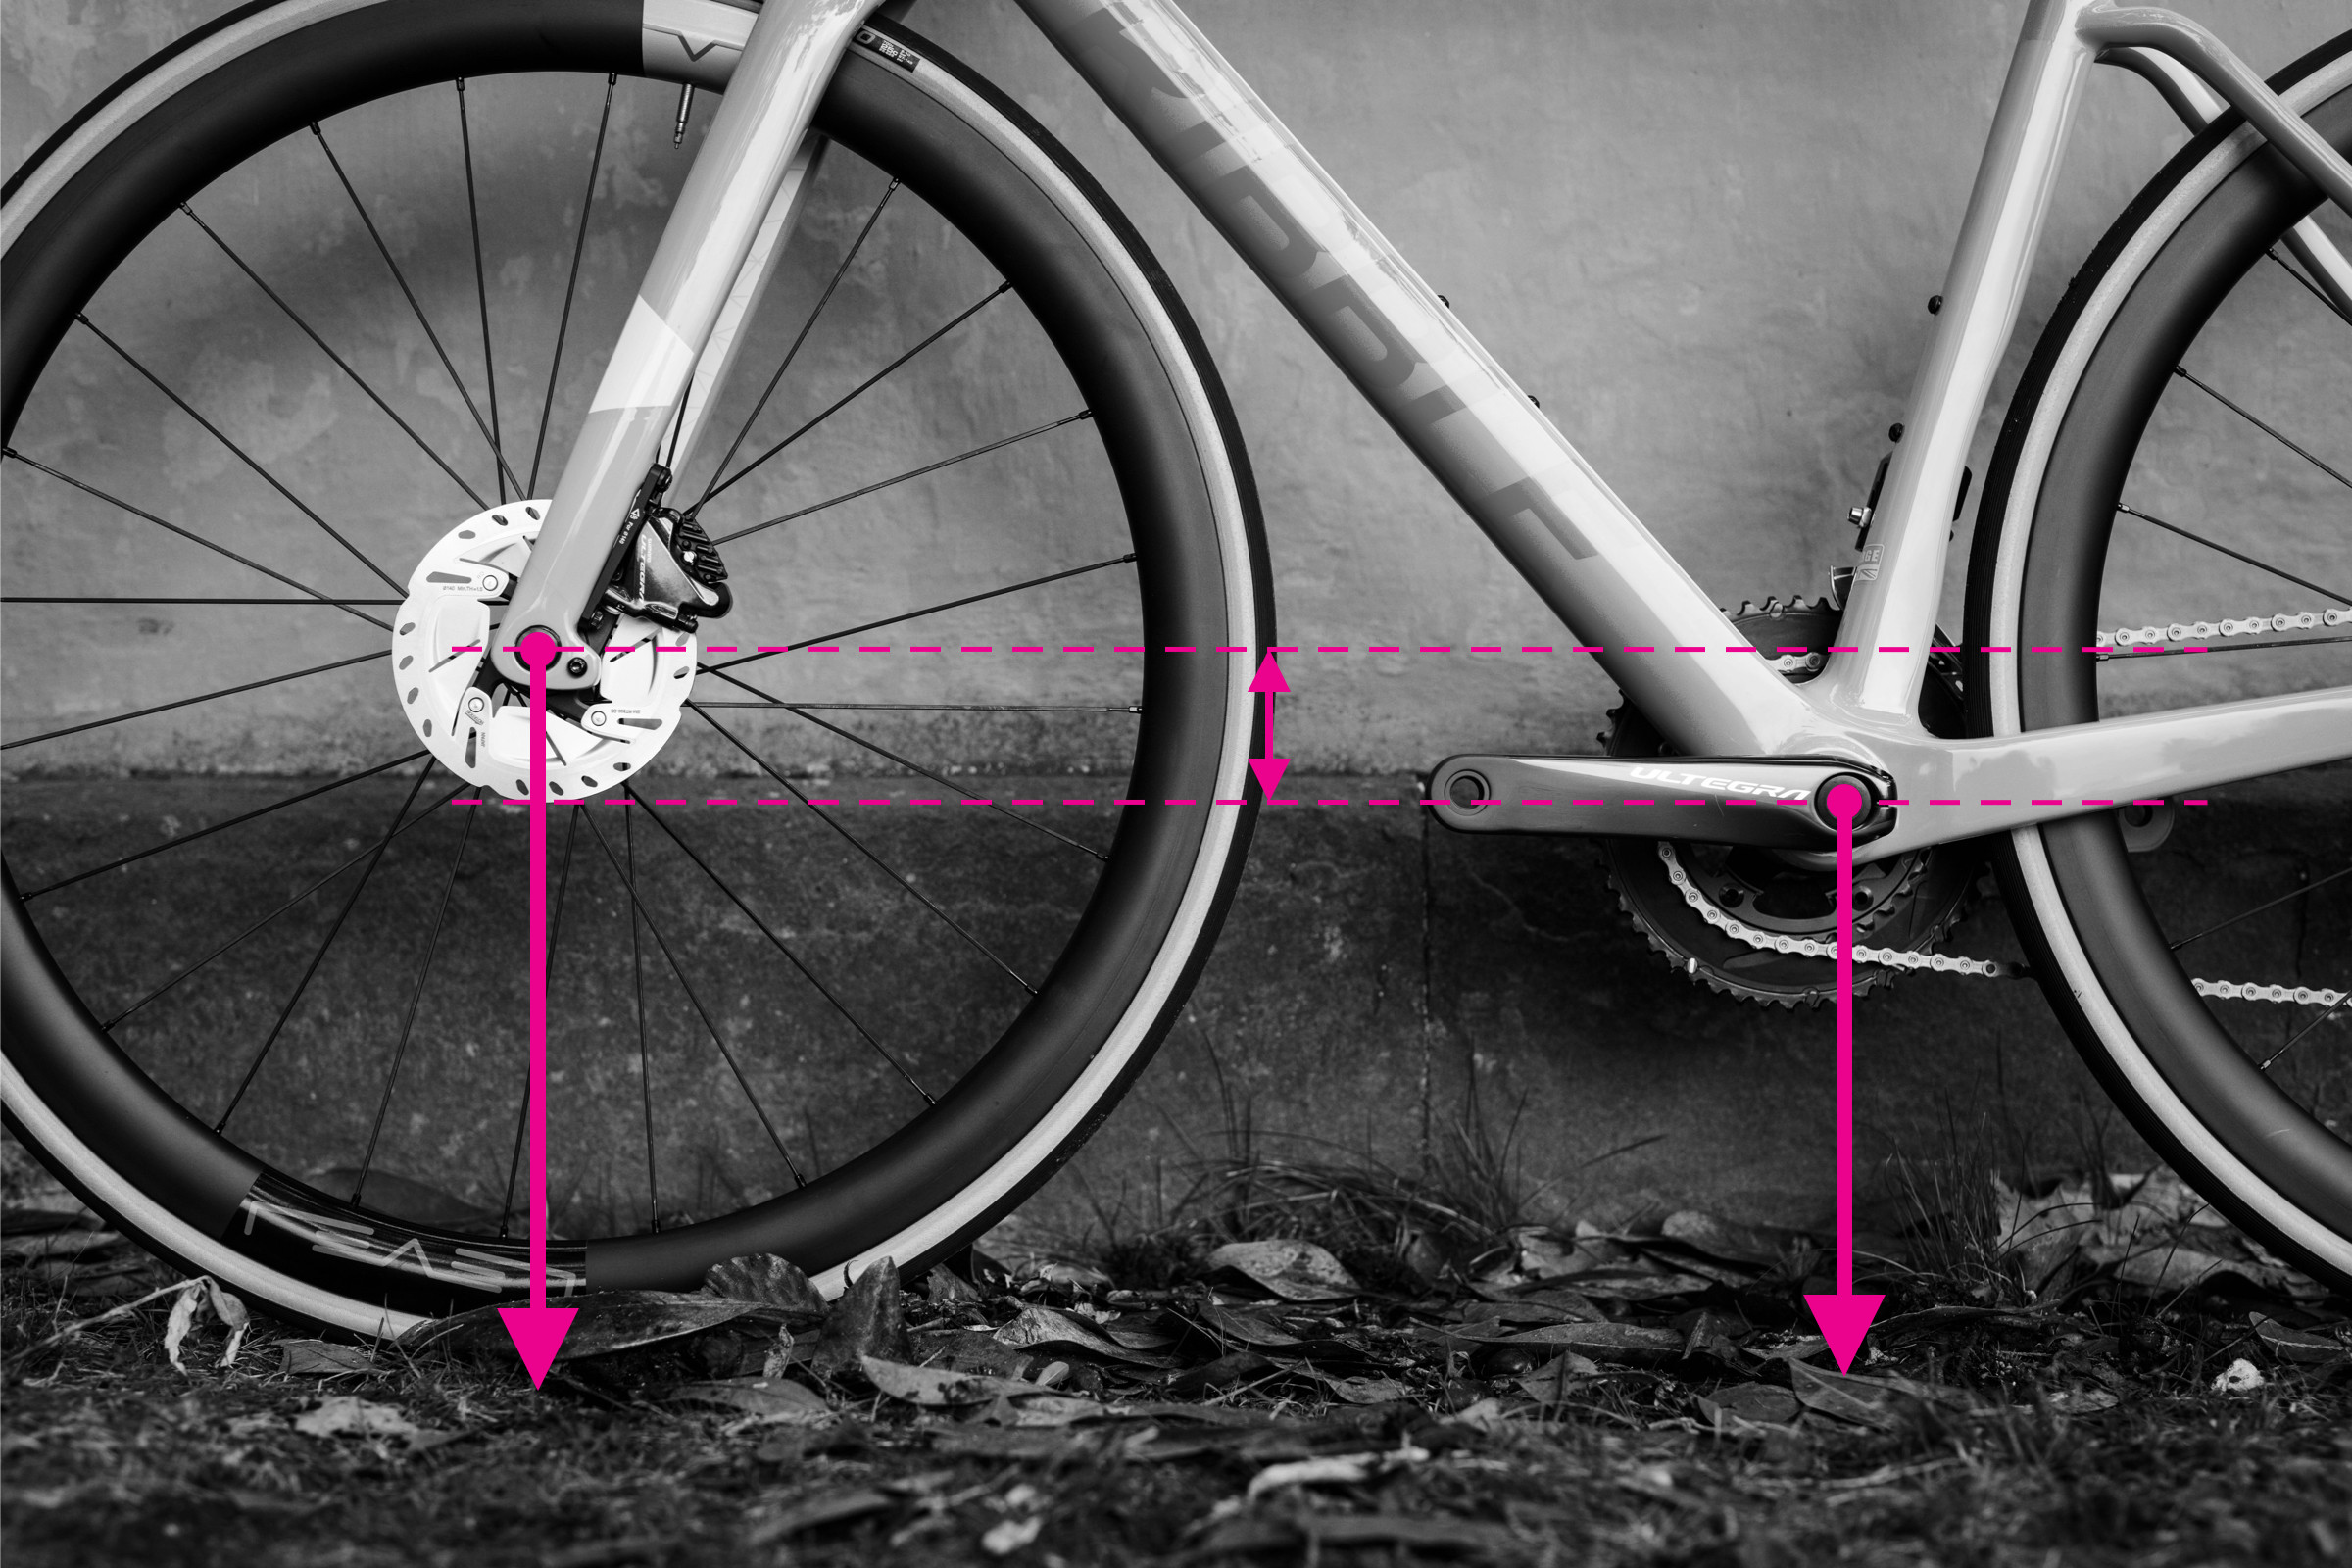
Step-by-Step Guide: How to Measure Bottom Bracket Drop
 BB drop measurement demonstrated on a bike frame
Bottom bracket drop is the vertical distance between the wheel axles and the center of the crank axle. It’s a key measurement in bike geometry charts and influences stability and handling.
To measure bottom bracket drop:
- Measure Rear Axle Height: Measure the vertical distance from the ground to the center of the rear axle.
- Measure Bottom Bracket Height: Measure the vertical distance from the ground to the center of the bottom bracket.
- Calculate Drop: Subtract the rear axle height from the bottom bracket height. The result is your bottom bracket drop.
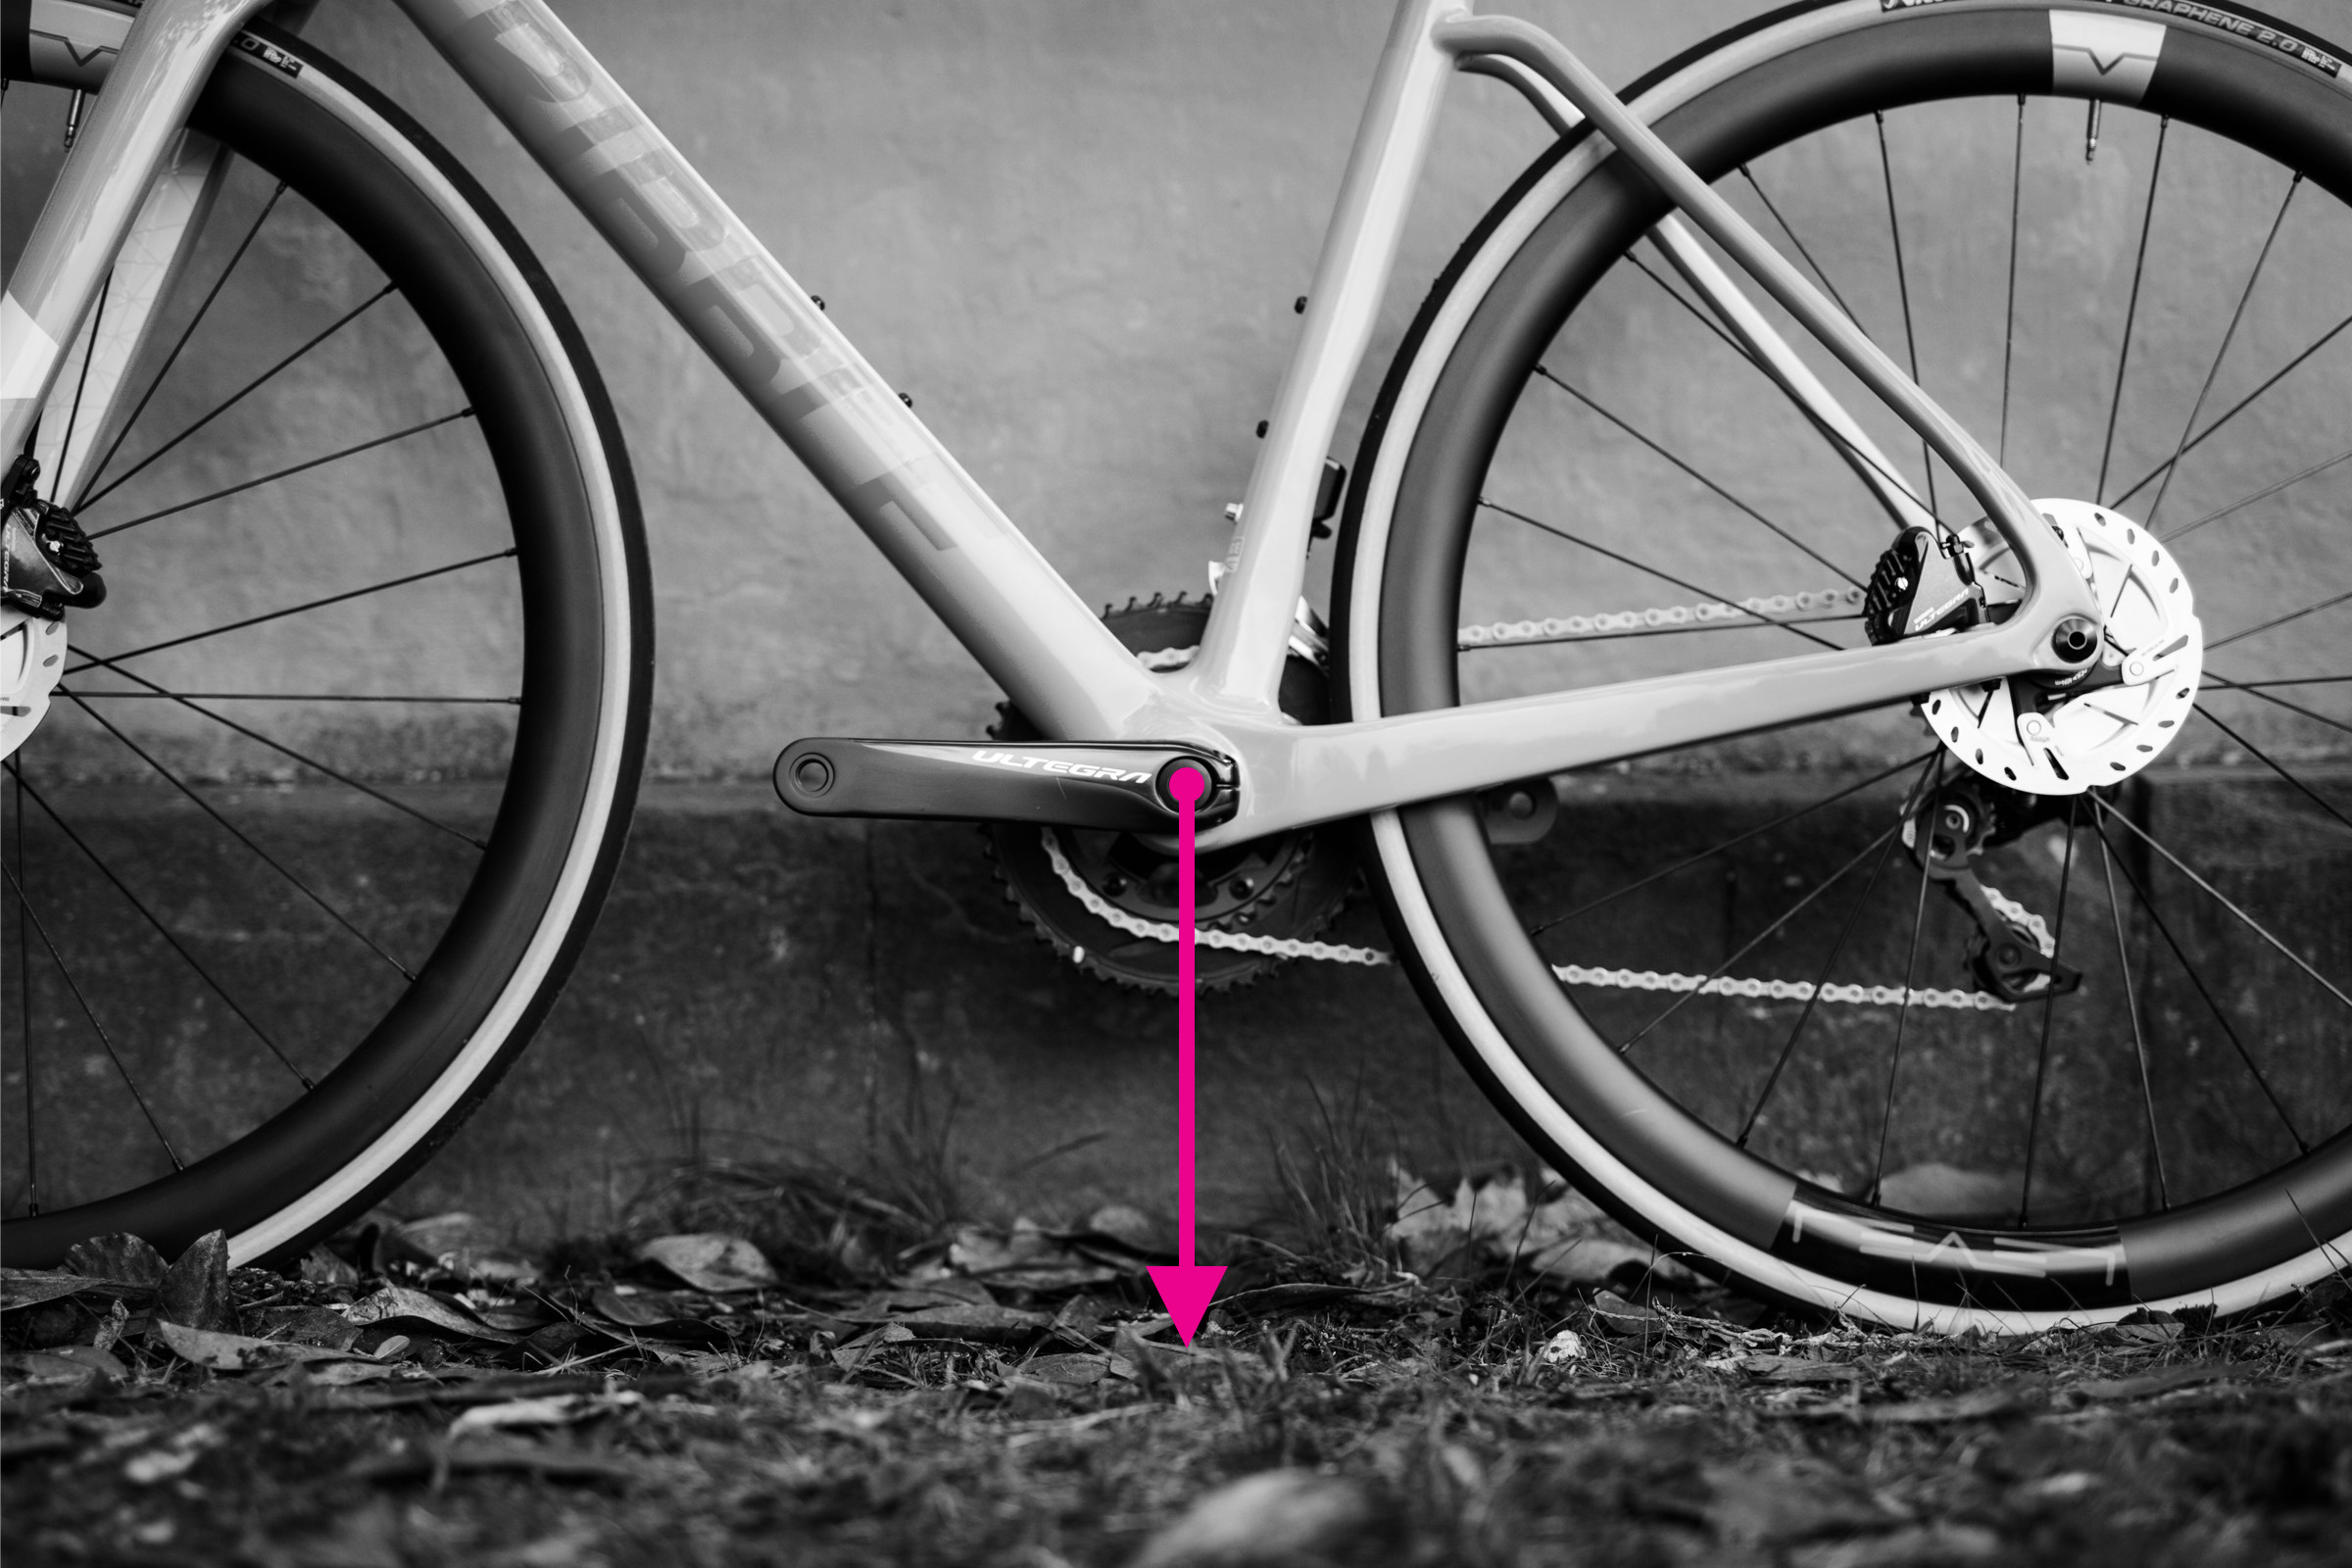
Step-by-Step Guide: How to Measure Bottom Bracket Height
 Bottom bracket height measurement demonstrated on bike frame
Bottom bracket height is simply the distance from the ground to the center of the bottom bracket shell. It affects ground clearance and, to a lesser extent, stability.
To measure bottom bracket height:
- Vertical Bike Position: Ensure the bike is standing straight upright.
- Measure Ground to Bottom Bracket: Measure the vertical distance from the ground to the center of the bottom bracket shell. This is your bottom bracket height.
Remember that bottom bracket height can be slightly affected by tire inflation. For the most accurate measurement, inflate your tires to your typical riding pressure.
By understanding how to measure the size of a bike and its key geometry measurements, you are now equipped to make informed decisions when purchasing a new or used bike, whether it’s a road bike, mountain bike, commuting bike, or gravel bike. Keep your measurements recorded for future reference, streamlining your bike selection process and ensuring a comfortable and efficient ride.