
Are you experiencing discomfort in your shoulders, neck, or back while riding your bike? A common culprit for these aches and pains is often an improperly fitted bicycle, particularly the handlebar height. Many cyclists, especially those new to cycling or assembling bikes purchased online, find themselves wondering, “Is it possible to raise my handlebars?” The answer is yes, and this adjustment can significantly enhance your riding comfort.
Poorly fitted bikes are a growing issue, especially with the rise of “bike-in-a-box” purchases and bikes from large retailers where assembly and fitting may be overlooked. Beyond handlebar height, issues like seat position and stem length can contribute to discomfort. Even improperly installed components, like forks installed backward leading to brake malfunctions, are not uncommon.
It’s crucial to understand that numerous factors influence rider comfort. These include seat height, fore and aft position, seat angle, top tube length, stem type and length, and even suspension style. Your body weight is distributed across your feet, seat, and hands during cycling. Adjusting handlebar height will redistribute this weight, potentially requiring different muscle groups to engage.
When considering raising your handlebars, there are a couple of key points to keep in mind. Firstly, raising handlebars can increase pressure on your seat. This is why comfort bikes designed for leisurely rides often feature heavily padded seats. Conversely, lower handlebars can put more strain on your hands, shoulders, and neck.
Younger riders often adapt to lower handlebars by using their back muscles to support their upper body, minimizing hand pressure. A more angled or curved back position, common with lower handlebars, can be aerodynamic and suitable for flexible, strong young adults. However, this posture can be problematic for older adults with less back strength and flexibility, potentially stressing spinal discs.
Secondly, raising handlebars might necessitate replacing brake and gear cables with longer ones. This can add complexity and cost to the adjustment. Each bike is unique, and it’s essential to assess whether handlebar height can be increased without extensive cable replacement. A small adjustment might be possible without cable changes, but significant raises often require longer cables.
Finding the ideal bike position is a balancing act to distribute weight appropriately across your feet, seat, and hands. Ideally, your hands should bear minimal weight, primarily serving to steer the bike. Achieving this optimal position often involves some trial and error. While younger, more flexible riders may find it easier to adapt to slight misadjustments, proper handlebar and seat positioning is crucial for comfort and endurance, especially for longer rides and older cyclists.
The Expert Solution: Professional Bike Fitting
For the most personalized and effective solution, consulting a professional bike fitter is highly recommended. Local bike shops often have trained staff who can assess your riding style and body mechanics to provide tailored bike fit recommendations. They possess the expertise and parts to make precise adjustments to your bike. While professional fitting is the gold standard, many cyclists prefer to explore handlebar adjustments themselves.
Before attempting DIY handlebar adjustments, it’s important to acknowledge that a properly fitting bike involves a complex interplay of factors. Therefore, while this guide focuses on raising handlebars on threadless headsets, it’s part of a broader picture of bike fit. The answer to “Can I raise my handlebars?” is always yes, but the effort and expense vary. A minor adjustment, like half an inch, is typically straightforward. However, achieving significant relief from discomfort might require raising them by an inch or two.
This article will specifically focus on raising handlebars on bikes equipped with threadless headsets. Threaded headsets, while still present on some bikes, are more common on older models and will be addressed in a separate discussion.
Understanding Threadless Headsets
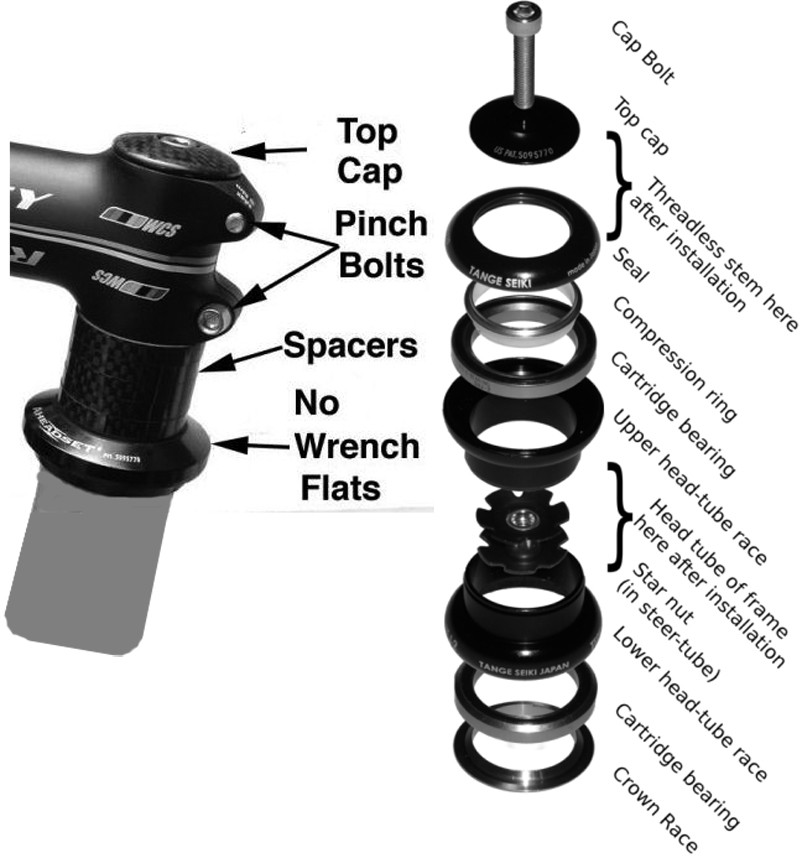
Most modern bikes utilize either threaded or threadless headsets. While both types involve threads, their operational mechanisms differ. The headset is the assembly that allows your bike’s front wheel and fork to rotate for steering (Figure 1). It comprises upper and lower bearings for smooth rotation within the head tube. A threadless headset features an internal “star nut” pressed into the steerer tube, which is part of the front fork and passes through the bike’s head tube. The head badge is usually located on the steerer tube.
 Threadless Headset Diagram and Bicycle Stem
Figure 1. Exploded View of a Threadless Bicycle Stem and Headset Components. (Photo: Public Domain from the Internet)
The “star nut,” named for its star-like appearance, is internally threaded. A top cap bolt is screwed into this star nut from the top of the steerer tube. Tightening this bolt pulls the steerer tube upwards, pressing the headset bearings against the bearing races at the top and bottom of the head tube (Figure 2).
This system is advantageous because it allows for easy headset adjustment. By adjusting the top cap bolt, you can tighten or loosen the bearing pressure. Proper tightness is crucial; overtightening can bind the bearings, making steering stiff, while under-tightening can cause a clunking sound when the front wheel is lifted and dropped. The goal is to achieve a balanced bearing pressure – neither too tight nor too loose.
 Threadless Bicycle Stem Functionality
Figure 2. Diagram Illustrating the Clamping Force of a Threadless Stem on the Steerer Tube. (Photo: Courtesy of Newman and McKeegan, 2017)
Another benefit of threadless headsets is the direct stem-to-steerer tube connection. The handlebars clamp directly to the stem, which then clamps to the steerer tube. This simplifies handlebar and stem changes. You can replace the stem or handlebars without disassembling the headset or detaching brake and derailleur levers from the handlebars.
 Bike Stem Connecting Handlebars to Steerer Tube
Figure 3. The Stem as the Key Interface Between Handlebars and the Bike’s Steerer Tube. (Photo: © Doug Barnes 2023)
However, a primary disadvantage of threadless headsets is that adjusting handlebar height is more involved than with older threaded systems. Threadless headsets often use spacers to allow for minor height adjustments. Spacers can be repositioned above or below the stem within a limited range (Figure 3). However, this adjustment is often minimal and may not be sufficient for riders needing significant handlebar height changes.
Methods to Elevate Handlebars on Threadless Headsets
Raising handlebars on threadless headsets can be achieved through several methods, offering varying degrees of height increase. We’ll explore these methods, progressing from the least to most impactful height adjustments (Forgrave 2015). While threadless headsets simplify fork removal, they paradoxically complicate handlebar height adjustments.
1. Repositioning Stem Spacers
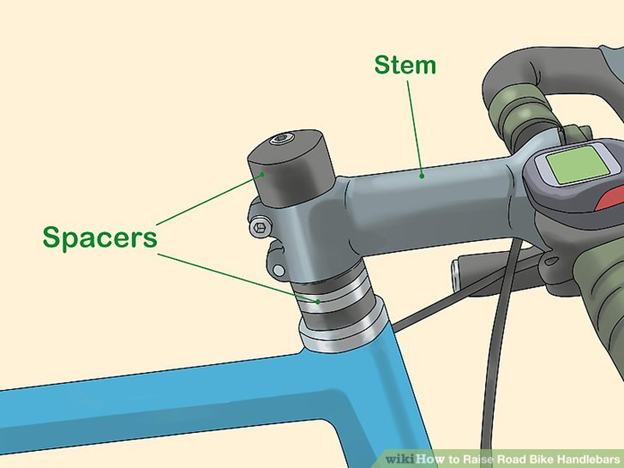
The simplest method, already briefly mentioned, involves relocating stem spacers. If all spacers are positioned above the stem, you can raise the handlebars slightly by moving them below the stem. This procedure is relatively straightforward. Loosen and remove the stem bolts, slide the stem off the steerer tube, reposition the spacers below the stem, and then re-install and tighten the stem. The limited adjustability of threadless headsets, achieved by drawing the steerer tube upwards, means spacer adjustments offer only minor height changes.
 Bike Stem Spacers on Steerer Tube
Figure 4. Stem Spacers Used for Minor Handlebar Height Adjustments on a Threadless Headset. (Photo: © WikiHow 2022)
2. Flipping the Stem Orientation
This method is applicable if your current stem is angled, either upwards or downwards. It’s similar to spacer repositioning but involves reversing the stem’s direction. Instead of just moving spacers, you remove the stem and flip it 180 degrees before reinstalling.
The process involves first detaching the handlebars from the stem, then removing the stem from the steerer tube. Flip the stem upside down, reattach it to the steerer tube, and finally, re-secure the handlebars to the stem.
If the stem was originally angled downwards, flipping it upwards will raise the handlebars. Conversely, if it was already angled upwards, flipping it down will lower them. The degree of height change depends on the stem angle. A stem with a slight angle will yield a minimal difference, while a stem with a steeper angle will result in a more noticeable handlebar height alteration.
 Reversing Bike Stem Orientation
Figure 5. Illustrating Handlebar Height Change by Flipping an Angled Stem. (Photo: Product Image Modified by Doug Barnes 2023)
3. Replacing the Handlebars
Changing handlebars can also raise your hand position relative to the seat. Handlebars with a significant upward sweep, like those found on comfort or cruiser bikes, can dramatically alter riding posture.
However, handlebar replacement is a more complex undertaking. Different handlebar styles often require specific brake and shifter types. For bikes with multiple gears, shifter compatibility is a key consideration. Replacing handlebars might necessitate new brake levers and shifters, as well as potentially longer brake and shifter cables.
While not the most straightforward method for simply raising handlebars, it can be a desirable solution if you’re looking to switch from drop handlebars, which often promote a more crouched riding position, to a more upright style.
 Comfort Bike Handlebars with Upward Sweep
Figure 6. Moustache Style Handlebars Commonly Found on Upright Comfort Bicycles. (Photo: Public Domain Image)
4. Installing a Stem Extender
For a significant handlebar height increase, a stem extender is often the most effective solution for threadless headsets. Stem extenders can typically raise handlebars by 1 to 2 inches. Installation is relatively simple once you understand threadless headset mechanics. Some stem extender models (Figure 7) offer adjustable height within a range, simply by loosening stem bolts. This adjustability is beneficial if cable length is a concern. Stem extenders also eliminate the need to replace handlebars, as they integrate with your existing stem setup.
 Bike Stem Extender for Handlebar Height Adjustment
Figure 7. A Typical Stem Extender Designed to Increase Handlebar Height. (Photo: Doug Barnes & Delta Product Image)
5. Replacing the Stem with an Adjustable Stem
Adjustable stems offer another way to modify handlebar height. These stems replace your fixed stem and allow you to adjust the handlebar angle by up to 70 degrees. This adjustability provides two key benefits: raising handlebars by approximately an inch and shortening stem reach, reducing the rider’s forward lean compared to a fixed stem (Figure 8).
 Adjustable Bike Stem for Height and Reach
Figure 8. An Adjustable Stem Allowing for Both Handlebar Height and Reach Customization. (Photo: Product Image Modified by Doug Barnes)
Choosing the Right Method
For personal preference and ease of use, stem extenders stand out as a top choice. They are relatively simple to install and, if your existing cables are sufficiently long, require minimal component changes beyond the stem cap. Stem extenders also provide a significant range of handlebar height adjustment. Models like the Delta extender offer fine-tuning; you can adjust height by simply loosening stem bolts, sliding the stem to the desired height, and retightening.
Adjustable stems are a close second favorite. While requiring stem replacement, they offer easier on-the-fly adjustments compared to stem extenders. Adjusting height is as simple as loosening pivot bolts and repositioning the handlebars.
Replacing a fixed stem with one of a different length or angle is also a viable option, but it lacks flexibility. If further adjustments are needed after stem replacement, you’ll need to purchase another stem with different dimensions, potentially becoming costly if you don’t find the perfect fit initially. The same limitation applies to handlebar replacement.
Repositioning spacers is the least impactful method, often yielding only a fraction of an inch of height change. While potentially useful for fine-tuning a racing bike setup, it’s unlikely to provide significant relief for riders seeking substantial comfort improvements.
Handlebar Height vs. Reach: What to Adjust?
While inaction is the easiest path, addressing bike discomfort is worthwhile. Adjusting handlebar height or reach can significantly improve your riding experience, although it requires time and potentially some expense. It’s important to acknowledge that adjustments may involve some trial and error before achieving the ideal bike fit.
Consulting a bike fitter is often the most effective, albeit potentially more expensive, approach. Bike fitters can observe your riding style and recommend tailored solutions, often having a range of components to optimize your bike fit.
Adjusting handlebars will impact bike handling. Raising handlebars shifts weight distribution, placing more pressure on the seat and less on the handlebars. This can affect balance, particularly with heavy handlebar bags or on technical terrain. However, for general road or path riding, the impact is usually minimal.
As we age and flexibility decreases, raising handlebars for a more upright and comfortable riding posture becomes increasingly beneficial. Cycling should be enjoyable and pain-free, akin to sitting comfortably. Adjusting handlebar height shifts weight from arms to the seat, and finding the right balance is key. Handlebar height and reach are adjustable parameters that can be optimized for increased comfort, allowing for more enjoyable and longer rides in the outdoors.
Ultimately, if cycling causes back pain, shoulder soreness, wrist aches, or hand numbness, it’s time to consider adjusting handlebar height and reach. You can explore DIY methods outlined in this guide, but seeking professional bike fitting advice is often the most effective path to lasting comfort.
References
Note: The leading image of this article is sourced from the Park Tool Website.
- Brown, Sheldon. 2021. “Servicing Bicycle Headsets.” Sheldon Brown Website. Accessed March 2021. https://www.sheldonbrown.com/headsets.html
- Forgrave, Bob. 2019. “Why threadless stems? And five ways to raise your bars.” Flat Bikes Website. https://flatbike.com/threadless-stems-5-ways-raise-bars/
- Huang, James. 2017. “Origins: How the AheadSet threadless headset changed bikes forever – CyclingTips“ Cycling Tips Website. https://cyclingtips.com/2017/02/origins-how-the-aheadset-threadless-headset-changed-bikes-forever/
- Newman, Adam and Eric McKeegan. 2017. “Nuts and Bolts: Wrapping your head around headsets”, Bicycle Times. Illustrated, August 28. https://bicycletimesmag.com/nuts-and-bolts-wrapping-your-head-around-headsets/
- Phender, Benedict, 2020. “The Ultimate Guide to Headsets”. Bicycle Radar Website. Accessed 2023. https://www.bikeradar.com/features/the-ultimate-guide-to-headsets/
- WikiHow. 2022. “3 Ways to Raise Road Bike Handlebars.” WikiHow Website. Accessed 2023. https://www.wikihow.com/Raise-Road-Bike-Handlebars