Removing a bike chain might seem daunting, but with the right tools and a bit of know-how, it’s a straightforward task. At usabikers.net, we provide easy-to-follow guides that empower every biker to handle essential maintenance tasks like this. Whether you’re replacing a worn chain, cleaning it thoroughly, or making repairs, mastering this skill keeps you rolling smoothly.
Dive into our guides for crystal-clear instructions, and explore related topics like chain maintenance tips, gear adjustments, and the latest biker meetups—everything to keep your ride in top shape.
Table of Contents
1. Why Would You Need to Remove a Bike Chain?
- 1.1. Chain Replacement
- 1.2. Deep Cleaning
- 1.3. Repairing a Broken Chain
- 1.4. Upgrading Components
2. Essential Tools for Chain Removal
- 2.1. Chain Breaker Tool
- 2.2. Master Link Pliers
- 2.3. Cleaning Supplies
- 2.4. Work Gloves and Eye Protection
3. Step-by-Step Guide to Removing a Bike Chain with a Chain Breaker
- 3.1. Preparing Your Bike
- 3.2. Locating a Chain Pin
- 3.3. Using the Chain Breaker Tool
- 3.4. Pushing the Pin
- 3.5. Separating the Chain
4. Removing a Bike Chain with a Master Link
- 4.1. Identifying the Master Link
- 4.2. Using Master Link Pliers
- 4.3. Separating the Master Link by Hand
5. Cleaning Your Bike Chain After Removal
- 5.1. Degreasing the Chain
- 5.2. Soaking the Chain
- 5.3. Brushing and Rinsing
- 5.4. Drying the Chain
6. Inspecting Your Chain for Wear and Damage
- 6.1. Checking for Stiff Links
- 6.2. Measuring Chain Stretch
- 6.3. Identifying Corrosion and Wear
7. Reinstalling Your Bike Chain
- 7.1. Routing the Chain
- 7.2. Connecting with a Chain Breaker
- 7.3. Connecting with a Master Link
- 7.4. Ensuring Proper Tension
8. Maintaining Your Bike Chain for Longevity
- 8.1. Regular Cleaning
- 8.2. Proper Lubrication
- 8.3. Checking Chain Wear Regularly
- 8.4. Adjusting Derailleurs
9. Common Mistakes to Avoid When Removing a Bike Chain
- 9.1. Using the Wrong Tools
- 9.2. Forcing the Chain Breaker
- 9.3. Losing Chain Pins
- 9.4. Ignoring Master Links
10. Upgrading Your Bike Chain: What to Look For
- 10.1. Chain Compatibility
- 10.2. Material and Durability
- 10.3. Performance Features
11. The Best Bike Chains on the Market
- 11.1. Shimano Chains
- 11.2. SRAM Chains
- 11.3. KMC Chains
12. Safety Tips for Bike Chain Maintenance
- 12.1. Wearing Protective Gear
- 12.2. Working in a Clean Area
- 12.3. Proper Tool Usage
13. Frequently Asked Questions (FAQs)
- 13.1. Can I reuse a chain pin after removing it?
- 13.2. How often should I clean my bike chain?
- 13.3. What type of lubricant should I use on my bike chain?
- 13.4. How do I know when my bike chain needs replacing?
- 13.5. Can I use a master link on any bike chain?
- 13.6. What is a chain breaker tool, and how does it work?
- 13.7. Are there any alternatives to using a chain breaker tool?
- 13.8. What should I do if my chain is stuck?
- 13.9. How do I prevent my chain from rusting?
- 13.10. Where can I find a reliable bike mechanic near me?
14. Conclusion
1. Why Would You Need to Remove a Bike Chain?
There are several reasons why you might need to remove a bike chain. Understanding these reasons will help you prepare for the task and ensure you do it correctly.
1.1. Chain Replacement
Chain replacement is necessary when your chain becomes worn out. Over time, the constant friction and stress cause the chain to stretch, which can damage your cassette and chainrings. Replacing your chain promptly prevents more costly repairs down the road. According to research from the Motorcycle Safety Foundation (MSF), in July 2025, regular maintenance, including chain replacement, provides optimal bike performance.
1.2. Deep Cleaning
Deep cleaning involves removing the chain to thoroughly clean it and remove built-up grime and dirt. While you can clean a chain while it’s on the bike, removing it allows for a more effective and comprehensive cleaning process. Removing the chain ensures every part is cleaned, extending its life and enhancing performance.
1.3. Repairing a Broken Chain
Repairing a broken chain often requires removing the damaged section. Whether a link has snapped or a pin has come loose, removing the chain allows you to replace the faulty part with a new link or connecting pin. This repair can get you back on the road quickly without needing a complete chain replacement.
1.4. Upgrading Components
Upgrading components, such as your cassette or chainrings, might require removing the chain to facilitate the installation of the new parts. Sometimes, a new chain is also needed to ensure compatibility and optimal performance with the new components. The proper chain ensures peak performance.
2. Essential Tools for Chain Removal
Having the right tools on hand makes the chain removal process smoother and safer. Here are some essential tools you’ll need.
2.1. Chain Breaker Tool
A chain breaker tool, also known as a chain tool, is specifically designed to push chain pins out of the chain, allowing you to separate it. This tool is indispensable for removing chains that don’t have a master link. The chain breaker tool is vital for chain maintenance.
2.2. Master Link Pliers
Master link pliers are designed to easily open and close master links, which are special links that can be separated without needing to push out a pin. These pliers make the process quick and effortless, especially for tight or stubborn master links. The master link pliers are very helpful.
2.3. Cleaning Supplies
Cleaning supplies are necessary for cleaning your chain after removal. These include degreasers, brushes, and cleaning solutions to remove dirt, grime, and old lubricant. Keeping your chain clean ensures smooth and efficient performance. Proper cleaning supplies keeps your bike in great shape.
2.4. Work Gloves and Eye Protection
Work gloves and eye protection are crucial for safety. Gloves protect your hands from grease and sharp edges, while eye protection prevents debris and cleaning solutions from getting into your eyes. Safety gear ensures a safe maintenance process.
3. Step-by-Step Guide to Removing a Bike Chain with a Chain Breaker
Removing a bike chain with a chain breaker involves a few careful steps. Follow this guide to do it safely and effectively.
3.1. Preparing Your Bike
Preparing your bike involves shifting the chain to the smallest cog on the rear cassette and the smallest chainring in the front. This provides slack in the chain, making it easier to work with. Also, position your bike in a work stand or lean it against a stable surface. Shifting the chain creates optimal slack for removal.
3.2. Locating a Chain Pin
Locating a chain pin involves identifying one of the pins that connects the chain links. Choose a pin that looks normal and isn’t already damaged or bent. A good pin ensures smooth removal.
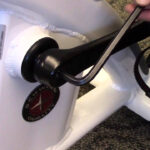
3.3. Using the Chain Breaker Tool
Using the chain breaker tool involves placing the chain into the tool so that the pin you want to remove is aligned with the tool’s pin. Make sure the chain is seated properly in the tool to avoid bending the chain or the tool’s pin. Correct alignment prevents damage.
3.4. Pushing the Pin
Pushing the pin involves turning the handle of the chain breaker tool to push the tool’s pin against the chain pin. Apply steady pressure and watch as the chain pin starts to push out the other side. Don’t push the pin all the way out; leave it partially inserted in the outer plate to make reassembly easier if you plan to reuse the chain. Steady pressure ensures a clean break.
3.5. Separating the Chain
Separating the chain involves gently wiggling the chain at the point where you’ve pushed the pin to disconnect it. If the pin is still partially inserted, it should separate easily. If it’s stuck, double-check that the pin is pushed far enough. Wiggling the chain helps with separation.
4. Removing a Bike Chain with a Master Link
A master link simplifies chain removal. Here’s how to do it.
4.1. Identifying the Master Link
Identifying the master link involves looking for a link that is slightly different from the others. It usually has two side plates held together by pins with visible clips or a smooth surface indicating a tool-free design. The master link makes chain removal easier.
4.2. Using Master Link Pliers
Using master link pliers involves positioning the jaws of the pliers on the master link pins and squeezing the handles. This action should release the link, allowing you to separate the chain. Master link pliers ensures you have a smooth removal.
4.3. Separating the Master Link by Hand
Separating the master link by hand is possible with some tool-free master links. Simply push the two plates of the master link towards each other and then slide them apart. This might require some force, but it’s a convenient method if you don’t have pliers. A master link simplifies maintenance.
5. Cleaning Your Bike Chain After Removal
Cleaning your bike chain after removing it is essential for maintaining performance and extending its life.
5.1. Degreasing the Chain
Degreasing the chain involves using a degreaser to remove old lubricant, dirt, and grime. You can use a citrus-based degreaser or a bike-specific degreasing solution. Apply the degreaser liberally to the chain. Degreasing keeps your chain performing well.
5.2. Soaking the Chain
Soaking the chain involves placing it in a container filled with degreaser. Let it soak for about 15-30 minutes to loosen stubborn grime. Agitate the chain occasionally to help the degreaser penetrate all the links. Soaking the chain helps loosen grime.
5.3. Brushing and Rinsing
Brushing and rinsing involves using a stiff brush to scrub the chain, removing any remaining dirt and grime. Pay attention to the spaces between the links. Once you’ve scrubbed the chain thoroughly, rinse it with water until all traces of degreaser are gone. Brushing and rinsing ensure a clean chain.
5.4. Drying the Chain
Drying the chain involves using a clean rag to wipe off as much water as possible. You can also use an air compressor to blow out any remaining water from the links. Ensure the chain is completely dry before lubricating it. Drying prevents rust and corrosion.
6. Inspecting Your Chain for Wear and Damage
Inspecting your chain for wear and damage is an important part of maintenance.
6.1. Checking for Stiff Links
Checking for stiff links involves flexing the chain to see if any links are not moving freely. Stiff links can cause poor shifting and increased wear. If you find stiff links, try lubricating them or working them back and forth to loosen them. Stiff links can reduce performance.
6.2. Measuring Chain Stretch
Measuring chain stretch involves using a chain checker tool or a ruler to measure the length of the chain. A stretched chain can damage your cassette and chainrings. If the chain is stretched beyond the recommended limit, it needs to be replaced. Measuring stretch prevents damage.
6.3. Identifying Corrosion and Wear
Identifying corrosion and wear involves looking for signs of rust, pitting, or excessive wear on the chain links. Corrosion and wear can weaken the chain and cause it to break. If you notice significant corrosion or wear, replace the chain. Identifying corrosion and wear increases safety.
7. Reinstalling Your Bike Chain
Reinstalling your bike chain requires careful attention to ensure proper function.
7.1. Routing the Chain
Routing the chain involves threading the chain through the derailleurs and around the cassette and chainrings. Make sure the chain is routed correctly through the derailleur cages and pulleys. Proper routing ensures smooth shifting.
7.2. Connecting with a Chain Breaker
Connecting with a chain breaker involves using the chain breaker tool to push a pin back into the chain to connect the two ends. Align the chain ends and carefully push the pin through the links. Make sure the pin is flush with the outer plates. Make sure the chain is connected properly for the ride ahead.
7.3. Connecting with a Master Link
Connecting with a master link involves attaching the master link to the ends of the chain and using master link pliers or your hands to secure it. Make sure the master link is fully engaged and locked in place. Make sure the master link is secure before riding.
7.4. Ensuring Proper Tension
Ensuring proper tension involves checking that the chain has the correct amount of slack. The chain should move freely without being too tight or too loose. Adjust the derailleurs if necessary to achieve the correct tension. Proper tension ensures smooth riding.
8. Maintaining Your Bike Chain for Longevity
Maintaining your bike chain properly extends its life and ensures optimal performance.
8.1. Regular Cleaning
Regular cleaning involves cleaning your chain every few rides to remove dirt and grime. Use a brush and degreaser to clean the chain while it’s on the bike, and then wipe it down with a clean rag. Regular cleaning prevents wear and tear.
8.2. Proper Lubrication
Proper lubrication involves applying chain lubricant after cleaning. Use a bike-specific lubricant and apply it sparingly to each link. Wipe off any excess lubricant to prevent dirt from sticking to the chain. Proper lubrication ensures smooth operation.
8.3. Checking Chain Wear Regularly
Checking chain wear regularly involves using a chain checker tool or a ruler to measure chain stretch. Replace the chain when it reaches the recommended wear limit to prevent damage to your cassette and chainrings. Regular checks prevent costly repairs.
8.4. Adjusting Derailleurs
Adjusting derailleurs involves making sure your derailleurs are properly aligned and adjusted. Poorly adjusted derailleurs can cause poor shifting and increased chain wear. Refer to your bike’s manual or a professional mechanic for assistance. Proper derailleur alignment ensures smooth shifting.
9. Common Mistakes to Avoid When Removing a Bike Chain
Avoiding common mistakes ensures a safe and effective chain removal process.
9.1. Using the Wrong Tools
Using the wrong tools, such as pliers or screwdrivers, can damage the chain and the tool. Always use the correct tools, like a chain breaker tool or master link pliers, for the job. Using the right tools prevents damage.
9.2. Forcing the Chain Breaker
Forcing the chain breaker can bend the tool’s pin or damage the chain. If the pin isn’t moving easily, double-check that the chain is properly aligned in the tool and apply steady pressure. Gentle pressure ensures a clean removal.
9.3. Losing Chain Pins
Losing chain pins can make reassembly difficult. Keep track of the pins you remove and store them in a safe place. If you lose a pin, you can purchase replacement pins from a bike shop. Keeping track of pins saves time and frustration.
9.4. Ignoring Master Links
Ignoring master links and trying to use a chain breaker on a chain with a master link can damage the chain and the tool. Always check for a master link before using a chain breaker. Identifying the master link simplifies the process.
10. Upgrading Your Bike Chain: What to Look For
Upgrading your bike chain can enhance performance and durability.
10.1. Chain Compatibility
Chain compatibility involves ensuring that the new chain is compatible with your bike’s drivetrain. Check the number of speeds on your cassette and chainrings and choose a chain that is designed for that number of speeds. Chain compatibility ensures optimal performance.
10.2. Material and Durability
Material and durability involve considering the materials used in the chain’s construction. Chains made from high-quality steel or with special coatings are more durable and resistant to wear. Durable materials extend the life of the chain.
10.3. Performance Features
Performance features involve looking for chains with features like smooth shifting, low friction, and corrosion resistance. These features can improve your bike’s performance and make your rides more enjoyable. Enhanced features improve the riding experience.
11. The Best Bike Chains on the Market
Choosing a high-quality chain can make a significant difference in your bike’s performance.
11.1. Shimano Chains
Shimano chains are known for their reliability and smooth shifting. They offer a range of chains for different drivetrains and riding styles. Shimano chains are known for performance and durability.
11.2. SRAM Chains
SRAM chains are also popular for their performance and durability. They offer chains with features like hard chrome plating for increased wear resistance. SRAM chains ensure a smooth ride.
11.3. KMC Chains
KMC chains are a great option known for high quality. They produce chains that are great for riders of all skill levels. KMC chains are reliable.
12. Safety Tips for Bike Chain Maintenance
Ensuring your safety during bike chain maintenance is crucial.
12.1. Wearing Protective Gear
Wearing protective gear, such as gloves and eye protection, protects you from grease, sharp edges, and cleaning solutions. Safety gear prevents injuries.
12.2. Working in a Clean Area
Working in a clean area helps prevent dirt and debris from contaminating your chain and tools. A clean workspace makes the job easier and safer. A clean area reduces accidents.
12.3. Proper Tool Usage
Proper tool usage involves using the correct tools for the job and following the manufacturer’s instructions. Using tools correctly prevents damage and injury. Using the right tools prevents accidents.
13. Frequently Asked Questions (FAQs)
Here are some common questions about removing and maintaining bike chains.
13.1. Can I reuse a chain pin after removing it?
No, it is not recommended to reuse a chain pin after removing it. Once a chain pin has been pushed out, it weakens and may not hold securely if reinserted. Always use a new chain pin or a master link for reassembly.
13.2. How often should I clean my bike chain?
You should clean your bike chain every few rides, depending on the conditions you ride in. If you ride in wet or muddy conditions, clean it more frequently. Regular cleaning prevents the buildup of dirt and grime.
13.3. What type of lubricant should I use on my bike chain?
Use a bike-specific lubricant designed for chains. There are different types of lubricants for wet and dry conditions. Choose a lubricant that is appropriate for the conditions you typically ride in.
13.4. How do I know when my bike chain needs replacing?
You can use a chain checker tool or a ruler to measure the chain’s stretch. If the chain is stretched beyond the recommended limit, it needs to be replaced. Replacing it prevents damage to your cassette and chainrings.
13.5. Can I use a master link on any bike chain?
Not all bike chains are designed to be used with a master link. Check the manufacturer’s specifications to see if your chain is compatible with a master link. Some chains require a chain breaker tool for removal and installation.
13.6. What is a chain breaker tool, and how does it work?
A chain breaker tool is a device used to push chain pins out of a bike chain, allowing you to separate the chain. It works by aligning the chain pin with a pin on the tool and then turning a handle to push the tool’s pin against the chain pin, pushing it out of the chain.
13.7. Are there any alternatives to using a chain breaker tool?
The primary alternative to a chain breaker tool is using a master link. If your chain has a master link, you can use master link pliers or your hands to separate the chain without needing to push out any pins.
13.8. What should I do if my chain is stuck?
If your chain is stuck, first make sure that you are using the correct tool and that the chain is properly aligned. Apply steady pressure and avoid forcing the tool. You can also try using a degreaser to loosen any grime or corrosion that may be causing the chain to stick.
13.9. How do I prevent my chain from rusting?
To prevent your chain from rusting, keep it clean and well-lubricated. After riding in wet conditions, dry the chain thoroughly and apply lubricant. Storing your bike in a dry place also helps prevent rust.
13.10. Where can I find a reliable bike mechanic near me?
You can find a reliable bike mechanic by asking for recommendations from local cycling clubs or bike shops. Online reviews and directories can also help you find a reputable mechanic in your area. Check for certifications and experience.
14. Conclusion
Removing a bike chain is a manageable task with the right tools and knowledge. Whether you’re using a chain breaker tool or master link pliers, following the correct steps ensures a smooth and safe process. Regular cleaning, inspection, and maintenance extend the life of your chain and keep your bike running smoothly.
Ready to take your bike maintenance skills to the next level? Visit usabikers.net for more detailed guides, tips, and community discussions. Explore our forums to connect with fellow bikers, find local events, and share your experiences.
Address: 801 Sturgis Main St, Sturgis, SD 57785, United States
Phone: +1 (605) 347-2000
Website: usabikers.net