
Removing the rear wheel of your mountain bike can seem daunting, but it’s a skill every biker should master. On usabikers.net, we break down the process into easy-to-follow steps, ensuring you can confidently tackle flat tires and maintenance tasks. This guide will provide detailed instructions, helpful tips, and address common issues, making you a rear-wheel removal pro in no time, enhancing your overall mountain biking experience, and keeping you prepared for any trailside repairs, with a focus on bike maintenance, trailside repairs, and cycling skills.
1. Understanding The Need To Remove Your Mountain Bike’s Rear Wheel
Why is knowing how to remove the rear wheel of your mountain bike so important? Because mastering this skill empowers you to handle common maintenance tasks and trailside repairs confidently. According to research from the Motorcycle Safety Foundation (MSF), in July 2025, understanding your bike’s components enhances overall riding safety.
1.1. Common Scenarios Requiring Rear Wheel Removal
Removing the rear wheel of your mountain bike becomes necessary in several situations:
- Flat Tire Repair: A flat tire is perhaps the most common reason. Being able to quickly remove the wheel allows you to replace or patch the tube, getting you back on the trail faster.
- Bike Transportation: When transporting your bike in a car, especially one without a bike rack, removing the wheels often makes it easier to fit the frame inside.
- Routine Maintenance: Cleaning and lubricating the drivetrain, replacing worn tires or cassettes, and performing other maintenance tasks often require wheel removal for better access.
- Brake Work: Adjusting or replacing brake pads, servicing disc brakes, or working on the brake calipers can be easier with the wheel removed.
1.2. Essential Tools For The Job
Having the right tools on hand makes the rear wheel removal process smoother and more efficient:
- Multi-Tool: A good multi-tool with various Allen keys and screwdrivers is essential for most minor adjustments and repairs on the trail.
- Tire Levers: These are crucial for removing the tire from the rim when dealing with a flat.
- Allen Keys: A set of Allen keys of different sizes is necessary for loosening bolts and screws on your bike.
- Wrench: Depending on your bike, you may need a wrench for certain bolts.
- Bike Stand (Optional): While not essential, a bike stand can make the process easier by keeping the bike stable and at a convenient height.
1.3. Safety Precautions Before You Start
Before diving into the removal process, it’s important to take a few safety precautions:
- Wear Gloves: Protect your hands from grease and dirt by wearing gloves.
- Work in a Safe Area: Choose a flat, stable surface to work on your bike.
- Be Mindful of the Drivetrain: The drivetrain can be greasy, so avoid touching it unnecessarily to keep your hands clean.
- Inspect Your Bike: Before starting, give your bike a quick inspection to identify any potential issues or damage.
2. Step-By-Step Guide: Removing Your Mountain Bike’s Rear Wheel
Removing the rear wheel of your mountain bike might seem complicated, but with a systematic approach, it’s quite manageable. Follow these steps for a smooth and efficient process.
2.1. Shifting Gears For Easier Removal
Shift to the Smallest Cog: Before you start, shift the chain to the smallest cog (the outermost gear) on the rear cassette. This minimizes tension in the chain and makes wheel removal much easier.
2.2. Disengaging The Brakes
Rim Brakes: If your bike has rim brakes, you’ll need to disengage them to create enough clearance for the tire to pass through.
- Side-Pull Brakes: Locate the quick-release lever on the brake caliper and flip it open. This will widen the brake pads, providing the necessary clearance.
- V-Brakes: For V-brakes, detach the brake cable from its holder by squeezing the brake arms together and slipping the cable out.
Disc Brakes: If your bike has disc brakes, you can skip this step as disc brakes don’t usually interfere with wheel removal.
2.3. Loosening The Quick Release Or Thru-Axle
The method for loosening the wheel depends on whether your bike uses a quick release or a thru-axle system.
-
Quick Release:
- Locate the quick-release lever on the rear wheel hub.
- Open the lever by pulling it away from the frame.
- Unscrew the nut on the opposite side of the lever to loosen the axle. You may need to turn it several times to create enough space for the wheel to drop out.
-
Thru-Axle:
- Locate the thru-axle lever.
- Unscrew the lever by turning it counter-clockwise. On some bikes, you may need to first pull the lever slightly outward to disengage it.
- Once unscrewed, pull the thru-axle out of the hub.
2.4. Detaching The Derailleur
To remove the wheel, you’ll need to create some slack in the chain by manipulating the rear derailleur.
- Grip the Derailleur: Hold the rear derailleur body with one hand.
- Pull Backwards: Gently pull the derailleur backwards, away from the cassette. This will create enough slack in the chain to allow the wheel to drop out.
2.5. Removing The Wheel
With the quick release or thru-axle loosened and the derailleur pulled back, you can now remove the wheel.
- Lift the Bike: Lift the rear of the bike slightly off the ground. This will allow gravity to help you remove the wheel.
- Guide the Wheel: Gently guide the wheel downwards and out of the frame. You may need to maneuver it slightly to clear the brake calipers and the chain.
- Set Aside: Once the wheel is free, set it aside in a safe place.
2.6. Troubleshooting Common Issues
Sometimes, removing the rear wheel doesn’t go as smoothly as planned. Here are a few common issues and how to address them:
- Wheel Won’t Drop Out:
- Issue: The wheel is not dropping out easily, even with the quick release open and the derailleur pulled back.
- Solution: Make sure the quick release is fully open and that the nut is unscrewed enough to provide ample space. Ensure the derailleur is pulled back sufficiently to create slack in the chain.
- Brake Interference:
- Issue: The brake pads are still interfering with the wheel, even after disengaging the brakes.
- Solution: Double-check that the brake quick-release lever is fully open. If the pads are too close, you may need to deflate the tire slightly to create more clearance.
- Chain Obstruction:
- Issue: The chain is still obstructing the wheel, making it difficult to remove.
- Solution: Ensure the chain is on the smallest cog and that you are pulling the derailleur back far enough to create enough slack.
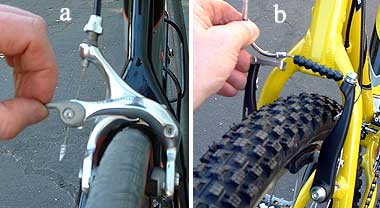 Open the brake so the tire fits through.
3. Step-By-Step Guide: Installing Your Mountain Bike’s Rear Wheel
Putting the rear wheel back on your mountain bike might seem tricky, but with a bit of patience and the right technique, it’s a straightforward process. Follow these steps to ensure your wheel is securely and correctly installed.
3.1. Preparing The Bike For Wheel Installation
Check the Frame: Before you begin, inspect the rear dropouts on your bike frame to ensure they are clean and free of any debris. This will help the wheel sit properly.
Position the Bike: Ensure your bike is stable. If you have a bike stand, use it. If not, lean the bike against a wall or have someone hold it steady.
3.2. Positioning The Wheel
Align with Dropouts: Hold the wheel by the tire and carefully align the cassette with the space between the chainstays.
Chain Alignment: Make sure the chain is positioned on the smallest cog of the cassette. This will make it easier to slide the wheel into place.
3.3. Reattaching The Derailleur
Pull Back the Derailleur: With one hand, pull the rear derailleur backwards, away from the cassette, just as you did when removing the wheel.
Slide the Wheel In: Gently slide the wheel into the dropouts, ensuring the axle seats properly. The cassette should fit neatly between the chainstays.
3.4. Securing The Quick Release Or Thru-Axle
Once the wheel is in place, you need to secure it using either a quick release or a thru-axle.
-
Quick Release:
- Tighten the Nut: Screw the nut on the opposite side of the quick-release lever until it is snug.
- Close the Lever: Push the quick-release lever towards the frame. It should require a firm push to close, indicating that the wheel is securely fastened.
-
Thru-Axle:
- Insert the Axle: Slide the thru-axle through the hub and the dropouts.
- Tighten the Axle: Screw the thru-axle in clockwise until it is snug. On some bikes, you may need to tighten it to a specific torque setting, so refer to your bike’s manual.
3.5. Re-Engaging The Brakes
If you disengaged the brakes during the removal process, now is the time to re-engage them.
-
Rim Brakes:
- Side-Pull Brakes: Flip the quick-release lever on the brake caliper back to its closed position.
- V-Brakes: Reattach the brake cable to its holder by squeezing the brake arms together and slipping the cable back into place.
-
Disc Brakes: No action is needed for disc brakes unless you’ve made adjustments to the caliper.
3.6. Checking Wheel Alignment
Spin the Wheel: Give the wheel a spin to check that it is running straight and not rubbing against the frame or brake pads.
Adjust as Needed: If the wheel is not aligned correctly, loosen the quick release or thru-axle and make small adjustments to the wheel’s position in the dropouts. Re-tighten and check again until the wheel spins freely and is properly aligned.
3.7. Final Checks And Adjustments
Brake Check: Squeeze the brake levers to ensure the brakes are engaging properly and stopping the wheel effectively.
Quick Release/Thru-Axle Check: Double-check that the quick release or thru-axle is securely tightened.
Test Ride: Take a short test ride to ensure everything is working smoothly. Pay attention to any unusual noises or vibrations.
3.8. Troubleshooting Common Issues
Installing the rear wheel can sometimes present challenges. Here are some common issues and how to resolve them:
- Wheel Won’t Seat Properly:
- Issue: The wheel isn’t seating fully into the dropouts.
- Solution: Ensure the chain is on the smallest cog and the derailleur is pulled back sufficiently. Check that the dropouts are clean and free of obstructions.
- Brake Rub:
- Issue: The brake pads are rubbing against the rim or rotor.
- Solution: For rim brakes, adjust the brake pads so they are evenly spaced and not rubbing. For disc brakes, you may need to realign the caliper.
- Quick Release/Thru-Axle Issues:
- Issue: The quick release or thru-axle won’t tighten properly.
- Solution: Ensure the threads are clean and not damaged. If using a quick release, make sure the nut is tightened enough before closing the lever. For a thru-axle, ensure it is properly aligned before tightening.
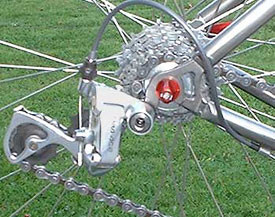 Pull back the rear derailleur by hand for easy wheel removal/installation.
4. Maintaining Your Mountain Bike Wheels
Proper maintenance of your mountain bike wheels ensures optimal performance, extends their lifespan, and keeps you safe on the trails. Regular maintenance includes cleaning, inspecting, and making necessary adjustments to keep your wheels in top condition.
4.1. Regular Cleaning And Inspection
Cleaning: After each ride, especially in muddy or dusty conditions, clean your wheels with a soft brush and mild soap. Pay particular attention to the braking surfaces and the cassette.
Inspection: Regularly inspect your wheels for signs of damage or wear:
- Tires: Check for cuts, bulges, or excessive wear.
- Rims: Look for dents, cracks, or bends.
- Spokes: Ensure all spokes are tight and none are broken or bent.
- Hubs: Check for play or roughness.
4.2. Checking And Adjusting Spoke Tension
Importance of Spoke Tension: Proper spoke tension is crucial for wheel strength and trueness. Uneven spoke tension can lead to wheel failure.
How to Check: Pluck each spoke like a guitar string. They should all have a similar pitch. A spoke wrench can be used to adjust tension. If you’re not comfortable doing this yourself, take your wheels to a professional mechanic.
4.3. Hub Maintenance
Types of Hubs: Mountain bikes typically use either cup-and-cone or sealed-bearing hubs.
Cup-and-Cone Hubs: These require periodic cleaning, greasing, and adjustment. Over time, the bearings can wear, leading to play in the hub.
Sealed-Bearing Hubs: These are generally lower maintenance, but the bearings can still wear out and need replacement.
4.4. Brake Surface Care
Rim Brakes: Keep the braking surfaces on your rims clean and free of debris. Replace brake pads when they become worn.
Disc Brakes: Check the rotors for damage or warping. Clean them regularly with a disc brake cleaner. Replace brake pads when they become worn.
4.5. Tire Maintenance
Tire Pressure: Maintain the correct tire pressure for your riding conditions and tire type.
Tire Wear: Replace tires when the tread is worn or when they show signs of damage.
4.6. Storage Tips
Proper Storage: Store your bike in a dry place away from direct sunlight. This will help prevent tire degradation and corrosion.
Wheel Storage: If you remove your wheels for storage, store them in a wheel bag or hang them from hooks to prevent damage.
4.7. When To Seek Professional Help
Complex Issues: If you notice any of the following, it’s time to take your wheels to a professional mechanic:
- Significant wheel damage
- Inability to true the wheel
- Hub issues you can’t resolve
- Unusual noises or vibrations
5. Understanding Different Types of Mountain Bike Wheels
Mountain bike wheels come in various types, each designed for specific riding styles and terrain. Knowing the differences can help you choose the right wheels for your needs and maintain them effectively.
5.1. Wheel Sizes
26-inch Wheels: Once the standard, 26-inch wheels are now less common but still found on older bikes. They offer good maneuverability but are less efficient on rough terrain.
27.5-inch Wheels (650b): These wheels strike a balance between maneuverability and roll-over capability. They are popular for trail and enduro bikes.
29-inch Wheels: 29-inch wheels offer excellent roll-over capability and are efficient on cross-country and trail bikes.
5.2. Rim Materials
Aluminum Rims: Aluminum rims are affordable, durable, and relatively lightweight. They are a popular choice for most mountain bikes.
Carbon Fiber Rims: Carbon fiber rims are lighter and stiffer than aluminum rims, offering improved performance. They are more expensive and can be more susceptible to damage from impacts.
5.3. Rim Width
Narrow Rims: Narrow rims are typically used for cross-country riding and offer lower weight and improved aerodynamics.
Wide Rims: Wide rims provide better tire support, allowing for lower tire pressures and improved traction. They are popular for trail and enduro bikes.
5.4. Hub Types
Quick Release Hubs: These hubs use a quick-release lever to secure the wheel to the frame. They are easy to use and suitable for most riding styles.
Thru-Axle Hubs: Thru-axle hubs use a bolt-on axle for increased stiffness and security. They are common on modern mountain bikes, especially those designed for aggressive riding.
5.5. Spoke Count And Patterns
Spoke Count: Higher spoke counts (32 or 36) provide increased strength and durability. Lower spoke counts (24 or 28) offer lower weight.
Spoke Patterns: Radial, tangential, and combinations of patterns are used to optimize strength and stiffness.
5.6. Tubeless Vs. Tube-Type Wheels
Tube-Type Wheels: These require an inner tube to hold air. They are simple and easy to maintain but are more prone to pinch flats.
Tubeless Wheels: Tubeless wheels use a special rim and tire that seal together to hold air without a tube. They offer improved traction, lower rolling resistance, and reduced risk of flats.
5.7. Disc Brake Compatibility
Disc Brake Mounts: Wheels designed for disc brakes have specific mounts for attaching the brake rotor. The two most common types are 6-bolt and center lock.
Hub Compatibility: Ensure your wheels are compatible with your bike’s disc brake system.
6. Tips For Preventing Flat Tires On Your Mountain Bike
Flat tires are a common nuisance for mountain bikers, but with some preventive measures, you can significantly reduce the risk and enjoy more uninterrupted rides.
6.1. Choosing The Right Tires
Tire Type: Select tires that are appropriate for your riding conditions. Tires with thicker sidewalls and more aggressive tread patterns are more resistant to punctures.
Tire Pressure: Maintain the correct tire pressure for your weight, riding style, and terrain. Too little pressure increases the risk of pinch flats, while too much pressure reduces traction.
6.2. Using Tire Sealant
Tubeless Setups: If you are running tubeless tires, use a high-quality tire sealant. Sealant can quickly seal small punctures, preventing air loss and keeping you rolling.
Adding Sealant to Tubes: Even if you are using tubes, you can add sealant to them to help prevent flats.
6.3. Inspecting Your Tires Regularly
Check for Damage: Before each ride, inspect your tires for cuts, embedded objects, or signs of wear. Remove any sharp objects and replace damaged tires.
Sidewall Integrity: Pay close attention to the sidewalls, as they are more vulnerable to cuts and abrasions.
6.4. Riding Technique
Avoid Sharp Objects: Be mindful of sharp rocks, glass, and other debris on the trail. Try to avoid riding over them.
Proper Line Choice: Choose smooth lines and avoid obstacles that could damage your tires.
6.5. Using Tire Inserts
Protection: Tire inserts provide an extra layer of protection between the tire and the rim, reducing the risk of pinch flats and rim damage.
Performance: Some tire inserts can also improve tire stability and cornering performance.
6.6. Carrying Essential Repair Tools
Be Prepared: Always carry essential repair tools, including a spare tube, tire levers, a pump or CO2 inflator, and a multi-tool.
Practice Repairs: Practice changing a flat tire at home so you can do it quickly and efficiently on the trail.
6.7. Regular Tire Maintenance
Clean Tires: Keep your tires clean to prevent the build-up of debris that can cause punctures.
Proper Storage: Store your bike in a cool, dry place away from direct sunlight to prevent tire degradation.
7. Common Mistakes To Avoid When Removing And Installing Mountain Bike Wheels
Removing and installing mountain bike wheels might seem straightforward, but there are several common mistakes that can lead to frustration, damage, or even unsafe riding conditions. Being aware of these pitfalls can help you avoid them and ensure a smooth, safe process.
7.1. Not Shifting To The Smallest Cog
Mistake: Attempting to remove the rear wheel without shifting the chain to the smallest cog on the cassette.
Consequence: Increased tension in the chain makes it difficult to remove the wheel and can damage the derailleur or chain.
Solution: Always shift the chain to the smallest cog before removing the rear wheel.
7.2. Forgetting To Disengage The Brakes
Mistake: Failing to disengage the brakes before attempting to remove the wheel.
Consequence: The brake pads will interfere with the tire, making it difficult or impossible to remove the wheel.
Solution: Always disengage the brakes by opening the quick-release lever on side-pull brakes or detaching the cable on V-brakes.
7.3. Over-Tightening The Quick Release Or Thru-Axle
Mistake: Over-tightening the quick release or thru-axle.
Consequence: Can damage the frame, hub, or quick release mechanism.
Solution: Tighten the quick release or thru-axle until it is snug and secure, but not excessively tight. Refer to your bike’s manual for torque specifications.
7.4. Not Checking Wheel Alignment
Mistake: Failing to check wheel alignment after installation.
Consequence: The wheel may rub against the frame or brake pads, causing damage and affecting handling.
Solution: Spin the wheel to check for proper alignment and adjust as needed.
7.5. Neglecting Brake Adjustment
Mistake: Neglecting to check and adjust the brakes after reinstalling the wheel.
Consequence: Brakes may not engage properly, compromising safety.
Solution: Test the brakes to ensure they are working effectively and adjust as needed.
7.6. Using The Wrong Tools
Mistake: Using the wrong tools or improper techniques.
Consequence: Can damage components or lead to injury.
Solution: Use the correct tools and follow proper procedures. If you are unsure, consult a professional mechanic or refer to your bike’s manual.
7.7. Not Securing The Bike Properly
Mistake: Failing to secure the bike properly during wheel removal and installation.
Consequence: The bike may fall, causing damage or injury.
Solution: Use a bike stand or lean the bike against a stable surface. Have someone hold the bike if necessary.
7.8. Ignoring Unusual Noises Or Vibrations
Mistake: Ignoring unusual noises or vibrations after reinstalling the wheel.
Consequence: May indicate a problem with the wheel or brakes that could lead to a more serious issue.
Solution: Investigate any unusual noises or vibrations and address the problem before riding.
7.9. Improper Storage of Wheels
Mistake: Storing wheels improperly.
Consequence: Can lead to tire degradation, rim damage, or spoke tension issues.
Solution: Store wheels in a cool, dry place away from direct sunlight. Use wheel bags or hang them from hooks to prevent damage.
8. Upgrading Your Mountain Bike Wheels
Upgrading your mountain bike wheels can significantly enhance your riding experience by improving performance, handling, and overall enjoyment. Choosing the right upgrades depends on your riding style, budget, and the type of terrain you typically encounter.
8.1. Benefits Of Upgrading Wheels
Improved Performance: Lighter wheels accelerate faster and climb more efficiently.
Enhanced Handling: Stiffer wheels provide more precise steering and better cornering.
Increased Durability: Upgraded wheels are often more durable and resistant to damage.
Better Ride Quality: Some upgraded wheels offer improved compliance, resulting in a smoother ride.
8.2. Types Of Wheel Upgrades
Rim Material: Upgrading from aluminum to carbon fiber rims can significantly reduce weight and improve stiffness.
Rim Width: Wider rims provide better tire support and allow for lower tire pressures, improving traction.
Hubs: Upgrading to higher-quality hubs can improve rolling resistance and durability.
Spokes: Lighter and stronger spokes can enhance wheel stiffness and reduce weight.
8.3. Factors To Consider
Riding Style: Choose wheels that are appropriate for your riding style, whether it’s cross-country, trail, enduro, or downhill.
Terrain: Consider the type of terrain you typically ride on. Rough, rocky trails require more durable wheels.
Budget: Wheel upgrades can range from a few hundred dollars to several thousand. Set a budget and stick to it.
Compatibility: Ensure the new wheels are compatible with your bike’s frame, brakes, and drivetrain.
8.4. Popular Wheel Upgrade Options
Carbon Fiber Wheels: These offer the best combination of weight, stiffness, and performance.
Wide Aluminum Wheels: These provide excellent tire support and are a good value for the money.
High-Engagement Hubs: These offer quicker acceleration and improved power transfer.
Tubeless-Ready Wheels: These allow you to run tubeless tires, reducing the risk of flats and improving traction.
8.5. Installation And Maintenance
Professional Installation: Consider having a professional mechanic install your new wheels to ensure they are properly set up.
Regular Maintenance: Maintain your upgraded wheels by cleaning them regularly, checking spoke tension, and servicing the hubs as needed.
8.6. Balancing Cost And Performance
Value For Money: Look for wheels that offer a good balance of cost and performance.
Long-Term Investment: Consider wheel upgrades as a long-term investment in your riding enjoyment and performance.
9. Essential Gear For Mountain Biking
Having the right gear is essential for a safe and enjoyable mountain biking experience. From protective equipment to repair tools, here’s a list of must-have items for every mountain biker.
9.1. Protective Gear
Helmet: A high-quality helmet is the most important piece of protective gear. Choose one that fits well and meets safety standards.
Gloves: Gloves protect your hands from abrasions and provide better grip.
Eye Protection: Sunglasses or goggles protect your eyes from dust, debris, and UV rays.
Knee and Elbow Pads: These provide protection for your joints in case of a fall.
Body Armor: For more aggressive riding, consider wearing body armor to protect your torso and back.
9.2. Repair Tools
Multi-Tool: A multi-tool with various Allen keys, screwdrivers, and a chain tool is essential for trailside repairs.
Tire Levers: These are crucial for removing tires from the rim when dealing with a flat.
Spare Tube: Always carry a spare tube that matches your tire size.
Pump or CO2 Inflator: Use a pump or CO2 inflator to inflate your tires after a flat repair.
Patch Kit: A patch kit can be used to repair tubes in a pinch.
9.3. Hydration And Nutrition
Hydration Pack: A hydration pack allows you to carry water and other essentials on your back.
Water Bottles: Water bottles can be carried in bottle cages mounted on your frame.
Energy Bars and Gels: Pack energy bars and gels to fuel your ride.
9.4. Navigation And Communication
GPS Computer: A GPS computer can track your ride, provide navigation, and display performance data.
Phone: Carry a phone for emergencies and communication.
Map: A physical map can be helpful in areas with limited cell service.
9.5. Clothing
Moisture-Wicking Jersey: A moisture-wicking jersey helps keep you cool and dry.
Cycling Shorts: Padded cycling shorts provide comfort on long rides.
Jacket: A lightweight jacket can protect you from wind and rain.
Socks: Wear moisture-wicking socks to keep your feet dry and comfortable.
9.6. First Aid Kit
Basic Supplies: Carry a small first aid kit with bandages, antiseptic wipes, pain relievers, and any personal medications.
Emergency Information: Include emergency contact information and any relevant medical history.
10. Exploring Mountain Biking Communities And Resources
Connecting with other mountain bikers and accessing valuable resources can enhance your riding experience, provide support, and help you discover new trails and techniques.
10.1. Local Biking Clubs
Group Rides: Join a local biking club to participate in group rides and meet other riders.
Skill Clinics: Many clubs offer skill clinics and workshops to improve your riding technique.
Trail Maintenance: Participate in trail maintenance days to give back to the community.
10.2. Online Forums And Communities
Information Sharing: Online forums and communities are great places to ask questions, share experiences, and get advice.
Trail Recommendations: Find recommendations for new trails and plan your next adventure.
Gear Reviews: Read reviews of gear and equipment before making a purchase.
10.3. Social Media Groups
Connecting with Riders: Join social media groups to connect with other riders and stay up-to-date on local events.
Sharing Photos and Videos: Share photos and videos of your rides and inspire others.
Organizing Rides: Use social media to organize group rides and meetups.
10.4. Mountain Biking Events
Races: Participate in mountain biking races to test your skills and compete against other riders.
Festivals: Attend mountain biking festivals to celebrate the sport and connect with other enthusiasts.
Demo Days: Take advantage of demo days to try out new bikes and gear.
10.5. Online Resources
Websites and Blogs: Follow reputable websites and blogs for informative articles, gear reviews, and trail guides.
YouTube Channels: Watch YouTube channels for instructional videos, ride vlogs, and bike reviews.
Apps: Use mountain biking apps to track your rides, find trails, and navigate the terrain.
10.6. Bike Shops
Expert Advice: Visit your local bike shop for expert advice and service.
Community Hub: Bike shops often serve as a community hub for local riders.
Group Rides: Some bike shops organize group rides and events.
By engaging with these communities and resources, you can enhance your mountain biking experience, improve your skills, and discover new adventures.
Ready to take your mountain biking skills to the next level? Visit usabikers.net today to explore a wealth of articles, connect with a vibrant community, and find the resources you need to master your ride. Join us and let’s hit the trails together Whether you’re seeking guidance on advanced techniques, gear recommendations, or simply looking to share your passion with fellow enthusiasts, usabikers.net is your ultimate destination for all things mountain biking, providing expert tips, tricks, and comprehensive guides to keep you riding confidently and safely.
FAQ: Removing and Installing Mountain Bike Rear Wheel
1. Why is it important to know how to remove my mountain bike’s rear wheel?
Knowing how to remove your mountain bike’s rear wheel is crucial for tasks like fixing flat tires, transporting your bike, and performing routine maintenance. It empowers you to handle common issues independently.
2. What tools do I need to remove my mountain bike’s rear wheel?
You’ll need a multi-tool with Allen keys, tire levers, and possibly a wrench, depending on your bike. A bike stand can also be helpful but isn’t essential.
3. What safety precautions should I take before removing the rear wheel?
Wear gloves to protect your hands, work in a safe area, and be mindful of the drivetrain to avoid getting greasy.
4. How do I shift gears for easier rear wheel removal?
Shift the chain to the smallest cog (outermost gear) on the rear cassette to minimize tension and make wheel removal easier.
5. What should I do if my bike has rim brakes?
If your bike has rim brakes, disengage them by opening the quick-release lever on side-pull brakes or detaching the cable on V-brakes to create clearance for the tire.
6. How do I loosen the wheel with a quick release system?
Open the quick-release lever, then unscrew the nut on the opposite side to loosen the axle.
7. How do I loosen the wheel with a thru-axle system?
Unscrew the thru-axle lever by turning it counter-clockwise, and then pull the thru-axle out of the hub.
8. How do I detach the derailleur to remove the wheel?
Grip the rear derailleur body and gently pull it backwards to create slack in the chain, allowing the wheel to drop out.
9. What are some common issues when removing the rear wheel and how can I fix them?
If the wheel won’t drop out, ensure the quick release is fully open and the derailleur is pulled back enough. If brake pads interfere, double-check the brake quick-release lever. If the chain obstructs, ensure it’s on the smallest cog.
10. How do I ensure the wheel is properly aligned after installing it?
Spin the wheel to check that it runs straight and doesn’t rub against the frame or brake pads. Adjust the wheel’s position in the dropouts as needed and re-tighten.