
Knowing how to remove and install your bike pedals is a fundamental skill for anyone who enjoys cycling. Whether you’re upgrading your pedals, performing routine maintenance, or packing your bike for travel, taking off your pedals is a task you’ll encounter. While it might seem straightforward, there are nuances to ensure you do it correctly and avoid any damage to your bike. This guide will walk you through the process step-by-step, ensuring you can confidently remove and reinstall your bike pedals like a seasoned cyclist.
Step 1: Gather the Right Tools for Bike Pedal Removal
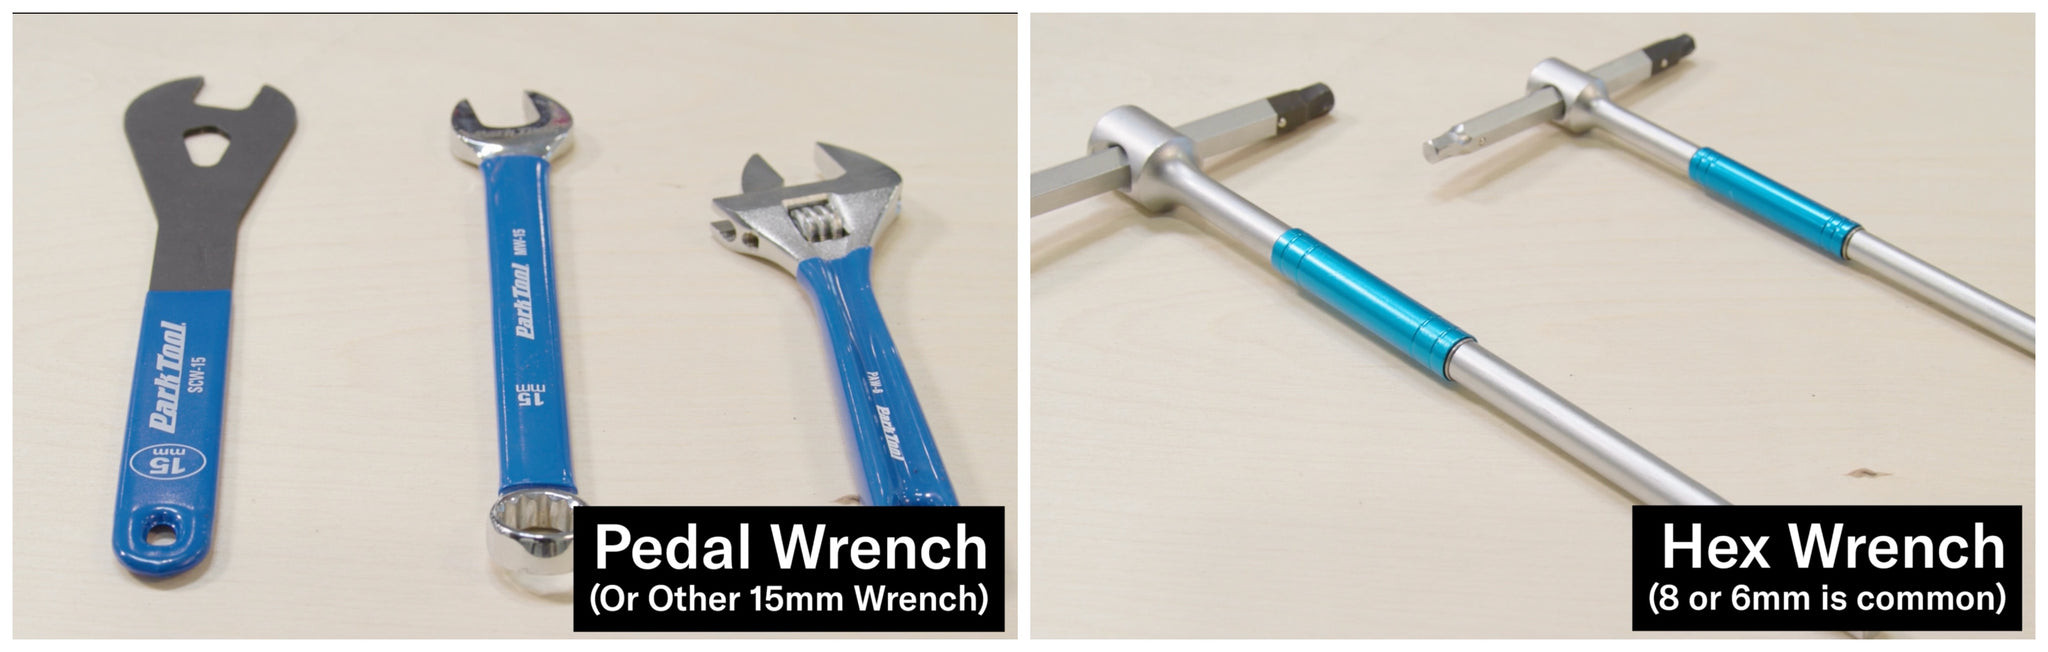 Tools needed to remove bike pedals including pedal wrench and hex keys
Before you start, it’s crucial to have the correct tool for your specific pedals. Bike pedals are typically designed to be removed and installed using one of three types of tools:
-
Pedal Wrench / 15mm Wrench: Often the go-to for older or budget-friendly pedals. These pedals have flat sections on the pedal spindle specifically designed to fit a 15mm wrench. Pedal wrenches are purposely thin to easily maneuver between the pedal and the crank arm, a space often too narrow for standard wrenches. While a dedicated pedal wrench is ideal, a slim 15mm box-end wrench or a narrow adjustable wrench can also work if they fit in the space.
Important Note: Be cautious if using a thin 15mm cone wrench as it can potentially damage or round out the wrench flats on your pedals. A pedal-specific wrench is always the recommended option for the best grip and to prevent damage.
-
8mm Hex Wrench (Allen Key): Many modern clipless and flat pedals utilize an 8mm hex wrench, also known as an Allen key. This tool fits into the end of the pedal spindle.
-
6mm Hex Wrench (Allen Key): Some newer or lightweight pedals might use a smaller 6mm hex wrench fitting instead of the 8mm.
Inspect your pedals closely to determine whether you need a pedal wrench (15mm) or a hex wrench (6mm or 8mm) before proceeding. Having the right tool will make the job significantly easier and prevent any potential damage.
Step 2: Understand Pedal Thread Direction: Right vs. Left
 Right bike pedal thread direction illustration
 Left bike pedal thread direction illustration
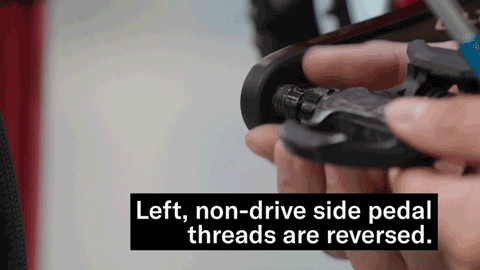
One of the most common points of confusion when removing or installing bike pedals is the thread direction. It’s essential to understand that bike pedals have different thread directions to prevent them from loosening while you pedal.
-
Right Pedal (Drive Side): This pedal has a standard thread. This means you turn it clockwise to tighten and counterclockwise to loosen – “righty-tighty, lefty-loosey.”
-
Left Pedal (Non-Drive Side): This pedal has a reverse thread (also known as left-hand thread). This is crucial: you turn it counterclockwise to tighten and clockwise to loosen. It’s the opposite of the standard thread.
This reverse threading on the left pedal is designed to counteract the natural tendency of the pedal to unscrew itself due to the rotational forces during pedaling.
To help remember the direction for both removal and installation, visualize this:
 Bike pedal removal and installation direction towards front and rear wheel illustration
- To Remove Pedals: Position your wrench on the pedal spindle and turn the top of the wrench towards the REAR wheel of the bike to loosen both pedals.
- To Install Pedals: Position your wrench and turn the top of the wrench towards the FRONT wheel of the bike to tighten both pedals.
If you are still unsure which pedal is which, look for markings. Most pedals have an “R” for Right and “L” for Left stamped on the pedal spindle or body. If no markings are visible, examine the threads closely to determine the tightening direction.
Step 2.5: Always Grease Pedal Threads Before Installation
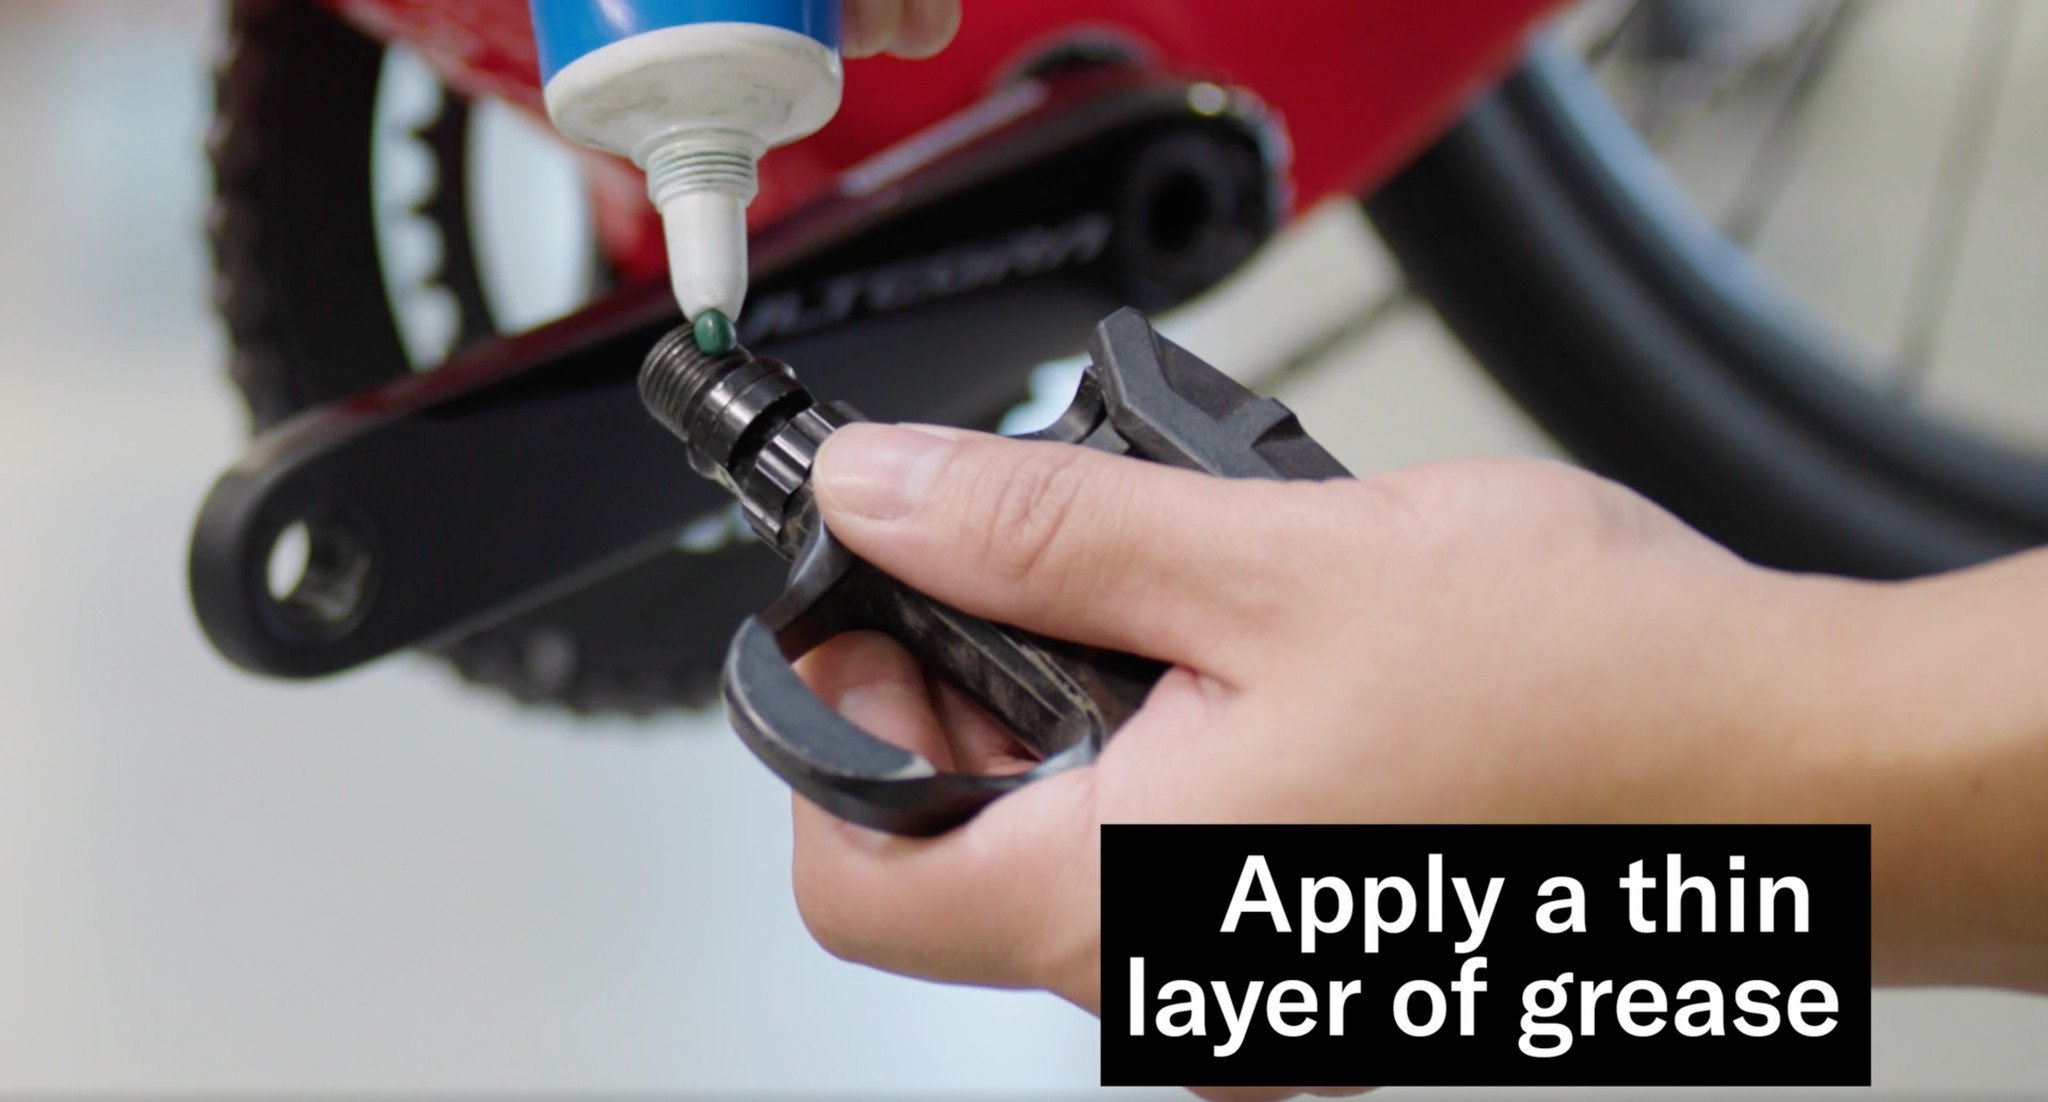 Applying grease to bike pedal threads before installation
Preventing stuck pedals in the future is easier than dealing with them later. Before you install any bike pedals, always apply a small amount of grease to the pedal threads. Grease acts as a barrier against moisture and prevents corrosion, which is the primary culprit behind pedals seizing and becoming incredibly difficult to remove.
If you are reinstalling used pedals, take a moment to wipe off any old grease and dirt from the threads before applying fresh grease. You don’t need to slather grease on; a small dab spread thinly and evenly around the threads of the pedal spindle is sufficient.
While bike-specific grease is readily available and affordable, lasting for many applications, you can also use waterproof grease or anti-seize compound from hardware or auto parts stores. In an emergency, a very small amount of Vaseline can work temporarily, but it’s best to use proper grease as soon as you can. Installing pedals without grease, even for a short time, can lead to problems down the road, especially if you ride in wet conditions.
Step 3: Removing Your Bike Pedals: Step-by-Step
Now that you have the right tools and understand thread direction, let’s get those pedals off:
- Position Your Bike: Ideally, use a bike stand for stability. If you don’t have one, lean your bike against a wall or have someone hold it steady.
- Locate the Correct Tool Fit: Ensure your pedal wrench or hex wrench is securely engaged with the pedal spindle. For pedal wrenches, make sure it’s firmly on the flats. For hex wrenches, ensure it’s fully inserted into the spindle end.
- Apply Force in the Correct Direction (Removal): Remember, to remove pedals, you want to turn the top of your wrench towards the rear wheel of the bike for both pedals.
- Right Pedal (Standard Thread): Turn counterclockwise.
- Left Pedal (Reverse Thread): Turn clockwise.
- Use Firm, Steady Pressure: Pedals can sometimes be tight, especially if they haven’t been removed in a while. Apply firm, steady pressure to the wrench. Avoid jerky or excessive force, which could slip and damage the tool or your knuckles. If a pedal is particularly stubborn, try applying penetrating oil and let it sit for a few minutes before trying again.
- Loosen and Unscrew: Once you break the initial tightness, the pedal should unscrew relatively easily by hand. Continue turning until the pedal is completely removed from the crank arm.
- Repeat for the Other Pedal: Follow the same steps for the other pedal, remembering to reverse the direction if you are working on the left (non-drive) side of the bike due to the reverse threading.
Step 4: Installing Your Bike Pedals: Step-by-Step
Once you’ve removed your pedals, installing new ones or reinstalling the old ones is the reverse process:
- Grease the Threads: As emphasized earlier, always grease the threads of your pedals before installation.
- Start by Hand: Begin threading the pedal into the crank arm by hand. This is crucial to prevent cross-threading. Turn the pedal spindle into the crank arm, turning the top of the pedal spindle towards the front wheel of the bike for both pedals.
- Right Pedal (Standard Thread): Turn clockwise.
- Left Pedal (Reverse Thread): Turn counterclockwise.
- Ensure Smooth Threading: The pedal should thread in smoothly and easily. If you encounter resistance, stop immediately. Do not force it. Resistance is a sign of cross-threading (see important tip below). Back the pedal out, inspect the threads for damage, re-grease, and try again, making sure the pedal is starting straight.
- Tighten with a Wrench: Once you’ve threaded the pedal in as far as you can by hand, use your pedal wrench or hex wrench to tighten it fully.
- Apply Sufficient Torque: Bike pedals don’t require excessive torque. The motion of pedaling actually helps to keep them tightened over time. The typical recommended torque is around 360 inch-pounds or 40.5 Newton meters. However, many mechanics tighten pedals firmly by hand. A good guideline is to tighten until the pedal spindle contacts the crank arm and then give it a firm “oomph” with your wrench – about a quarter to half turn more after initial contact. This should be sufficient to keep the pedal secure without making it too difficult to remove later.
- Repeat for the Other Pedal: Install the other pedal, again remembering the reverse thread for the left pedal and greasing the threads.
Important Tip: Avoiding Cross-Threading Bike Pedals
Cross-threading is a common issue and can seriously damage your crank arms. It occurs when the pedal threads are not aligned correctly with the threads in the crank arm and you force them together. Cross-threading can ruin the threads in your expensive crank arms, and in severe cases, can cause a pedal to fail while riding, which could be dangerous.
How to Prevent Cross-Threading:
- Start by Hand, Straight and True: Always begin threading pedals by hand. Ensure the pedal is perfectly straight and aligned with the crank arm threads.
- No Resistance: Pedals should thread in easily by hand for several turns. If you feel any resistance or if it feels like it’s binding, stop immediately.
- Inspect and Re-attempt: If you feel resistance, back the pedal out completely. Inspect the pedal threads and the crank arm threads for any damage or debris. Clean and re-grease the threads, and then carefully try again, ensuring proper alignment. If it still resists, it’s best to consult a bike mechanic to check for damaged threads on either the pedals or crank arms.
By following these steps and taking your time, you can easily remove and install your bike pedals, keeping your bike in top condition for every ride.