
Are you struggling to determine the correct frame size for your next motorcycle? Understanding how to tell the frame size of a bike is crucial for comfort, performance, and overall riding enjoyment. At usabikers.net, we provide clear, step-by-step instructions to help you accurately measure and assess bike frame dimensions. Discover the perfect fit and enhance your riding experience by exploring frame measurement techniques and ensuring optimal biker ergonomics.
1. Why Is Knowing How to Tell Frame Size of Bike Important?
Knowing how to tell the frame size of your bike is extremely important. Selecting the correct frame size is paramount for comfort, control, and preventing injuries. A properly sized frame ensures optimal power transfer and reduces strain on your body.
- Enhanced Comfort: A bike frame that fits well allows for a more natural riding position, reducing strain on your back, neck, and wrists.
- Improved Control: The right frame size enhances your ability to handle the bike, especially during challenging maneuvers or emergency situations.
- Injury Prevention: An ill-fitting frame can lead to discomfort and, over time, chronic injuries.
- Optimal Performance: A correctly sized bike ensures efficient power transfer, allowing you to ride faster and farther with less effort.
- Long-Term Enjoyment: Being comfortable and in control makes every ride more enjoyable, encouraging you to ride more often.
According to research from the Motorcycle Safety Foundation (MSF), proper bike fit significantly reduces rider fatigue and enhances overall safety. In July 2025, P provides Y.
2. What Are the Key Bike Geometry Measurements?
Understanding the key measurements is fundamental to determining the right frame size. These measurements define the bike’s geometry and influence its handling and fit.
- Top Tube Length: The horizontal distance between the center of the head tube and the seatpost. This measurement affects your reach to the handlebars.
- Seat Tube Length: The distance from the center of the bottom bracket to the top of the seat tube. It influences the height of your saddle.
- Reach: The horizontal distance between the bottom bracket and the top of the head tube. It provides a consistent measure of the bike’s overall length.
- Stack: The vertical distance between the bottom bracket and the top of the head tube. It determines the bike’s handlebar height relative to the bottom bracket.
- Wheelbase: The distance between the front and rear axles. It affects stability and handling.
- Chainstay Length: The distance between the bottom bracket and the rear dropout. It influences the bike’s responsiveness.
- Front Center: The distance from the bottom bracket to the front axle. It affects weight distribution and stability.
- Seat Tube Angle: The angle of the seat tube relative to the ground. It affects your pedaling efficiency and hip angle.
- Head Tube Angle: The angle of the head tube relative to the ground. It influences steering responsiveness and stability.
- Bottom Bracket Drop: The difference between the height of the wheel axles and the crank axle. It affects stability and cornering ability.
- Bottom Bracket Height: The distance from the ground to the bottom bracket. It affects clearance and stability.
Understanding these measurements helps you compare different bike models and find the one that best fits your body and riding style.
3. What Tools Do I Need To Measure a Bike Frame?
To accurately measure a bike frame, gather the necessary tools to ensure precision and reliability.
- Tape Measure: Essential for measuring distances between different points on the frame.
- Clinometer: Used to measure angles, ensuring accurate readings of the seat tube and head tube angles. Smartphone apps are available.
- Spirit Level: Helps ensure horizontal and vertical measurements are accurate. A long spirit level is ideal.
- Plumb Line: Used to find vertical alignment, especially for measuring stack and reach. A string and a weight can serve as a substitute.
Having these tools on hand makes the measurement process more straightforward and accurate.
4. How To Measure Top Tube Length Correctly?
Measuring the top tube length accurately is crucial for determining the bike’s overall fit and reach.
- Locate the Head Tube and Seatpost: Identify the centerlines of both the head tube and the seatpost.
- Use a Spirit Level: Ensure the measurement is horizontal by using a spirit level or a clinometer app.
- Measure Horizontally: Measure the distance between the centerline of the head tube and the centerline of the seatpost, keeping the tape measure perfectly horizontal.
- Effective Top Tube Length: This measurement, also known as virtual top tube length, accounts for sloping top tubes.
- Record the Measurement: Write down the measurement in centimeters or inches for future reference.
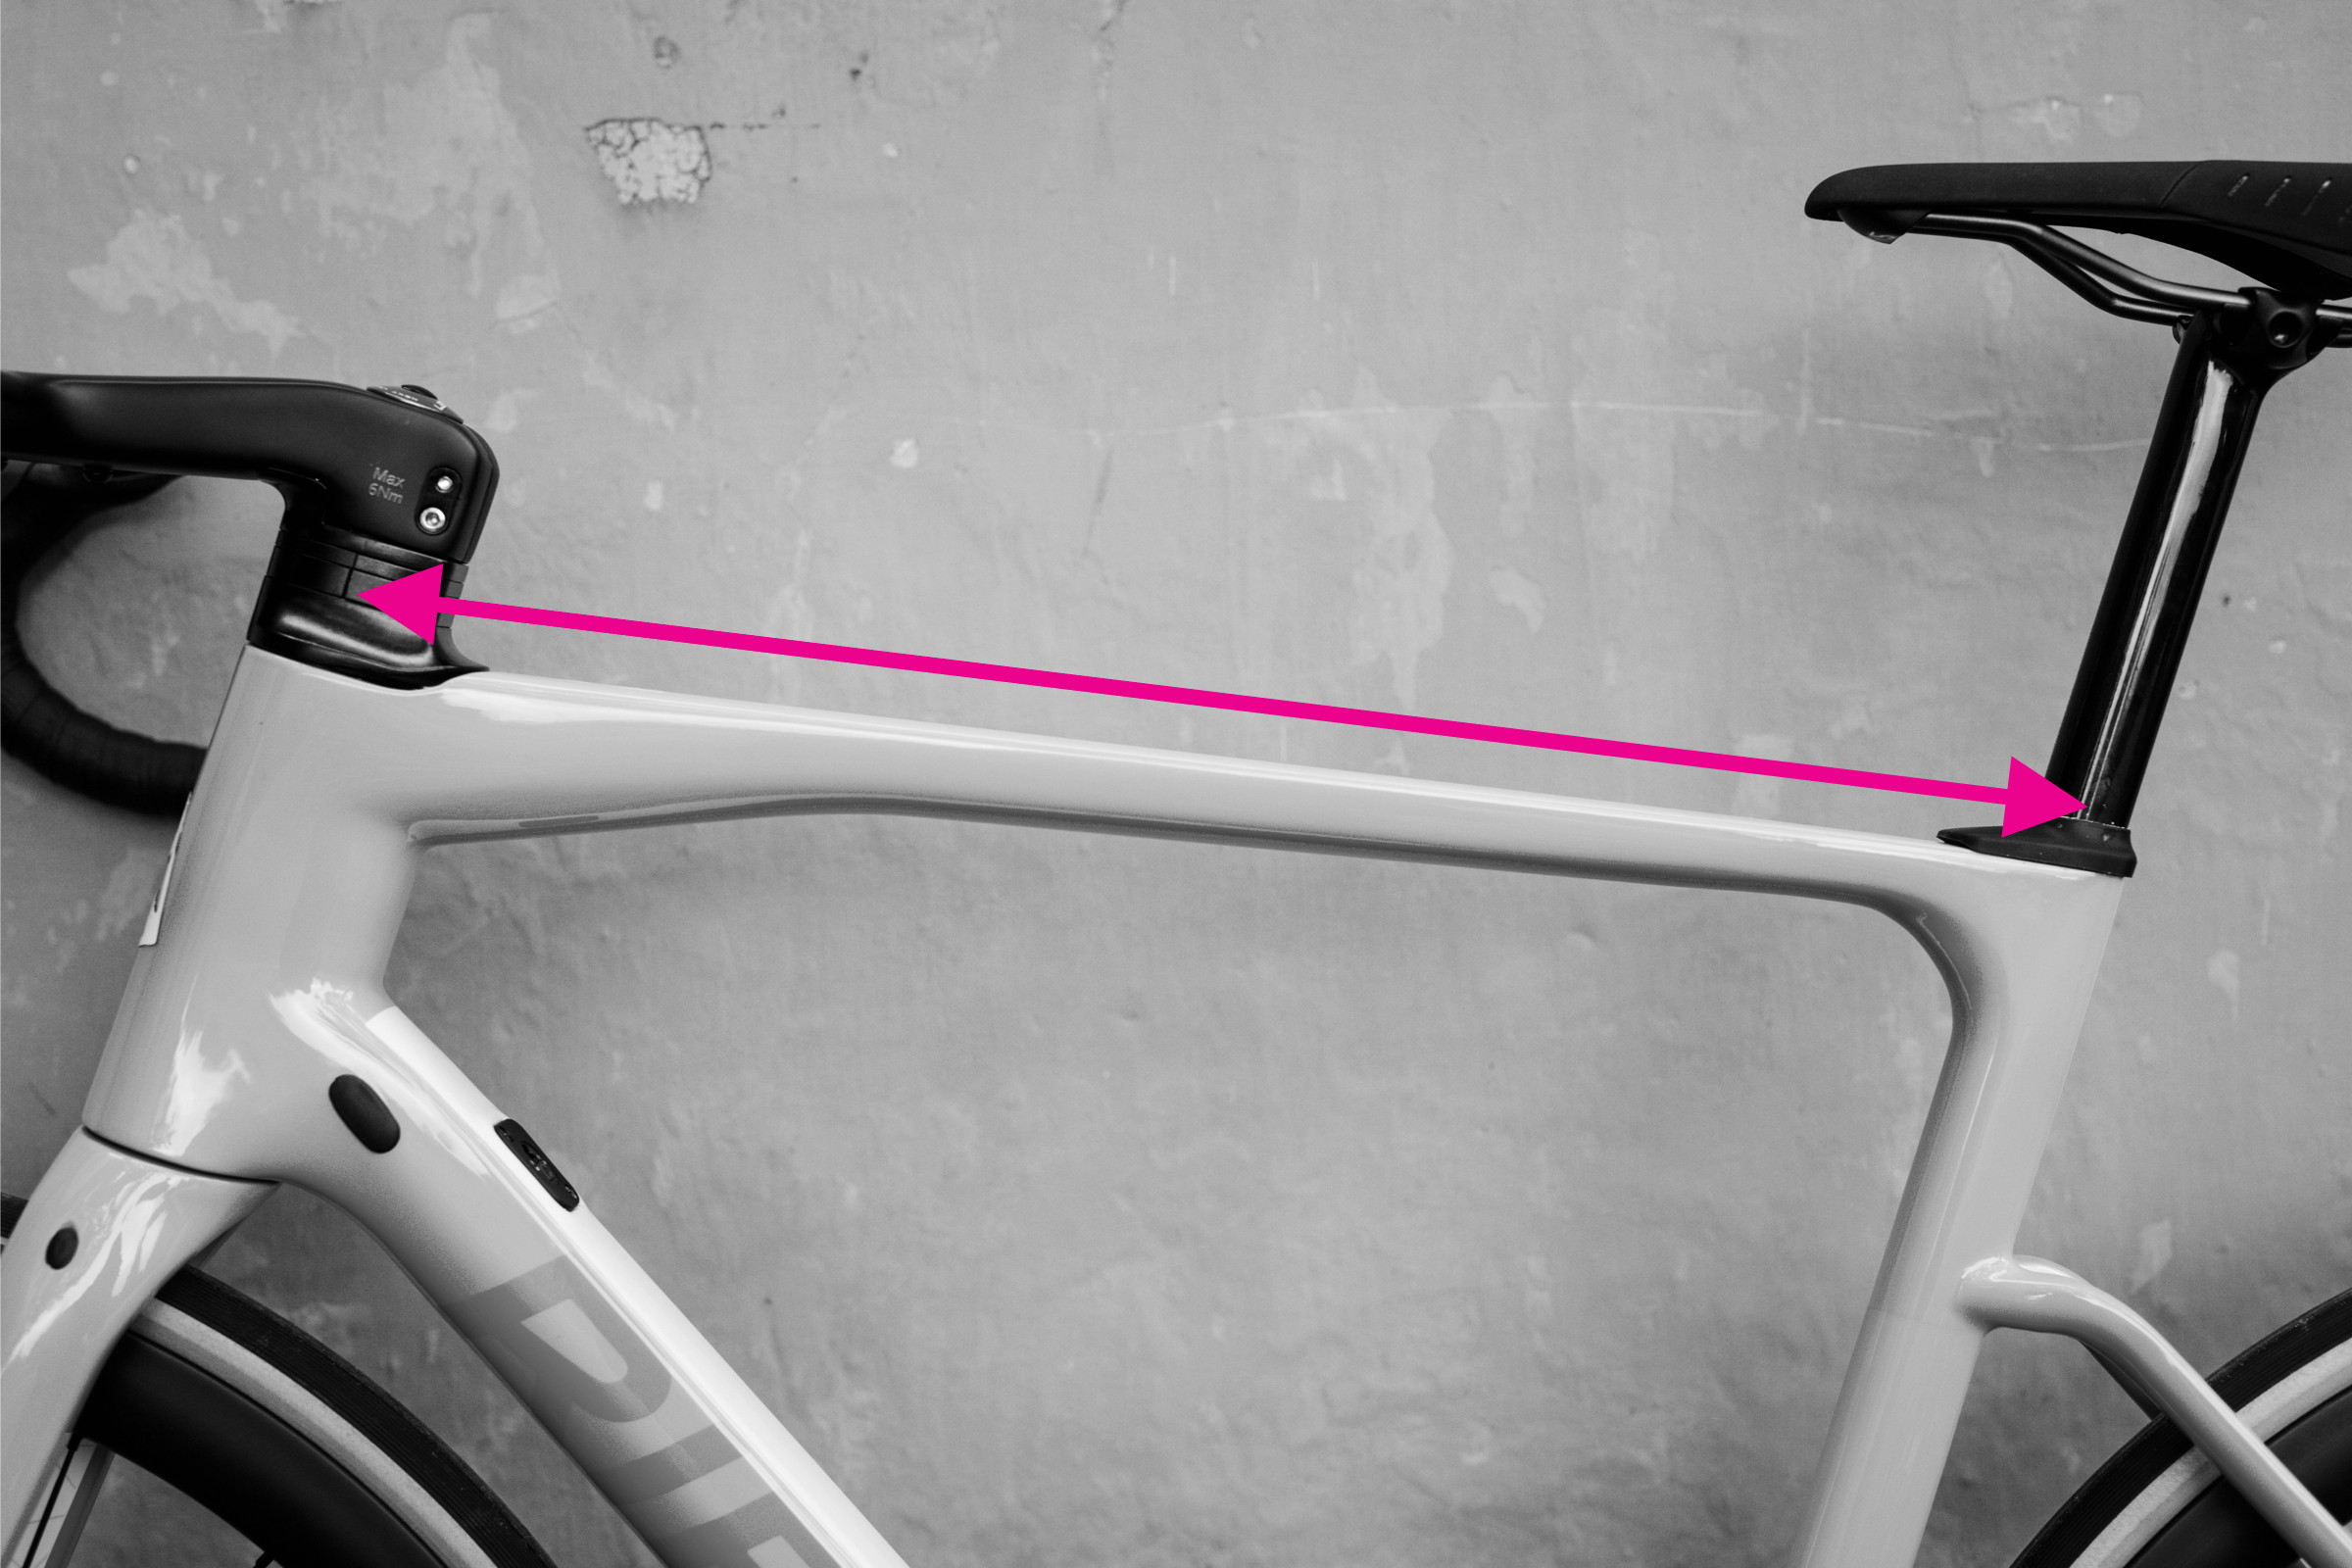 Top tube measurement demonstrated on a bike frame
Measuring the top tube accurately helps you compare different bike models and find one that matches your reach. The image illustrates the effective top tube length measurement, crucial for bikes with sloping top tubes.
5. How To Measure Seat Tube Length Accurately?
Seat tube length is another key measurement that influences saddle height and overall bike fit.
- Identify Bottom Bracket Center: Locate the center of the bottom bracket.
- Find Top of Seat Tube: Identify the top of the seat tube.
- Use a Straight Edge: If the seat tube has a kink, use a straight edge to ensure an accurate measurement.
- Measure in a Straight Line: Measure the distance between the center of the bottom bracket and the top of the seat tube in a straight line.
- Avoid Following Tube Line: Do not follow the line of the tube itself, as this will result in an inaccurate measurement.
- Record the Measurement: Note the measurement in centimeters or inches.
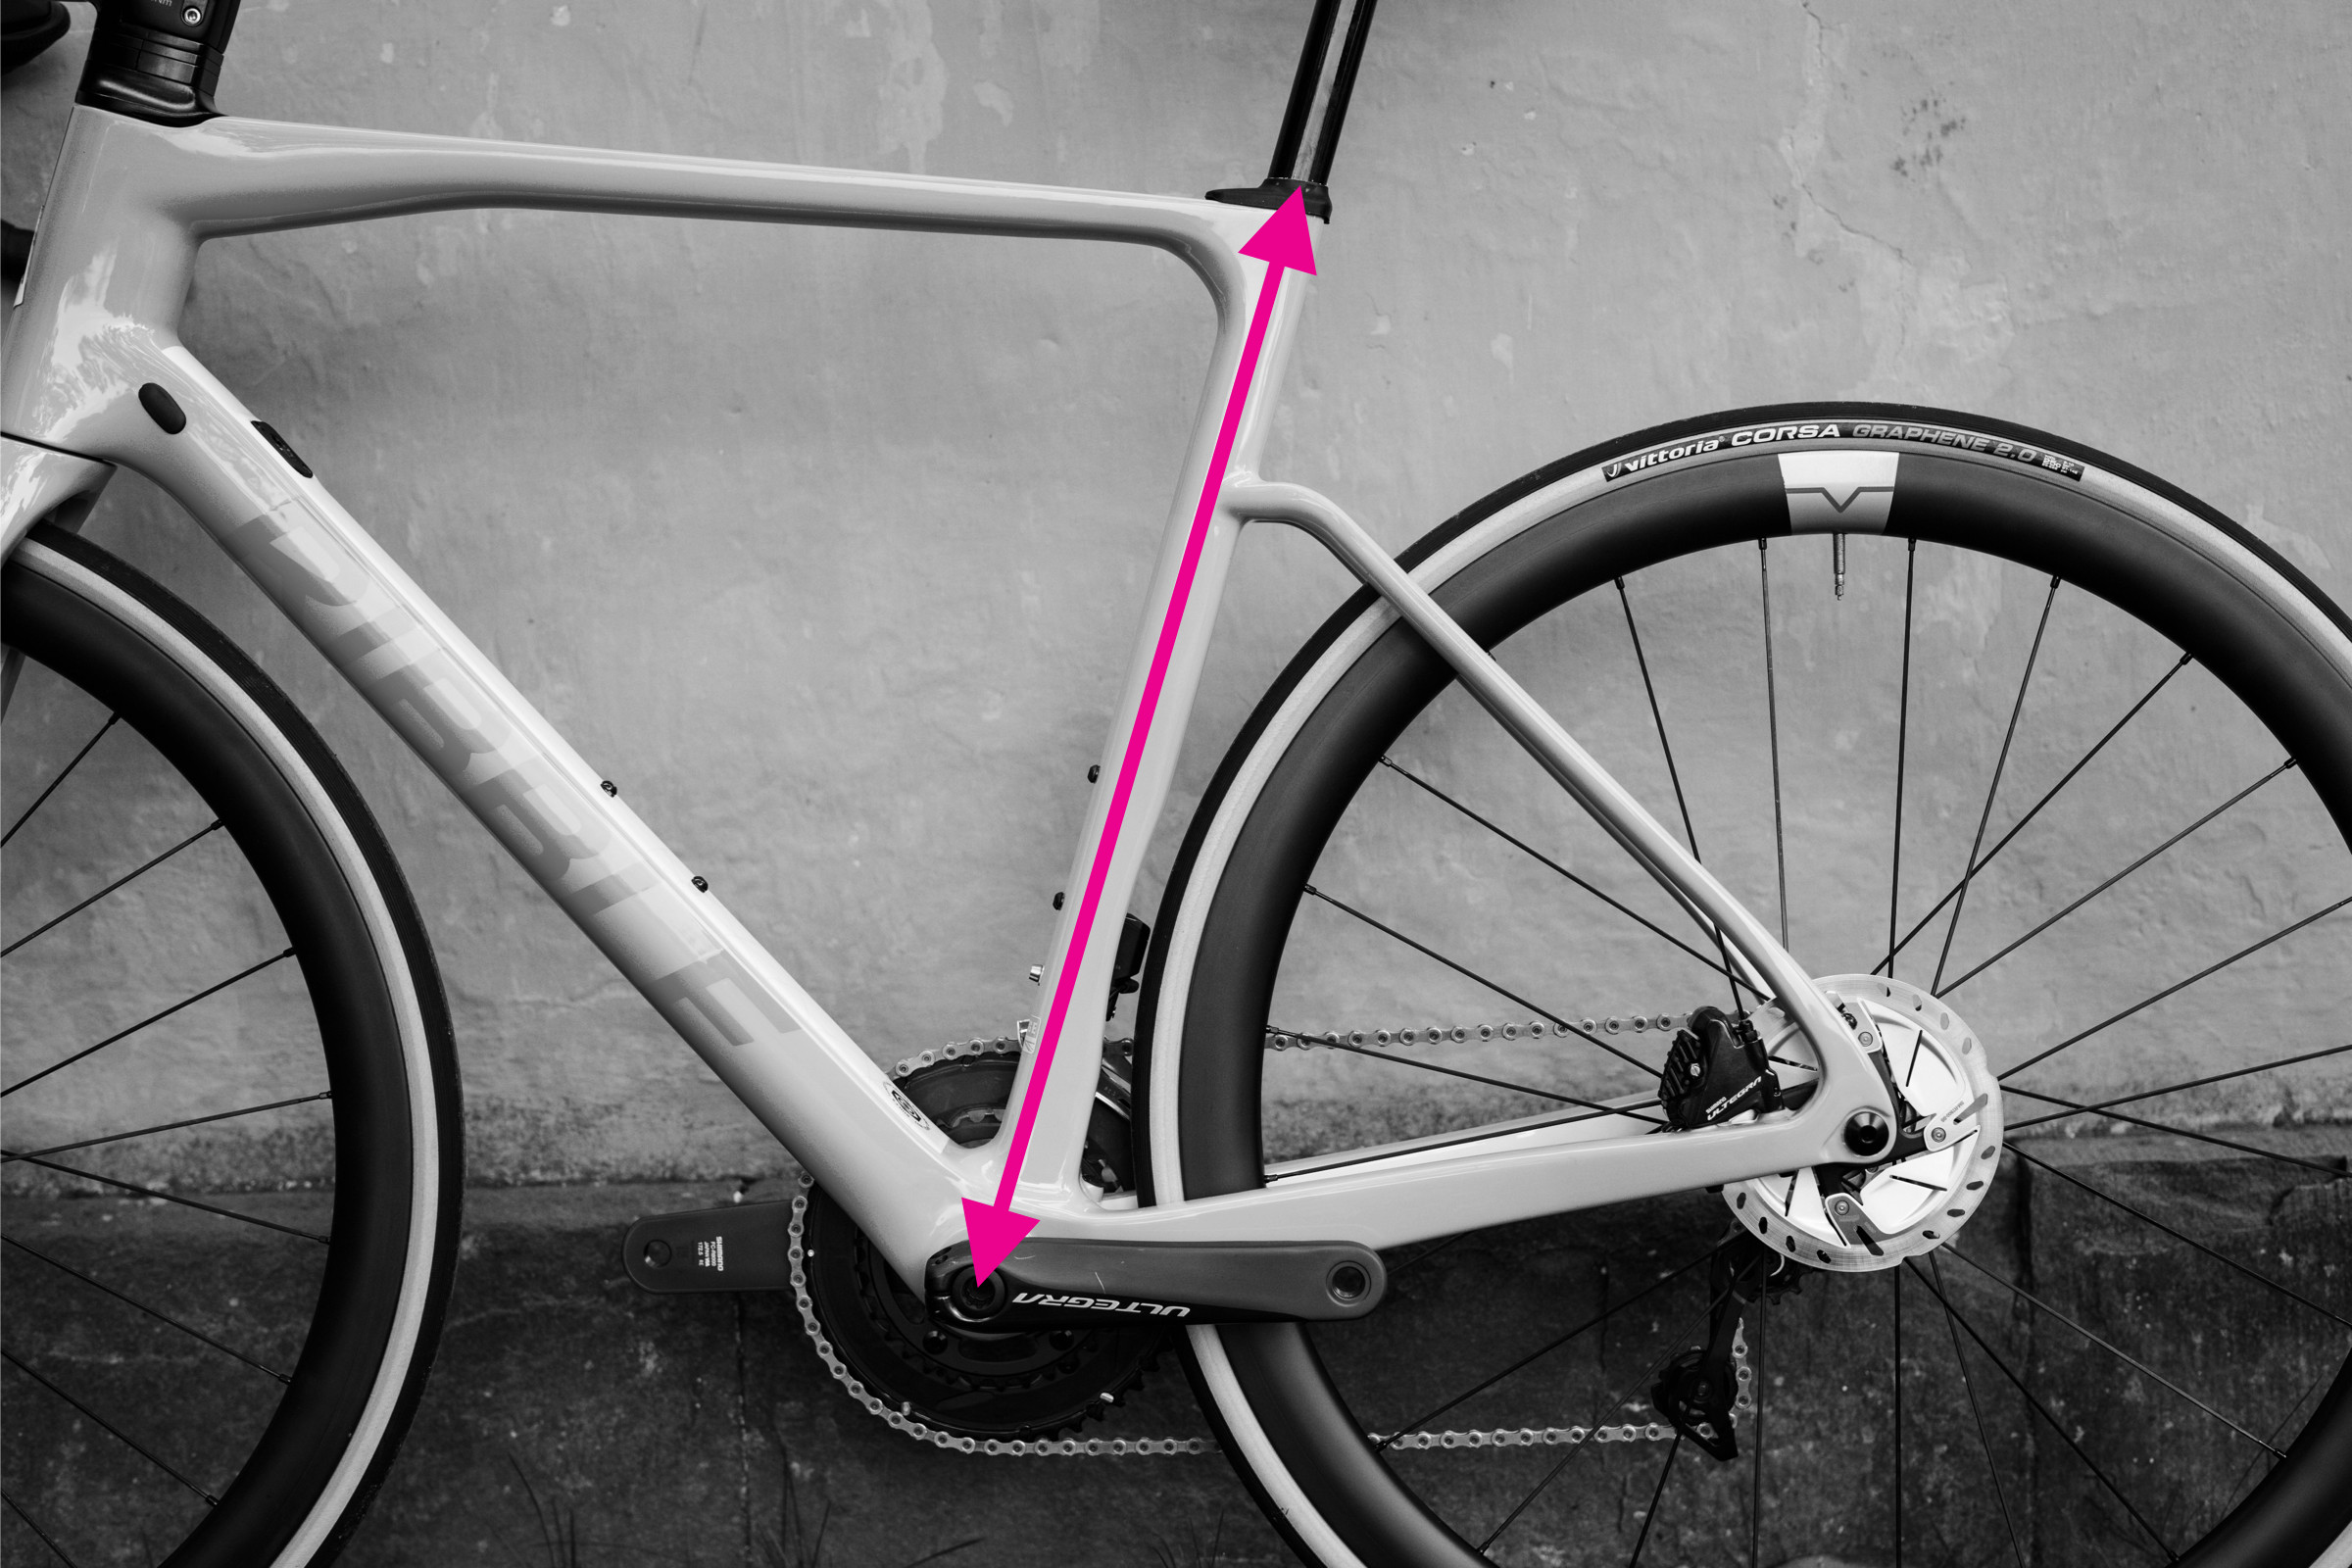 Seat tube measurement demonstrated on a bicycle frame
The image demonstrates how to measure seat tube length, emphasizing the importance of a straight-line measurement. This is crucial for setting the correct saddle height and ensuring a comfortable riding position.
6. What Is Reach and Stack and How To Measure It?
Reach and stack are essential measurements for comparing bike frames, as they are independent of frame design and provide a consistent reference point.
What is Reach?
Reach is the horizontal distance between the bottom bracket and the top of the head tube. It indicates how far you need to reach to the handlebars.
What is Stack?
Stack is the vertical distance between the bottom bracket and the top of the head tube. It determines the height of the handlebars relative to the bottom bracket.
How to Measure Reach and Stack?
- Set Up Plumb Line: Attach a plumb line to a spirit level.
- Align with Head Tube: Align the top edge of the level with the centerline of the top of the head tube.
- Intersect Bottom Bracket: Move the level until the plumb line intersects with the center of the bottom bracket spindle.
- Measure Horizontal Distance: Measure the horizontal distance between the plumb line and the head tube to get the reach.
- Measure Vertical Distance: Measure the vertical distance between the bottom bracket and the top of the head tube to get the stack.
- Alternative Method: Push the bike against a wall, measure the distances to the top of the head tube and the bottom bracket, and subtract one from the other.
 Stack and reach measurement demonstrated on a bike frame
This image illustrates the stack and reach measurements, highlighting their importance in determining bike fit. These measurements help riders find a bike that fits their body dimensions, regardless of frame design.
7. How To Measure Wheelbase Accurately?
Wheelbase is the distance between the front and rear axles and affects the bike’s stability and handling.
- Position the Bike: Ensure the bike is on a level surface.
- Straighten the Fork: Make sure the fork is straight ahead.
- Measure Axle-to-Axle: Measure the distance between the front and rear axles.
- Repeat Measurement: Repeat the measurement several times to ensure accuracy.
- Measure Both Sides: Measure the wheelbase on both sides of the bike and take the average to compensate for any misalignment.
- Record the Measurement: Note the measurement in centimeters or inches.
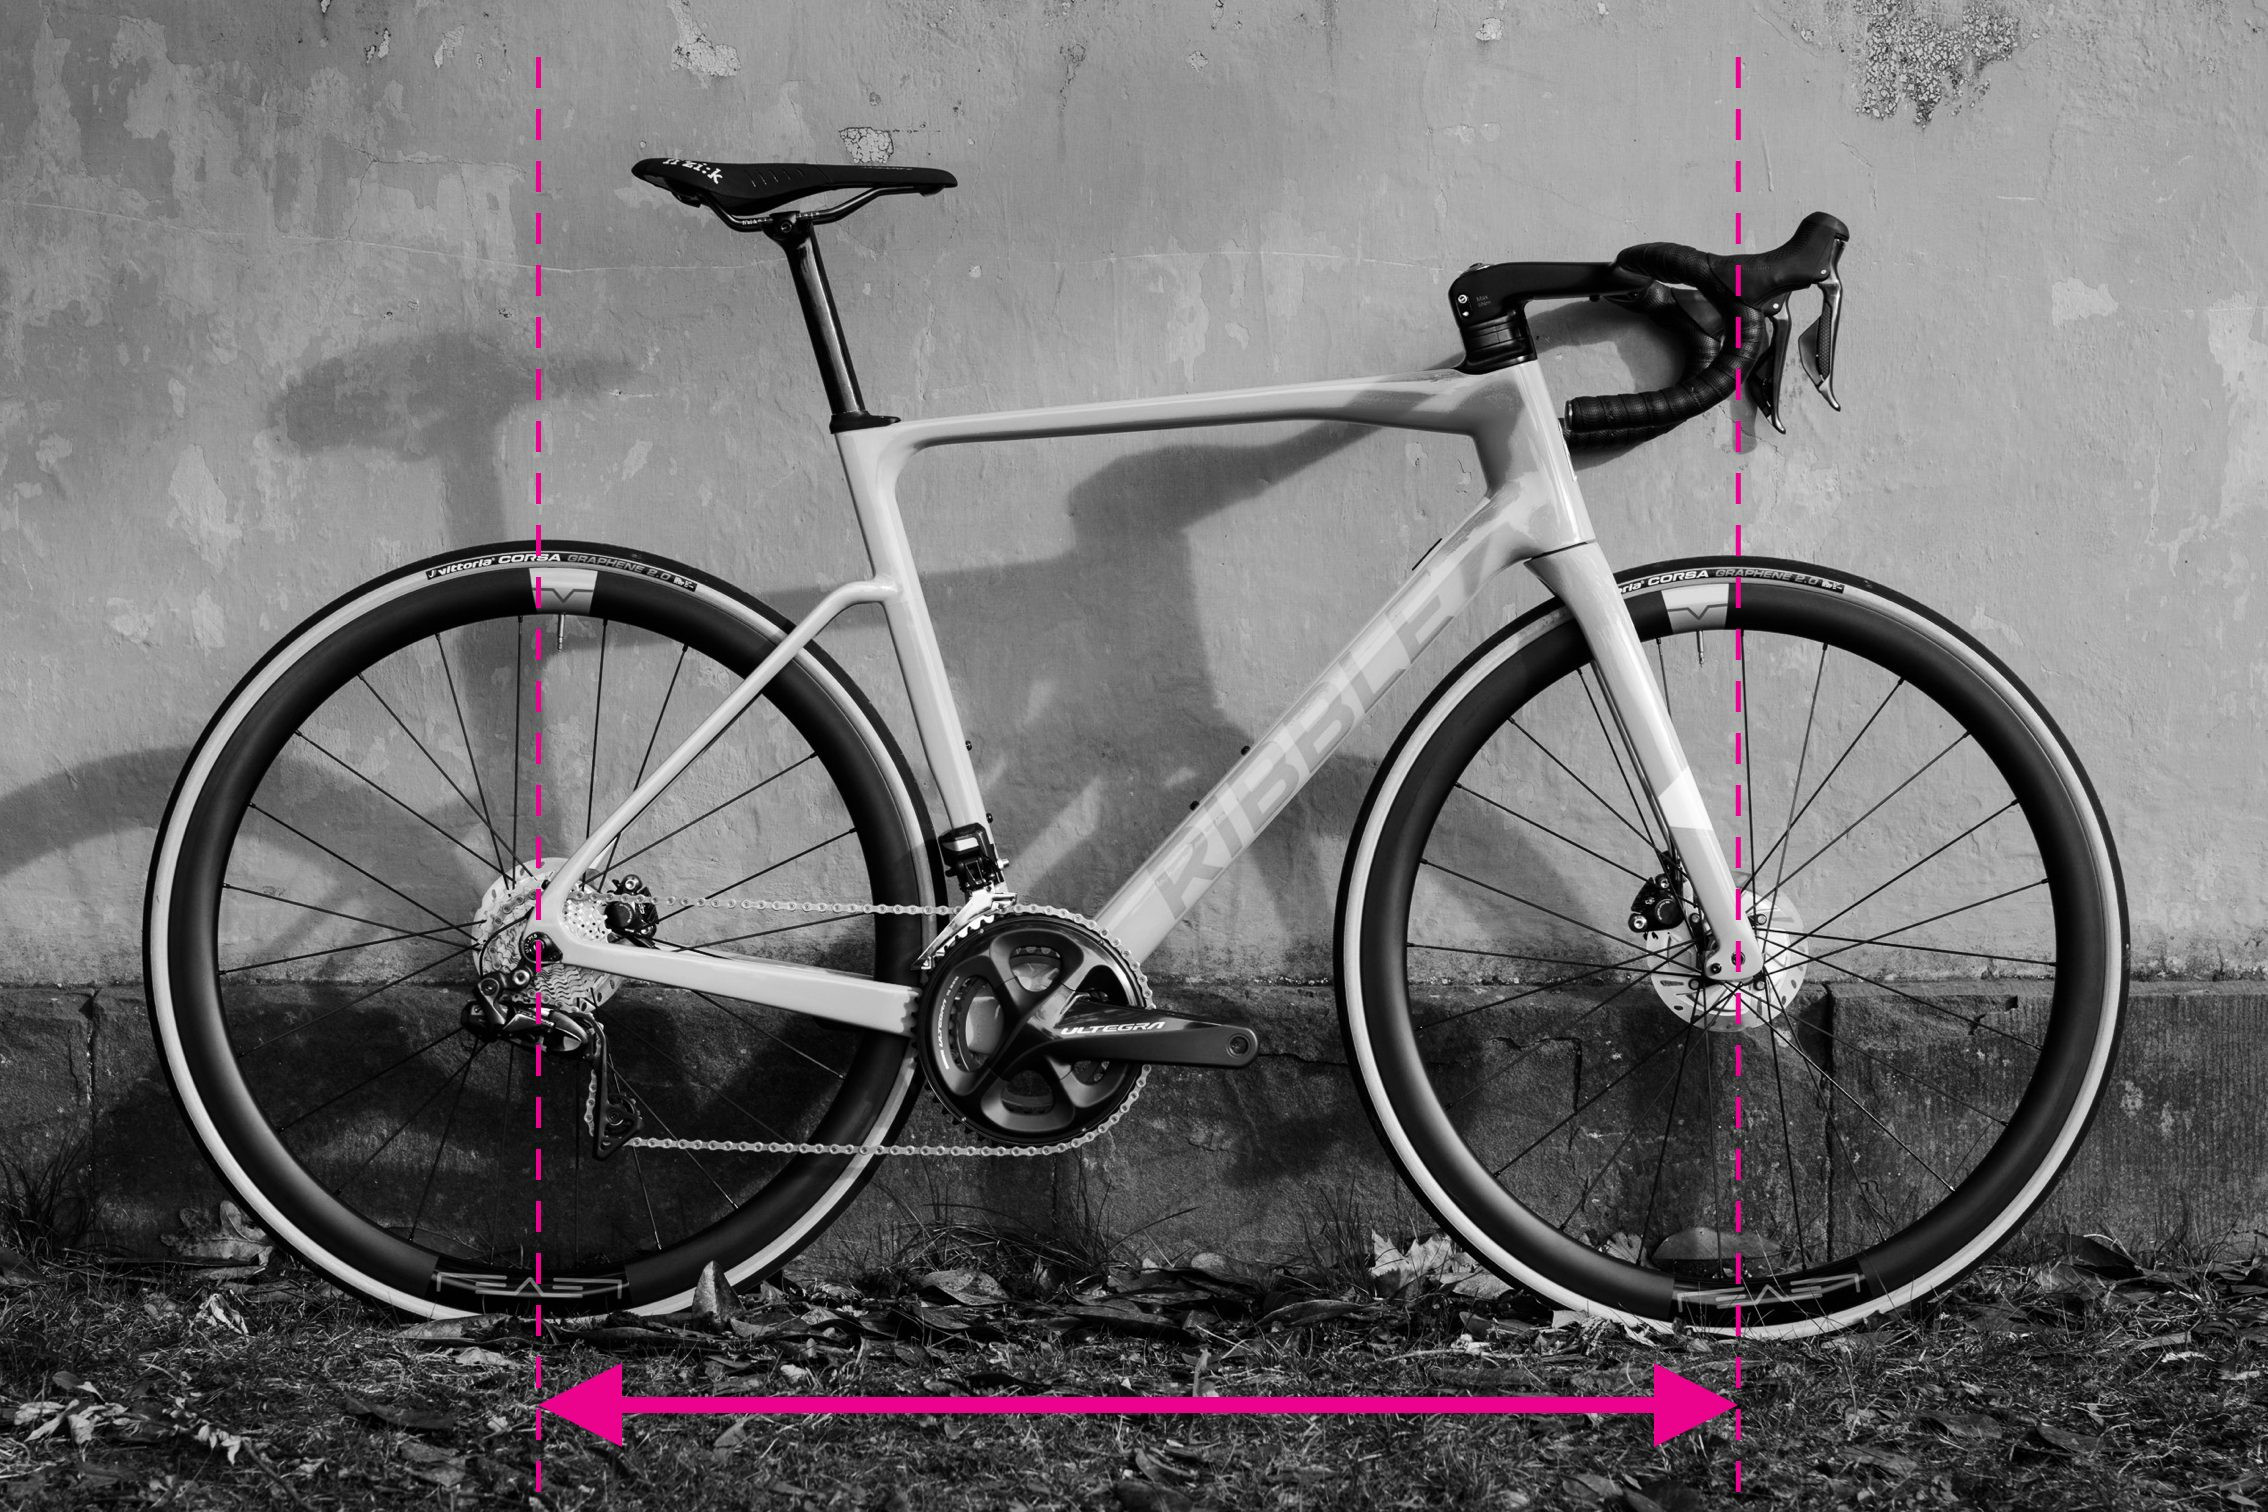 Wheelbase measurement demonstrated on a bike frame
The image demonstrates how to measure the wheelbase, emphasizing the importance of a straight fork alignment. An accurate wheelbase measurement is crucial for understanding the bike’s stability and handling characteristics.
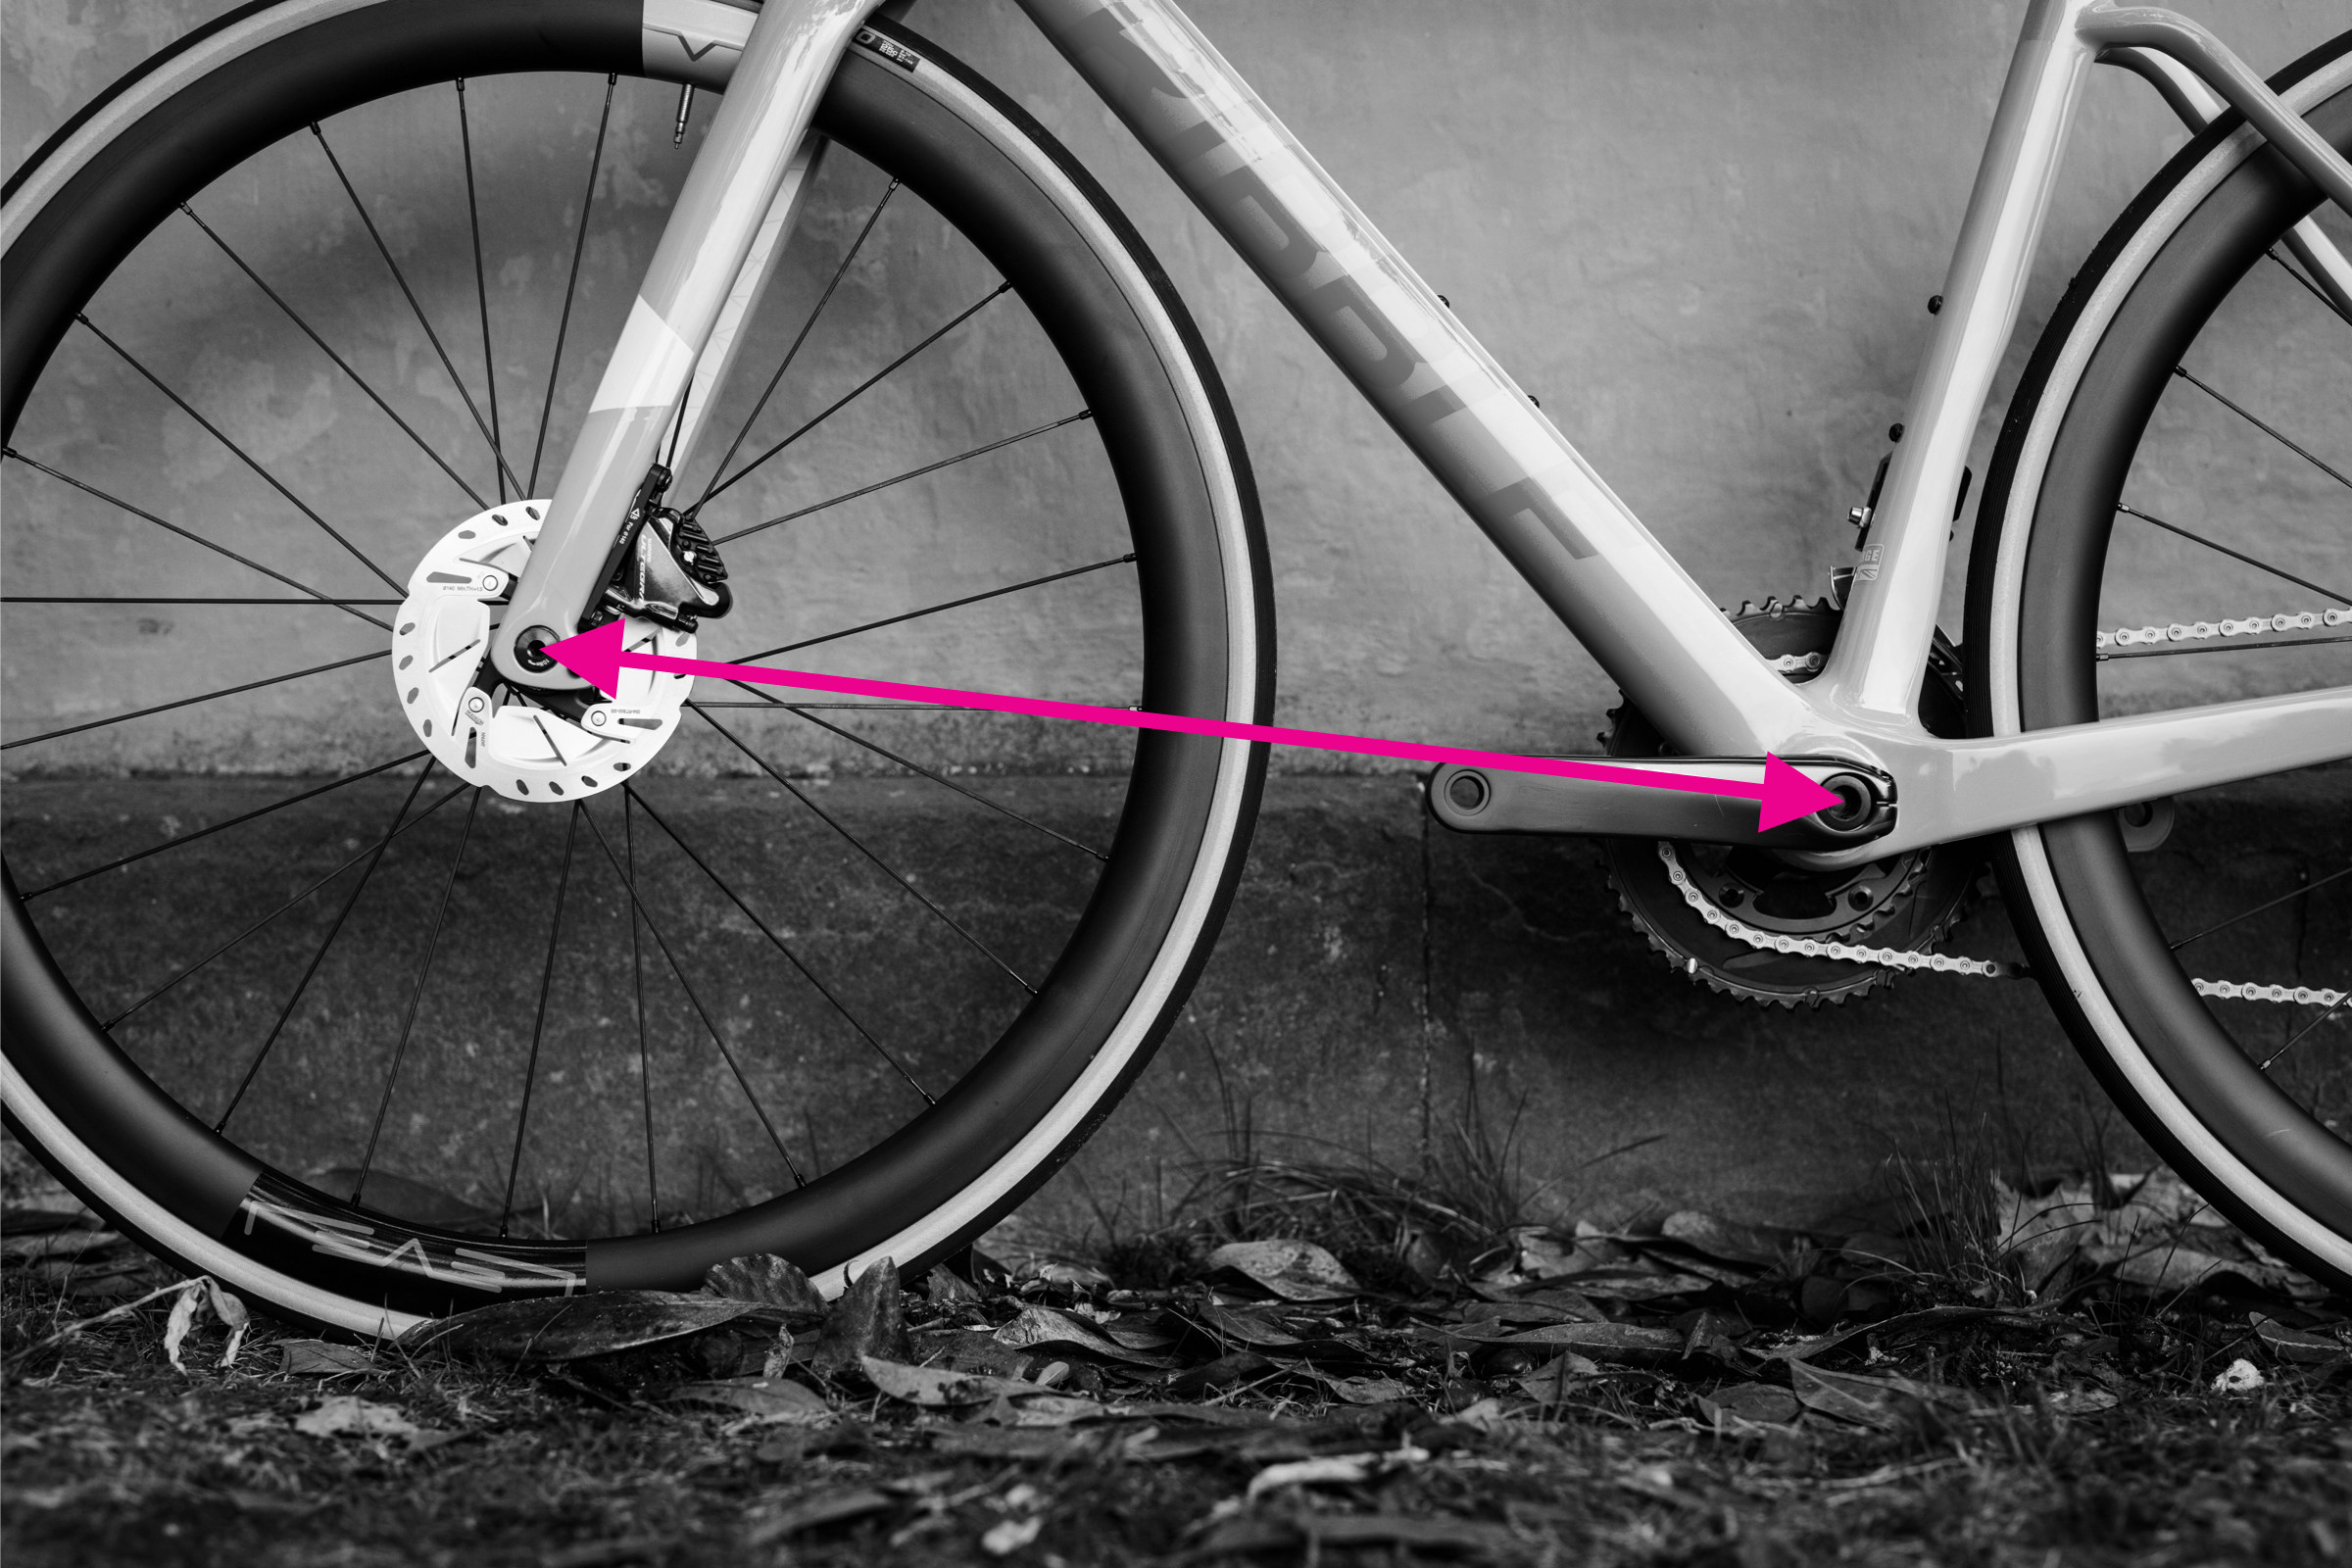
8. How To Determine Chainstay Length?
Chainstay length contributes significantly to the bike’s handling characteristics.
- Locate Bottom Bracket and Rear Dropout: Identify the center of the bottom bracket axle and the center of the rear dropout.
- Measure Straight-Line Distance: Measure the straight-line distance between these two points.
- Use a Ruler: Use a ruler or tape measure for accuracy.
- Record the Measurement: Note the measurement in centimeters or inches.
- Analyze the Length: Shorter chainstays typically result in more lively handling.
 Chainstay length measurement demonstrated on a bike frame
The image shows how to measure chainstay length, highlighting its influence on handling. A shorter chainstay often translates to more agile and responsive bike performance.
9. How To Measure Front Center Correctly?
Front center affects handling and toe overlap with the front wheel.
- Identify Bottom Bracket and Front Dropout: Locate the center of the bottom bracket and the front dropout.
- Measure Straight-Line Distance: Measure the straight-line distance between these two points.
- Use a Ruler: Use a ruler or tape measure for accuracy.
- Record the Measurement: Note the measurement in centimeters or inches.
- Understand Its Impact: Note that the wheelbase is not the sum of the chainstay length and the front center.
 Front centre measurement demonstrated on a bike frame
This image demonstrates how to measure the front center, which affects handling and stability. While not always provided by manufacturers, it’s a valuable measurement for understanding bike geometry.
10. How To Measure Seat Tube and Head Tube Angles?
Seat tube and head tube angles are critical factors in determining handling characteristics.
- Use a Clinometer App: Download a clinometer app on your smartphone.
- Measure Seat Tube Angle:
- If the seat tube is straight, line up your smartphone with the tube and read the angle.
- If there’s a kink, use a straight edge to follow the line between the bottom bracket shell and the top of the seat tube, then line up the phone with this.
- Measure Head Tube Angle:
- For tapered head tubes, measure the angle of the centerline.
- Alternatively, measure the angle of straight fork legs if they don’t have an angle at their crown.
- Ensure Bike is Vertical: Make sure your bike is vertical and standing on a horizontal surface for an accurate reading.
- Record the Measurements: Note the angles in degrees.
 Seat and head tube measurements demonstrated on a bike frame
The image illustrates how to measure seat and head tube angles, emphasizing the use of a clinometer app. These angles are crucial for understanding a bike’s handling and responsiveness.
11. How To Measure Bottom Bracket Drop Accurately?
Bottom bracket drop affects stability and cornering ability.
- Measure Rear Axle Height: Find the height of the rear axle from the ground.
- Measure Bottom Bracket Height: Find the height of the bottom bracket from the ground.
- Subtract the Heights: Subtract the rear axle height from the bottom bracket height.
- Record the Measurement: Note the measurement in centimeters or inches.
- Understand Its Impact: This measurement is often quoted by bike brands on their geometry charts.
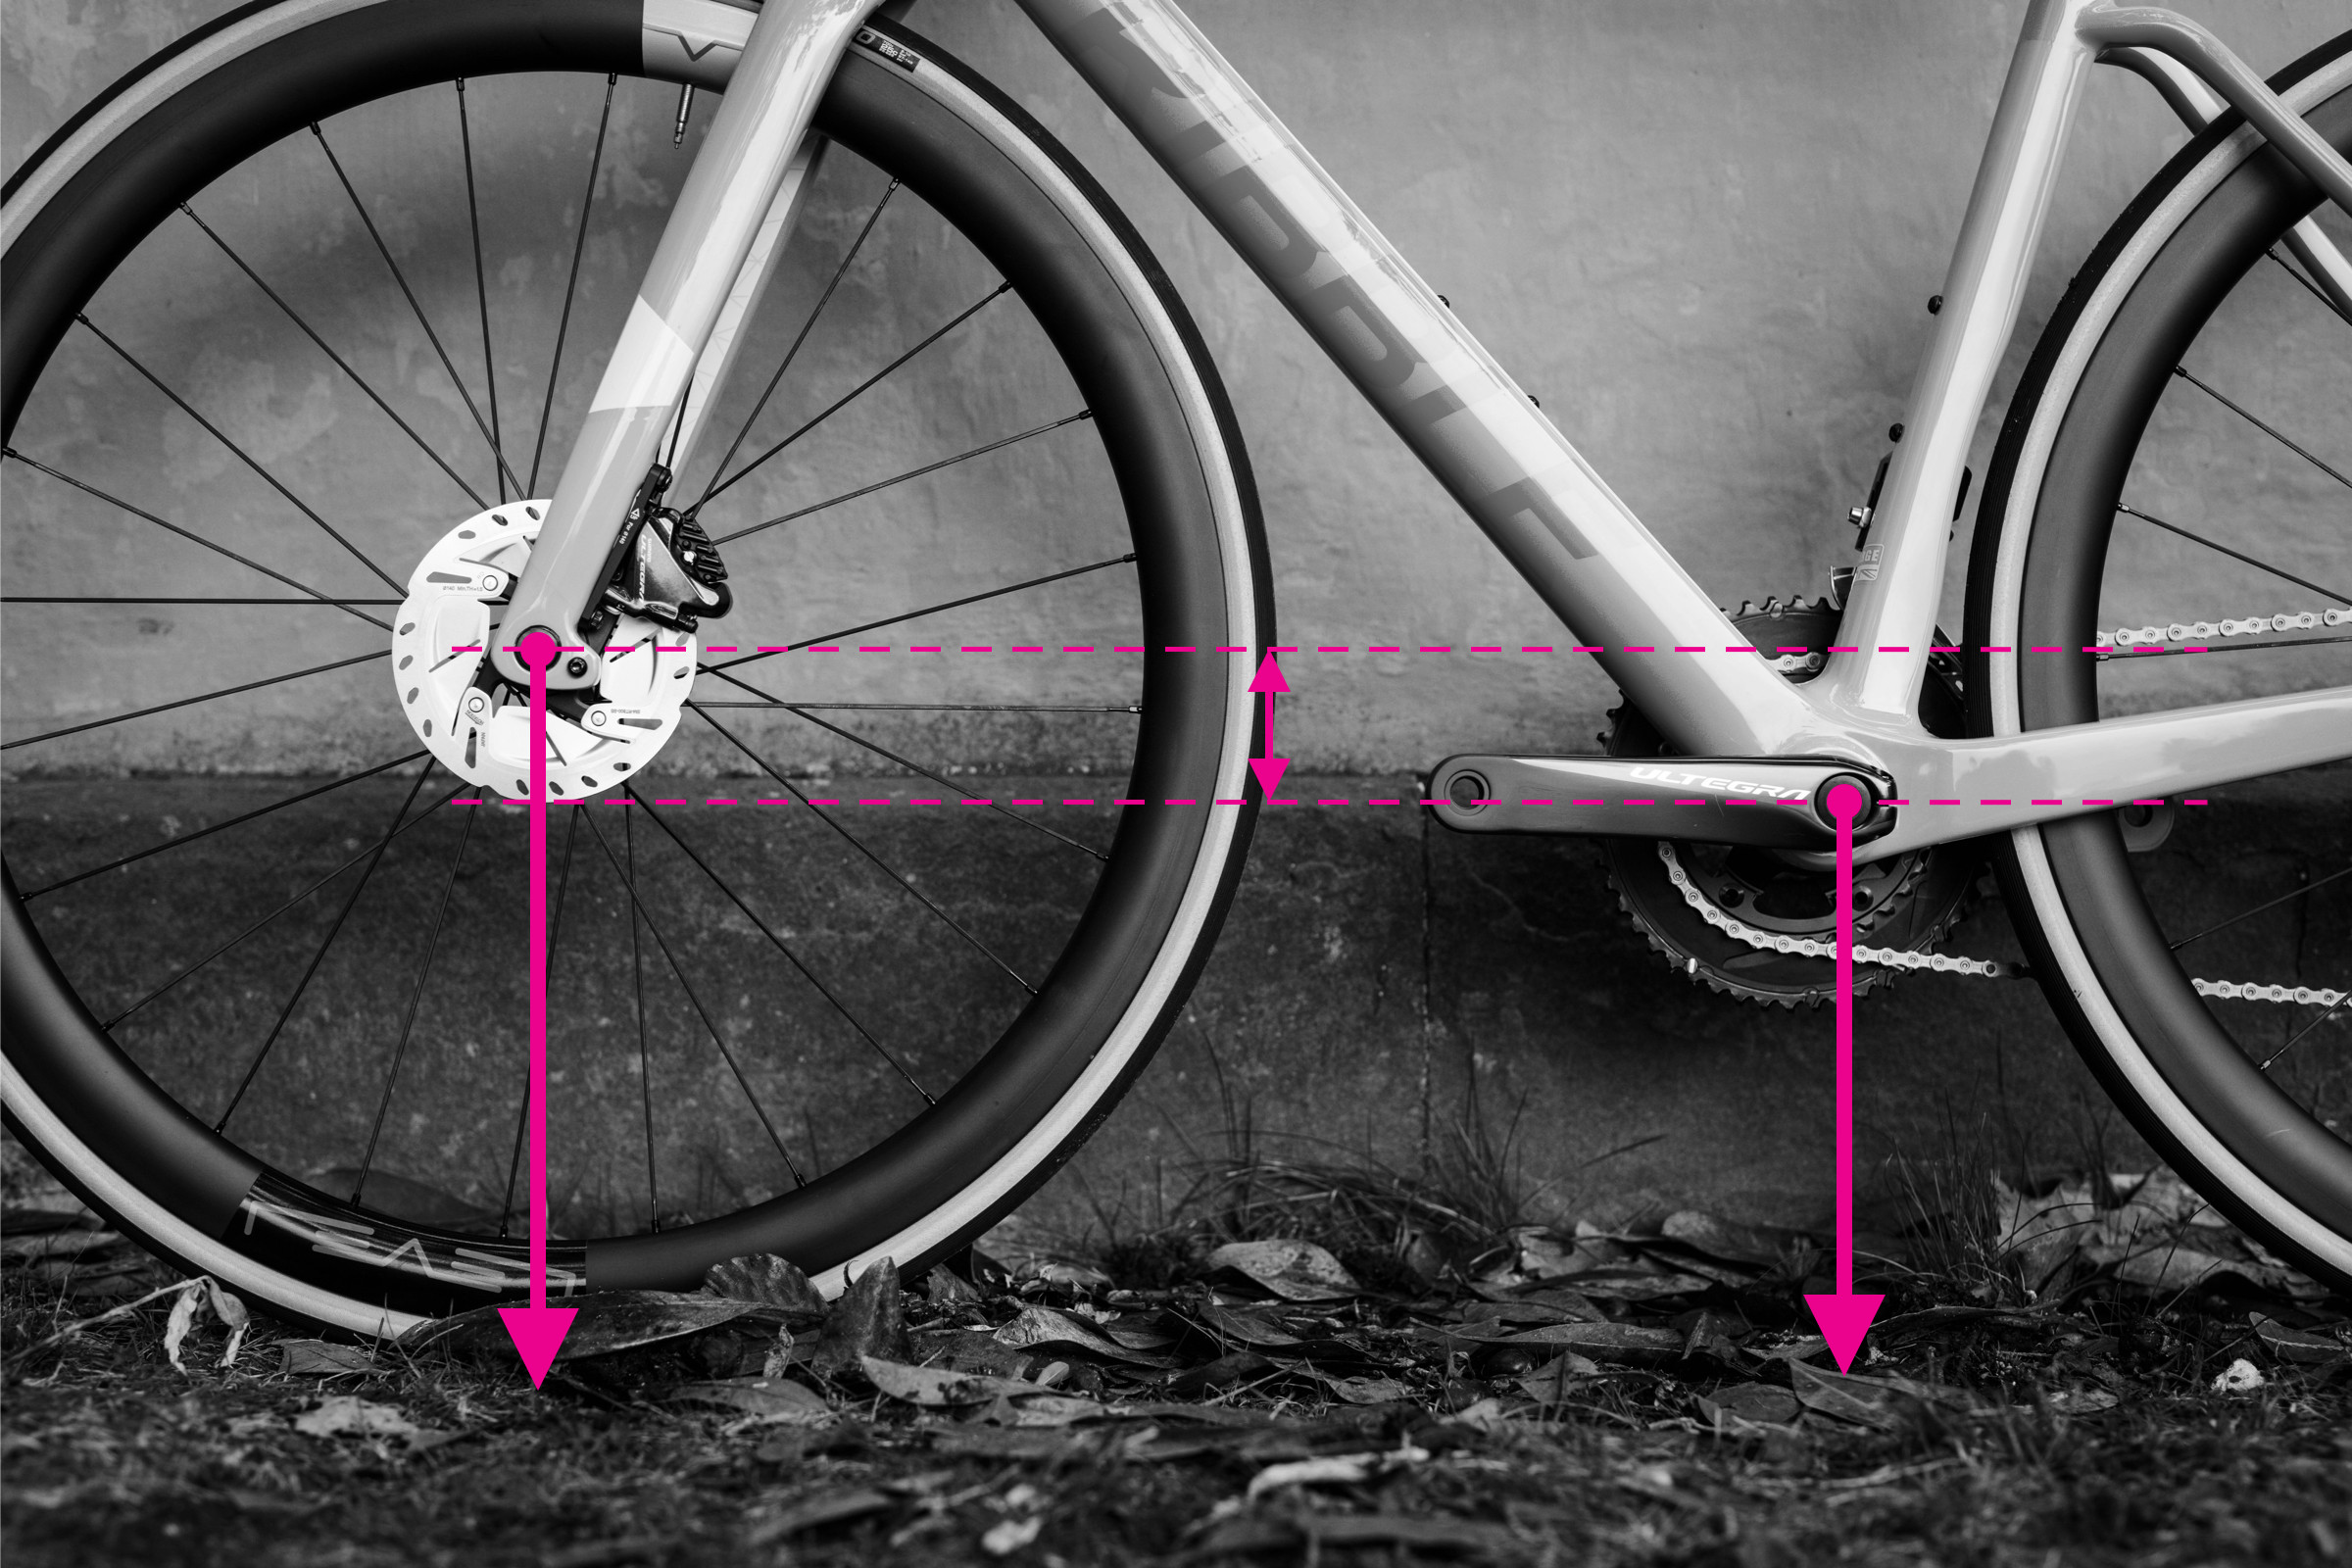 BB drop measurement demonstrated on a bike frame
The image demonstrates how to measure bottom bracket drop, highlighting its influence on stability. This measurement is crucial for understanding how the bike handles in corners.
12. How To Measure Bottom Bracket Height?
Bottom bracket height affects clearance and stability.
- Ensure Bike is Upright: Keep your bike straight upright on a level surface.
- Measure to Bottom Bracket Shell: Measure the distance from the ground to the center of the bottom bracket shell.
- Inflate Tires: Inflate your tires to your usual running pressure, as this will slightly affect the measurement.
- Record the Measurement: Note the measurement in centimeters or inches.
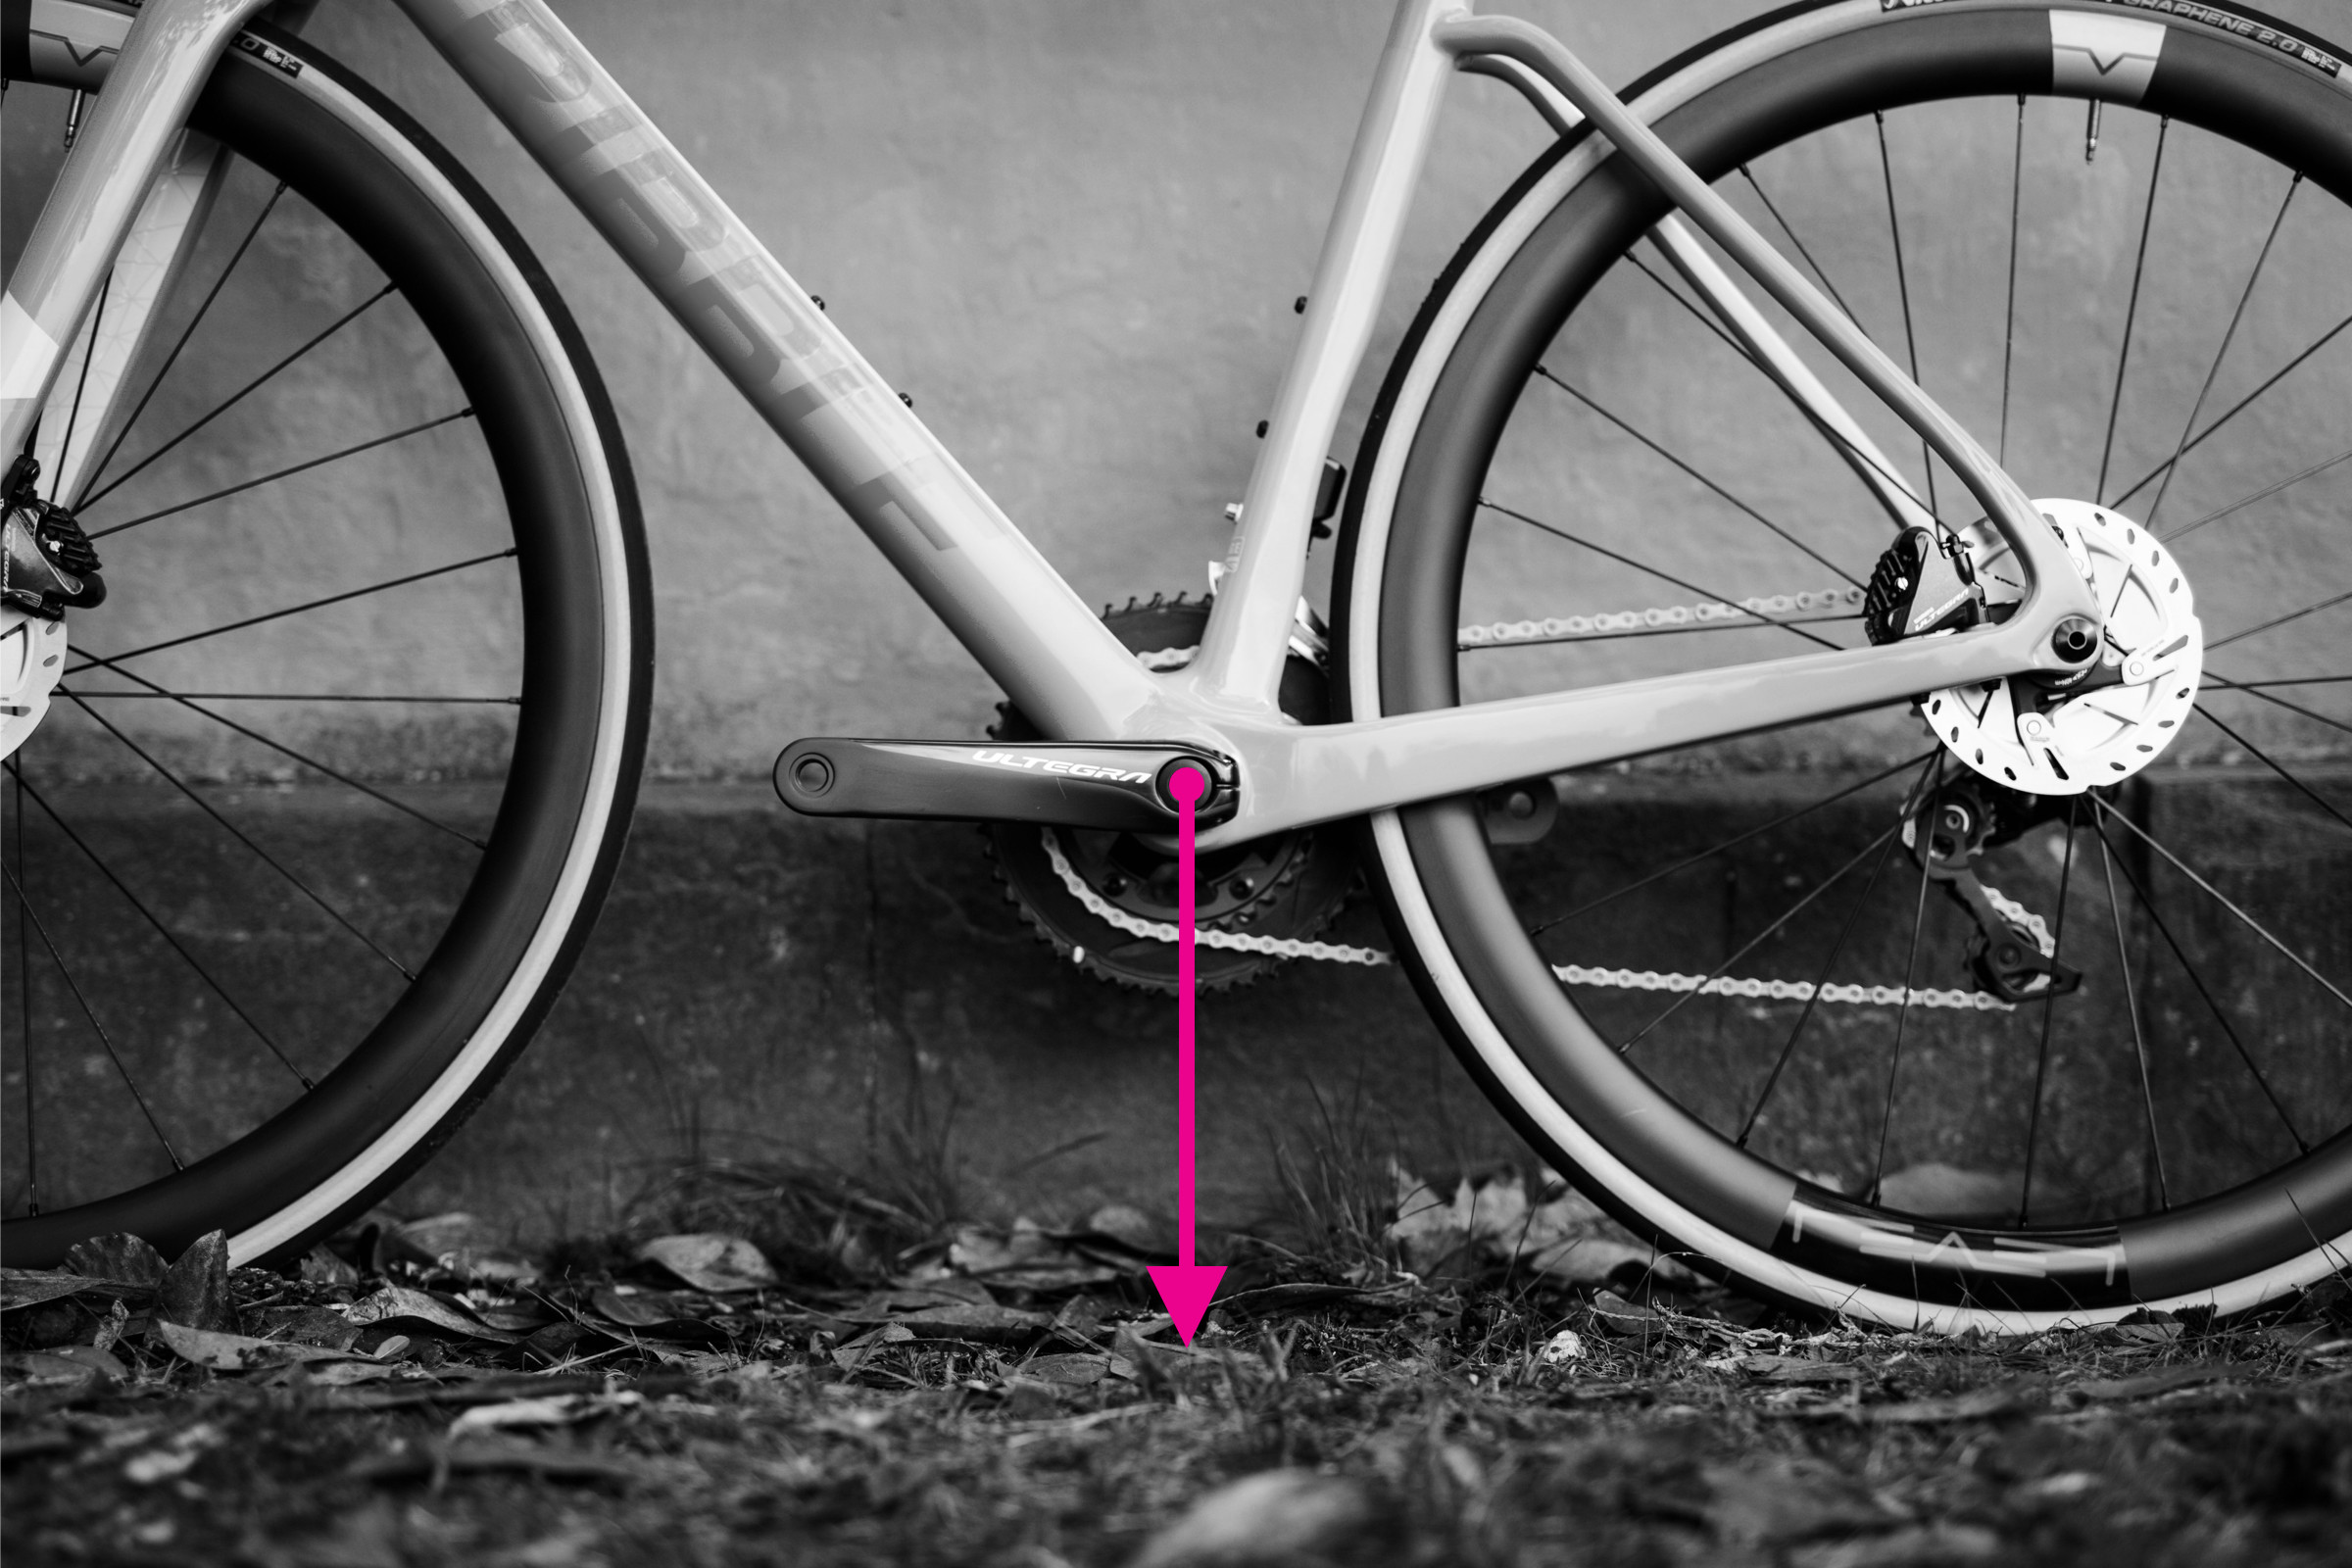 Bottom bracket height measurement demonstrated on bike frame
This image illustrates how to measure bottom bracket height, emphasizing the need for an upright bike position. The bottom bracket height influences stability and ground clearance.
13. How Do Bike Manufacturers Measure Frame Sizes?
Bike manufacturers employ various methods to measure frame sizes, which can sometimes lead to confusion. Understanding these methods helps ensure accurate comparisons.
- Top Tube Length: Some manufacturers, especially for road bikes, measure frame size by the top tube length.
- Seat Tube Length: Others measure by the seat tube length, from the center of the bottom bracket to the top of the seat tube.
- Reach and Stack: Many modern manufacturers provide reach and stack values, offering a more consistent way to compare frames.
- S, M, L Sizing: Mountain bikes and some road bikes are often sized using S, M, L, etc., which can vary significantly between brands.
- Mixed Units: Some brands, like Moots, even mix metric and imperial units, further complicating the process.
It’s essential to consult the manufacturer’s geometry chart for the most accurate information.
14. Road Bike Sizing: What To Consider?
Sizing a road bike correctly is crucial for comfort and performance.
- Top Tube Length: Road bikes are often sized by top tube length.
- Reach and Stack: Consider reach and stack values for a more accurate fit.
- Flexibility: Your flexibility affects the ideal reach and stack.
- Riding Style: Consider your riding style, whether it’s racing, endurance, or recreational.
- Professional Bike Fit: Consider getting a professional bike fit for optimal comfort and performance.
Consult resources like usabikers.net for detailed guides on road bike sizing.
15. Mountain Bike Sizing: Key Factors?
Mountain bike sizing differs from road bike sizing, with more emphasis on standover height and maneuverability.
- S, M, L Sizing: Mountain bikes are commonly sized using S, M, L, etc.
- Reach: Pay attention to reach, as it affects your position on the bike.
- Standover Height: Ensure adequate standover height for safety.
- Suspension: Consider the bike’s suspension and how it affects the fit.
- Maneuverability: Choose a size that allows for easy maneuverability on trails.
Usabikers.net provides comprehensive guides to help you choose the right mountain bike size.
16. How Does Bike Frame Material Affect Size Perception?
The material of a bike frame can subtly influence how a bike feels and performs, which in turn can affect your perception of its size.
- Stiffness: Aluminum frames tend to be stiffer, which can make a slightly larger frame feel more responsive.
- Compliance: Carbon fiber frames often offer more compliance, potentially making a slightly smaller frame feel more comfortable.
- Weight: Lighter frames made of carbon or high-end aluminum can make the bike feel more agile and easier to handle.
- Vibration Absorption: Frames with better vibration absorption can reduce fatigue, making longer rides more enjoyable even if the size isn’t perfectly dialed in.
While frame material doesn’t change the actual measurements, it can influence how the bike feels under you.
17. What Is the Role of Bike Fitters in Determining Frame Size?
Bike fitters play a crucial role in determining the ideal frame size by considering individual body dimensions and riding styles.
- Personalized Assessment: Bike fitters assess your body measurements, flexibility, and riding goals.
- Dynamic Fitting: They use dynamic fitting techniques to observe your position while riding.
- Adjustments: They make adjustments to saddle height, handlebar position, and other components to optimize fit.
- Recommendations: They recommend the ideal frame size and geometry based on their assessment.
- Injury Prevention: A professional bike fit can help prevent injuries and improve performance.
Investing in a professional bike fit can significantly enhance your riding experience.
18. How To Adjust a Bike Frame After Purchase?
Even after purchasing a bike, adjustments can be made to fine-tune the fit.
- Saddle Height: Adjust the saddle height for optimal leg extension.
- Handlebar Position: Adjust the handlebar position to improve reach and comfort.
- Stem Length: Consider changing the stem length to fine-tune reach.
- Cleat Position: Adjust cleat position on cycling shoes for efficient pedaling.
- Professional Assistance: Seek professional assistance for more complex adjustments.
Making these adjustments can improve comfort and performance on your bike.
19. What Are Common Mistakes in Measuring Bike Frame Size?
Avoid these common mistakes to ensure accurate measurements and optimal bike fit.
- Inaccurate Tools: Using inaccurate or poorly calibrated tools.
- Incorrect Measurement Points: Measuring from the wrong points on the frame.
- Not Keeping Measurements Horizontal/Vertical: Failing to keep measurements perfectly horizontal or vertical.
- Ignoring Sloping Top Tubes: Not accounting for sloping top tubes when measuring top tube length.
- Neglecting Geometry Charts: Ignoring the manufacturer’s geometry charts.
Avoiding these mistakes can help you find the right frame size for your needs.
20. Where Can I Find Reliable Bike Geometry Charts?
Finding reliable geometry charts is essential for comparing bike models and determining the right frame size.
- Manufacturer Websites: Check the manufacturer’s official website for geometry charts.
- Online Retailers: Many online retailers provide geometry charts for the bikes they sell.
- Bike Review Websites: Reputable bike review websites often include geometry charts in their reviews.
- Forums and Communities: Online forums and communities dedicated to cycling may have shared resources.
- Usabikers.net: Explore usabikers.net for comprehensive bike geometry information and resources.
Using reliable sources ensures you have accurate data for your bike sizing decisions.
21. Are There Different Frame Sizes for Men’s and Women’s Bikes?
Yes, there are differences in frame geometry between men’s and women’s bikes, although the distinction is becoming less pronounced.
- Frame Geometry: Women’s bikes often have shorter top tubes and higher stack heights to accommodate shorter torsos and longer legs.
- Saddle Design: Women’s bikes typically come with saddles designed for female anatomy.
- Handlebar Width: Handlebar width may be narrower on women’s bikes.
- Component Selection: Some women’s bikes feature components designed for smaller hands.
- Unisex Models: Many manufacturers now offer unisex models that can be adjusted to fit both men and women.
Choosing a bike designed for your body type can enhance comfort and performance.
22. How Do Electric Bike Frame Sizes Differ from Regular Bikes?
Electric bike frame sizes are generally similar to regular bikes, but there are a few considerations.
- Weight Distribution: Electric bikes have different weight distribution due to the motor and battery.
- Frame Reinforcement: E-bike frames may be reinforced to handle the extra weight and power.
- Component Integration: Frame design may integrate the battery and motor.
- Comfort: Comfort is crucial on e-bikes due to longer ride distances.
- Geometry: E-bike geometry may prioritize stability and comfort over agility.
When selecting an e-bike, consider these differences to ensure a proper fit.
23. Can I Use an Online Bike Size Calculator To Help?
Online bike size calculators can be a helpful starting point, but they should not be the sole determinant of your frame size.
- Basic Measurements: Calculators typically require basic measurements like height, inseam, and arm length.
- General Recommendations: They provide general recommendations based on these measurements.
- Individual Variation: They may not account for individual variations in body proportions and riding style.
- Professional Confirmation: Always confirm the calculator’s recommendation with a professional bike fitter.
- Usabikers.net Resources: Use usabikers.net to cross-reference calculator results with detailed geometry charts.
Use calculators as a guide, but always prioritize professional advice and test rides.
24. What Are the Advantages of a Properly Sized Bike Frame?
Riding a bike with a properly sized frame offers numerous advantages that enhance your overall cycling experience.
- Enhanced Comfort: A well-fitted frame allows for a more natural riding position, reducing strain on your body.
- Improved Efficiency: Proper bike fit maximizes power transfer, making pedaling more efficient.
- Reduced Risk of Injury: A correctly sized frame minimizes the risk of overuse injuries.
- Better Handling: A properly sized bike handles more predictably, improving control.
- Increased Enjoyment: Riding a comfortable and efficient bike makes cycling more enjoyable.
Investing in a properly sized bike frame is an investment in your cycling health and enjoyment.
25. What Are the Disadvantages of Riding a Bike Frame That Is Too Big?
Riding a bike with a frame that is too large can lead to discomfort, injury, and reduced performance.
- Difficulty Reaching Controls: You may struggle to reach the handlebars and brakes comfortably.
- Back Pain: Overreaching can cause back pain and discomfort.
- Neck and Shoulder Strain: A stretched-out position can strain your neck and shoulders.
- Reduced Power: Inefficient pedaling due to improper leg extension.
- Poor Handling: Difficulty maneuvering and controlling the bike.
Avoid these issues by ensuring you choose the correct frame size.
26. What Are the Disadvantages of Riding a Bike Frame That Is Too Small?
Riding a bike with a frame that is too small can also lead to discomfort and potential injuries.
- Cramped Position: A cramped riding position can restrict breathing and movement.
- Knee Pain: Overflexing your knees can cause pain and discomfort.
- Saddle Discomfort: An improper saddle position can lead to discomfort and chafing.
- Inefficient Pedaling: Reduced power transfer due to an unnatural leg angle.
- Unstable Handling: A twitchy and unstable feel, especially at high speeds.
Avoid these issues by carefully considering frame size before making a purchase.
27. How Can I Test Ride a Bike To Determine the Right Frame Size?
Test riding a bike is an essential step in determining the right frame size.
- Proper Attire: Wear cycling shorts, shoes, and a helmet for a realistic experience.
- Evaluate Reach: Ensure you can comfortably reach the handlebars without overstretching.
- Check Saddle Height: Adjust the saddle height to achieve a slight bend in your knee at the bottom of the pedal stroke.
- Assess Handling: Pay attention to how the bike handles and responds to your movements.
- Listen to Your Body: Pay attention to any discomfort or strain in your back, neck, or knees.
- Seek Expert Advice: Ask the bike shop staff for their opinion and guidance.
A thorough test ride can help you confirm whether a bike is the right size for you.
28. What Are the Best Brands Known for Accurate Frame Sizing?
Certain brands are known for their consistent and accurate frame sizing, making it easier to find the right fit.
- Trek: Known for their extensive size range and consistent geometry.
- Specialized: Offers a wide range of sizes and models to suit various body types.
- Giant: Provides accurate sizing and detailed geometry charts.
- Cannondale: Known for their innovative designs and reliable sizing.
- Santa Cruz: Offers a range of mountain bikes with consistent sizing.
Choosing a brand known for accurate sizing can simplify the selection process.
29. How To Choose the Right Bike Frame Size Based on Your Height?
Choosing the right bike frame size based on your height involves using general guidelines and fine-tuning based on your individual proportions.
- Consult Size Charts: Refer to manufacturer size charts that correlate height with frame size.
- Consider Inseam: Your inseam is also crucial, as it determines standover height and saddle position.
- Compare Measurements: Compare your measurements with the bike’s geometry chart.
- Test Ride: Always test ride the bike to confirm the fit.
- Professional Advice: Seek advice from a bike fitter for a personalized recommendation.
Using height as a starting point and fine-tuning based on other factors can help you find the right frame size.
30. What Types of Bikes Have Different Frame Sizing Methods?
Different types of bikes have varying frame sizing methods due to their specific design and intended use.
- Road Bikes: Often sized by top tube length or reach and stack.
- Mountain Bikes: Commonly sized using S, M, L, etc., with a focus on standover height.
- Hybrid Bikes: May use a combination of top tube length and S, M, L sizing.
- Cruiser Bikes: Typically sized based on rider height, with a focus on comfort.
- BMX Bikes: Sized by top tube length, with smaller frames for younger riders.
Understanding these differences can help you navigate the sizing process for different types of bikes.
31. How To Determine Frame Size for Vintage Bikes?
Determining the frame size for vintage bikes can be challenging due to variations in sizing standards and the availability of geometry charts.
- Measure Seat Tube Length: Measure the seat tube length from the center of the bottom bracket to the top of the seat tube.
- Measure Top Tube Length: Measure the top tube length horizontally.
- Compare to Modern Charts: Compare these measurements to modern size charts as a general guide.
- Consider Component Compatibility: Ensure that replacement parts and components are compatible with the vintage frame.
- Consult Experts: Seek advice from vintage bike experts or collectors.
Accurately measuring a vintage frame requires careful attention to detail and an understanding of historical sizing conventions.
32. Can I Modify a Bike Frame To Fit Me Better?
Modifying a bike frame to improve fit is generally not recommended due to safety concerns and potential damage to the frame.
- Safety Risks: Modifying a frame can compromise its structural integrity.
- Warranty Void: Modifications typically void the manufacturer’s warranty.
- Professional Alterations: Minor adjustments like changing the stem or handlebars are acceptable.
- Frame Replacement: If the frame doesn’t fit, consider replacing it with a properly sized one.
- Professional Advice: Consult with a bike mechanic before making any modifications.
Prioritize safety and avoid altering the frame itself.
33. What Are the Benefits of Shorter Chainstays on a Bike Frame?
Shorter chainstays on a bike frame offer several benefits that enhance handling and performance.
- Improved Acceleration: Shorter chainstays result in quicker acceleration and responsiveness.
- Enhanced Climbing: They make it easier to lift the front wheel on steep climbs.
- Increased Maneuverability: They improve the bike’s ability to navigate tight corners and technical trails.
- Playful Handling: They give the bike a more playful and lively feel.
- Weight Distribution: They can improve weight distribution, especially on smaller frames.
Shorter chainstays are often preferred by riders who prioritize agility and responsiveness.
34. How Does Head Tube Angle Affect Bike Frame Size Selection?
The head tube angle significantly influences handling and should be considered when selecting a bike frame size.
- Steeper Angles: Steeper head tube angles result in quicker steering and more responsive handling.
- Slacker Angles: Slacker head tube angles provide more stability at high speeds and on rough terrain.
- Riding Style: Consider your riding style; aggressive riders may prefer steeper angles, while those seeking stability may prefer slacker angles.
- Frame Size: The head tube angle can affect the overall reach and wheelbase, so factor it into your size selection.
- Geometry Charts: Consult geometry charts to compare head tube angles between different models.
Understanding the impact of head tube angle can help you choose a bike that suits your riding preferences.
35. What is the Importance of Standover Height in Bike Frame Sizing?
Standover height is a crucial measurement in bike frame sizing, particularly for mountain bikes.
- Clearance: Standover height refers to the distance between the top tube and the ground, ensuring you have adequate clearance when straddling the bike.
- Safety: Sufficient standover height prevents injury in case of sudden stops or dismounts.
- Comfort: It allows you to comfortably straddle the bike without hitting the top tube.
- Mountain Biking: It is especially important for mountain biking, where quick dismounts are common.
- Measurement: Measure from the ground to the top of the top tube, ensuring it is lower than your inseam.
Adequate standover height enhances safety and comfort, particularly for mountain bikers.
36. How Do Different Types of Handlebars Affect Perceived Bike Frame Size?
The type of handlebars you choose can significantly affect the perceived bike frame size and overall comfort.
- Drop Bars: Drop bars on road bikes extend the reach, requiring a slightly smaller frame.
- Flat Bars: Flat bars on mountain bikes provide a more upright position, potentially requiring a slightly larger frame.
- Riser Bars: Riser bars raise the handlebar height, making the reach feel shorter.
- Aero Bars: Aero bars extend the reach significantly, requiring careful consideration of frame size.
- Adjustments: Adjust stem length and handlebar position to fine-tune the fit.
Selecting the right handlebars and adjusting their position can optimize your riding experience.
37. How to Factor in Shoe Size When Determining Bike Frame Size?
While often overlooked, shoe size can influence bike frame size by affecting your foot position on the pedals.
- Foot Position: Shoe size affects your foot’s position on the pedals, which in turn influences your leg extension.
- Saddle Height: Adjust saddle height to compensate for shoe sole thickness and ensure proper leg extension.
- Cleat Position: Fine-tune cleat position on cycling shoes to optimize pedaling efficiency.
- Crank Length: Consider using different crank lengths to accommodate varying shoe sizes.
- Professional Fit: A professional bike fit can help you optimize shoe and pedal setup.
Paying attention to shoe size and making appropriate adjustments can enhance comfort and performance.
38. Frequently Asked Questions (FAQs) About How To Tell Frame Size Of Bike
Q1: How do I measure my bike frame size at home?
To measure your bike frame size at home, use a tape measure to find the seat tube length (from the center of the bottom bracket to the top of the seat tube) and the top tube length (the horizontal distance between the center of the head tube and seatpost). Additionally, measuring stack and reach provides a more comprehensive understanding of the bike’s fit.
Q2: What tools do I need to measure my bike frame?
You will need a tape measure, a clinometer (or a smartphone app), a long spirit level, and a plumb line (or string with a weight).
Q3: How does top tube length affect bike fit?
Top tube length determines the reach to the handlebars. A longer top tube may require a longer reach, while a shorter top tube brings the handlebars closer to the rider.
Q4: What is the difference between reach and stack?
Reach is the horizontal distance from the bottom bracket to the top of the head tube, while stack is the vertical distance between these two points. These measurements are independent of frame design and provide a consistent way to compare bike sizes.
Q5: How do I measure reach and stack on my bike?
Use a spirit level with a plumb line. Align the level with the top of the head tube and measure the horizontal (reach) and vertical (stack) distances to the bottom bracket.
Q6: Is seat tube length important for bike fit?
Yes, seat tube length is important as it determines the saddle height. Ensure the seat tube length allows you to achieve proper leg extension while pedaling.
Q7: How does wheelbase affect the handling of a bike?
A longer wheelbase provides more stability, while a shorter wheelbase offers quicker handling and maneuverability.
Q8: What is chainstay length, and why is it important?
Chainstay length is the distance between the bottom bracket and the rear axle. Shorter chainstays typically result in quicker acceleration and more responsive handling.
Q9: How can a bike fitter help determine the right frame size for me?
A bike fitter assesses your body measurements, flexibility, and riding goals. They use dynamic fitting techniques to observe your position while riding and recommend the ideal frame size and geometry.
Q10: Are there different frame sizes for men’s and women’s bikes?
Yes, women’s bikes often have shorter top tubes and higher stack heights to accommodate shorter torsos and longer legs. However, many manufacturers now offer unisex models that can be adjusted to fit both men and women.
Find Your Perfect Fit at usabikers.net
Ready to find the ideal bike frame size for your next ride? At usabikers.net, we provide all the resources you need, from detailed guides and measurement techniques to expert advice and community support. Don’t compromise on comfort or performance—visit usabikers.net today to explore our articles, participate in our forums, and discover the joy of a perfectly fitted bike.
Address: 801 Sturgis Main St, Sturgis, SD 57785, United States
Phone: +1 (605) 347-2000
Website: usabikers.net