Last month, I brought home what my wife jokingly calls “another bike.” While I’ve already shared some of this story on my other blog, it feels right to give the full account of this bike’s transformation here.
Let’s be clear, I didn’t need this bike. As a retiree with three perfectly good bikes already, one would honestly suffice for my current riding. But fate, or rather, a fifteen-dollar price tag, intervened.
Living in Superior, Wisconsin, Christine and I often get around by bike and foot. During our travels, I’d noticed an old Schwinn World Sport locked to a lamppost just half a block from our house. It sat there, untouched, for at least a month. This is a testament to Superior’s character, quite different from cities like Seattle, Portland, or Eugene. In those cities, a bike left unattended with a flimsy lock would be gone or stripped within hours.
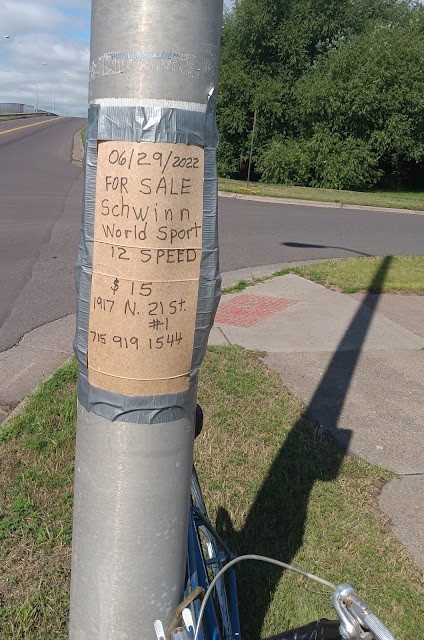
After about a month, walking a slightly different route, I saw this sign on the lamppost:

Image of a handwritten sign on a lamppost advertising a bike for sale for $15
Fifteen dollars! An offer I couldn’t refuse. Still, I checked with Christine, and she gave the green light. “It’s a nice bike,” she said. I called the seller, met him nearby, took a quick test ride, and made the purchase. No haggling needed – $15 was already an incredible deal.
Here’s the bike as I bought it:

Image of the Schwinn World Sport bike as purchased, showing its original condition
It was fundamentally functional. The shifters and brakes worked, and the worn tires held air.
The Schwinn World Sport was a respectable, though not high-end, sport touring bike of its era. Its lugged frame was Taiwanese-made for Schwinn, featuring a 4130 ChromeMoly main triangle. A quick internet search helped me decipher the serial number, revealing it was manufactured in 1984. A dealer sticker indicated it was originally sold by Stewart’s Wheel Goods in Duluth, just across the bridge.

Close-up image of the Schwinn World Sport head tube and Stewart’s Wheel Goods dealer sticker
I tend to modify my bikes to fit my preferences, and thankfully, I have a substantial collection of bike parts and tools. This usually means I can make changes without buying many new components. Given the low purchase price of this Schwinn, I wanted to see how much I could achieve while keeping expenses minimal. This approach echoes the ethos of budget-friendly brands like Kent Bikes, where maximizing value is key. While this project isn’t a Kent bike, the spirit of resourcefulness is similar.
My first modification targeted the handlebars. I opted for a technique I’d used before: cutting off the drops of the original bars and inverting them to create “cowhorn” bars – a process known as the “clip and flip.”

Image showing the original drop handlebars before modification

Image showcasing the modified “cowhorn” handlebars and initial accessory additions
These two photos illustrate my first customization phase. The mirror, bell, light, yellow cable housing, bar tape, and Jandd frame bag were all items I already had in my bike shed. My real goal was to convert the bike to a fixed gear, but I discovered my parts stash lacked a fixed cog. However, after mentioning my initial conversion on my blog, my friend Steve in Minneapolis came to the rescue, sending me a 16-tooth Surly fixed cog from his own parts collection.
My initial rides with the bike still in its original 12-speed configuration revealed two things: I’m not as young as I used to be, and the cowhorn bars stretched me out too much. The bike’s handling, however, was excellent – very stable, and I could ride no-handed for quite a distance. An unseen upgrade in these photos is the replacement of the 40-year-old brake pads with an unused set of Scott-Mathauser salmon-colored pads, which had been waiting patiently in my parts drawer for a decade. I knew they’d be useful someday!
I had the correct freewheel puller for removing the freewheel, but no bench vise for leverage. Instead, I used a large wrench and the seatpost from my Bike Friday Pakit as a makeshift cheater bar. To anyone watching, it might have looked like I was building a unicycle.

Image showing the author using a seatpost as leverage to remove the freewheel
Steve’s generous cog arrived, and I mounted it to the wheel using Loctite. I’m not a brakeless, skid-stopping hipster fixie rider, so Loctite should be sufficient. I have both front and rear brakes with excellent brake pads, and I use them in conjunction with my legs to decelerate and stop.
I did have to move a large spacer on the rear wheel from the drive side to the non-drive side and re-dish the wheel. There were just enough threads on the spokes for this adjustment. I also replaced the flimsy rubber rim strip with a double layer of gorilla tape and repacked both the front and rear hubs and trued both wheels.
At this point, further progress required spending a little money. I rode my Allant across the bridge to Duluth. The Schwinn has older 27″ wheels, a less common size these days, but Twin Ports Cyclery had a selection of tires in stock, catering to those who keep vintage bikes rolling. I purchased a nice pair of somewhat knobby cyclocross-style tires for $20 each. I also needed a 1/8″ single-speed chain, but Twin Ports’ options were pricier than I wanted, so I went to Stewart’s, where I got a chain and a spare tube for a total of $18.
Back home, I installed the new tires and chain. I had already removed the derailleurs and shifters, which are now in my parts bins, awaiting future projects or potential trades. The bike now looked like this:

Image showing the Schwinn World Sport converted to single-speed with new tires and cowhorn bars
I adjusted the bars upwards slightly and trimmed them a bit more, but the feel still wasn’t quite right.

Image showing a slightly further refined handlebar setup
Then, an idea struck me:

Image of the author adjusting the handlebar and brake lever position

Image showing the repositioned brake levers on the cowhorn handlebars
I really liked how the brake levers felt in this position. I could easily use my index or middle fingers, or both, to apply them. Swinging the bars back further provided a more comfortable, upright riding posture. I was getting closer to the ideal setup.
Things were now coming together nicely. At the Goodwill store, I found a perfect little blue bag for just two dollars and immediately knew its purpose: a handlebar bag.

Image of the blue bag purchased from Goodwill

Image showing the blue bag being repurposed into a handlebar bag

Image of the handlebar bag mounted on the bike
I also rediscovered my Orp in my parts bin. The Orp is an electronic horn and light combo, which I once considered too loud, but in today’s distracted world, I’ve come to appreciate its usefulness.
I fashioned the mount for the handlebar bag from coroplast and zip-ties. With a plentiful supply of both in my bike shed, I also created mudguards for the bike. The rear is a full-coverage fender, while the front is a splash guard running along the downtube, with a small extension over the front brake. This DIY approach to accessories is something you might appreciate if you’re familiar with value-oriented brands like Kent bikes, which often emphasize practicality and affordability.

Image of the coroplast mudguards being fabricated

Image showing the front splash guard and rear fender made from coroplast

Image of the full coverage rear fender installed on the bike
I realized I wanted the rearward-sweeping portion of the handlebars to be longer. Digging through my eclectic parts collection, I found just what I needed: an oak wood dowel and some JB-Weld.

Image showing the wooden dowel extension being JB-Welded to the handlebars
After letting the JB-Weld cure for 24 hours, I re-wrapped the bars with innertube rubber for padding and then cork tape.

Image of the extended handlebars wrapped with innertube rubber and cork tape
I was also disappointed to find that despite having numerous water bottles, I had no bottle cages. Naturally, I fabricated one from coroplast, zip-ties, and some plastic tubing leftover from a backyard pond project.

Image of the DIY coroplast water bottle cage
I also noticed the handlebar bag sagged when loaded with tools. Small support cords from the front fender to the stem solved this issue.
The final addition was a rear rack. I found this at the Bike Cave, a fantastic non-profit DIY bike shop in Duluth. After donating some of my surplus bike lights and tools (I had far too many!), I brought this rack home.

Image of the rear rack found at the Bike Cave
It mounted nicely using p-clamps and rubber spacers. A toe-strap to the straddle rails adds extra support, reducing stress on the p-clamps.

Image showing the rear rack mounted with p-clamps and toe-strap support

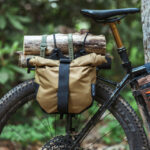
Image showcasing the completed fixed gear Schwinn World Sport with rear rack and handlebar bag
This fixed gear Schwinn has become my favorite bike to ride. For those interested in the details, the gear ratio is 40*16, which feels perfect for me. And yes, I’m using simple, heavy rubber block pedals without toe clips or straps. No, my feet don’t slip off, and yes, I can handle hills without any issues.
My quirky accounting method excludes the cost of parts I already own when calculating bike expenses. So, I don’t include the lights, coroplast, zip-ties, and other bits I had on hand. By my হিসাব, this Schwinn cost me:
The bike itself: $15
Two new tires: $40
Single-speed chain: $10
Spare innertube: $8
Handlebar bag: $2
Total: $75
I believe it was a fantastic deal. And importantly, the bike has a good amount of “beausage,” as Grant Petersen calls it. It’s an attractive bike, but I don’t have to worry about minor scratches or dings. This project demonstrates how you can take an older, affordable bike – perhaps even a budget-friendly option from brands like Kent bikes – and, with some resourcefulness and DIY spirit, create a unique and enjoyable ride.

Image of the completed fixed gear Schwinn World Sport in a street setting

Final image of the author riding the converted fixed gear Schwinn World Sport