
Finding the right road bike frame size is crucial for comfort, efficiency, and injury prevention. An ill-fitting bike can lead to discomfort, pain, and reduced performance, hindering your enjoyment and progress in cycling. Understanding how to use a Road Bike Frame Size Chart is the first step in ensuring you select a bike that feels like an extension of your body, allowing you to ride further, faster, and with more pleasure. This guide will delve into how to accurately determine your ideal frame size using proven methods and charts.
Understanding Road Bike Frame Sizing
Choosing the correct frame size is more than just about standover height; it’s about achieving a balanced riding position. A properly sized frame allows for optimal power transfer, efficient breathing, and comfortable handling. Conversely, riding a bike that is too large or too small can lead to a host of problems.
Why Frame Size Matters
- Comfort: A correctly sized frame reduces strain on your back, neck, shoulders, and knees, preventing pain and discomfort on longer rides.
- Efficiency: Proper frame size ensures optimal leg extension and body positioning for maximum power output with each pedal stroke.
- Handling: A frame that fits well provides better control and stability, especially when cornering and during high-speed descents.
- Injury Prevention: Incorrect sizing can lead to repetitive stress injuries, knee pain, back problems, and numbness in hands and feet.
Key Measurement: Inseam
The most critical measurement for determining your road bike frame size is your inseam. This is the distance from the ground to your crotch, and it directly correlates to the standover height and overall geometry of the bike frame that will best suit your body.
How to Measure Inseam Accurately
To get an accurate inseam measurement, follow these steps:
- Dress Appropriately: Wear cycling shorts or thin, form-fitting clothing and no shoes.
- Stand Against a Wall: Stand with your back against a wall and your feet shoulder-width apart.
- Use a Book: Place a thin, hardcover book (approximately 2 inches thick) between your legs, mimicking the pressure of a saddle. Slide the book up until it firmly presses against your pubic bone, just as a saddle would.
- Mark the Wall: Have someone help you mark the wall at the top edge of the book’s spine.
- Measure: Use a measuring tape to measure from the floor to the mark on the wall in centimeters or inches.
- Repeat: Measure 2-3 times and take the average for the most accurate inseam measurement.
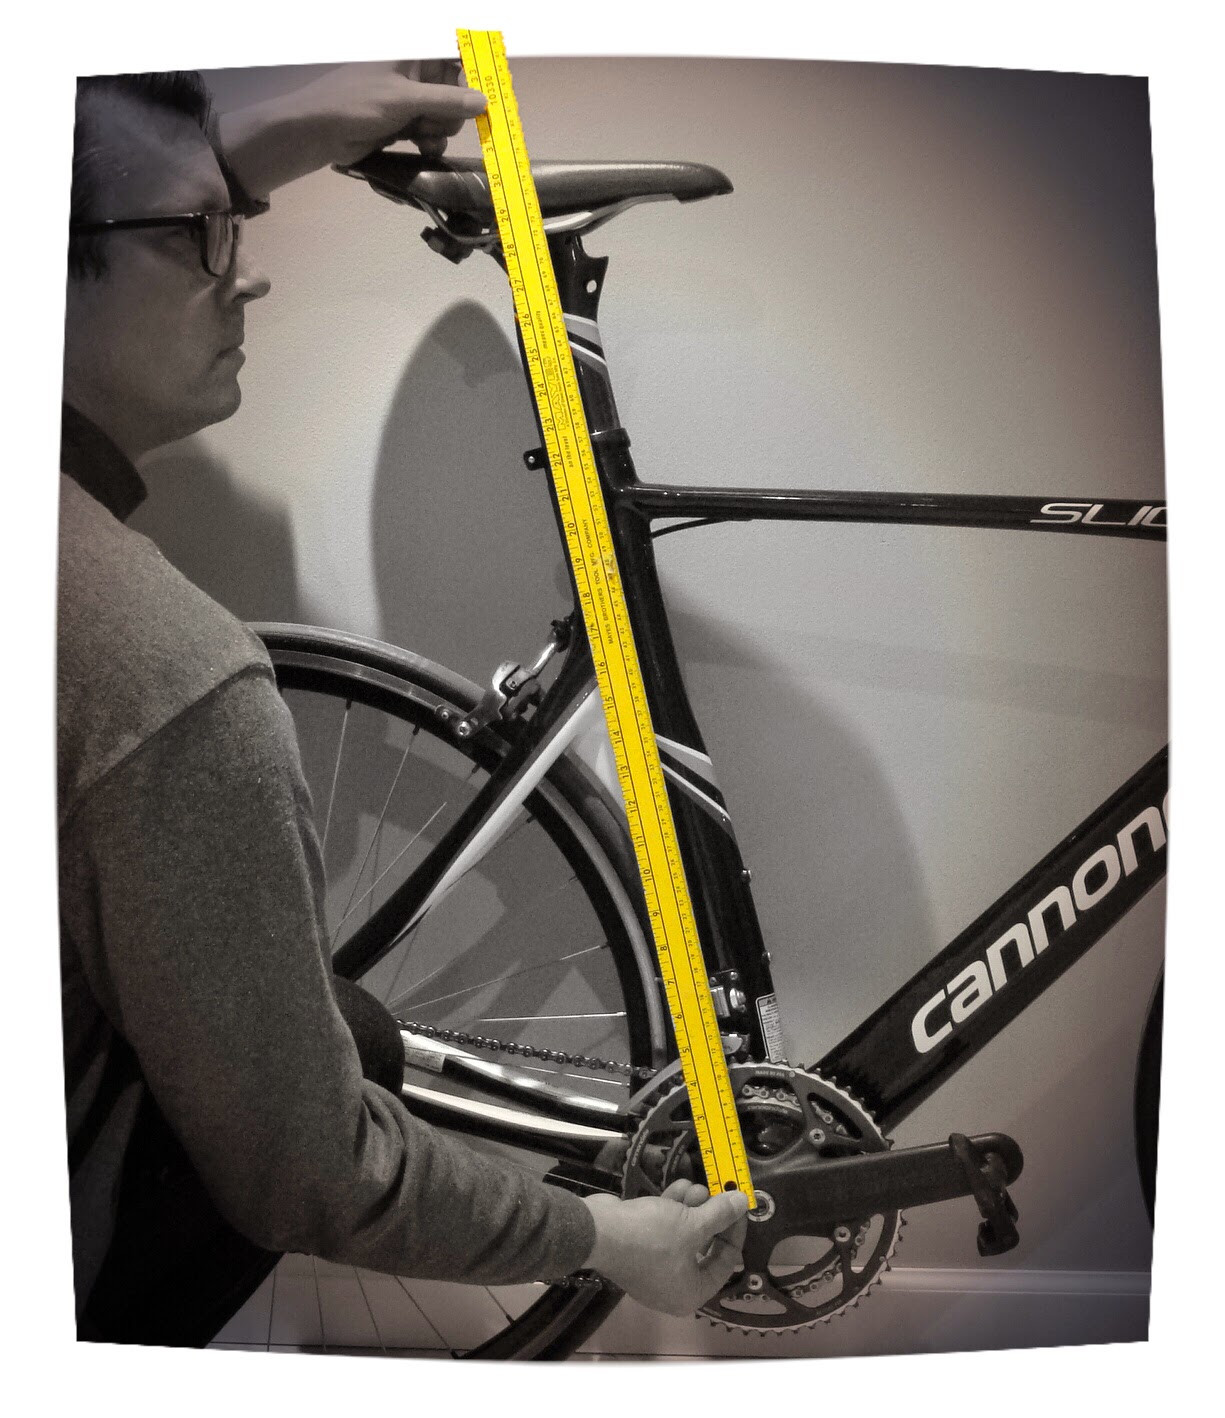 Measuring inseam for bike sizing
The Lemond Road Bike Frame Size Chart
One of the most respected methods for determining road bike frame size and saddle height is based on the research championed by cycling legend Greg Lemond. This method, developed by Dr. Ginet and supervised by Cyrille Guimard, focuses on optimal leg extension for cycling efficiency. The Lemond chart uses your inseam measurement to recommend both frame size and saddle height.
The Lemond Method Explained
The Lemond method calculates ideal saddle height based on approximately 96% of full leg extension. The chart simplifies the math by using a formula of inseam multiplied by 0.883, measured from the center of the bottom bracket to the top of the saddle, accounting for average shoe and cleat thickness. While the formula is precise, the chart provides a user-friendly way to quickly find recommended sizes.
Using the Lemond Chart
To use the Lemond Road Bike Frame and Saddle Height Sizing Chart, locate your inseam measurement in the left-hand column. The chart then provides the corresponding recommended frame size and saddle height. Frame sizes are typically given in centimeters and inches. Saddle height is measured from the center of the bottom bracket to the top of the saddle, along the seat tube.
 |
|---|
| The Lemond Frame and Saddle Height Sizing Chart |
Important Notes on the Lemond Chart:
- Classic Frame Design: The Lemond chart is based on traditional frame geometries with horizontal top tubes. For bikes with sloping top tubes (common in modern designs), the chart still provides a good starting point, but you might need to adjust slightly.
- Saddle Height Measurement: Always measure saddle height along the seat tube angle, from the center of the bottom bracket to the top of the saddle.
- Crank Length: The chart assumes standard crank lengths (around 172.5mm). Adjustments may be needed for significantly different crank lengths.
- Fine-Tuning: The chart is a guide. Individual flexibility, riding style, and preferences may require minor adjustments to frame size and saddle height.
Hamley Method: An Alternative Approach
The “Hamley Method” offers another perspective on saddle height, focusing on maximizing power output, particularly for shorter bursts of effort. Research by Hamley and Thomas (1967) and confirmed by Faria and Cavanagh (1978) suggests that maximum power is achieved with a saddle height approximately 9% greater than the inseam (measured from pedal at the bottom of the stroke to the top of the saddle).
While the Hamley method may optimize peak power, studies by Nordeen-Synder (1977) indicate that the Lemond-recommended saddle height (around 107% of inseam, similar to Lemond’s 96% of full leg extension) is closer to the most efficient position in terms of oxygen consumption, aligning with endurance cycling needs.
For road cycling, particularly longer distances and varied terrains, the Lemond method is generally preferred for its balance of power and efficiency. The Hamley method might be more relevant for track sprinters or cyclists focused on short, high-intensity efforts.
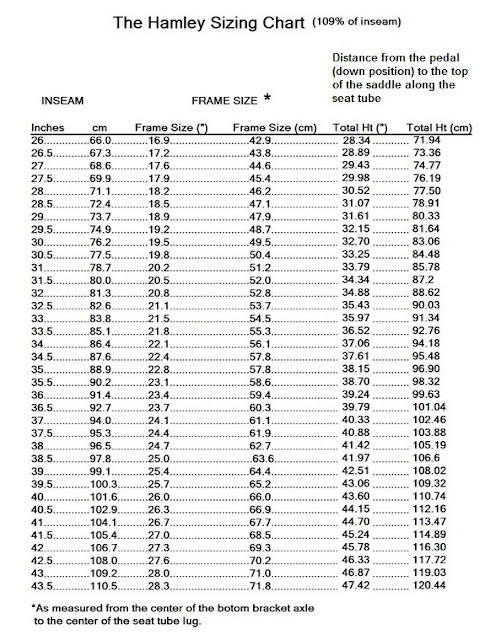 Hamley Sizing Chart for Saddle Height
Beyond Frame Size: Saddle Height and Position
While frame size is the foundation, saddle height and position are equally critical for a comfortable and efficient ride.
Saddle Height: Lemond vs. Hamley
As discussed, both Lemond and Hamley methods offer guidelines for saddle height. The Lemond chart provides saddle height recommendations directly related to frame size and inseam, aiming for a balance of power and endurance. The Hamley method, while less commonly used for general road cycling, suggests a slightly higher saddle position that might maximize short-burst power. For most road cyclists, starting with the Lemond chart’s saddle height recommendation is advisable.
Saddle Position
Saddle fore-aft position also plays a role in comfort and power. Generally, a neutral saddle position is recommended, with the nose of the saddle at least 5cm behind a vertical line from the bottom bracket, as per UCI regulations. Experimenting with slight adjustments to saddle fore-aft can fine-tune your knee position over the pedals and overall comfort.
Other Fit Considerations
Beyond frame size and saddle height, handlebar width, stem length, and overall bike setup contribute to your riding experience. Handlebar width should generally match your shoulder width for comfortable breathing and control. Stem length affects your reach to the handlebars and influences your body position. Adjustments to stem length and handlebar position can further refine your fit for optimal comfort and aerodynamics.
Conclusion
Choosing the right road bike frame size is an essential investment in your cycling journey. Utilizing a road bike frame size chart, such as the Lemond chart, based on your inseam measurement is a reliable starting point. Remember to consider saddle height, position, and other fit adjustments to personalize your bike setup. By prioritizing proper bike fit, you’ll unlock greater comfort, efficiency, and enjoyment on every ride.