
Diving into the world of custom bikes, I recently discovered the unique appeal of OCC Stingray choppers through the ebike community. These bikes have garnered a dedicated following, often being motorized with both gas and electric setups. My exploration led me to peddlechoppers.com and Jim Wilson, who seemed like a long-time enthusiast and a valuable resource for these builds. However, my experience turned sour as it seemed his primary interest was financial gain, even after I purchased several parts from him. Despite the website listing parts as in stock, it appeared he mostly resold and ordered items, keeping minimal inventory.
I had my sights set on 3G forks for my Stingray Chopper Bike project. When I mentioned this, Jim insisted I send the forks to him for fitting, naturally for a fee. Being a firm believer in the “built, not bought” philosophy, I declined. This led to a negative turn, with him refusing to answer my questions and asserting that fitting these forks on an OCC Stingray was beyond my capabilities or anyone around me. Consider this a challenge accepted! I’m now hands-on, learning and tackling this build myself. To add insult to injury, I was even banned from his Stingray-related Facebook groups – perhaps they should be renamed “peddle chopper$$$.com fan club, buy from me only.”
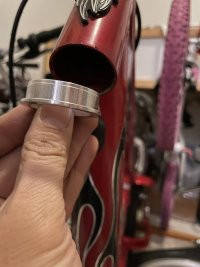
Rant aside, I’ve made progress fitting the forks. To adapt the springer forks, which have a 1” tube diameter, to the OCC Stingray, I’m using a fork tube shim or spacer sourced from eBay. This cleverly reduces the fork tube size to accommodate a 1” threadless headset, essential for this custom modification.
 Fork tube shim spacer used for fitting springer forks to a stingray chopper bike
This project marks my first attempt at headset installation, and honestly, all the components are a bit puzzling initially.
 Components of a threadless headset for stingray chopper bike springer fork installation
The cups are currently just pressed in temporarily. I’m waiting on a New Old Stock (NOS) chrome Crane Creek headset before fully installing the star nut. I anticipate needing some assistance with that step, particularly regarding the placement of the second-to-thinnest washer.
 Temporary installation of headset cups on a stingray chopper bike fork
 Close up of headset cups installed on a custom stingray chopper bicycle project
Fork Placement and Spacers: Balancing Length and Height
Next, I’m tackling fork placement on the neck tube. I’ve always been drawn to the long and low aesthetic of choppers. To maximize the bike’s length, I’m considering using spacers instead of cutting the fork head tube. A longer fork equates to a longer bike, but also a taller one. The challenge is finding the right balance between bike length, bike height, and maintaining a level frame. I’m experimenting with different setups to gauge the visual impact. Do any of these configurations look excessively odd?
Option 1: Trimmed Fork Tube, No Spacers
This setup involves trimming the fork tube and using no spacers. The bike is already tilted upwards due to the fork length itself.
 Stingray chopper bike fork placement with trimmed tube and no spacers
Option 2: Spacers Top and Bottom
Using spacers both above and below the frame. This looks reasonably balanced. However, I might need to retain some spacers at the top to prevent the spring from hitting the triple tree during larger bumps.
 Springer fork placement on a stingray chopper bike with spacers at top and bottom
Option 3: Spacer on Bottom for Max Length and Height
Placing a spacer only at the bottom to achieve maximum length and height. The frame level is noticeably raised. I’m questioning how this setup would actually handle.
 Maximum length and height configuration of forks on a stingray chopper bike using bottom spacer
Managing the Gap
A challenge with this setup is managing the gap created by the fork flare.
 Gap from fork flare on a custom stingray chopper bike with springer forks
Option 4: All Spacers on Top – Not Ideal?
Using all spacers only at the top. This configuration doesn’t seem right aesthetically. A shot from further back would give a better perspective on the overall proportions.
 Questionable fork placement with all spacers above the frame on a stingray chopper bike
Further Customization Ideas
I’m even contemplating disassembling the springer fork to potentially shorten the top spring, though I’m unsure if this is feasible without shortening other tubes. Headlight placement is also on my mind. Perhaps a combination of a triangle light and a flat rectangle light could work if space allows. Clip-on handlebars are another consideration, as the ape bars I had in mind are now on another bike project.
 Ape hanger handlebars repurposed for another bike project away from the stingray chopper
Springer Seat Post and Banana Seat Mounting
I also acquired a springer seat post. I’m curious if the seat mount can be removed from the post. I haven’t mounted a banana seat before. Given that the custom seat will also incorporate rear springers, I believe the front mount needs some kind of floating nut to accommodate movement. Any insights on this would be appreciated!
[