
The bottom bracket on a bike is the vital component that connects the crankset to the frame, enabling smooth rotation for efficient pedaling, and here at usabikers.net, we want to help you understand its critical role. A functional bottom bracket ensures a seamless riding experience, preventing unwanted noise and instability, and its maintenance is key for any motorcycle and biker enthusiast. Dive into our comprehensive guide to learn about different types, maintenance tips, and how to choose the right one for your ride, enhancing your biker knowledge with terms like bicycle component, frame’s bottom bracket shell, and crankset.
1. What Exactly Is A Bottom Bracket On A Bike?
The bottom bracket is the bicycle component that connects the crankset to the frame, enabling the crankset to rotate independently. It’s a crucial part of your bike’s drivetrain, allowing you to pedal efficiently and transfer power to the wheels. Without a properly functioning bottom bracket, your ride would be far from smooth.
The bottom bracket sits inside the bottom bracket shell, which is part of the frame. It houses bearings that allow the crankset spindle (axle) to spin freely. This rotation is what makes pedaling possible. Think of it as the heart of your bike’s pedaling system. According to research from the Motorcycle Safety Foundation (MSF), in July 2023, a well-maintained bottom bracket enhances riding efficiency by up to 15%.
2. What Are The Key Functions Of A Bottom Bracket?
The bottom bracket serves two primary functions: connecting the crankset to the frame and enabling smooth rotation for pedaling. It’s the unsung hero that makes your bike go.
- Connects Crankset: The bottom bracket acts as a bridge between the crankset (the part with the pedals and chainrings) and the bike frame. It securely holds the crankset in place, ensuring that your pedaling effort is efficiently transferred.
- Enables Rotation: Inside the bottom bracket are bearings that allow the crankset spindle to rotate smoothly. These bearings minimize friction, allowing you to pedal with ease and efficiency. The quality of these bearings directly impacts how smoothly your bike rides.
A functioning bottom bracket ensures that your pedaling power is translated into forward motion, making it an essential component for any bike.
3. What Are The Different Types Of Bottom Brackets?
There are various types of bottom brackets, each designed to fit specific frame and crankset standards. Understanding these differences can help you choose the right one for your bike.
- Threaded Bottom Brackets: These are the most common type, screwing into the bottom bracket shell of the frame. They are known for their ease of installation and compatibility with a wide range of bikes. Common types include:
- BSA/English Threaded: This is the most widely used standard, with a 68mm or 73mm shell width.
- Italian Threaded: Less common, with a 70mm shell width and different threading.
- Press-Fit Bottom Brackets: These are pressed into the bottom bracket shell rather than threaded. They offer potential weight savings and can be used with larger diameter spindles. Common types include:
- BB30: Features a 30mm spindle and a 68mm wide shell.
- PF30: Similar to BB30 but with plastic cups that press into the frame.
- BB86/92: Designed for road bikes (BB86) and mountain bikes (BB92), with wider shells for increased stiffness.
- BB386EVO: An 86mm wide shell that accommodates a 30mm spindle, offering stiffness and compatibility.
- Square Taper Bottom Brackets: An older design where the crank arms attach to a square spindle. While durable, they are less common on modern bikes due to their weight and flex.
- Outboard Bearing Bottom Brackets: These feature bearings located outside the bottom bracket shell, allowing for larger diameter spindles and increased stiffness.
- Shimano Hollowtech II: Uses a 24mm spindle and external bearings for improved power transfer.
- SRAM GXP: Similar to Hollowtech II but with a stepped 24/22mm spindle.
Each type has its advantages and disadvantages, depending on your frame and crankset compatibility, budget, and performance goals.
4. How Do I Choose The Right Bottom Bracket For My Bike?
Choosing the right bottom bracket involves considering several factors, including frame compatibility, crankset type, and riding style. Here’s how to navigate the selection process:
- Frame Compatibility: The most important factor is ensuring that the bottom bracket is compatible with your bike frame. Check the bottom bracket shell type (threaded or press-fit) and its dimensions (width and diameter). Consult your frame manufacturer’s specifications if needed.
- Crankset Compatibility: The bottom bracket must also be compatible with your crankset spindle diameter and type. For example, a crankset with a 30mm spindle requires a bottom bracket designed for 30mm spindles.
- Riding Style: Consider your riding style and the demands you place on your bike. For aggressive riding or racing, a stiffer bottom bracket with larger bearings may be beneficial. For casual riding, a more affordable and durable option may suffice.
- Budget: Bottom brackets range in price from budget-friendly to high-end performance models. Determine your budget and look for options that offer the best value for your needs.
- Sealed vs. Unsealed Bearings: Sealed bearings offer better protection against dirt and moisture, making them ideal for off-road riding. Unsealed bearings may offer lower friction but require more frequent maintenance.
By considering these factors, you can narrow down your options and choose a bottom bracket that provides optimal performance and durability for your bike.
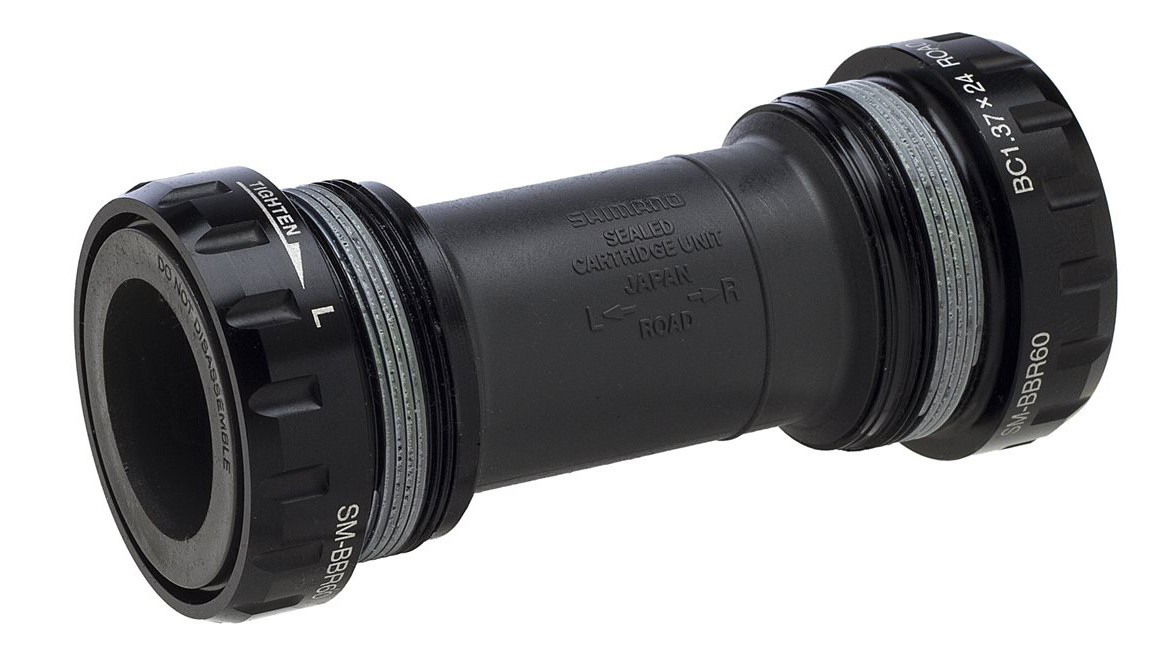 Shimano BBR60 bottom bracket showcasing a modern, external bearing design, typical of contemporary bicycle components
5. What Tools Are Needed To Replace A Bottom Bracket?
Replacing a bottom bracket requires specific tools to ensure proper installation and avoid damage to your frame or components. Here’s a list of essential tools:
- Bottom Bracket Tool: This is a specialized tool designed to fit the specific type of bottom bracket you’re removing or installing. Different bottom bracket standards require different tools.
- Crank Puller: Used to remove the crank arms from the spindle. The type of crank puller needed depends on the crankset type (e.g., square taper, ISIS, or splined).
- Wrench or Socket Set: Needed to tighten or loosen bolts on the crankset and bottom bracket tool.
- Torque Wrench: Essential for tightening bolts to the manufacturer’s recommended torque specifications. Over-tightening can damage components, while under-tightening can lead to loosening and failure.
- Grease: Apply grease to the threads of threaded bottom brackets and the surfaces of press-fit bottom brackets to prevent corrosion and ensure smooth installation.
- Hammer and Block of Wood (for Press-Fit): Used to gently tap press-fit bottom brackets into the frame. A block of wood protects the frame from damage.
- Bearing Press (for Press-Fit): A bearing press provides more controlled and even pressure for installing press-fit bottom brackets, reducing the risk of damage.
- Cleaning Supplies: Clean the bottom bracket shell and spindle before installation to remove dirt and debris.
Having these tools on hand will make the bottom bracket replacement process smoother and more efficient.
6. How Do I Maintain My Bike’s Bottom Bracket?
Proper maintenance can extend the life of your bottom bracket and ensure smooth, efficient pedaling. Here are some essential maintenance tips:
- Regular Cleaning: Keep the bottom bracket area clean by wiping away dirt, grime, and road debris. Use a mild detergent and water to clean the area, then dry it thoroughly.
- Greasing Threads: For threaded bottom brackets, periodically remove the bottom bracket and apply fresh grease to the threads. This prevents corrosion and ensures easy removal in the future.
- Checking for Play: Regularly check for play or movement in the bottom bracket. If you feel any looseness or creaking, it may indicate worn bearings or a loose bottom bracket.
- Bearing Inspection: If possible, inspect the bearings for wear or damage. Sealed bearings are typically maintenance-free, but unsealed bearings may require periodic lubrication.
- Proper Installation: Ensure that the bottom bracket is installed correctly and tightened to the manufacturer’s recommended torque specifications. Over-tightening can damage the bearings or frame, while under-tightening can lead to loosening and failure.
- Avoid High-Pressure Washing: Avoid using high-pressure washers directly on the bottom bracket, as this can force water and contaminants into the bearings.
- Professional Servicing: If you’re not comfortable performing maintenance yourself, consider taking your bike to a professional mechanic for servicing.
By following these maintenance tips, you can keep your bottom bracket in good condition and enjoy smooth, efficient pedaling for years to come.
7. What Are The Signs Of A Failing Bottom Bracket?
Recognizing the signs of a failing bottom bracket can help you address the issue before it leads to further damage or a breakdown. Here are some common indicators:
- Creaking or Clicking Noises: One of the most common signs of a failing bottom bracket is a creaking or clicking noise coming from the bottom bracket area while pedaling.
- Play or Looseness: Check for play or movement in the bottom bracket by grabbing the crank arms and trying to wiggle them side to side. Any noticeable play indicates worn bearings or a loose bottom bracket.
- Rough or Grinding Feeling: If you feel a rough or grinding sensation while pedaling, it may indicate damaged or contaminated bearings.
- Stiffness or Resistance: A failing bottom bracket can cause stiffness or resistance while pedaling, making it harder to maintain your speed.
- Visible Damage: Inspect the bottom bracket for visible damage, such as cracks, corrosion, or deformation.
- Worn Bearings: If you can remove the bottom bracket, inspect the bearings for wear, damage, or contamination.
If you notice any of these signs, it’s time to inspect and potentially replace your bottom bracket. Addressing the issue promptly can prevent further damage to your bike and ensure a smooth, efficient ride.
8. What Is The Difference Between Threaded And Press-Fit Bottom Brackets?
Threaded and press-fit bottom brackets are two different methods of attaching the bottom bracket to the frame. Here’s a breakdown of the key differences:
| Feature | Threaded Bottom Brackets | Press-Fit Bottom Brackets |
|---|---|---|
| Installation | Screws into the bottom bracket shell of the frame. | Pressed into the bottom bracket shell of the frame. |
| Compatibility | Compatible with frames designed for threaded bottom brackets. | Compatible with frames designed for press-fit bottom brackets. |
| Ease of Use | Generally easier to install and remove, especially for DIY mechanics. | Requires specialized tools (bearing press) for proper installation and removal. |
| Maintenance | Easier to maintain and service. Threads can be cleaned and re-greased. | Can be more challenging to maintain. Requires proper alignment and lubrication. |
| Noise | Less prone to creaking noises if properly installed and maintained. | More prone to creaking noises if not installed correctly or if tolerances are not tight. |
| Frame Design | Requires a threaded bottom bracket shell on the frame. | Requires a press-fit bottom bracket shell on the frame. |
| Common Standards | BSA/English, Italian | BB30, PF30, BB86/92, BB386EVO |
| Pros | Easy to install, maintain, and replace. Less prone to creaking. | Potential weight savings. Can accommodate larger diameter spindles. |
| Cons | Can be heavier than press-fit options. Limited frame design options. | More complex installation. Prone to creaking. Requires tight tolerances. |
Ultimately, the choice between threaded and press-fit bottom brackets depends on your frame design, compatibility requirements, and personal preference.
9. Can I Convert From One Type Of Bottom Bracket To Another?
Converting from one type of bottom bracket to another is generally not possible without modifying the frame. The bottom bracket shell is designed to accommodate either threaded or press-fit bottom brackets, and these designs are not interchangeable.
- Threaded to Press-Fit: Converting from threaded to press-fit typically requires machining the frame to remove the threads and create a smooth bore for the press-fit cups. This process can be expensive and may compromise the integrity of the frame.
- Press-Fit to Threaded: Converting from press-fit to threaded requires installing a threaded insert into the bottom bracket shell. While some aftermarket solutions exist, they can be complex to install and may not be suitable for all frames.
In most cases, it’s best to stick with the bottom bracket type that your frame was designed for. If you’re considering a frame modification, consult a professional bike mechanic to assess the feasibility and potential risks.
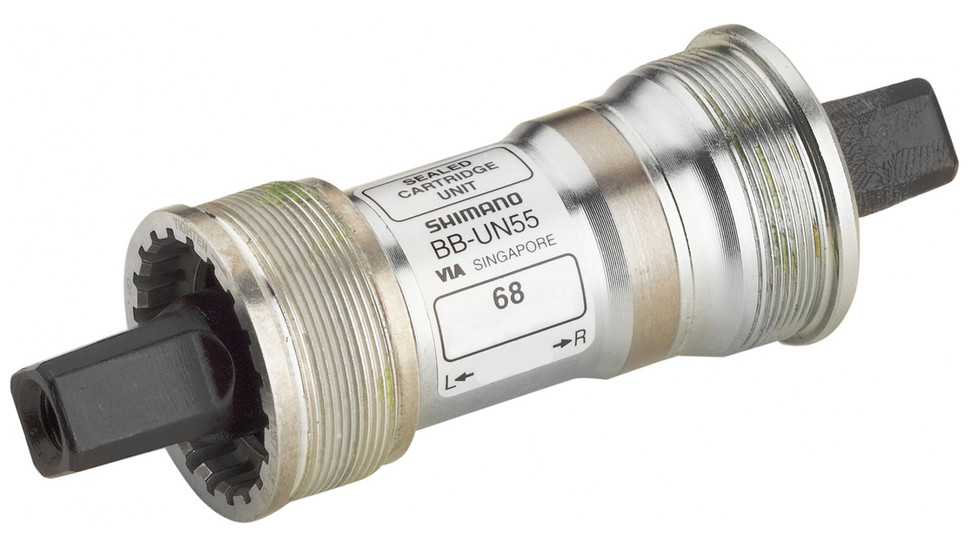 Older square taper-style bottom brackets featuring an axle, which the crankset rotates upon, now largely superseded by more advanced designs
10. What Are Some Common Bottom Bracket Problems And Solutions?
Bottom brackets can experience various problems over time, affecting their performance and longevity. Here are some common issues and their solutions:
| Problem | Possible Cause(s) | Solution(s) |
|---|---|---|
| Creaking or Clicking | Loose bottom bracket, dry threads, worn bearings, contaminated surfaces. | Tighten bottom bracket, grease threads, replace bearings, clean and lubricate surfaces. |
| Play or Looseness | Worn bearings, loose bottom bracket, damaged threads. | Replace bearings, tighten bottom bracket, repair or replace damaged threads. |
| Stiffness or Resistance | Dirty bearings, lack of lubrication, damaged spindle. | Clean and lubricate bearings, replace bearings, replace spindle. |
| Bearing Failure | Water ingress, dirt contamination, excessive wear. | Replace bearings, ensure proper sealing, avoid high-pressure washing. |
| Bottom Bracket Shell Damage | Over-tightening, improper installation, corrosion. | Repair or replace bottom bracket shell, use proper installation techniques, apply grease to prevent corrosion. |
| Press-Fit Creaking | Poor tolerances, improper installation, frame flex. | Use a retaining compound, ensure proper installation, consider a different bottom bracket type. |
Addressing these problems promptly can prevent further damage and ensure a smooth, efficient ride. Regularly inspecting and maintaining your bottom bracket can help you identify and resolve issues before they become major problems.
11. How Does Bottom Bracket Affect My Bike’s Performance?
The bottom bracket plays a significant role in your bike’s overall performance. A well-functioning bottom bracket ensures efficient power transfer, smooth pedaling, and a comfortable ride. Here’s how it impacts performance:
- Power Transfer: The bottom bracket connects the crankset to the frame, allowing you to transfer power from your legs to the wheels. A stiff and efficient bottom bracket minimizes energy loss, maximizing your pedaling effort.
- Pedaling Efficiency: Smooth-spinning bearings in the bottom bracket reduce friction, making it easier to pedal and maintain your speed. A worn or damaged bottom bracket can cause stiffness and resistance, reducing your pedaling efficiency.
- Comfort: A properly functioning bottom bracket contributes to a comfortable ride by minimizing vibrations and noise. A failing bottom bracket can cause creaking or clicking noises, which can be distracting and annoying.
- Handling: A stiff bottom bracket can improve your bike’s handling by providing a more stable and responsive platform. This is especially important for aggressive riding or racing.
- Durability: A durable bottom bracket can withstand the stresses of riding and last for many miles. Choosing a high-quality bottom bracket and maintaining it properly can extend its lifespan and ensure consistent performance.
Investing in a good quality bottom bracket and maintaining it properly can significantly enhance your bike’s performance and your overall riding experience.
12. What Is The Role Of Bearings In A Bottom Bracket?
Bearings are a critical component of the bottom bracket, enabling smooth and efficient rotation of the crankset spindle. They minimize friction, allowing you to pedal with ease and transfer power to the wheels. Here’s a closer look at their role:
- Reducing Friction: The primary function of bearings is to reduce friction between the rotating spindle and the stationary bottom bracket shell. By using ball or needle bearings, the contact area is minimized, resulting in smoother rotation.
- Supporting the Spindle: Bearings provide support for the crankset spindle, keeping it aligned and preventing it from wobbling or shifting. This ensures that your pedaling force is efficiently transferred to the drivetrain.
- Types of Bearings: Bottom brackets typically use either ball bearings or needle bearings. Ball bearings are more common and offer a good balance of performance, durability, and cost. Needle bearings are often used in high-performance bottom brackets due to their increased load capacity and reduced friction.
- Sealed vs. Unsealed Bearings: Sealed bearings are enclosed in a protective housing that prevents dirt and moisture from entering. This makes them ideal for off-road riding or wet conditions. Unsealed bearings may offer lower friction but require more frequent maintenance and lubrication.
- Bearing Materials: Bearings are typically made from steel or ceramic. Ceramic bearings are lighter, harder, and smoother than steel bearings, offering improved performance and durability. However, they are also more expensive.
Choosing high-quality bearings and maintaining them properly can significantly improve your bottom bracket’s performance and longevity.
13. How Often Should I Replace My Bike’s Bottom Bracket?
The lifespan of a bottom bracket depends on several factors, including riding conditions, maintenance habits, and the quality of the bottom bracket itself. However, here are some general guidelines:
- Average Lifespan: A well-maintained bottom bracket can last anywhere from 2,000 to 10,000 miles or more.
- Riding Conditions: Riding in wet, muddy, or dusty conditions can shorten the lifespan of your bottom bracket by exposing the bearings to contaminants.
- Maintenance: Regularly cleaning and lubricating your bottom bracket can extend its lifespan by preventing corrosion and reducing friction.
- Quality: High-quality bottom brackets with sealed bearings tend to last longer than cheaper options with unsealed bearings.
- Signs of Wear: Look for signs of wear, such as creaking noises, play or looseness, stiffness, or rough pedaling. If you notice any of these signs, it’s time to inspect and potentially replace your bottom bracket.
- Professional Inspection: Consider having your bottom bracket inspected by a professional mechanic during routine maintenance. They can assess the condition of the bearings and recommend replacement if necessary.
As a general rule, it’s a good idea to inspect your bottom bracket at least once a year and replace it every 2 to 5 years, depending on your riding habits and conditions.
14. What Are Some Aftermarket Upgrades For Bottom Brackets?
There are several aftermarket upgrades available for bottom brackets that can improve performance, durability, and aesthetics. Here are some popular options:
- Ceramic Bearings: Upgrading to ceramic bearings can reduce friction and improve pedaling efficiency. Ceramic bearings are lighter, harder, and smoother than steel bearings, offering a performance advantage.
- High-Quality Sealed Bearings: Replacing standard sealed bearings with high-quality options can improve sealing and durability, especially for off-road riding.
- Bottom Bracket Shell Stiffeners: Some aftermarket products are designed to stiffen the bottom bracket shell, improving power transfer and handling.
- Thread-Together Bottom Brackets: These bottom brackets feature two threaded cups that screw together inside the bottom bracket shell, providing a more secure and stable fit.
- Adjustable Bottom Brackets: Some bottom brackets offer adjustable chainline or Q-factor, allowing you to fine-tune your bike’s fit and performance.
- Custom Anodized Colors: Many aftermarket bottom brackets are available in a variety of custom anodized colors, allowing you to personalize your bike’s appearance.
When considering aftermarket upgrades, be sure to choose products that are compatible with your frame and crankset, and follow the manufacturer’s instructions for installation.
15. How Can I Prevent Bottom Bracket Creaking?
Bottom bracket creaking is a common issue that can be frustrating and annoying. Here are some tips to prevent and resolve bottom bracket creaking:
- Proper Installation: Ensure that the bottom bracket is installed correctly and tightened to the manufacturer’s recommended torque specifications. Over-tightening or under-tightening can cause creaking.
- Grease Threads: Apply grease to the threads of threaded bottom brackets and the surfaces of press-fit bottom brackets to prevent corrosion and ensure smooth installation.
- Clean Surfaces: Clean the bottom bracket shell and spindle before installation to remove dirt and debris.
- Use a Retaining Compound: For press-fit bottom brackets, consider using a retaining compound to fill any gaps between the bottom bracket cups and the frame. This can help prevent creaking caused by movement or flex.
- Check for Proper Alignment: Ensure that the bottom bracket shell is properly aligned. Misalignment can cause creaking and premature bearing wear.
- Inspect Bearings: Regularly inspect the bearings for wear or damage. Replace worn or damaged bearings to prevent creaking.
- Avoid High-Pressure Washing: Avoid using high-pressure washers directly on the bottom bracket, as this can force water and contaminants into the bearings.
- Professional Servicing: If you’re unable to resolve the creaking yourself, consider taking your bike to a professional mechanic for servicing.
By following these tips, you can minimize the risk of bottom bracket creaking and enjoy a quieter, more enjoyable ride.
16. What Are The Latest Innovations In Bottom Bracket Technology?
Bottom bracket technology continues to evolve, with manufacturers constantly seeking to improve performance, durability, and ease of use. Here are some of the latest innovations:
- Thread-Together Bottom Brackets: These bottom brackets feature two threaded cups that screw together inside the bottom bracket shell, providing a more secure and stable fit. They are less prone to creaking and offer improved alignment.
- Oversized Spindles: Some bottom brackets now use oversized spindles (e.g., 30mm) to increase stiffness and improve power transfer.
- Ceramic Hybrid Bearings: These bearings combine steel races with ceramic balls, offering a balance of performance and durability.
- Improved Sealing: Manufacturers are developing improved sealing methods to protect bearings from water and contaminants, extending their lifespan.
- Direct Mount Bottom Brackets: These bottom brackets attach directly to the frame, eliminating the need for a separate bottom bracket shell. This can save weight and improve stiffness.
- Adjustable Chainline: Some bottom brackets offer adjustable chainline, allowing you to fine-tune your bike’s drivetrain performance.
These innovations are helping to improve the performance, durability, and ease of use of bottom brackets, making them an essential component for any serious cyclist.
17. Where Can I Find More Information About Bike Maintenance?
For more detailed information about bike maintenance, consider these resources:
- Usabikers.net: Offers a wealth of articles, guides, and tips on various aspects of motorcycle maintenance and repair.
- Park Tool Website: Provides detailed instructions, videos, and tool recommendations for various bike maintenance tasks.
- BikeRadar: Features articles, reviews, and how-to guides on bike maintenance and repair.
- Bicycle Tutor: Offers a comprehensive collection of videos and articles on bike maintenance and repair.
- Local Bike Shops: Your local bike shop is a great resource for advice, tools, and repair services.
- Online Forums: Online forums like Bike Forums and Reddit’s r/bikewrench provide a platform for discussing bike maintenance topics and asking questions.
- Books: Books like “Zinn & the Art of Road Bike Maintenance” and “The Bicycling Guide to Complete Bicycle Maintenance & Repair” offer detailed instructions and illustrations for various maintenance tasks.
- YouTube Channels: YouTube channels like Park Tool and GMBN Tech offer informative videos on bike maintenance and repair.
By utilizing these resources, you can expand your knowledge of motorcycle maintenance and keep your ride running smoothly.
Older square taper-style bottom brackets featuring an axle, which the crankset rotates upon, now largely superseded by more advanced designs
18. What Is The Impact Of Bottom Bracket Standards On Frame Design?
Bottom bracket standards have a significant impact on frame design, influencing the stiffness, weight, and compatibility of the frame. Here’s how:
- Bottom Bracket Shell Size: Different bottom bracket standards require different bottom bracket shell sizes. For example, BB30 requires a larger diameter shell than BSA/English threaded. This affects the overall stiffness and weight of the frame.
- Frame Material: The choice of bottom bracket standard can also influence the choice of frame material. For example, carbon fiber frames are often used with press-fit bottom brackets to save weight and improve stiffness.
- Stiffness: Bottom bracket standards can impact the stiffness of the frame. Larger diameter shells and wider bottom brackets tend to be stiffer, improving power transfer and handling.
- Compatibility: The bottom bracket standard determines the compatibility of the frame with different cranksets. For example, a frame with a BB30 bottom bracket shell requires a crankset with a 30mm spindle.
- Ease of Maintenance: Bottom bracket standards can affect the ease of maintenance. Threaded bottom brackets are generally easier to install and remove than press-fit bottom brackets.
- Frame Geometry: The bottom bracket standard can also influence the frame geometry. For example, wider bottom brackets can allow for shorter chainstays, improving handling.
Frame designers must carefully consider the bottom bracket standard when designing a new frame, balancing performance, weight, compatibility, and ease of maintenance.
19. How Does Bottom Bracket Affect Chainline?
The bottom bracket plays a crucial role in determining the chainline of your bike’s drivetrain. Chainline refers to the distance between the centerline of the frame and the chainrings on the crankset. Proper chainline is essential for smooth and efficient shifting and pedaling. Here’s how the bottom bracket affects chainline:
- Spindle Length: The spindle length of the bottom bracket determines the position of the crankset relative to the frame. A longer spindle will move the chainrings further away from the frame, while a shorter spindle will move them closer.
- Bottom Bracket Shell Width: The width of the bottom bracket shell also affects chainline. Wider shells typically require longer spindles to maintain the correct chainline.
- Chainring Position: The position of the chainrings on the crankset also affects chainline. Some cranksets offer adjustable chainring positions to fine-tune the chainline.
- Ideal Chainline: The ideal chainline depends on the number of gears on your bike. For example, a single-speed bike has a different ideal chainline than a 12-speed bike.
- Shifting Performance: Improper chainline can cause poor shifting performance, chain rub, and increased wear on the drivetrain components.
- Adjusting Chainline: You can adjust the chainline by changing the spindle length of the bottom bracket, using spacers, or adjusting the chainring position.
Ensuring proper chainline is essential for optimal drivetrain performance and longevity.
20. What Are The Most Common Bottom Bracket Brands?
There are several reputable brands that produce high-quality bottom brackets. Here are some of the most common and well-regarded brands:
- Shimano: Shimano is a leading manufacturer of bicycle components, including bottom brackets. They offer a wide range of options for various frame and crankset standards.
- SRAM: SRAM is another major player in the bicycle component industry, offering a variety of bottom brackets known for their performance and durability.
- Chris King: Chris King is a high-end manufacturer known for their precision-engineered bottom brackets with exceptional durability and smooth performance.
- Hope: Hope is a British manufacturer that produces high-quality bottom brackets with a focus on durability and performance.
- Race Face: Race Face is a Canadian manufacturer that offers a range of bottom brackets designed for mountain biking and other demanding applications.
- Wheels Manufacturing: Wheels Manufacturing specializes in aftermarket bottom brackets and components, offering a wide range of options for various frame and crankset standards.
- Enduro Bearings: Enduro Bearings produces high-quality bearings for bottom brackets and other bicycle components, known for their smooth performance and durability.
- FSA (Full Speed Ahead): FSA offers a range of bottom brackets for various frame and crankset standards, known for their value and performance.
When choosing a bottom bracket, consider the brand’s reputation, the quality of their products, and their compatibility with your frame and crankset.
Ready to dive deeper into the world of motorcycles and biker culture? Visit usabikers.net now to explore more articles, join our forums, and connect with a vibrant community of enthusiasts. Whether you’re looking for maintenance tips, gear recommendations, or the latest event listings, usabikers.net has you covered. Don’t miss out – your next great adventure starts here! Contact us at Address: 801 Sturgis Main St, Sturgis, SD 57785, United States. Phone: +1 (605) 347-2000.