What Size Is Bike Chain? The correct bike chain size ensures smooth gear changes and optimal performance. At usabikers.net, we’ll guide you through determining the precise length for your ride, whether you’re a seasoned biker or just starting. Keep reading to discover the best methods for measuring and fitting your new chain!
1. Understanding Bike Chain Basics
What Are the Different Types of Bike Chains?
Bike chains come in two main types: master link chains and connecting rivet chains. Master link chains use removable outer plates for connection, while connecting rivet chains use a special rivet. Knowing which type you have is the first step to figuring out the right chain size.
How to Identify Master Link vs. Connecting Rivet Chains?
Master link chains have a distinct link that can be easily removed with master link pliers. Connecting rivet chains, on the other hand, use a special rivet that looks different from the others. Being able to identify these differences is crucial for proper maintenance and sizing.
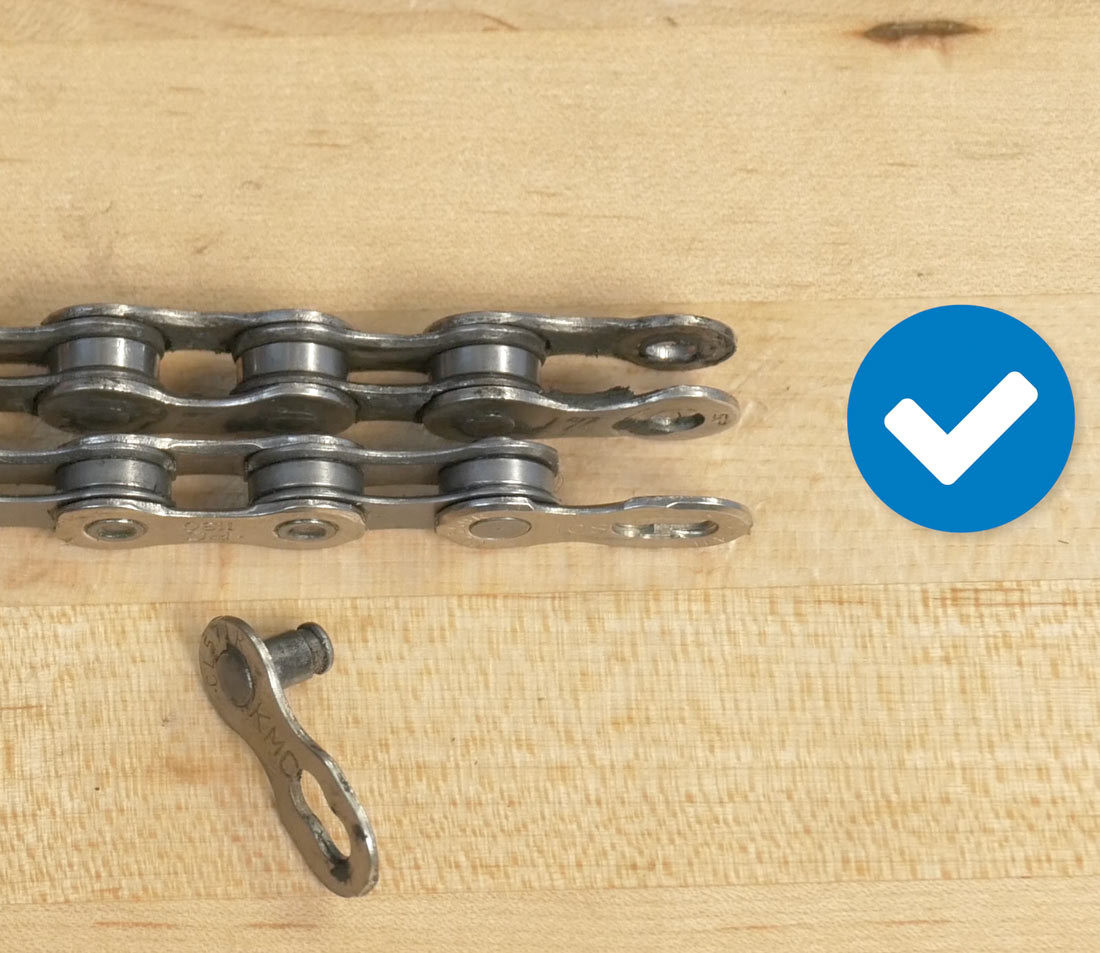
 Master link (L) and connecting rivet (R) chains
Alt Text: A side-by-side comparison illustrating a master link chain (left) and a connecting rivet chain (right), highlighting their unique connection mechanisms.
2. Checking and Removing Your Old Bike Chain
How to Verify the Correct Chain Length Before Removal?
Before removing the old chain, shift into the largest chainring and largest rear cog. The chain should be long enough to make this shift with slight bends at each pulley of the rear derailleur. Then, shift to the smallest chainring and sprocket. There should be no slack, and the derailleur shouldn’t pull so far back that the chain touches itself.
What is the Proper Derailleur Position and Chain Tension?
Proper chain tension means no slack when in the smallest chainring and sprocket. The derailleur should maintain tension without overextending. Correct derailleur position ensures smooth shifting and prevents damage to your bike.
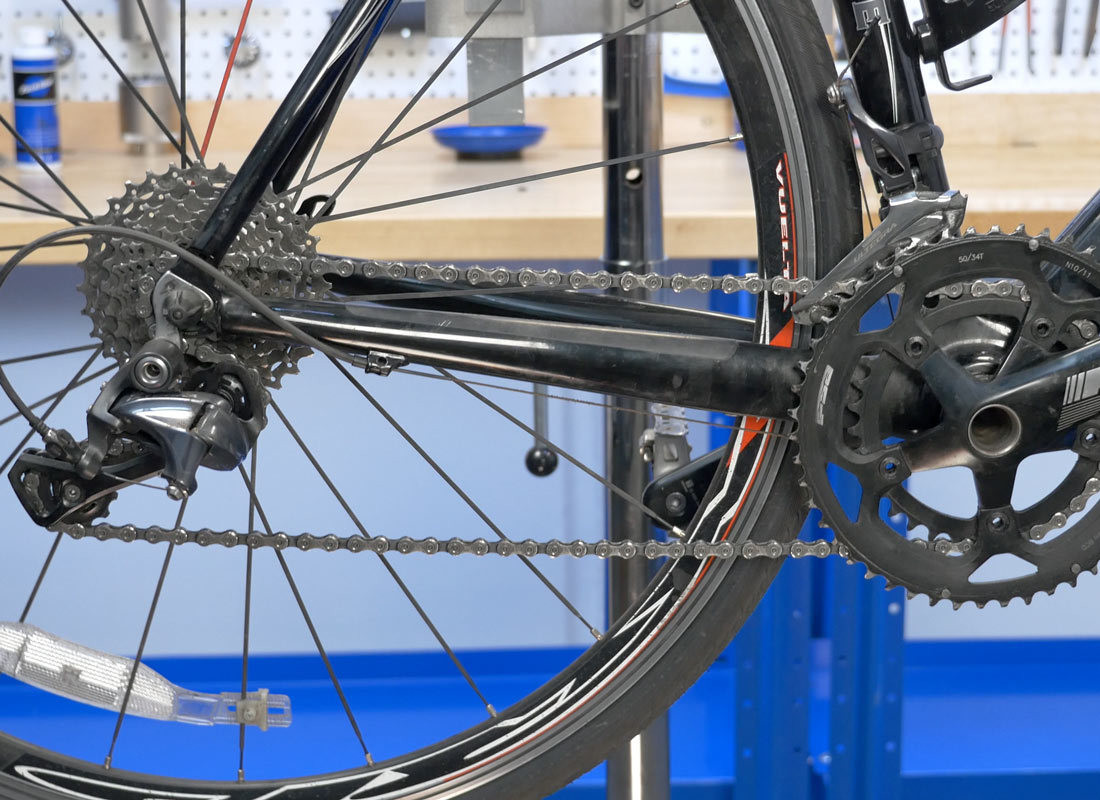 Correct derailleur position and chain tension
Alt Text: A visual representation of the correct derailleur position and ideal chain tension, showing the derailleur’s angle and the chain’s tautness.
Steps to Remove the Rear Wheel for Better Chain Access?
Removing the rear wheel takes tension off the chain, making it easier to work with. Start by releasing the brakes, then open the quick-release lever or loosen the axle nuts. Carefully lift the wheel out of the frame. This simple step provides better access for inspection and removal.
How to Remove a Chain with a Master Link?
If your chain has a master link, use master link pliers like the Park MLP-1.2 to disengage it. These pliers make the process quick and easy. If you don’t have pliers, you can use a chain tool to break the chain, especially if it’s worn out anyway.
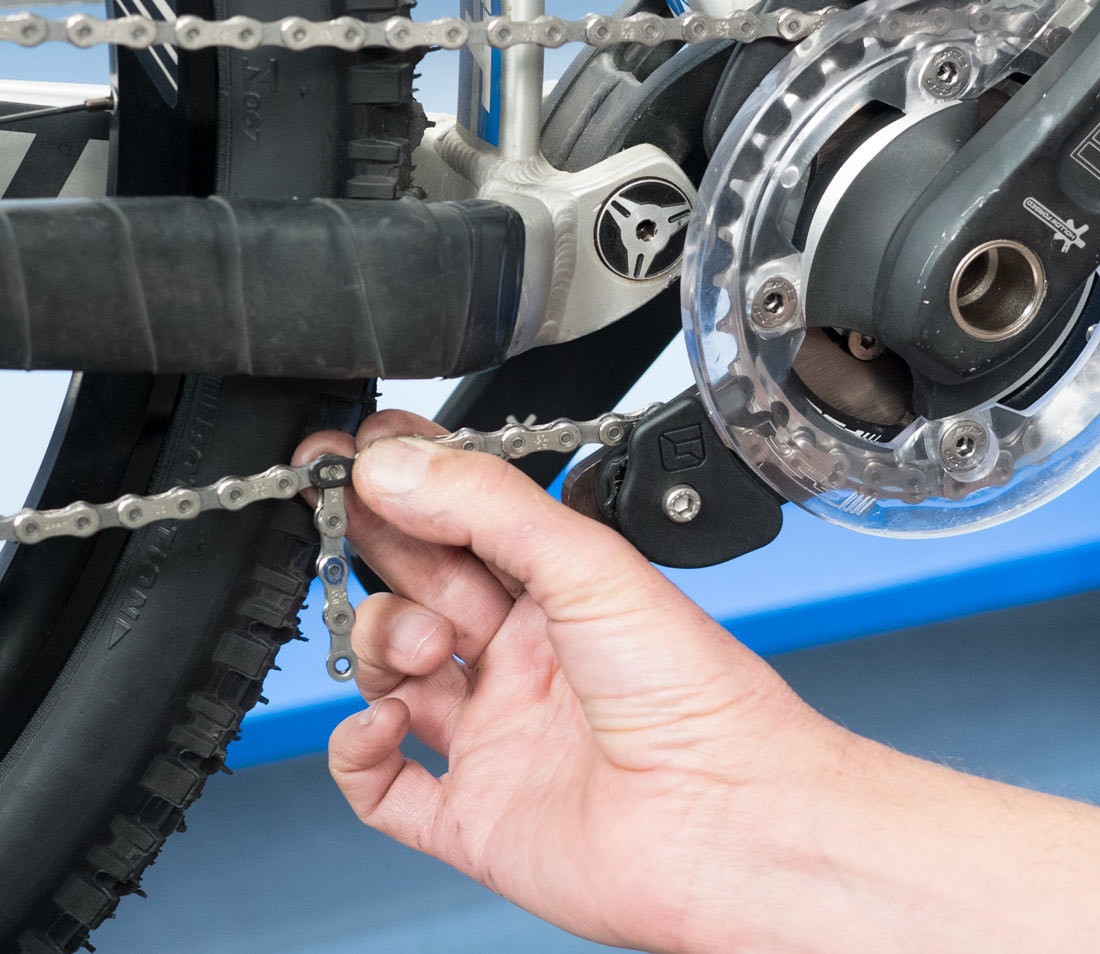
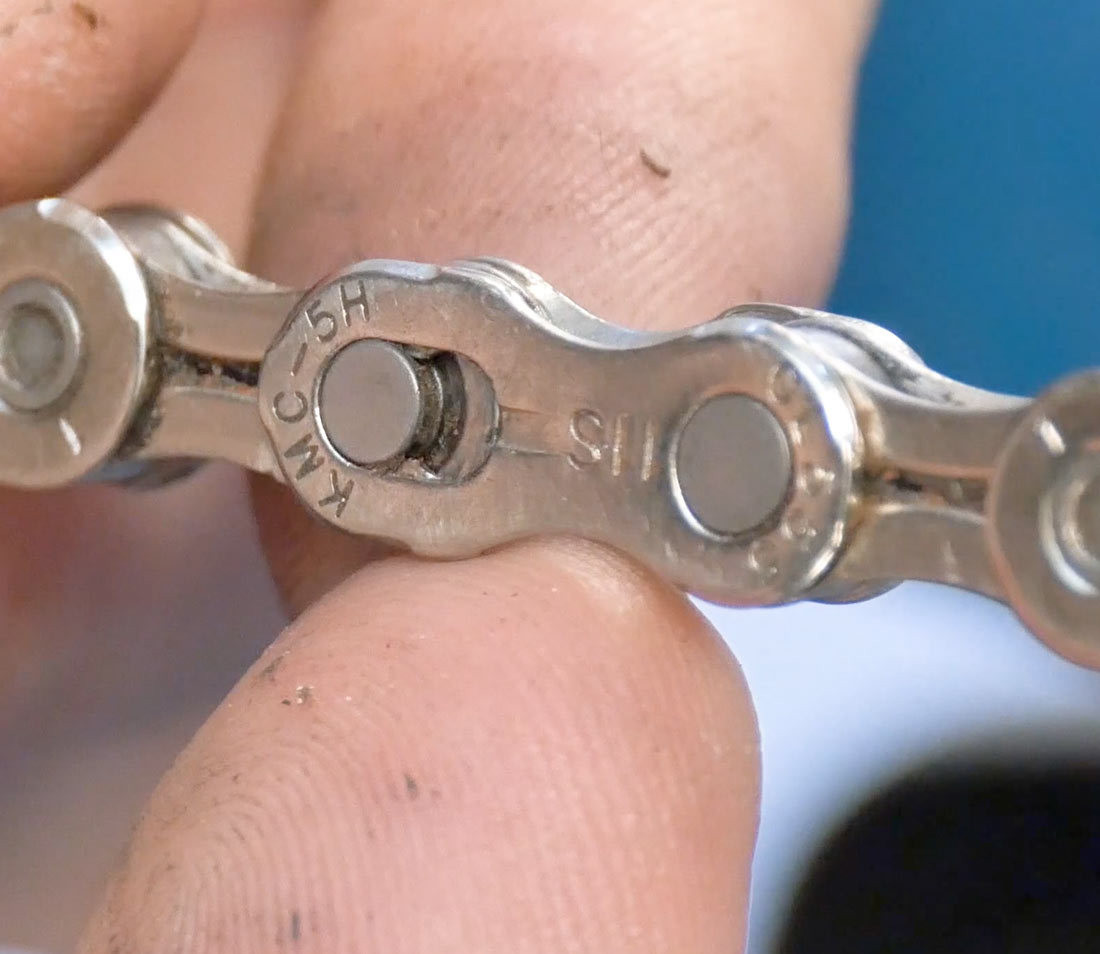 Master link
Alt Text: A close-up image displaying a master link on a bike chain, designed for easy identification and quick disengagement using appropriate pliers.
How to Remove a Chain with a Connecting Rivet?
Connecting rivets look different from other rivets. Use a chain tool to drive the rivet out. Ensure the chain tool pin is aligned straight with the rivet to avoid bending or damaging the tool. Turn the handle with force until the rivet is removed.
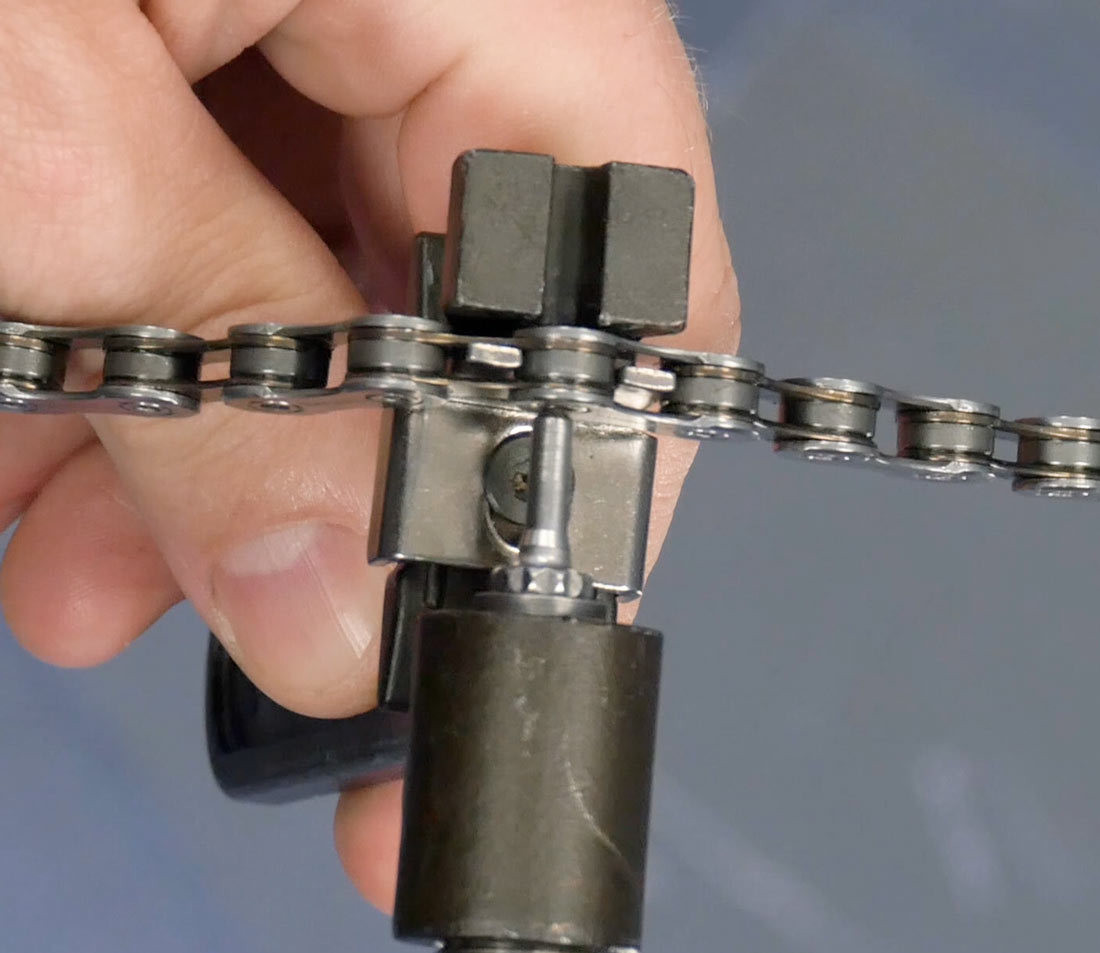 Bring tool into contact with rivet
Alt Text: Illustration of a chain tool correctly positioned to engage with a connecting rivet, ready to drive the rivet out for chain removal.
Why is it Important to Drive the Rivet Out in a Straight Line?
Driving the rivet out straight prevents damage to the chain tool and ensures a clean break. A bent pin can ruin the tool and make chain removal difficult. Precision is key for this step.
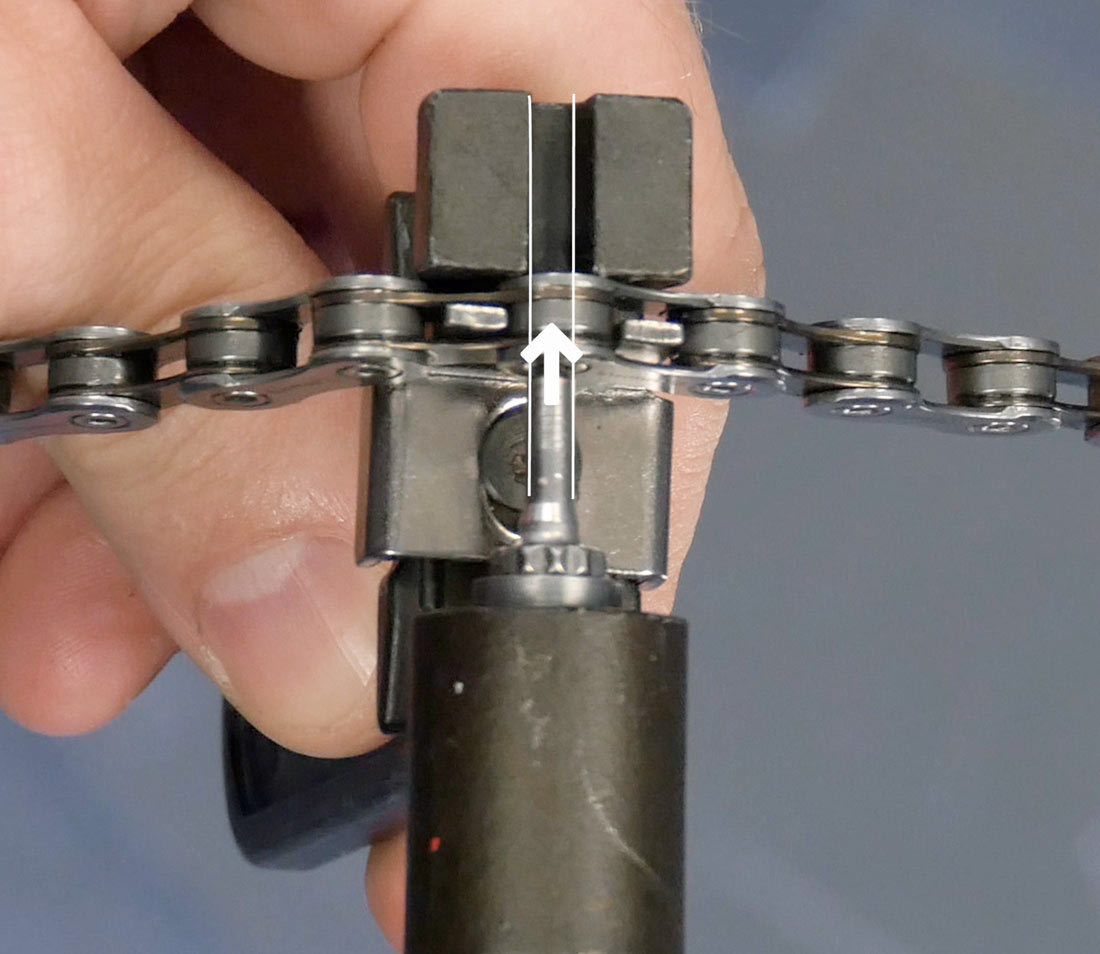 Closeup of chain tool with arrow demonstrating driving a chain rivet with the pin straight and centered
Alt Text: A magnified view of a chain tool pin driving a chain rivet straight and centered, ensuring smooth removal without damage.
3. Sizing a New Bike Chain to the Old Chain
How to Use the Old Chain as a Reference for Sizing?
If the old chain was the correct length, lay it next to the new chain, aligning outer plates with outer plates or inner plates with inner plates. Insert the master link to ensure an accurate comparison. Match them rivet by rivet, keeping in mind that old chains stretch as they wear.
What Should You Do When Matching Rivets on Old and New Chains?
When matching rivets, account for the wear and stretch of the old chain. Line up the new chain carefully and count the links to ensure the new chain is the correct length. This method is reliable if your old chain was properly sized.
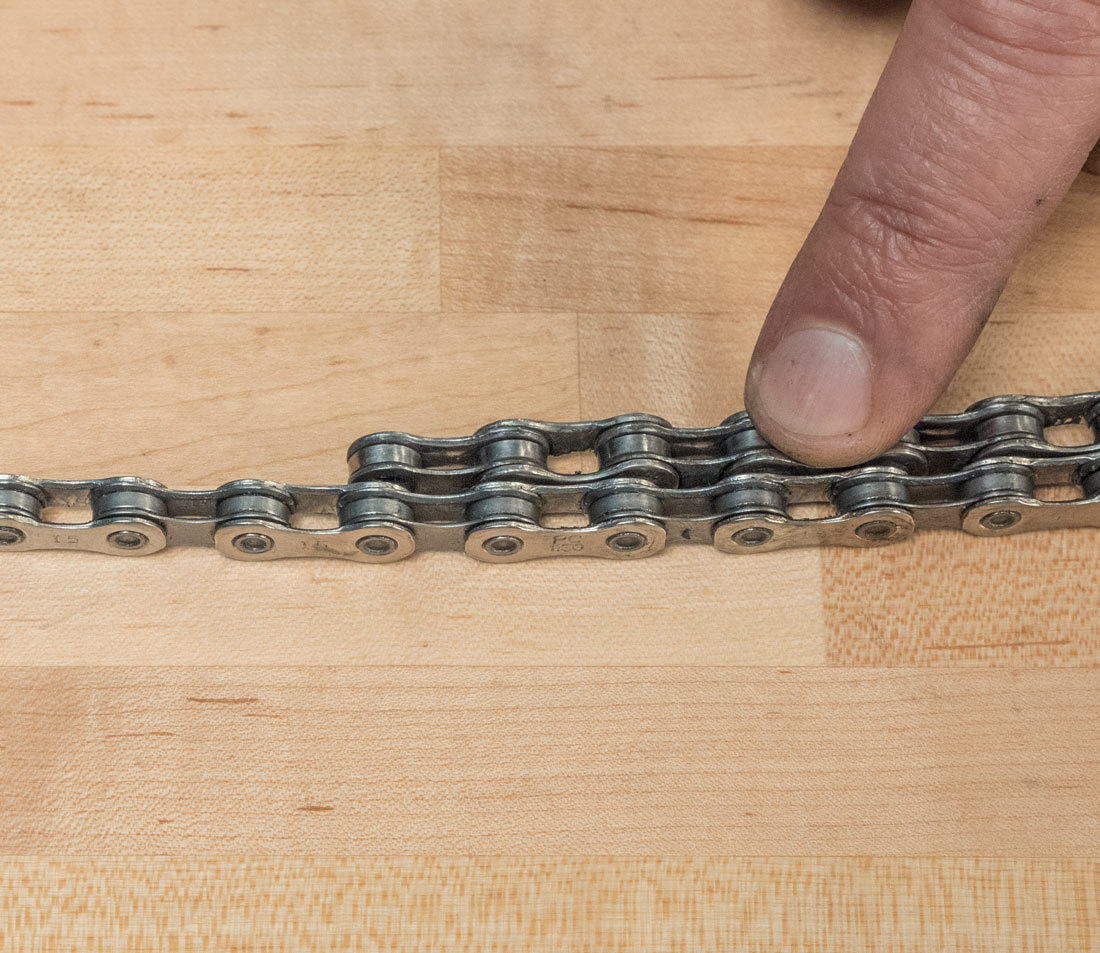
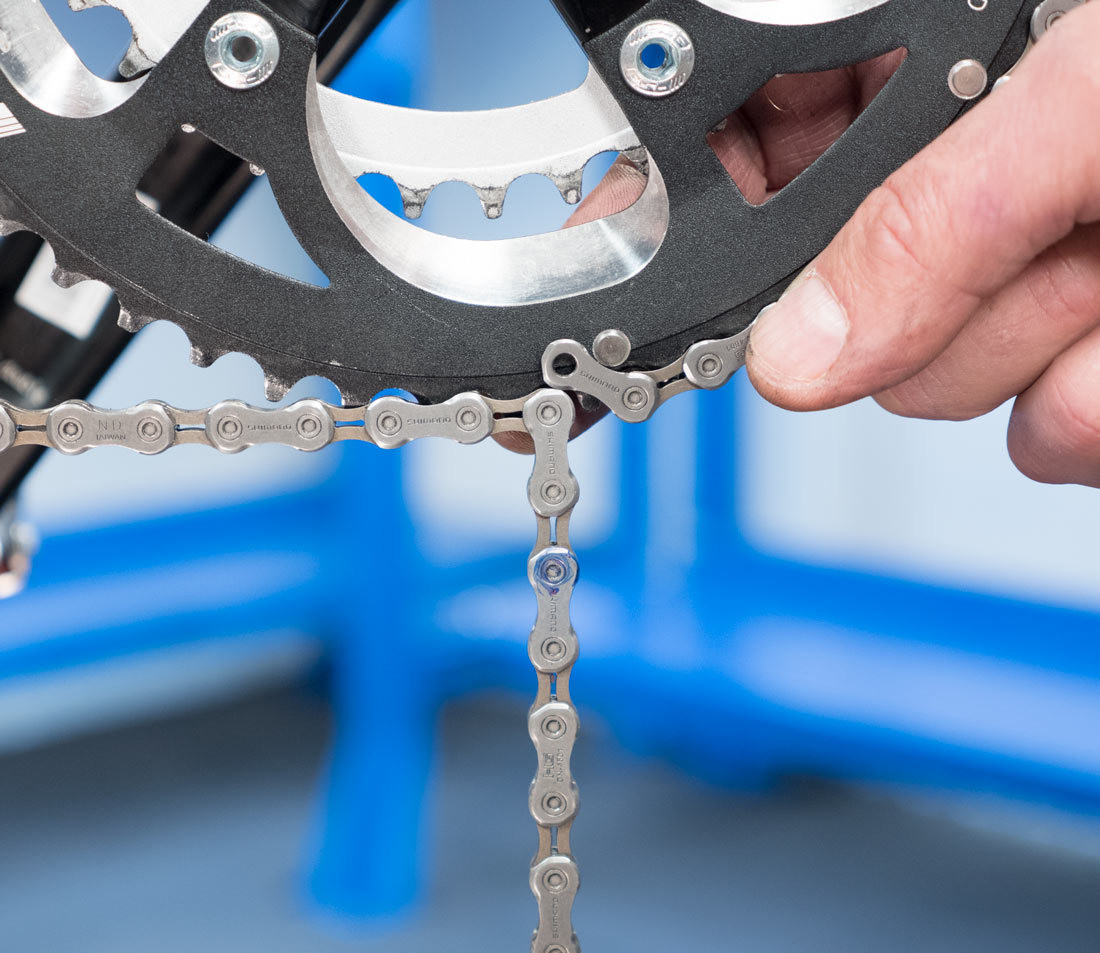
 Add master link for comparison
Alt Text: An image showing the process of adding a master link to an old bike chain to enable accurate comparison with a new chain during sizing.
Why is it Important to Account for Chain Wear When Sizing?
Accounting for chain wear is essential because a worn chain is longer than a new one. If you don’t consider this, your new chain may end up being too short. Accurate sizing ensures optimal performance and prevents premature wear on other drivetrain components.
 Match rivets on used chain to new chain
Alt Text: A detailed view of matching rivets on a used bike chain against those on a new chain, critical for determining the correct size and accounting for wear.
4. Largest Cog and Largest Chainring Method
When Should You Use the Largest Cog and Largest Chainring Method?
Use this method when sizing a chain from scratch, such as when replacing multiple drivetrain components. It’s also useful if the previous chain was incorrectly sized. This method involves using the largest rear sprocket and largest front ring as references.
How Much Chain Length Do You Need to Add?
For bikes with rear sprockets up to 36 teeth, add two rivets (one inch) to the length determined by wrapping the chain around the largest cog and chainring. This additional length accounts for the rear derailleur.
What Are the Steps for the Largest-to-Largest Method?
- Shift the front derailleur to the largest chainring and the rear derailleur to the smallest cog.
- Wrap the chain around the largest rear cog.
- Pass the chain through the front derailleur cage onto the largest front chainring.
- Hold it at about the five o’clock position.
How to Account for a Master Link in the Largest-to-Largest Method?
If the chain uses a master link, install half of the master link during the sizing process. This accounts for the extra half inch the master link provides. After this, the process is the same for both master link and connecting rivet chains.
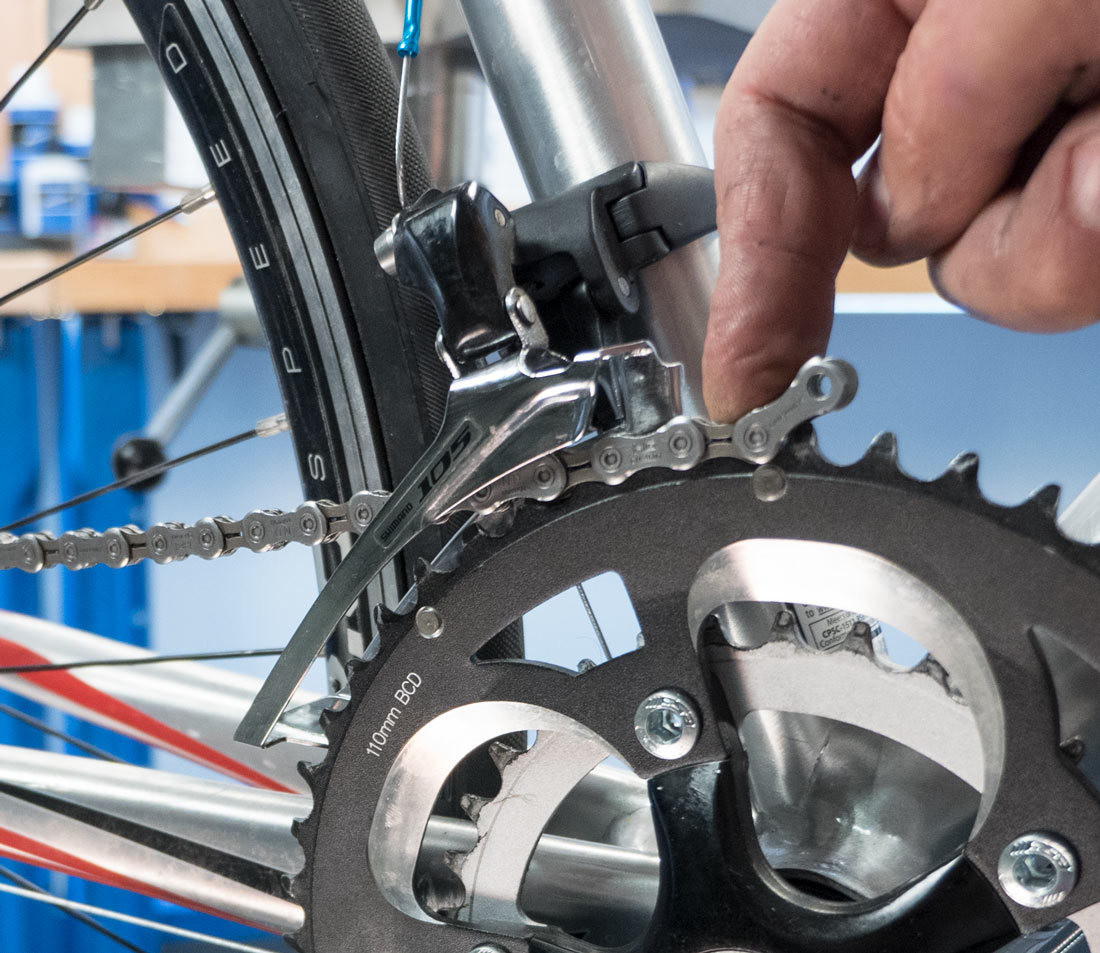 Pass chain through front derailleur
Alt Text: Illustration of a bike chain being passed through the front derailleur during the sizing process, ensuring correct positioning around the largest chainring.
Why is it Important to Engage the Chain Fully on the Largest Rear Cog?
Ensuring the chain is fully engaged on the largest rear cog is crucial for accurate sizing. This step determines the baseline length needed for proper shifting and prevents chain-related issues down the road.
 Hold at five o
Alt Text: Depiction of holding the bike chain at the five o’clock position on the largest front chainring during the sizing process, which aids in accurate measurement.
How to Determine the Reference Rivet and Cutting Point?
Find the closest rivet where the two chain ends can be joined, matching inner plates to outer plates. This is the reference rivet. From there, add two additional rivets. This point is where you’ll cut the chain.
 Pull lower section snug
Alt Text: Visual guide showing how to pull the lower section of a bike chain snug around the front chainring, a step crucial for accurate sizing.
What Happens if an Outer Plate Meets an Outer Plate?
If an outer plate meets an outer plate when pulling the lower section snug, that cannot be the reference rivet because the chain cannot be joined there. Add one rivet to shift the meeting point, making that the reference rivet. Then, add two additional rivets for the cutting point.
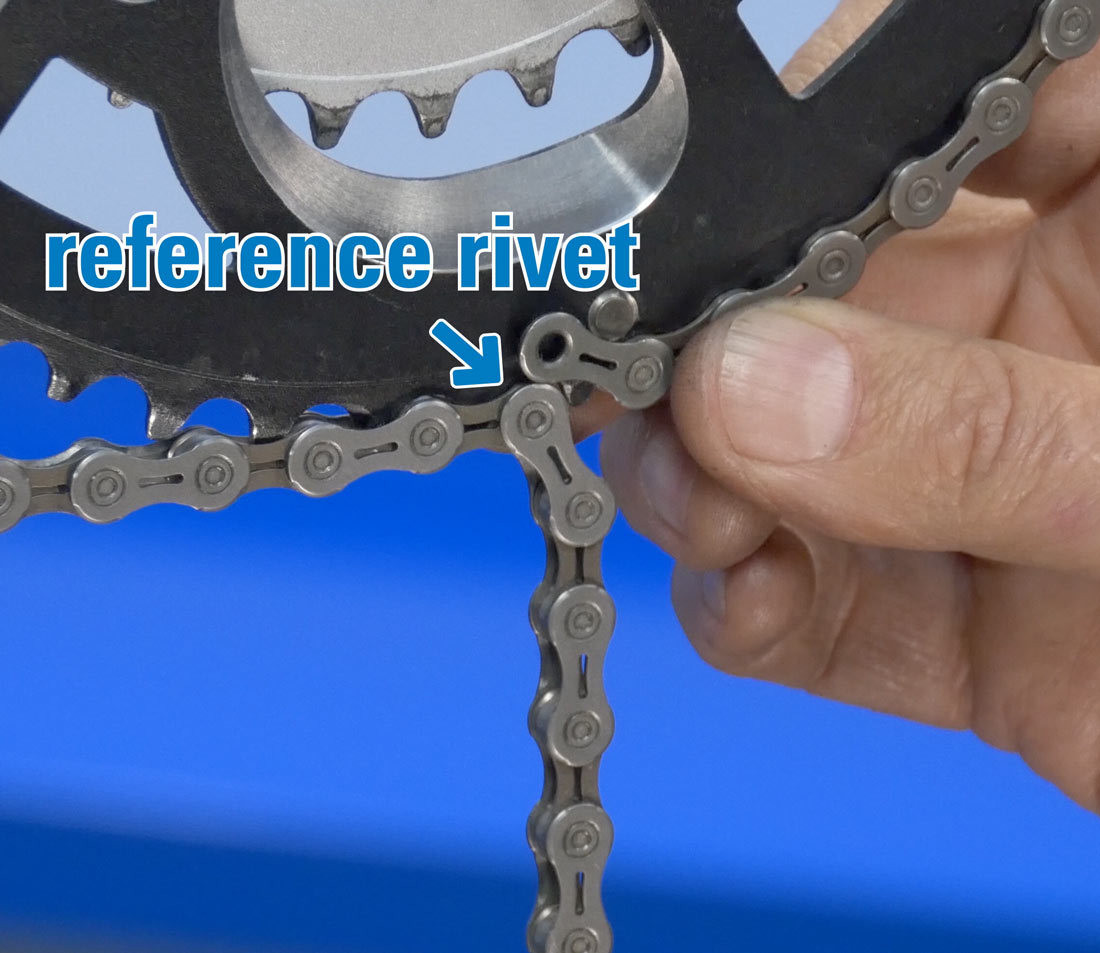 Reference rivet – note that inner plate joins to outer plate
Alt Text: Illustration indicating the reference rivet on a bike chain, emphasizing the connection where an inner plate joins to an outer plate, essential for accurate sizing.
How to Correctly Size a Bike Chain with an Inner Plate Joining to an Outer Plate?
To correctly size a bike chain, it’s crucial to ensure that an inner plate joins to an outer plate at the connection point. This configuration allows for proper articulation and secure fastening of the chain, contributing to smooth and efficient drivetrain operation. When the chain is properly sized with the correct plate alignment, it minimizes the risk of chain slippage, reduces wear on the drivetrain components, and enhances the overall performance of the bike. Ensuring this alignment during installation is a key step in maintaining the longevity and reliability of the bicycle’s chain system.
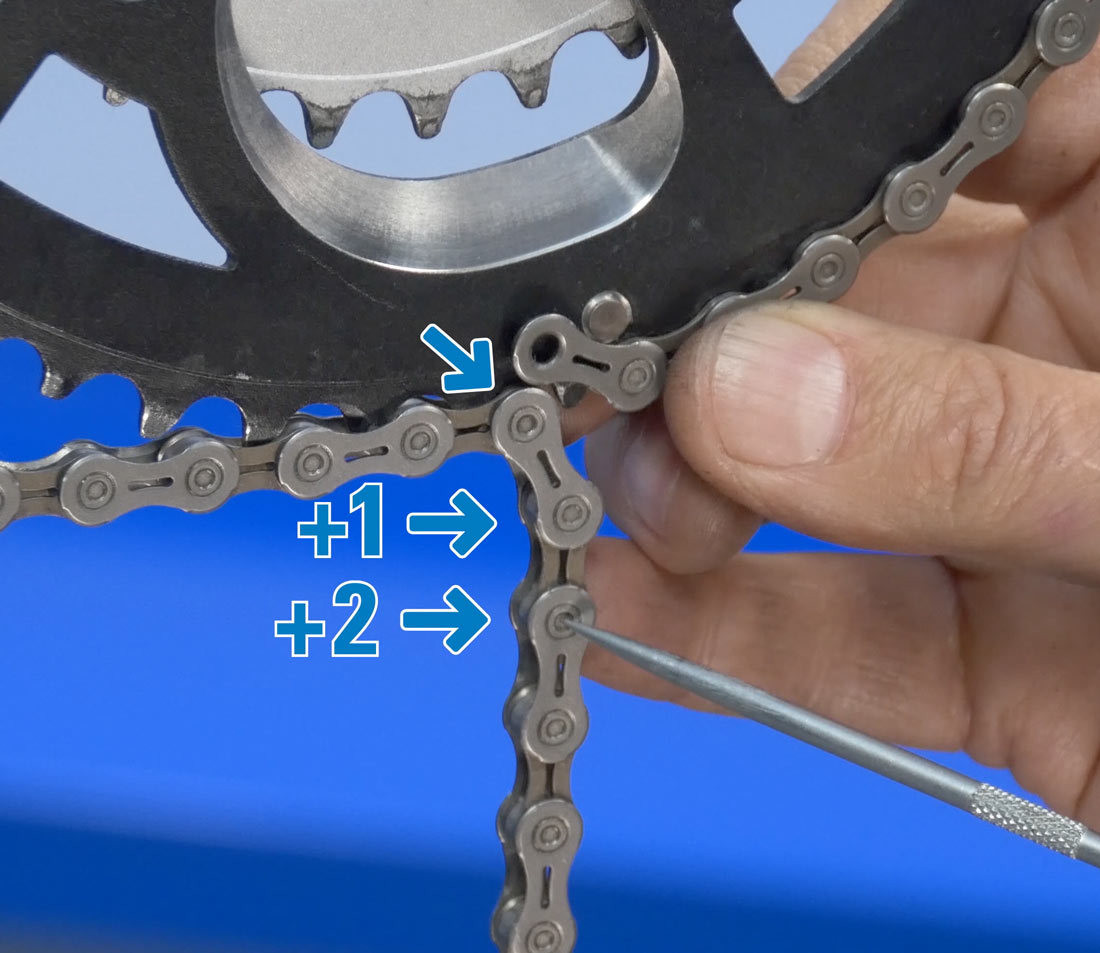 Add two rivets
Alt Text: Visual aid demonstrating the addition of two rivets from the reference point on a bike chain, marking the position for shortening the chain to the correct size.
5. Sizing for Drivetrains with Large Rear Cogs
When is a Longer Chain Required?
Dedicated 1X systems, which use a single front ring with wide-range rear sprockets (42 teeth or larger), require a longer chain than bikes with narrower ranges. These systems need extra length to accommodate the larger cogs.
How Much Extra Chain Length is Needed for 1X Systems?
For 1X systems, after routing the chain over the front ring and largest rear sprocket (without passing through the rear derailleur), find the shortest length where a chain would connect inner and outer plates. From this rivet, count four additional rivets (two inches) to determine the cutting position.
Steps to Properly Size a Chain for a 1X Drivetrain?
- Route the chain over the front ring and the largest rear sprocket, bypassing the rear derailleur.
- Determine the shortest length where inner and outer plates can connect.
- Count four additional rivets (two inches) from this point.
- Cut the chain at this spot.
 Dedicated 1X shifting system
Alt Text: An example of a dedicated 1X shifting system on a bike, illustrating the use of a single front ring paired with an extra-wide range of rear sprockets.
Why do 1X Systems Need Extra Chain Length?
1X systems need extra chain length because the large rear cogs require more chain to wrap around them fully. Without this extra length, the chain could be too short, leading to poor shifting and potential damage to the drivetrain.
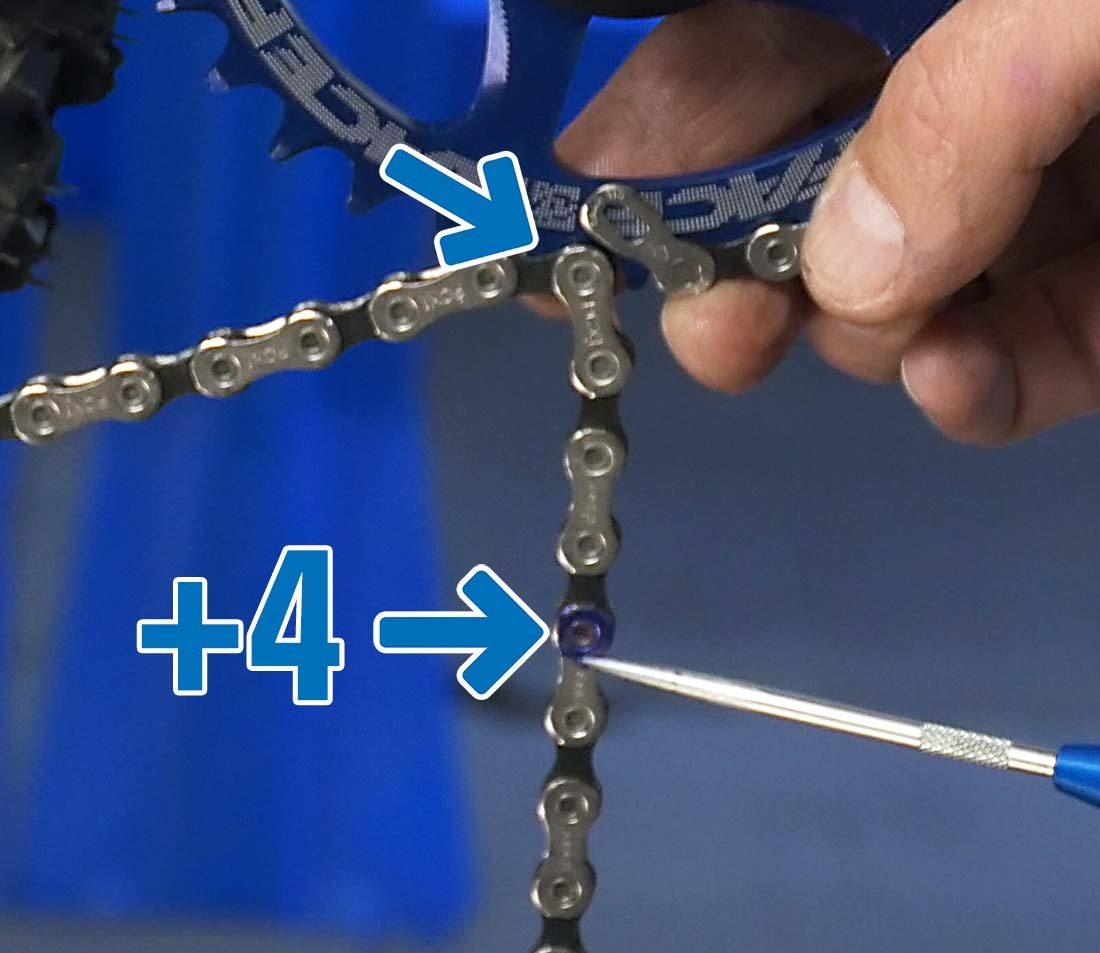 Sizing 1x add 4
Alt Text: A step-by-step guide on sizing a bike chain for a 1x drivetrain, instructing to add four rivets from the initial connection point.
6. Exceptions and Considerations
What Should You Do if Your Bike Uses a Chain Guide?
If your bike has a chain guide, make sure to route the chain through it before determining the chain length. The rest of the sizing process remains the same. Chain guides help prevent the chain from derailing, especially on rough terrain.
How Does Rear Suspension Affect Chain Length?
Rear suspension changes the distance between the rear cogs and front chainrings as it compresses. To account for this, disconnect the shock and compress the linkage fully to its bottomed-out position. Then, size the chain according to this compressed state.
What Are the Steps to Account for Rear Suspension?
- Disconnect the rear shock.
- Compress the suspension linkage fully.
- Route the chain through the drivetrain.
- Size the chain based on this compressed position.
Why is Accounting for Suspension Important?
Accounting for suspension ensures the chain is long enough when the suspension is fully compressed. If the chain is too short, it can cause damage to the derailleur or even break during a ride. Proper sizing maintains drivetrain integrity and performance.
 Route chain through guide
Alt Text: Illustrative depiction of routing a bike chain through a chain guide, ensuring proper positioning and functionality before determining the chain length.
What is the Role of Chain Guides in Determining Chain Length?
Chain guides play a crucial role in maintaining chain alignment and preventing derailment, particularly in challenging riding conditions. When determining chain length, it’s important to consider the positioning and functionality of the chain guide. The chain should be routed through the guide properly before sizing to ensure that there is adequate length for smooth operation without being too loose, which could still lead to derailment. By integrating the chain guide into the sizing process, riders can achieve optimal chain tension and secure chain management, ultimately enhancing the performance and reliability of their bike’s drivetrain.
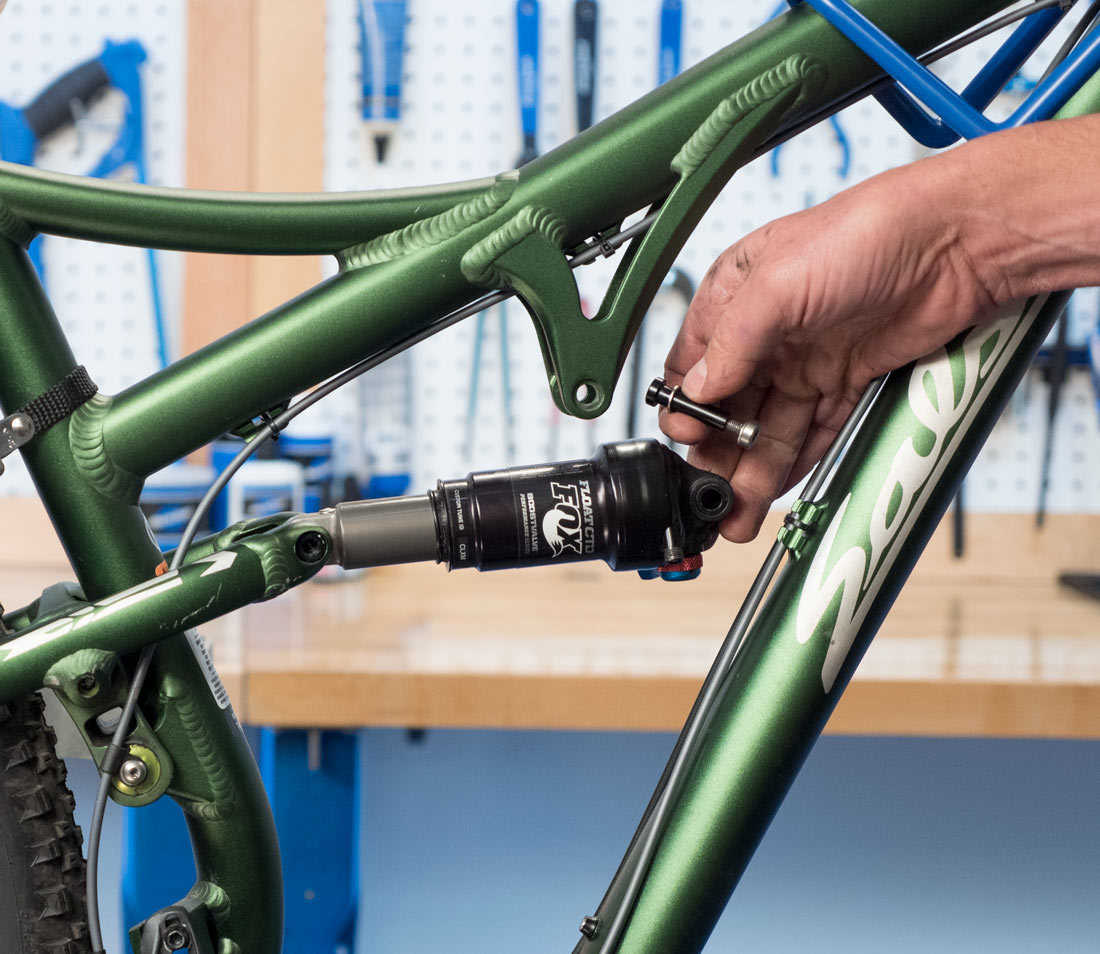 Disconnect shock
Alt Text: Photo demonstrating how to disconnect the shock on a bike, a necessary step for accurately sizing the chain while accounting for suspension compression.
How Does Compressing the Linkage Help in Chain Sizing?
Compressing the linkage is essential in chain sizing, especially for full-suspension bikes, as it simulates the bike’s state when the suspension is fully active. By compressing the linkage, you effectively shorten the distance between the rear axle and the crankset, which in turn requires more chain length to accommodate the compressed state. This process ensures that the chain is neither too tight, which could damage the drivetrain, nor too loose, which could cause the chain to derail. Compressing the linkage provides an accurate representation of the maximum chain length needed for optimal performance and safety during rides involving significant suspension travel.
 Compress linkage
Alt Text: Image showing the compression of a bike’s suspension linkage, which is essential to accurately measure and adjust the chain length for optimal performance.
7. Choosing the Right Bike Chain for Your Needs
What Factors Should You Consider When Choosing a Bike Chain?
Choosing the right bike chain involves considering several factors to ensure compatibility, durability, and optimal performance. Firstly, the chain must be compatible with your bike’s drivetrain, including the number of speeds (e.g., 9-speed, 10-speed, 11-speed, or 12-speed) and the brand (e.g., Shimano, SRAM, Campagnolo). Each drivetrain system requires a chain specifically designed to match its specifications.
What are Narrow Chains Good For?
Narrow bike chains are specifically designed for use with multi-speed drivetrains, particularly those with a high number of gears, such as 10-speed, 11-speed, and 12-speed systems. The narrower design allows for precise shifting and compatibility with the tighter spacing between gears on the cassette and chainrings. These chains offer enhanced flexibility and smoother transitions between gears, improving overall drivetrain efficiency and responsiveness.
What are Wide Chains Good For?
Wide bike chains are primarily used on single-speed bikes, BMX bikes, and older bicycles with fewer gears. The wider design provides increased strength and durability, making them suitable for handling the stresses of fixed-gear riding or BMX tricks where the chain is subjected to high levels of torque and impact. Wide chains are less likely to stretch or break under heavy loads, offering reliable performance and longevity in simpler drivetrain systems.
How Does the Material of the Chain Affect Its Performance?
The material of the bike chain affects its performance in several ways. High-quality materials such as hardened steel or alloy blends can increase the chain’s strength and resistance to wear, leading to longer lifespan and more consistent shifting. Some chains are also treated with special coatings to reduce friction and prevent corrosion, improving overall efficiency and reducing maintenance requirements.
What are the different chain finishes?
Different chain finishes provide varied benefits, enhancing the chain’s longevity, performance, and resistance to environmental factors. Nickel-plated finishes offer excellent corrosion resistance, making the chain more durable in wet or salty conditions. Chrome-plated finishes improve hardness and wear resistance, extending the chain’s lifespan. Teflon-coated finishes reduce friction, enabling smoother and quieter shifting while minimizing wear on other drivetrain components. Black oxide finishes provide a sleek aesthetic and moderate corrosion protection. Gold finishes, often achieved through titanium nitride coatings, offer enhanced hardness, reduced friction, and a luxurious appearance.
What Role Does the Chain’s Pin Type Play?
The chain’s pin type plays a critical role in its strength and ease of installation. Solid pins offer maximum strength and are typically used in high-performance chains for mountain biking or road racing. Hollow pins reduce weight without significantly compromising strength, making them a popular choice for weight-conscious cyclists. Riveted pins provide a secure and permanent connection, while quick-link pins (or master links) allow for easy chain installation and removal without tools, making them convenient for maintenance and repairs.
What Kind of Bike Chain is Best for E-Bikes?
E-bikes, with their powerful motors and increased torque, require bike chains specifically designed to withstand the added stress and strain. Chains for e-bikes are typically made from high-strength materials with reinforced construction to prevent stretching and breakage. They often feature enhanced pin treatments and durable coatings to resist wear and corrosion, ensuring reliable performance and longevity under the demanding conditions of e-bike riding.
What are Some Reputable Bike Chain Brands?
Some reputable bike chain brands include Shimano, SRAM, KMC, and Wippermann. These brands are known for producing high-quality chains that offer excellent performance, durability, and compatibility with a wide range of drivetrain systems. Researching customer reviews and professional recommendations can help you choose a brand and model that best meets your specific needs and preferences.
8. Maintaining Your Bike Chain
How Often Should You Clean Your Bike Chain?
How often you should clean your bike chain depends on how often and where you ride. If you ride regularly in dry, clean conditions, you might only need to clean your chain every few hundred miles. However, if you frequently ride in wet, muddy, or dusty conditions, you should clean your chain more often—perhaps after every ride or every few rides.
What Supplies Do You Need to Clean a Bike Chain?
To clean your bike chain effectively, you’ll need a few basic supplies. These include a chain cleaner device (optional but recommended), a degreaser specifically designed for bike chains, a brush with stiff bristles, clean rags or paper towels, and chain lubricant.
What are the Steps for Cleaning a Bike Chain?
- Prepare Your Bike: Place your bike on a stand or lean it against a stable surface.
- Apply Degreaser: Apply degreaser liberally to the chain, making sure to cover all surfaces.
- Clean the Chain: Use a chain cleaner device according to the manufacturer’s instructions, or use a brush to scrub the chain thoroughly.
- Rinse the Chain: Rinse the chain with water to remove the degreaser and grime.
- Dry the Chain: Use clean rags or paper towels to dry the chain thoroughly.
- Lubricate the Chain: Apply chain lubricant evenly to the chain, making sure to coat all surfaces.
- Wipe Off Excess Lube: Use a clean rag to wipe off any excess lubricant from the chain.
What are the Best Lubricants for a Bike Chain?
The best lubricants for a bike chain depend on the riding conditions. For dry conditions, use a dry lubricant that repels dust and dirt. For wet conditions, use a wet lubricant that adheres to the chain and resists water washout.
How Often Should You Lubricate Your Bike Chain?
You should lubricate your bike chain after every cleaning, or more often if you ride in wet or dusty conditions. A properly lubricated chain will shift smoothly, reduce wear on drivetrain components, and last longer overall.
What are Signs That Your Bike Chain Needs Replacement?
Signs that your bike chain needs replacement include:
- Stretching: Use a chain checker tool to measure chain stretch. If the chain is stretched beyond the recommended limit, it needs to be replaced.
- Skipping: If the chain skips or jumps on the cassette or chainrings, it may be worn and need replacement.
- Stiff Links: Stiff or binding links can indicate wear and tear, and the chain may need replacement.
How Do You Use a Chain Checker Tool?
A chain checker tool is a simple device that measures chain stretch. Insert the tool into the chain; if the tool sinks into the chain beyond the recommended limit, the chain needs to be replaced.
Why is Regular Chain Maintenance Important?
Regular chain maintenance is essential for preserving the condition of your bike and promoting a safe riding experience. A well-maintained chain ensures smooth shifting, reduces wear on other drivetrain components, and extends the overall lifespan of your bike. By keeping your chain clean, lubricated, and properly adjusted, you can enjoy a more efficient and enjoyable riding experience while minimizing costly repairs and replacements.
9. Common Bike Chain Problems and Solutions
What Causes a Bike Chain to Skip?
A bike chain can skip for several reasons. The most common cause is a worn chain that no longer meshes properly with the cassette and chainrings. Other causes include a worn cassette or chainrings, a misaligned derailleur, or stiff chain links.
How Do You Fix a Bike Chain That Keeps Falling Off?
A bike chain that keeps falling off can be frustrating and potentially dangerous. The most common causes include a misaligned derailleur, a bent derailleur hanger, a worn chain, or a chain that is too long. To fix this issue, first check the derailleur alignment and adjust it if necessary.
What is a Stiff Chain Link, and How Can You Fix It?
A stiff chain link is a link that doesn’t move freely, causing the chain to bind or catch. This can be caused by dirt, corrosion, or damage to the link. To fix a stiff chain link, first try lubricating the link thoroughly. If that doesn’t work, you may need to use a chain tool to loosen the link or replace the chain.
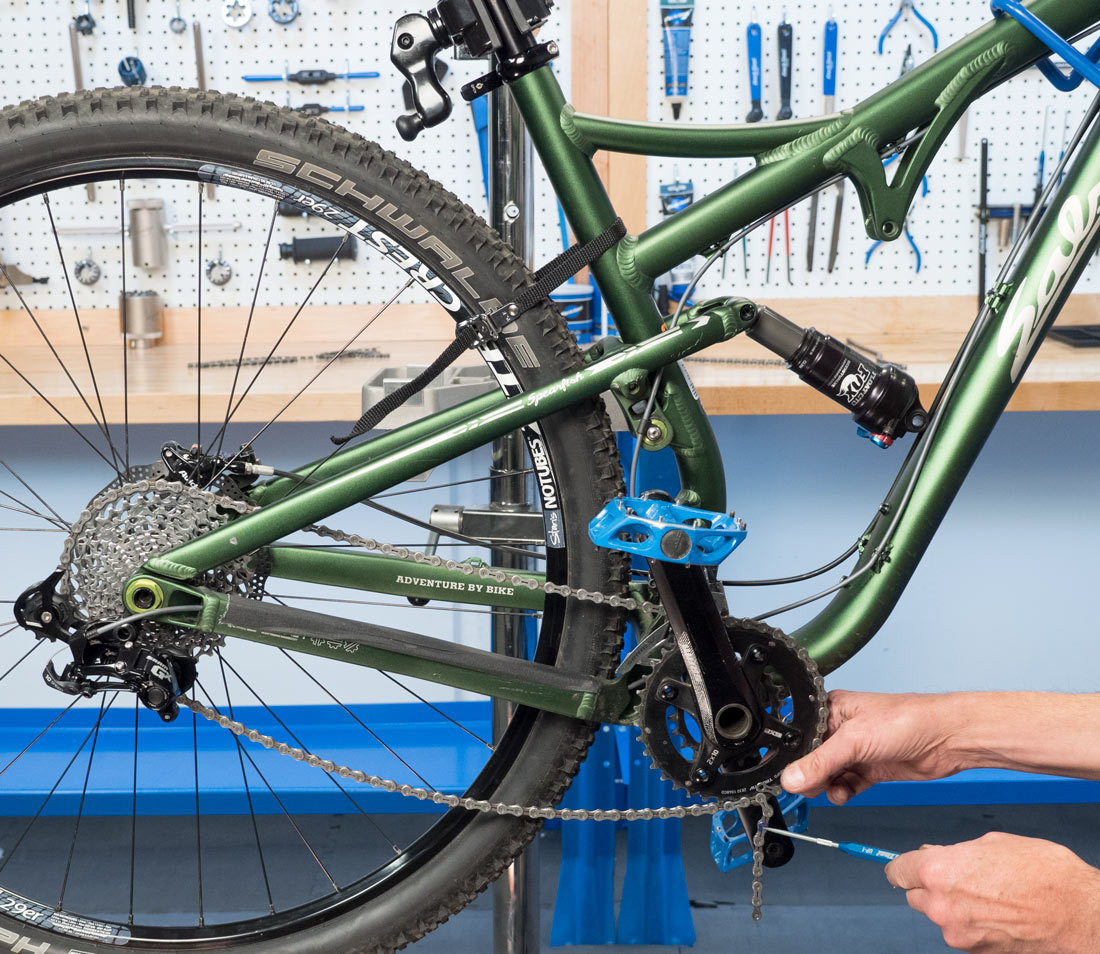
How Do You Break a Bike Chain?
Breaking a bike chain is a process that involves separating one of the chain links to either remove the chain for replacement or repair or to shorten the chain to the correct length. This is typically done using a specialized tool called a chain tool, also known as a chain breaker. This tool is designed to push a pin partially out of a chain link, allowing you to disconnect the chain.
How Tight Should a Bike Chain Be?
The proper tension for a bike chain is crucial for optimal performance and longevity. A chain that is too tight can cause excessive wear on the drivetrain components, including the chain, cassette, and chainrings. It can also lead to increased resistance and reduced efficiency, making it harder to pedal.
What is Chain Suck?
Chain suck is a common problem in cycling where the chain sticks to the chainring instead of releasing and moving smoothly onto the next gear. This often occurs during shifting, particularly when shifting from a smaller to a larger chainring.
How to Prevent Chain Suck?
Preventing chain suck involves a combination of proper maintenance, riding techniques, and component selection. Regularly cleaning and lubricating the chain is essential to ensure smooth movement and reduce friction between the chain and chainrings.
10. Optimizing Your Bike Chain for Performance
What Upgrades Can You Make to Your Bike Chain for Better Performance?
Upgrading your bike chain can significantly improve your bike’s performance and overall riding experience. One common upgrade is switching to a chain made from higher-quality materials, such as hardened steel or alloy blends.
How Do Ceramic Chains Work?
Ceramic chains, also known as coated chains, are bicycle chains treated with a ceramic coating to reduce friction and improve efficiency. The ceramic coating creates a smoother surface on the chain’s rollers and plates, minimizing friction between the chain and other drivetrain components.
What is the Impact of Chain Alignment on Efficiency?
The chain alignment on a bicycle is essential for maximizing drivetrain efficiency and minimizing wear on components. Proper chain alignment ensures that the chain runs straight between the chainrings and cassette, reducing friction and preventing unnecessary stress on the chain, gears, and derailleurs.
How Does Chain Tension Affect Shifting Performance?
Chain tension plays a crucial role in the shifting performance of a bicycle. Proper chain tension ensures that the chain engages smoothly with the gears on the cassette and chainrings, allowing for precise and reliable shifting.
What Role Does the Derailleur Play in Chain Performance?
The derailleur plays a critical role in the chain performance of a bicycle by guiding the chain onto different gears on the cassette and chainrings. The derailleur consists of a cage, pulleys, and linkage system that moves the chain laterally to facilitate gear changes.
FAQ: Bike Chain Sizing
How do I know what size bike chain I need?
Determine the number of speeds on your bike and match the chain to that specific speed. You can also use the largest cog and chainring method or compare it to your old chain.
Can I use a chain that’s slightly longer than recommended?
While a slightly longer chain might work, it’s not ideal. It can lead to poor shifting and potentially damage your derailleur.
What happens if my bike chain is too short?
A chain that’s too short can damage your derailleur, chainrings, and cassette. It can also prevent you from shifting into certain gears.
How do I measure chain wear?
Use a chain checker tool to measure the stretch of your chain. If it’s stretched beyond the recommended limit, it’s time for a replacement.
Is it okay to reuse a master link?
It’s generally not recommended to reuse a master link, especially if it’s been used for a long time. It’s best to use a new one each time you install a new chain.
Can I mix and match chain brands with different drivetrains?
While it’s possible, it’s generally best to stick with the same brand as your drivetrain components for optimal performance.
Do e-bikes require special chains?
Yes, e-bikes often require special chains designed to handle the increased torque and power.
How often should I replace my bike chain?
Replace your bike chain every 2,000 to 3,000 miles, or sooner if you ride in harsh conditions.
Can I use the same chain for different types of bikes?
No, you should use a chain that’s specifically designed for the type of bike and drivetrain you have.
What tools do I need to replace a bike chain?
You’ll need a chain tool, master link pliers (if applicable), and possibly gloves and a rag.
Ready to explore more? Visit usabikers.net to discover a wealth of articles, join our thriving community, and find everything you need for your biker journey! Don’t wait – your next adventure starts here! Find us at 801 Sturgis Main St, Sturgis, SD 57785, United States or call +1 (605) 347-2000.