
From our sponsor; more content below…

From our sponsor; more content below…
From our sponsor; more content below…
From our sponsor; more content below…

From our sponsor; more content below…

 Logan WattsBy Logan Watts
Founding Editor & Routes Director
2,167 Posts
To enhance his Budget Bikepacking Build-Off project, Logan developed this Make Your Own Bikepacking Gear (MYOBG) tutorial on creating a Wooden Bike Rack. This DIY guide provides a detailed, step-by-step process for constructing lightweight front and rear platform racks using wood, or any other material you prefer. Discover how to build your own wooden bike rack here.
PUBLISHED Jan 20, 2025
34 Conversation
The market is currently saturated with a plethora of bike racks, each boasting unique features and specifications. However, the most elegant and practical design remains the minimalist platform rack. Its beauty lies in its simplicity – providing a surface to effortlessly strap or attach essential gear, whether it’s a dry bag, basket, or crate. Racks like the Old Man Mountain Elkhorn and the Tumbleweed T Rack stand out as prime examples of well-engineered platform racks, offering a good balance of weight and functionality. Yet, not every cyclist requires features like three-pack mounts or axle kits, and the standardized heights of these racks might not suit every bicycle frame. Furthermore, the cost of commercially available racks can be a barrier for some. This is where the appeal of a custom or DIY solution, like a wooden bike rack, becomes clear.
Building or commissioning a custom bike rack from wood offers several advantages, most notably the ability to achieve a perfect fit for your specific bike. Ideally, every bike would have a custom-designed rack. By precisely tailoring the rack strut lengths, you minimize material usage and position the platform optimally – low and close to the bike frame. This optimizes the center of gravity when carrying gear, significantly improving stability and handling. This is precisely the goal when crafting a wooden bike rack.
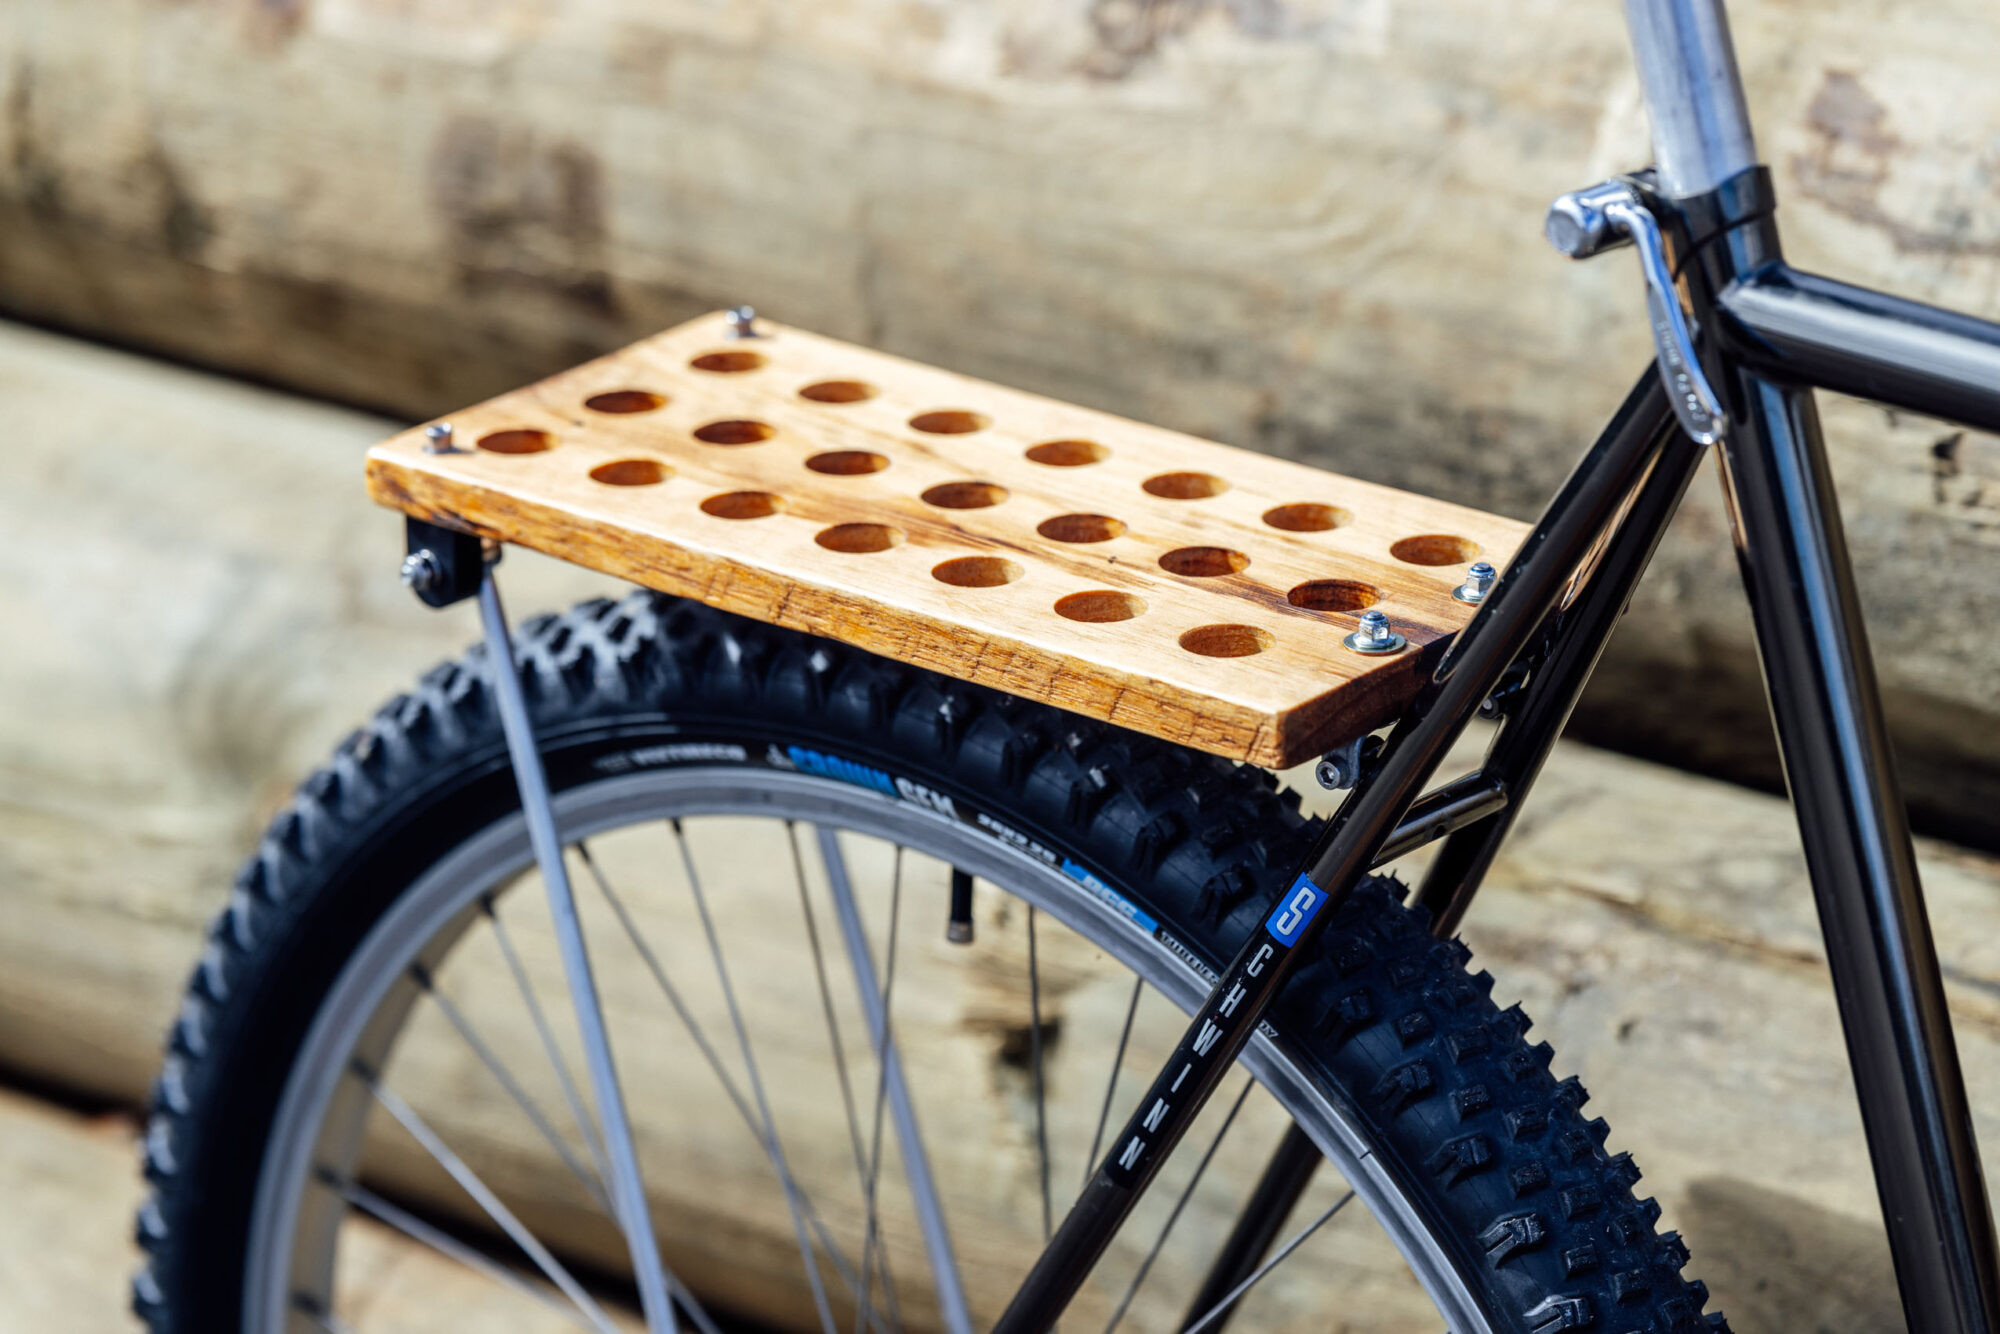
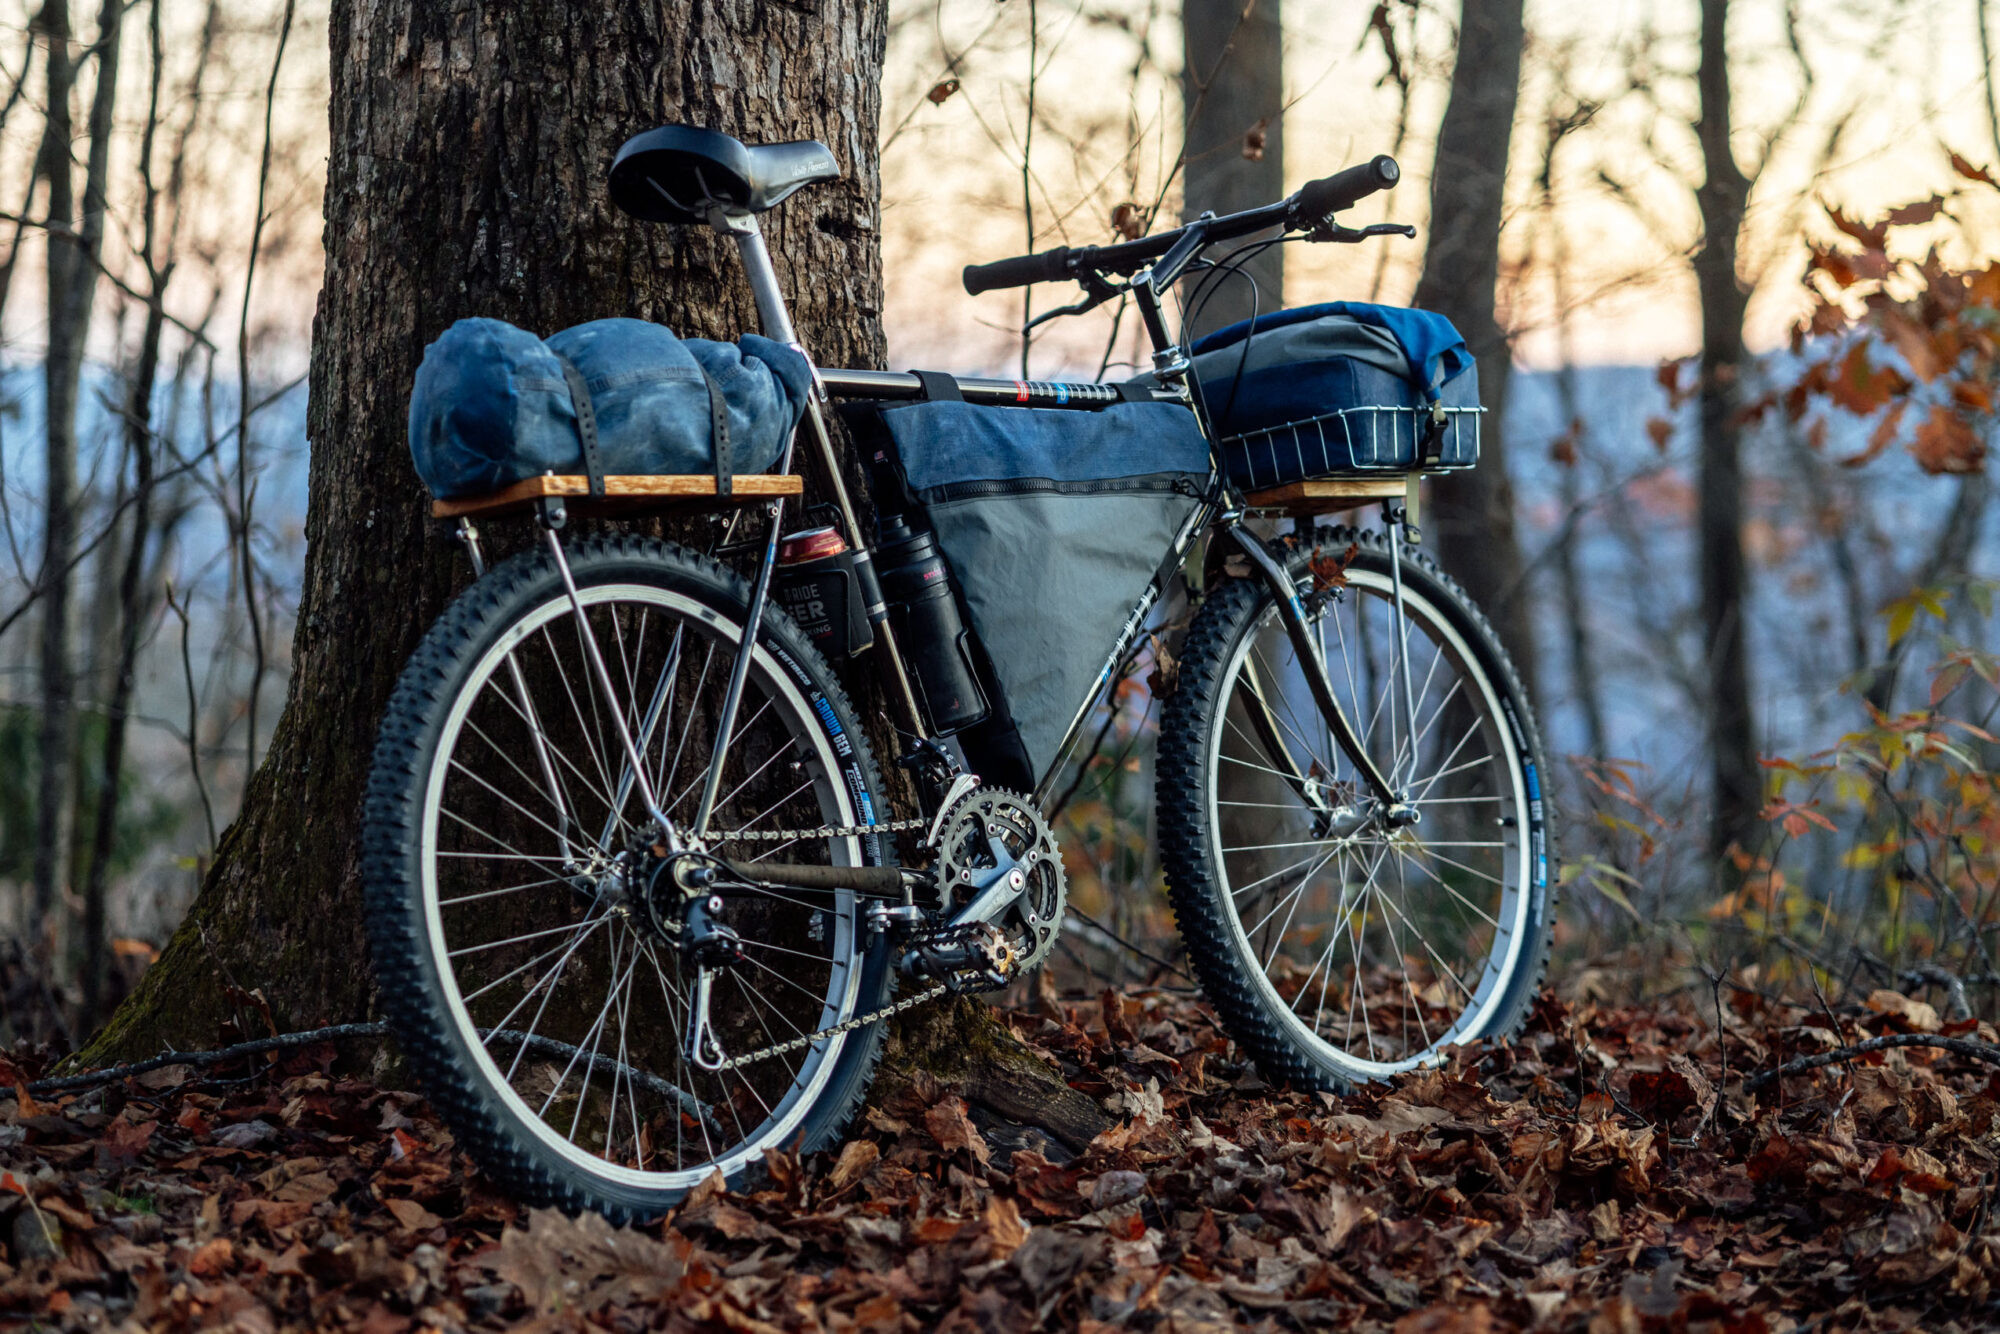
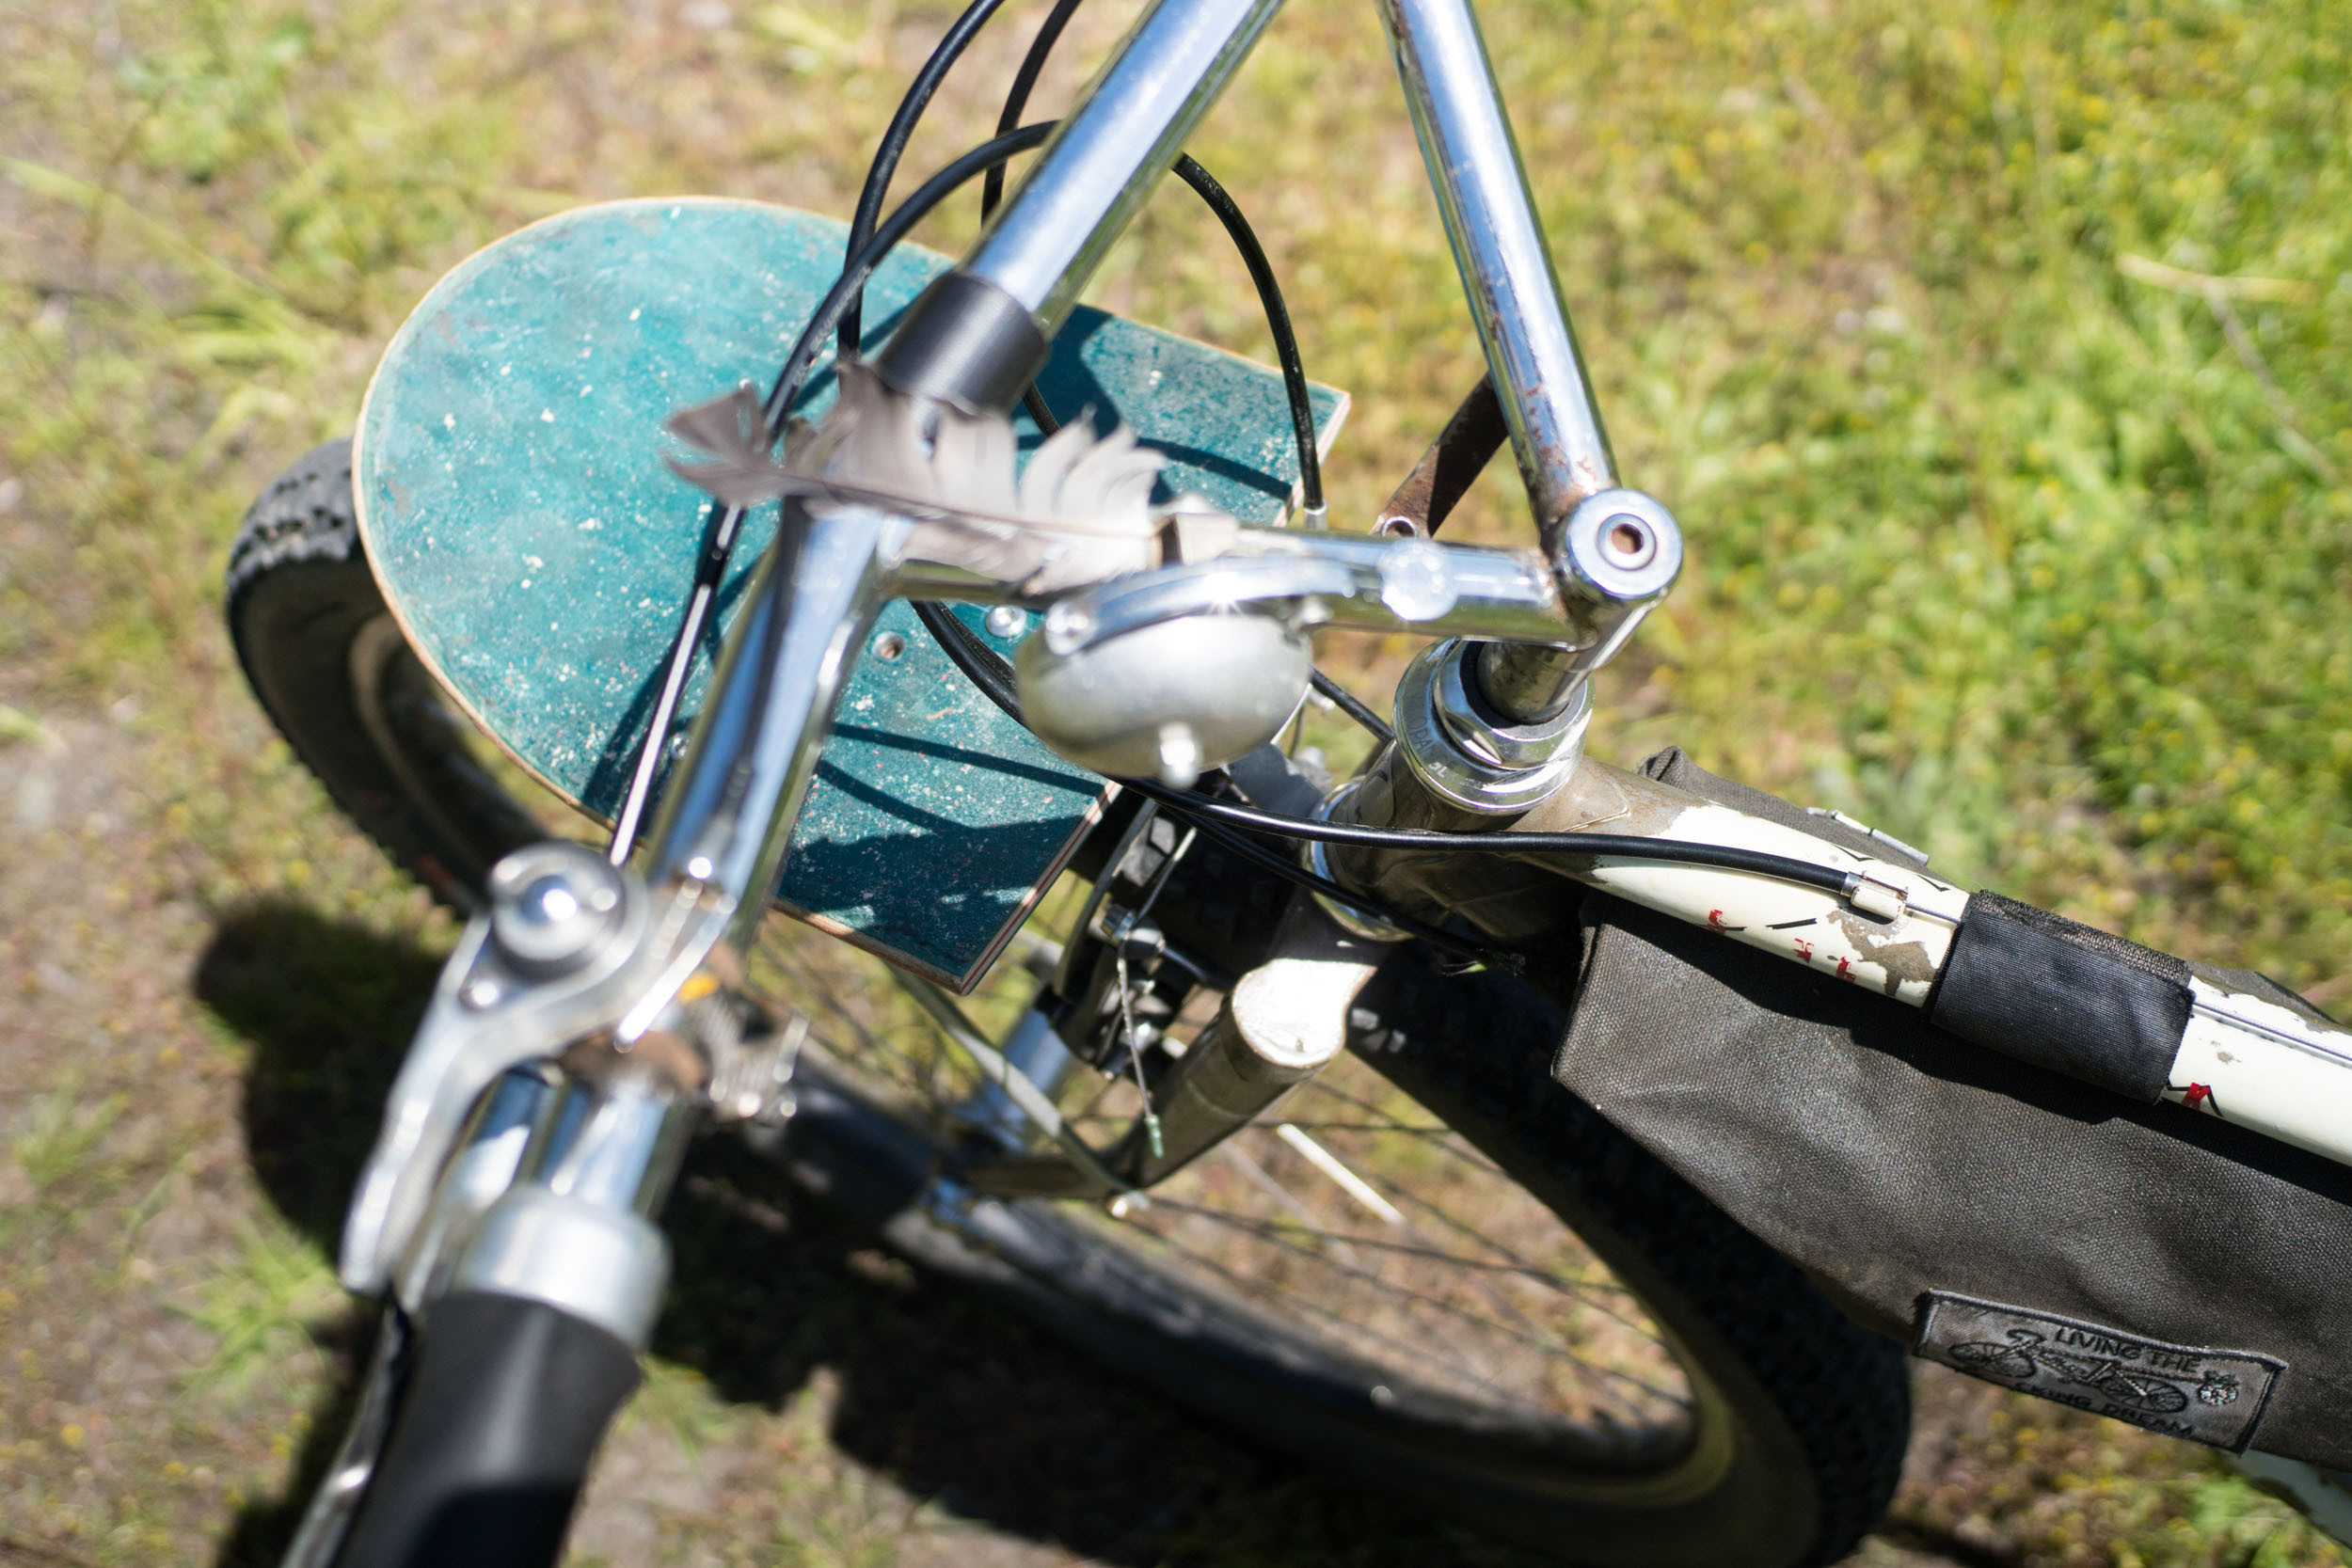
 Close up of the finished DIY wooden front bike rack mounted on a Schwinn High Sierra, showcasing the wooden platform and metal struts.Inspired by Dan Stranahan’s innovative skate deck rack (detailed in the Further Reading section below), I aimed to create the simplest, most affordable, and lightest platform racks possible for my Budget Bikepacking Build-Off project. To minimize expenses, I chose to use repurposed materials and an inexpensive $17 OEM rack strut kit. My design criteria were straightforward: the rear wooden bike rack needed to securely hold a dry bag, while the front rack would provide robust support for a basket. The final results surpassed my initial expectations, prompting me to share this tutorial for anyone interested in creating their own wooden bike rack.
What You Need to Build Your Wooden Bike Rack
Here’s a comprehensive list of the materials and tools I utilized to construct both the front and rear wooden bike racks. Please note that the front rack design requires a bike fork with a fork crown bolt hole.
Essentials for Your Wooden Bike Rack Project
- Saw: For cutting your wooden bike rack platforms or alternative materials. A chop saw is recommended for clean cuts.
- Drill: Essential for creating bolt holes in the wooden platforms and metal brackets. Select a drill bit appropriate for the bolt size.
- 1” Forstner bit or hole saw: For creating “drillium” weight-saving holes in your wooden bike rack platform.
- Bench vise or sturdy clamps: To securely hold metal pieces during bending and shaping for the rack brackets.
- Knipex pliers wrench (medium or large): A versatile tool for bending metal; pliers can be substituted if needed.
- File: For smoothing and finishing the edges of metal brackets, ensuring a clean and safe finish for your wooden bike rack.
- M5 bolts of various lengths and matching Nyloc nuts: For secure assembly of the wooden bike rack components.
- Finish coating: To protect your wooden bike rack platforms from weather. Tung oil was used, but spar varnish or exterior finishes are also suitable.
Components for the Front Wooden Bike Rack
- Flat steel stock: For fabricating the L-bracket that mounts the front wooden bike rack to the fork. Alternatively, pre-made diving board rack attachment kits from Rivendell or Velo Orange can be used.
- Rack strut kit: Crucial for the structural support of the wooden bike rack. One kit is sufficient for a single rack, two for both front and rear. A kit like this $17 option includes compression hardware and two 32cm steel rods. For longer struts (420mm), consider Rivendell, which excludes compression hardware.
- Wood for platform: The heart of your wooden bike rack. Choose hardwood or consider alternatives like aluminum, plastic, or other durable, flat materials. For this project, a piece of scrap hardwood approximately 6×8” was used.
Components for the Rear Wooden Bike Rack
- Flat steel stock: Needed to create the U-shaped fitting for attaching the rear wooden bike rack to the seat stay rack bosses.
- Rack strut kit: Same as the front rack – provides essential support. This $17 kit is a cost-effective choice, including compression hardware and 32cm steel rods. Longer 420mm struts are available from Rivendell if needed.
- Wood for platform: Similar to the front rack, select hardwood or a comparable material for the rear wooden bike rack platform. A scrap piece of hardwood, around 6×13”, was used in this project.
Step-by-Step Guide: Building Your Wooden Bike Rack
Follow these detailed steps to construct your own robust and stylish wooden bike rack.
1. Measure and Cut the Wooden Platforms
Begin by sourcing your platform material. Reclaimed wood is an excellent option, aligning with sustainable practices. Skateboard decks, constructed from layered hardwood, are particularly suitable due to their durability and weather resistance. Alternatives include plastic, aluminum, or other structurally sound and water-resistant materials. For this project, a piece of aesthetically pleasing Appalachian hardwood scrap was chosen.
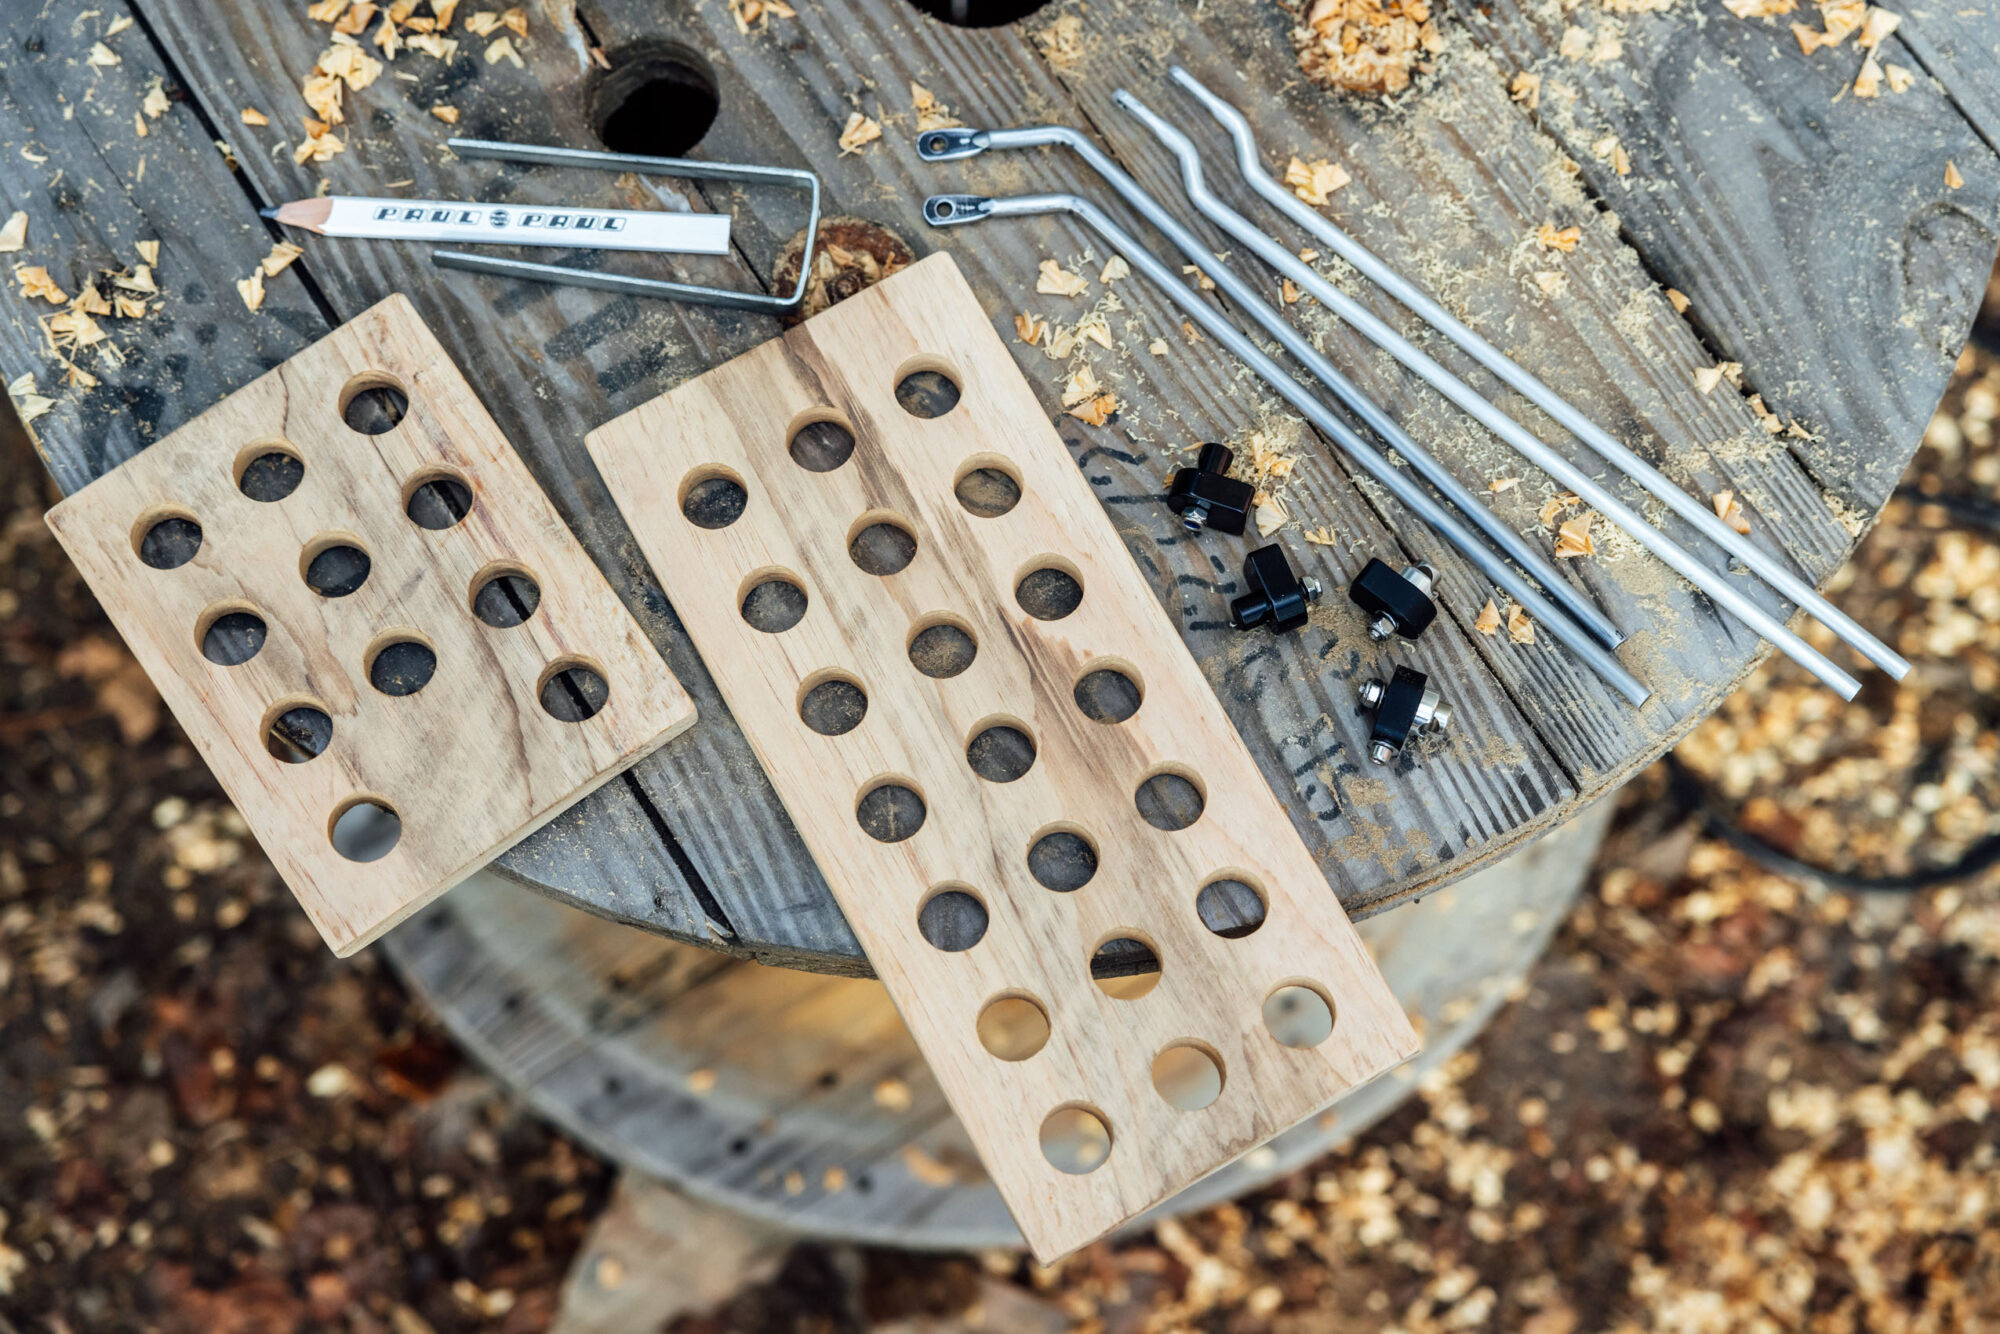 Close up of a hand sanding a cut piece of hardwood for the wooden bike rack platform, highlighting the wood grain.After sanding the entire wood piece to achieve a smooth surface, measure and cut the front wooden bike rack platform to approximately 6” wide by 8” long. This size is ideal for supporting a basket and aligns well with strut spacing for 100mm fork mounts. Wider platforms may be necessary for Boost-spaced forks.
Using the same 6” width, the rear wooden bike rack platform was cut to 13” in length. This generous length provides ample support for a larger rack-top bag, such as a DIY waxed-denim rack-top bag.
2. Drillium for Weight Reduction on Your Wooden Bike Rack
The next step is to lighten the wooden bike rack platforms using “drillium.” This technique, popular among cyclists in the 70s and 80s, involves drilling holes in bike components to reduce weight. While the aerodynamic benefits were later questioned, drillium remains a functional and aesthetically interesting technique for weight reduction, especially in components like wooden bike rack platforms.
A 1.75” center-to-center grid pattern was used to create a visually balanced arrangement for the 1” diameter holes. A Forstner bit was used for drilling, providing a clean and smooth hole finish. Alternatively, a hole saw can be used to achieve the drillium effect on your wooden bike rack platforms.
3. Finish the Wooden Platforms for Durability
Once the drilling is complete, thoroughly sand both wooden bike rack platforms to remove any rough edges and prepare them for finishing. Three coats of tung oil were applied to protect the wood. Tung oil was readily available, but its long-term weather resistance, particularly in rain, is not fully established. Research suggests it should offer adequate protection, but for enhanced durability, especially in wet climates, consider using spar varnish or another exterior-grade wood finish on your wooden bike rack platforms.
 Close up of the wooden bike rack platforms after being finished with tung oil, showcasing the drilled holes and wood grain.
4. Fabricate the Front L-Bracket for the Wooden Bike Rack
The next stage involves creating the brackets that connect the wooden bike rack platforms to the bicycle. For the front rack, two L-brackets are needed. Suitable steel stock, approximately half an inch wide and an eighth of an inch thick, is required. Material from garage tool hangers or similar sources can be repurposed. Alternatively, hardware stores or online retailers offer appropriate steel stock for fabricating these wooden bike rack brackets.
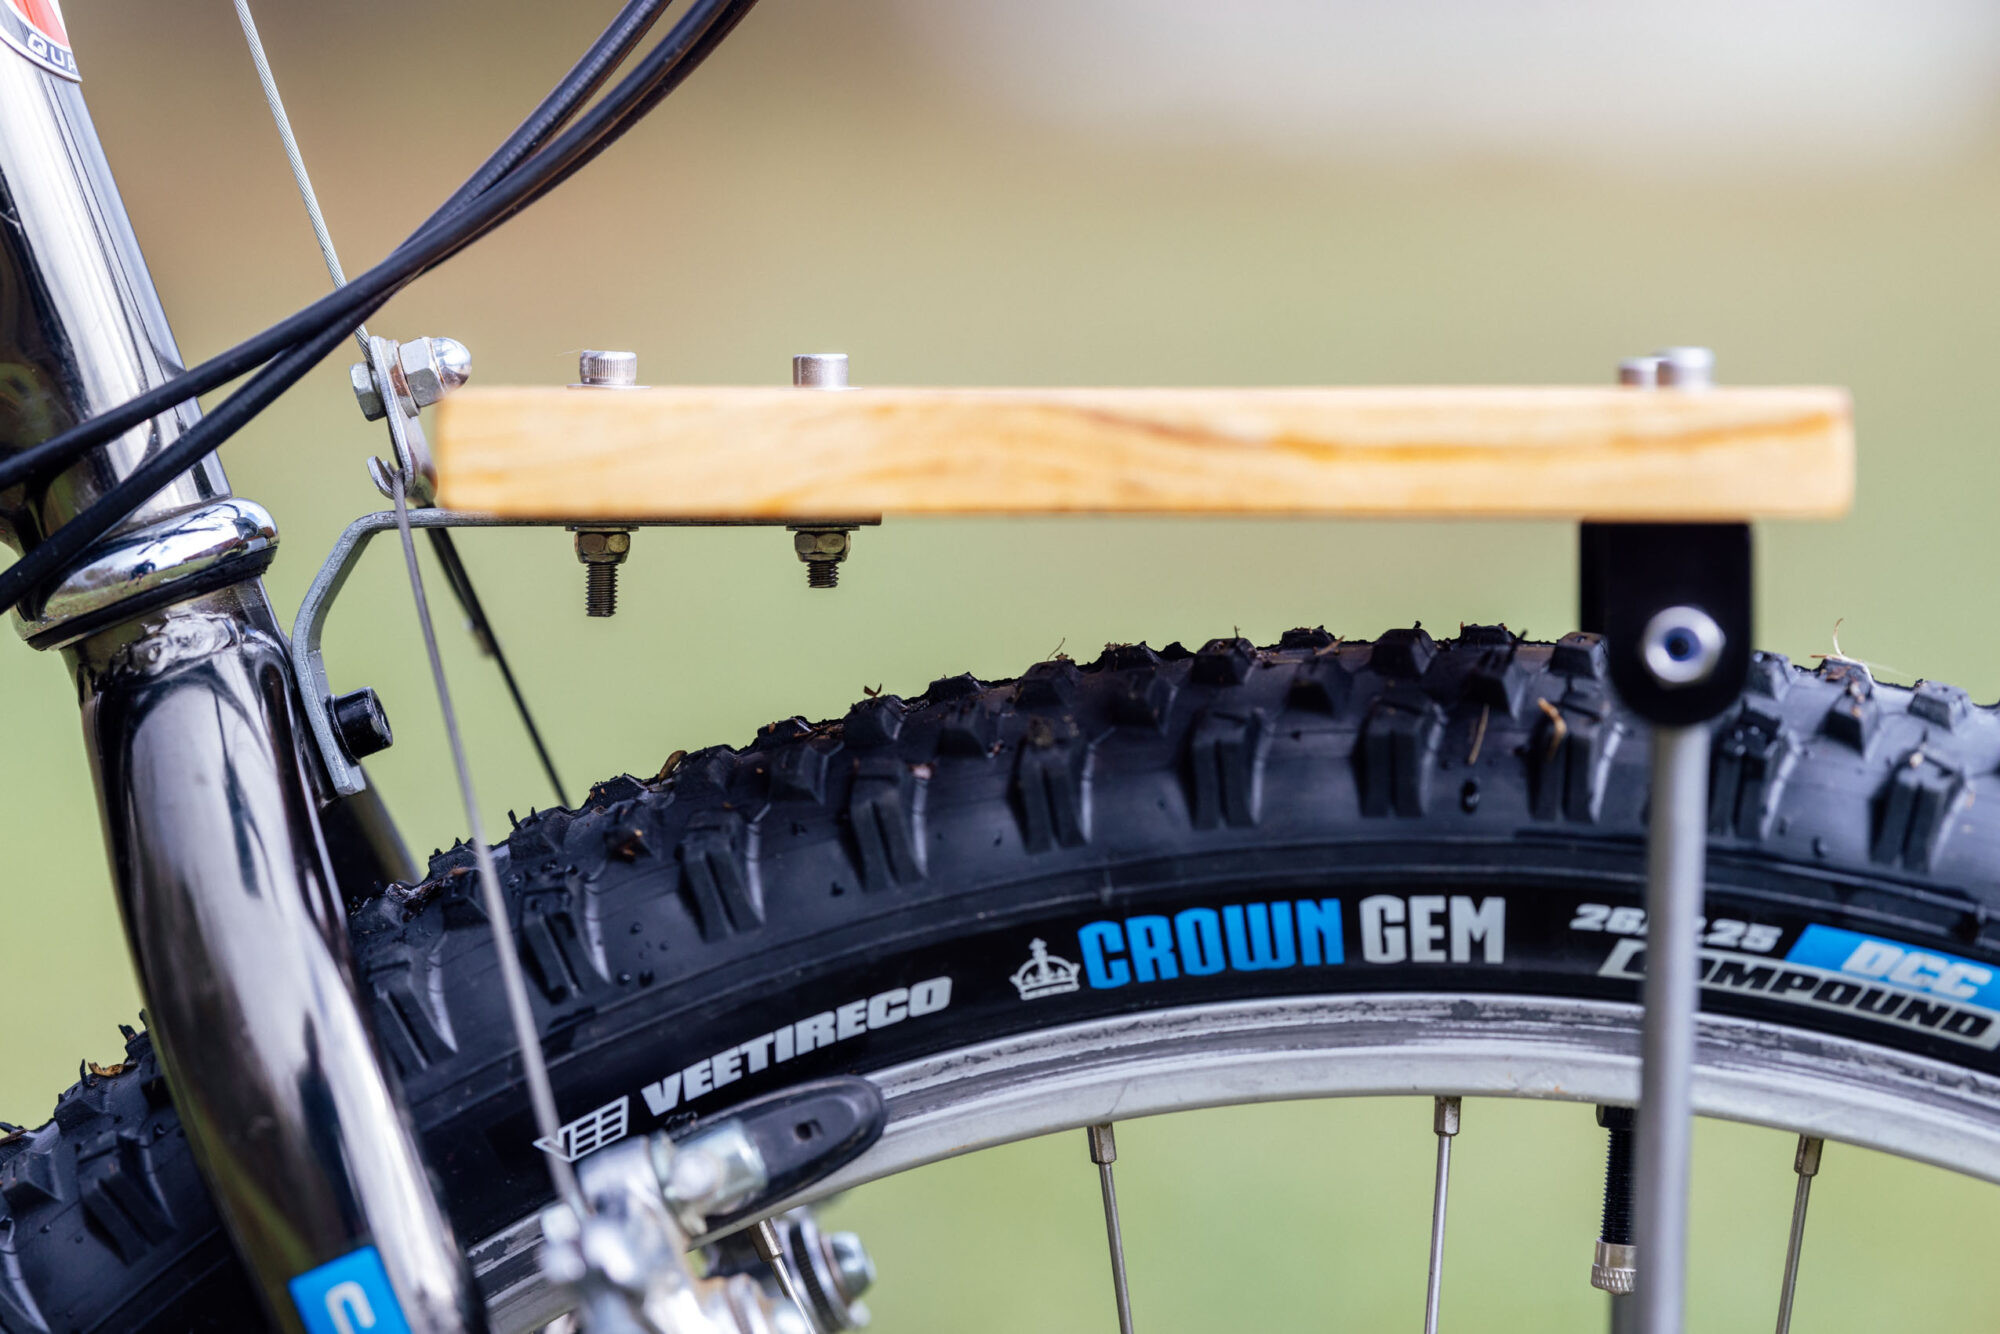
 Close up of bending a metal bracket in a vise for the front wooden bike rack, using pliers for leverage.The precise shape and dimensions of the front L-bracket will depend on your bike’s geometry, the location of the fork crown bolt, and whether you need to accommodate rim brakes. Begin by positioning the wooden bike rack platform on the tire, near the desired mounting location. Take measurements to estimate the vertical and horizontal lengths of the bracket. Bend the steel stock in a bench vise, checking the fit against the bike. Repeat this process of bending and measuring until the bracket conforms to the desired shape. Mark the cut lines with a pencil. Once the bracket is bent and correctly sized, file down any sharp edges and drill holes for the M5 bolts that will secure the wooden bike rack.
 Close up of the finished metal L-bracket for the front wooden bike rack, showing the drilled holes and filed edges.
5. Construct the Rear U-Brace for the Wooden Bike Rack
Creating the U-brace for the front of the rear wooden bike rack platform is more straightforward than the front L-bracket. However, this U-brace design is best suited for bikes with specific frame geometries. For instance, on bikes with 700c wheels, seat stay barrel mounts are often located below the tire’s top edge. Consequently, a simple U-brace like this is typically compatible with older 26″ tire-equipped mountain bikes. For modern bikes, a modified U-brace with angled bends may be necessary to achieve a similar mounting configuration for your wooden bike rack.
 Close up of shaping the metal U-brace for the rear wooden bike rack in a vise, showing the bending process.To fabricate the U-brace, hold the steel bar stock against the seat stays and mark three lines: two for the bends and one for the cut length. Cut off the excess steel and use a file to smooth the edges. Drill two holes for bolts to pass through and thread into the seat stay barrel mounts. Clamp the steel in a bench vise and use the Knipex Pliers Wrench to make the bends. Multiple adjustments may be needed to achieve the correct shape for your wooden bike rack U-brace.
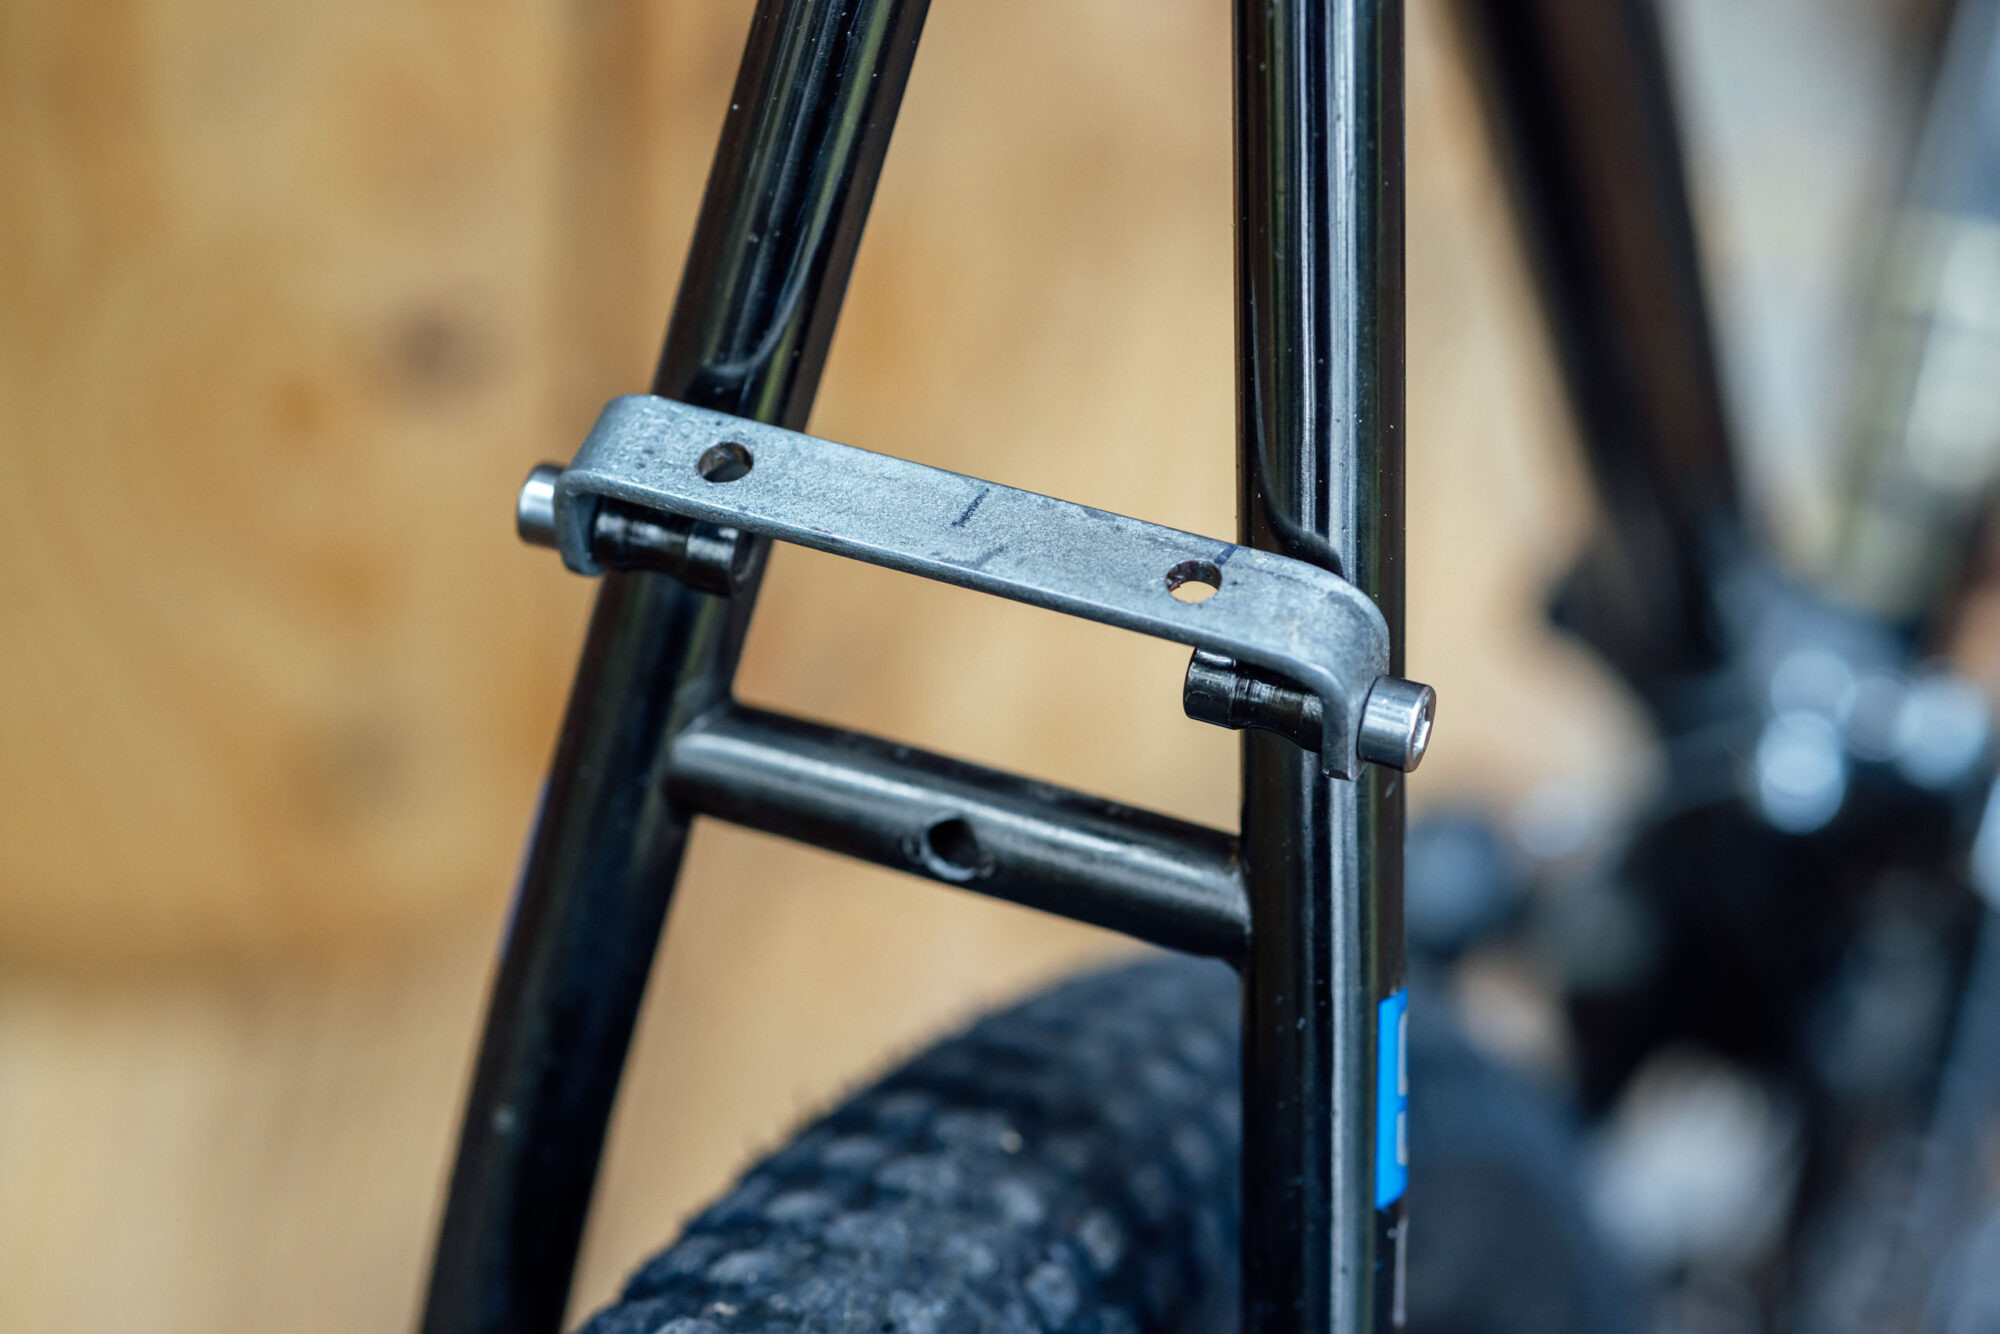
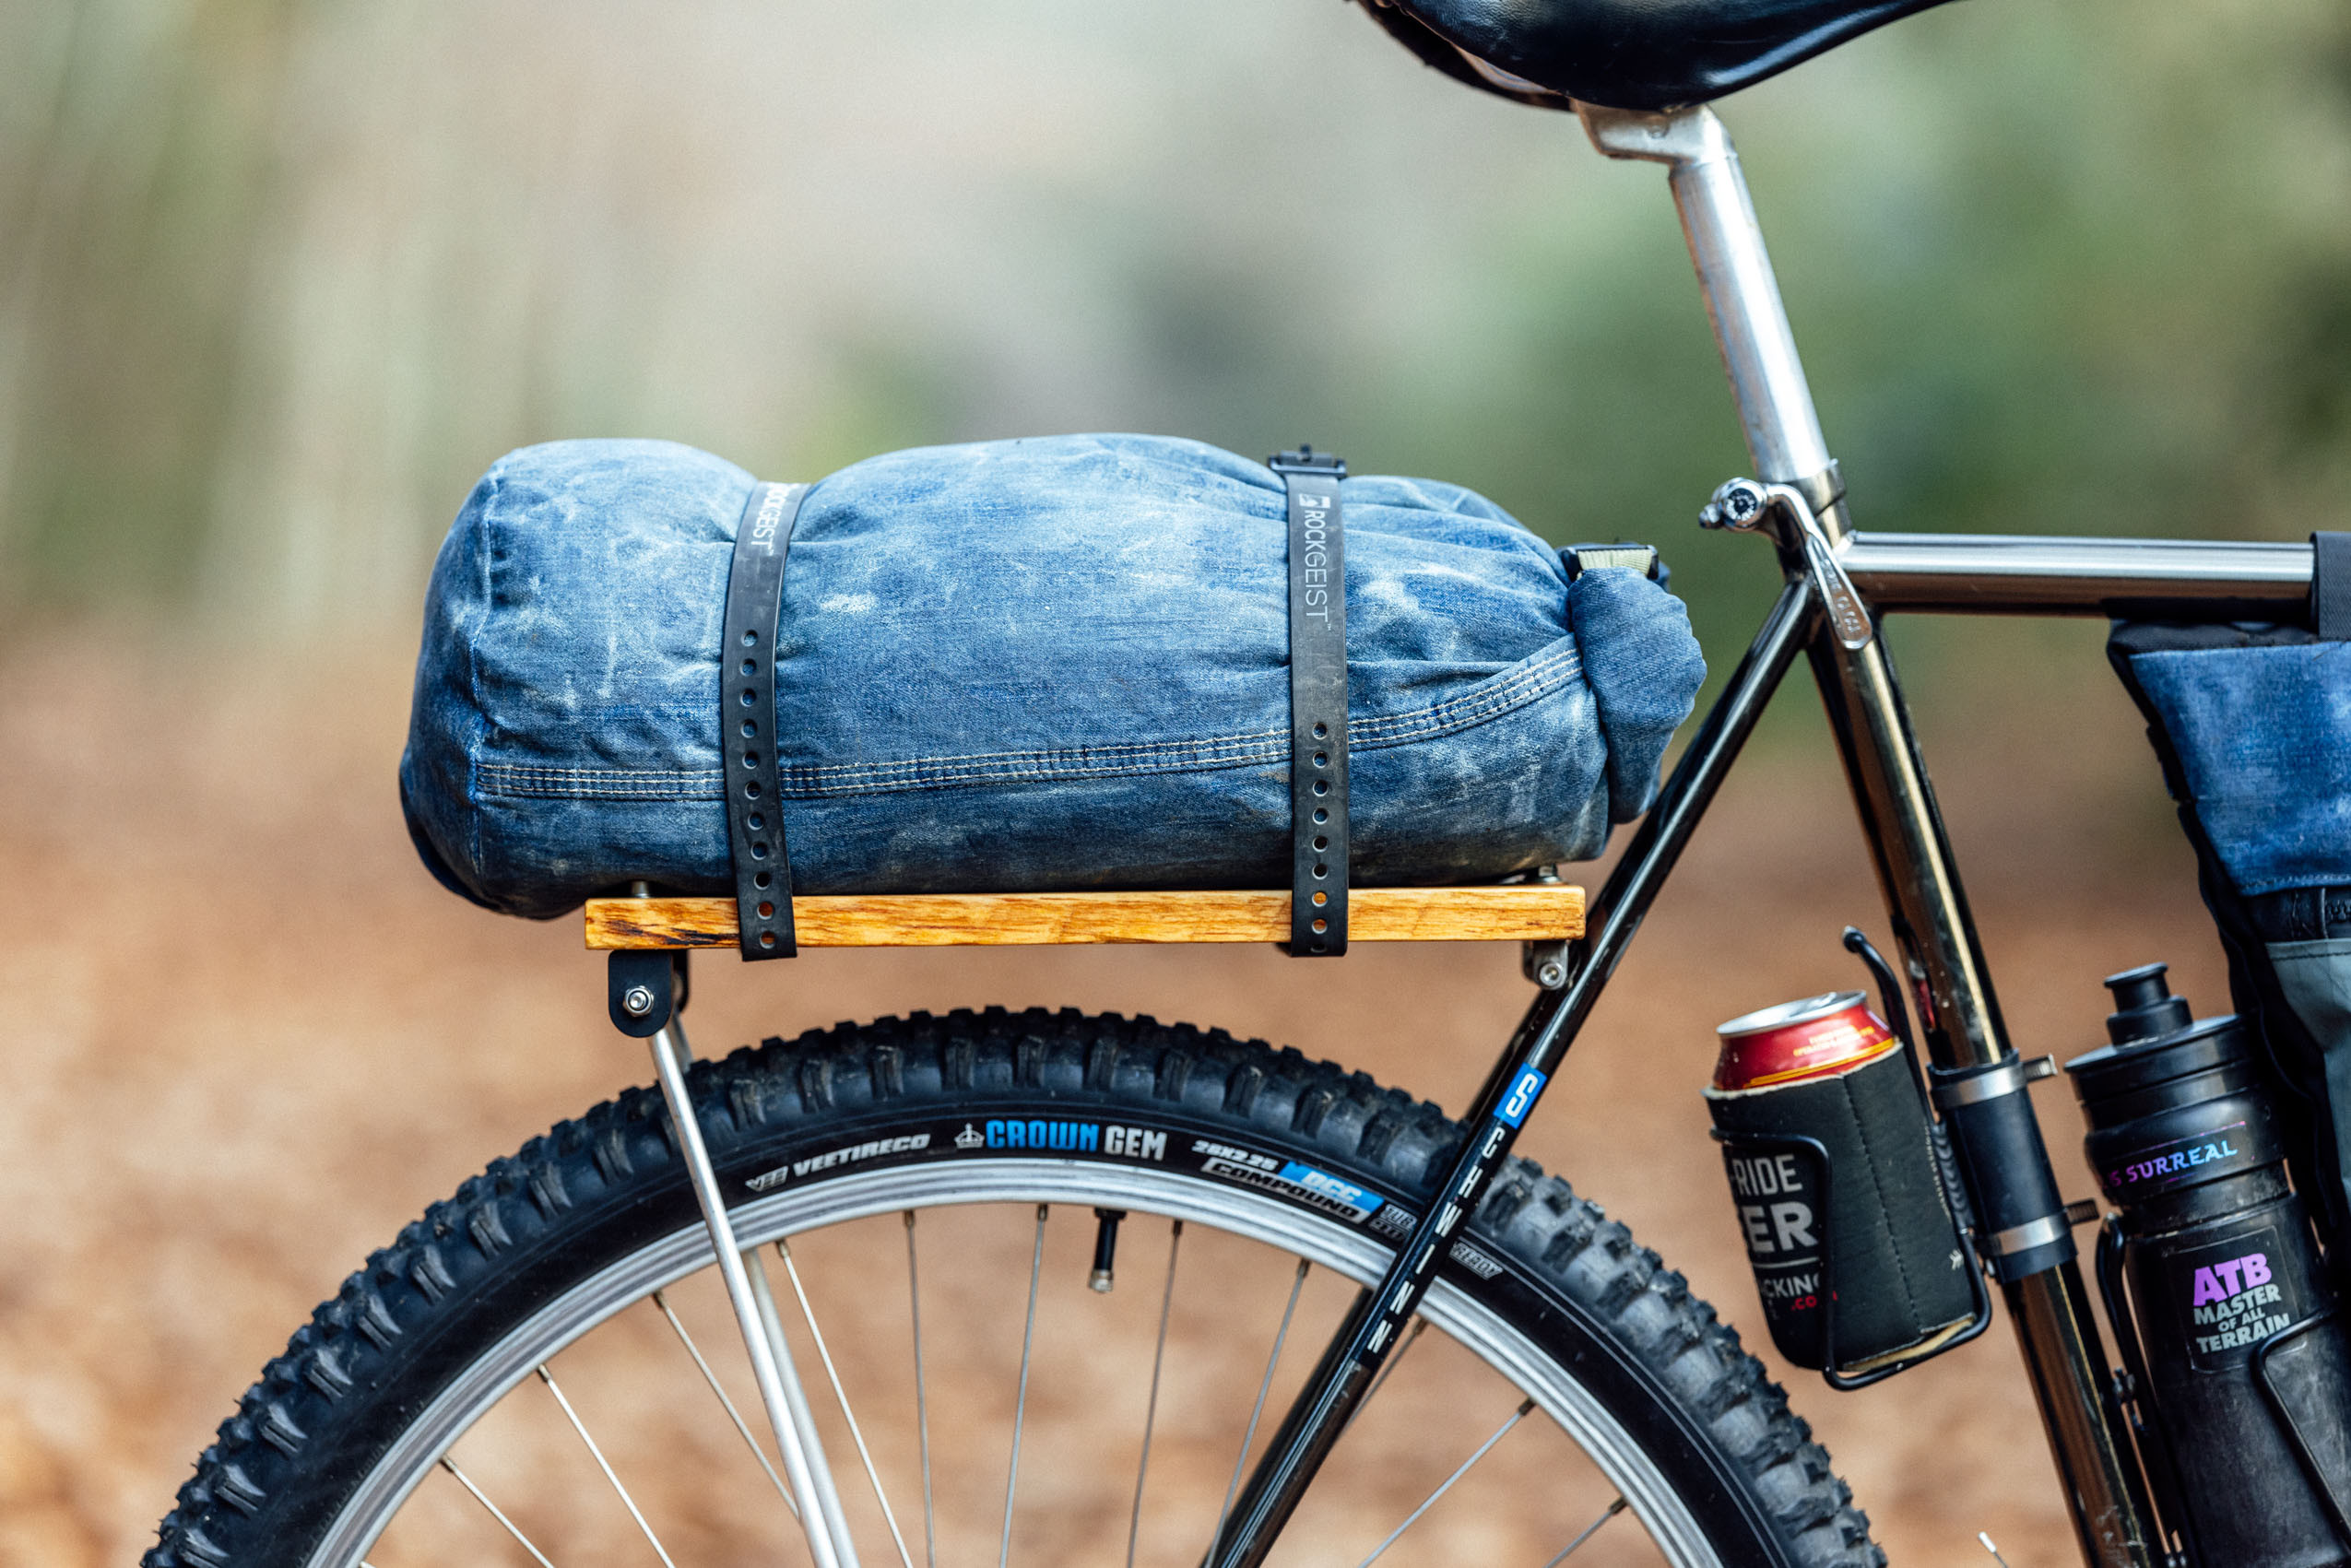
 Close up of the finished metal U-brace for the rear wooden bike rack, showing the drilled holes and smooth bends.Finally, drill two holes in the longer section of the U-brace to attach it to the wooden bike rack platform using longer M5 bolts and Nyloc nuts. A mistake was made by drilling these holes too close to the bracket’s edges, causing interference with the barrel mounts due to the nyloc nuts. To rectify this quickly, the bolts were reversed, placing the washers and nuts on top of the platform, which is less aesthetically ideal. Ideally, a single central hole and bolt would suffice. Future improvements will involve filling the misplaced holes in the platform and drilling a central bolt hole in the U-brace for a cleaner finish on the wooden bike rack.
6. Attach the Compression Hardware to the Wooden Bike Rack
Once you are satisfied with the bracket placement and have bolted them to the wooden bike rack platforms, attach the rack hardware to the outer corners of each wooden platform. Finding the correct bolt length for the compression hardware can be slightly challenging. Bolts that are too long may bottom out inside the machined aluminum fitting. After searching through various bolts, suitable ones were found, using washers for proper spacing. Note that the large barrel heads on the bolts used could potentially damage rack bags over time. Pan-head bolts are recommended as a more bag-friendly alternative for your wooden bike rack assembly.
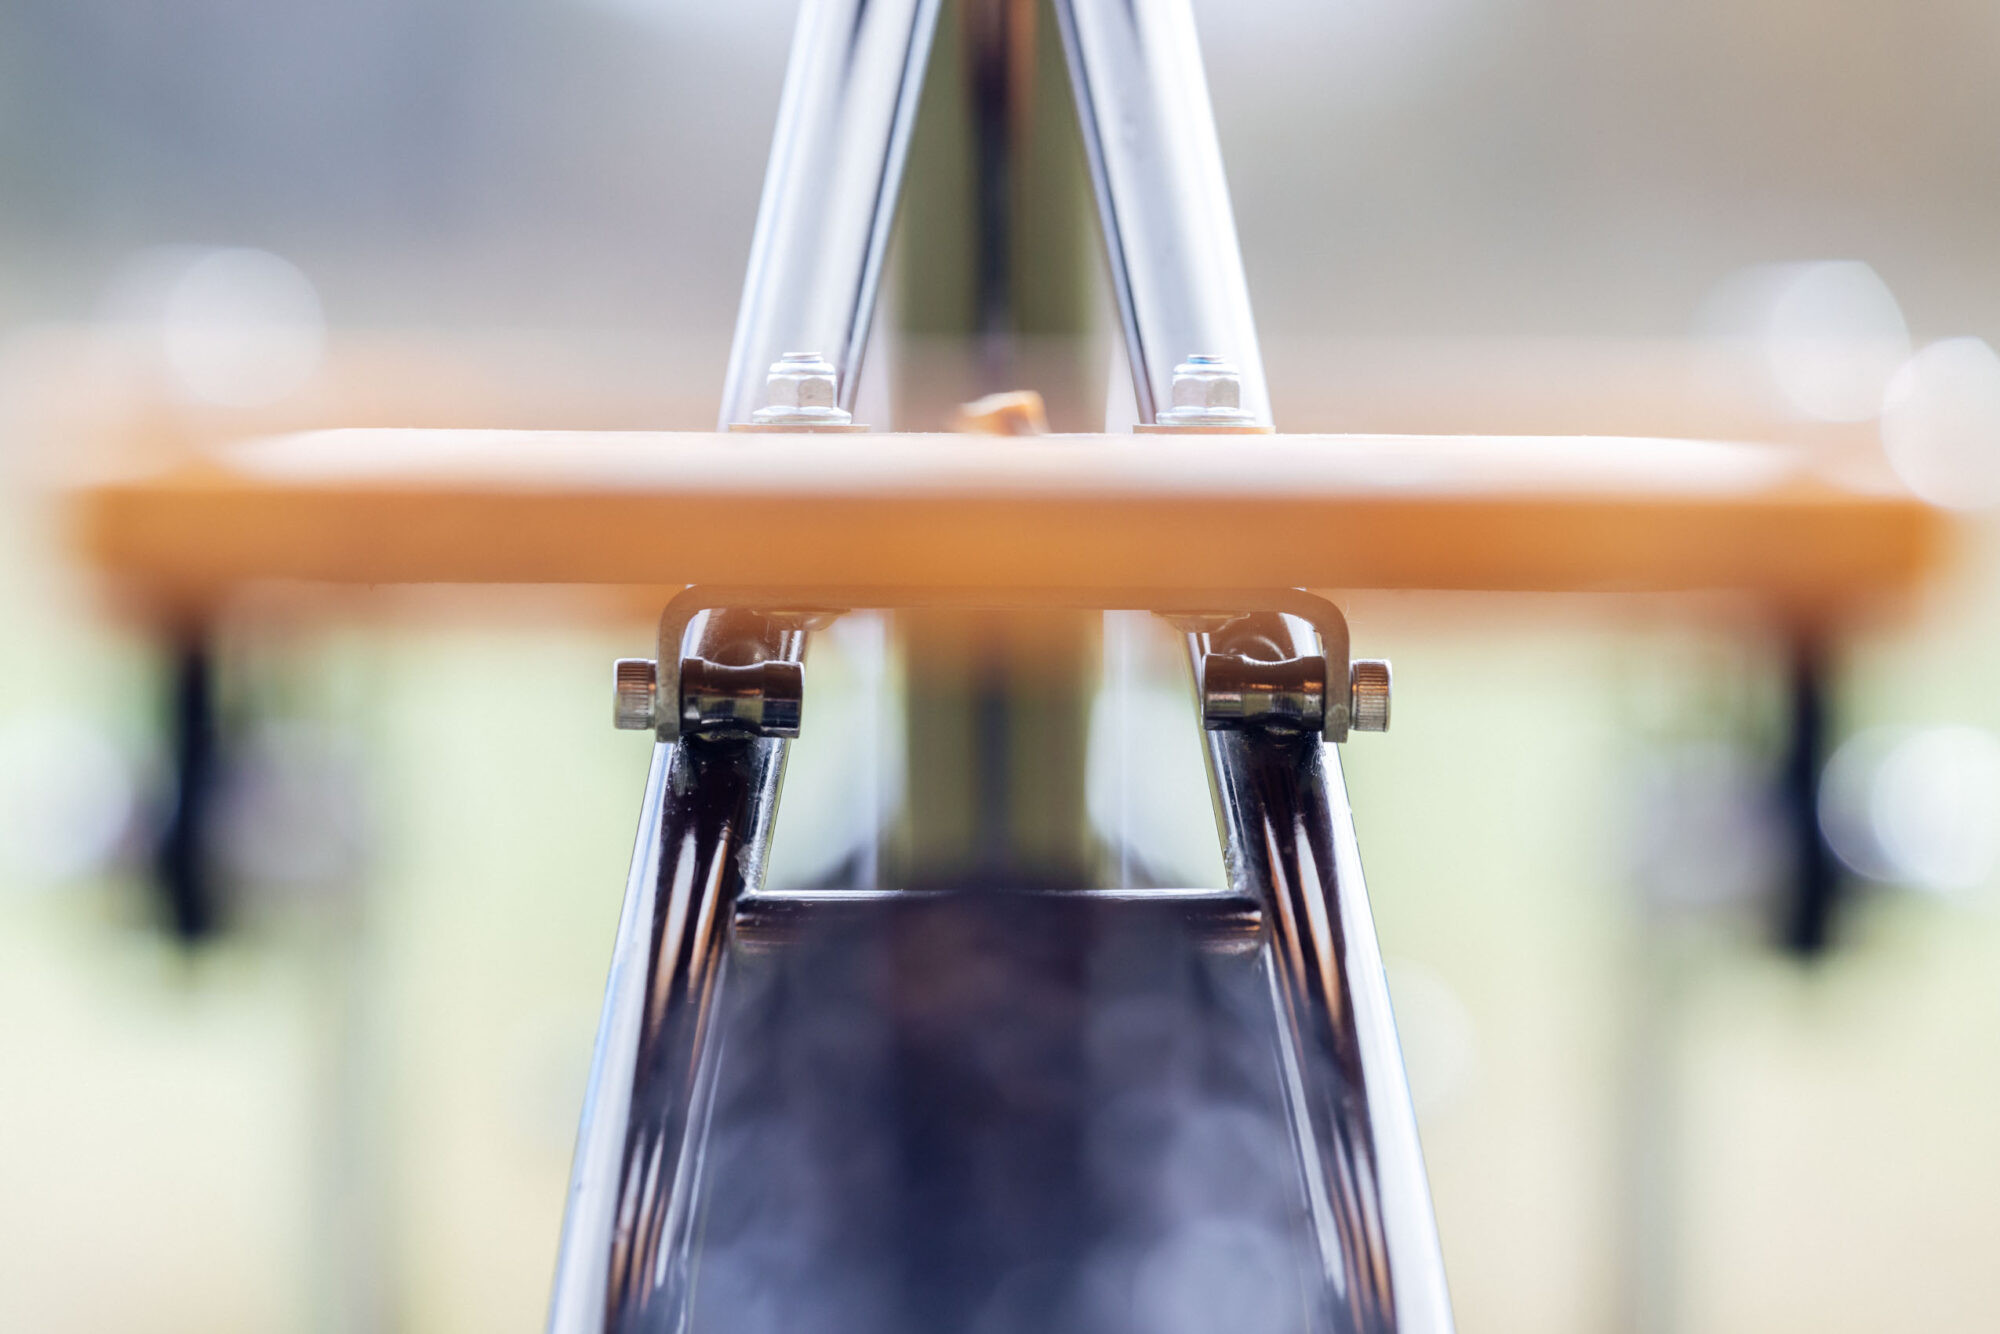
 Close up of attaching the compression hardware to the corner of a wooden bike rack platform, showing the bolt and fitting.
7. Size the Struts and Assemble Your Wooden Bike Rack
Next, attach the riser struts to the bike’s lower rack mounts. Bolt both the platform/bracket assemblies to the bicycle and determine where the struts need to be cut. The strut lengths were pre-calculated, and fortunately, no trimming was necessary in this instance. Longer struts are available (linked in the “What You Need” section) if required for your wooden bike rack installation.
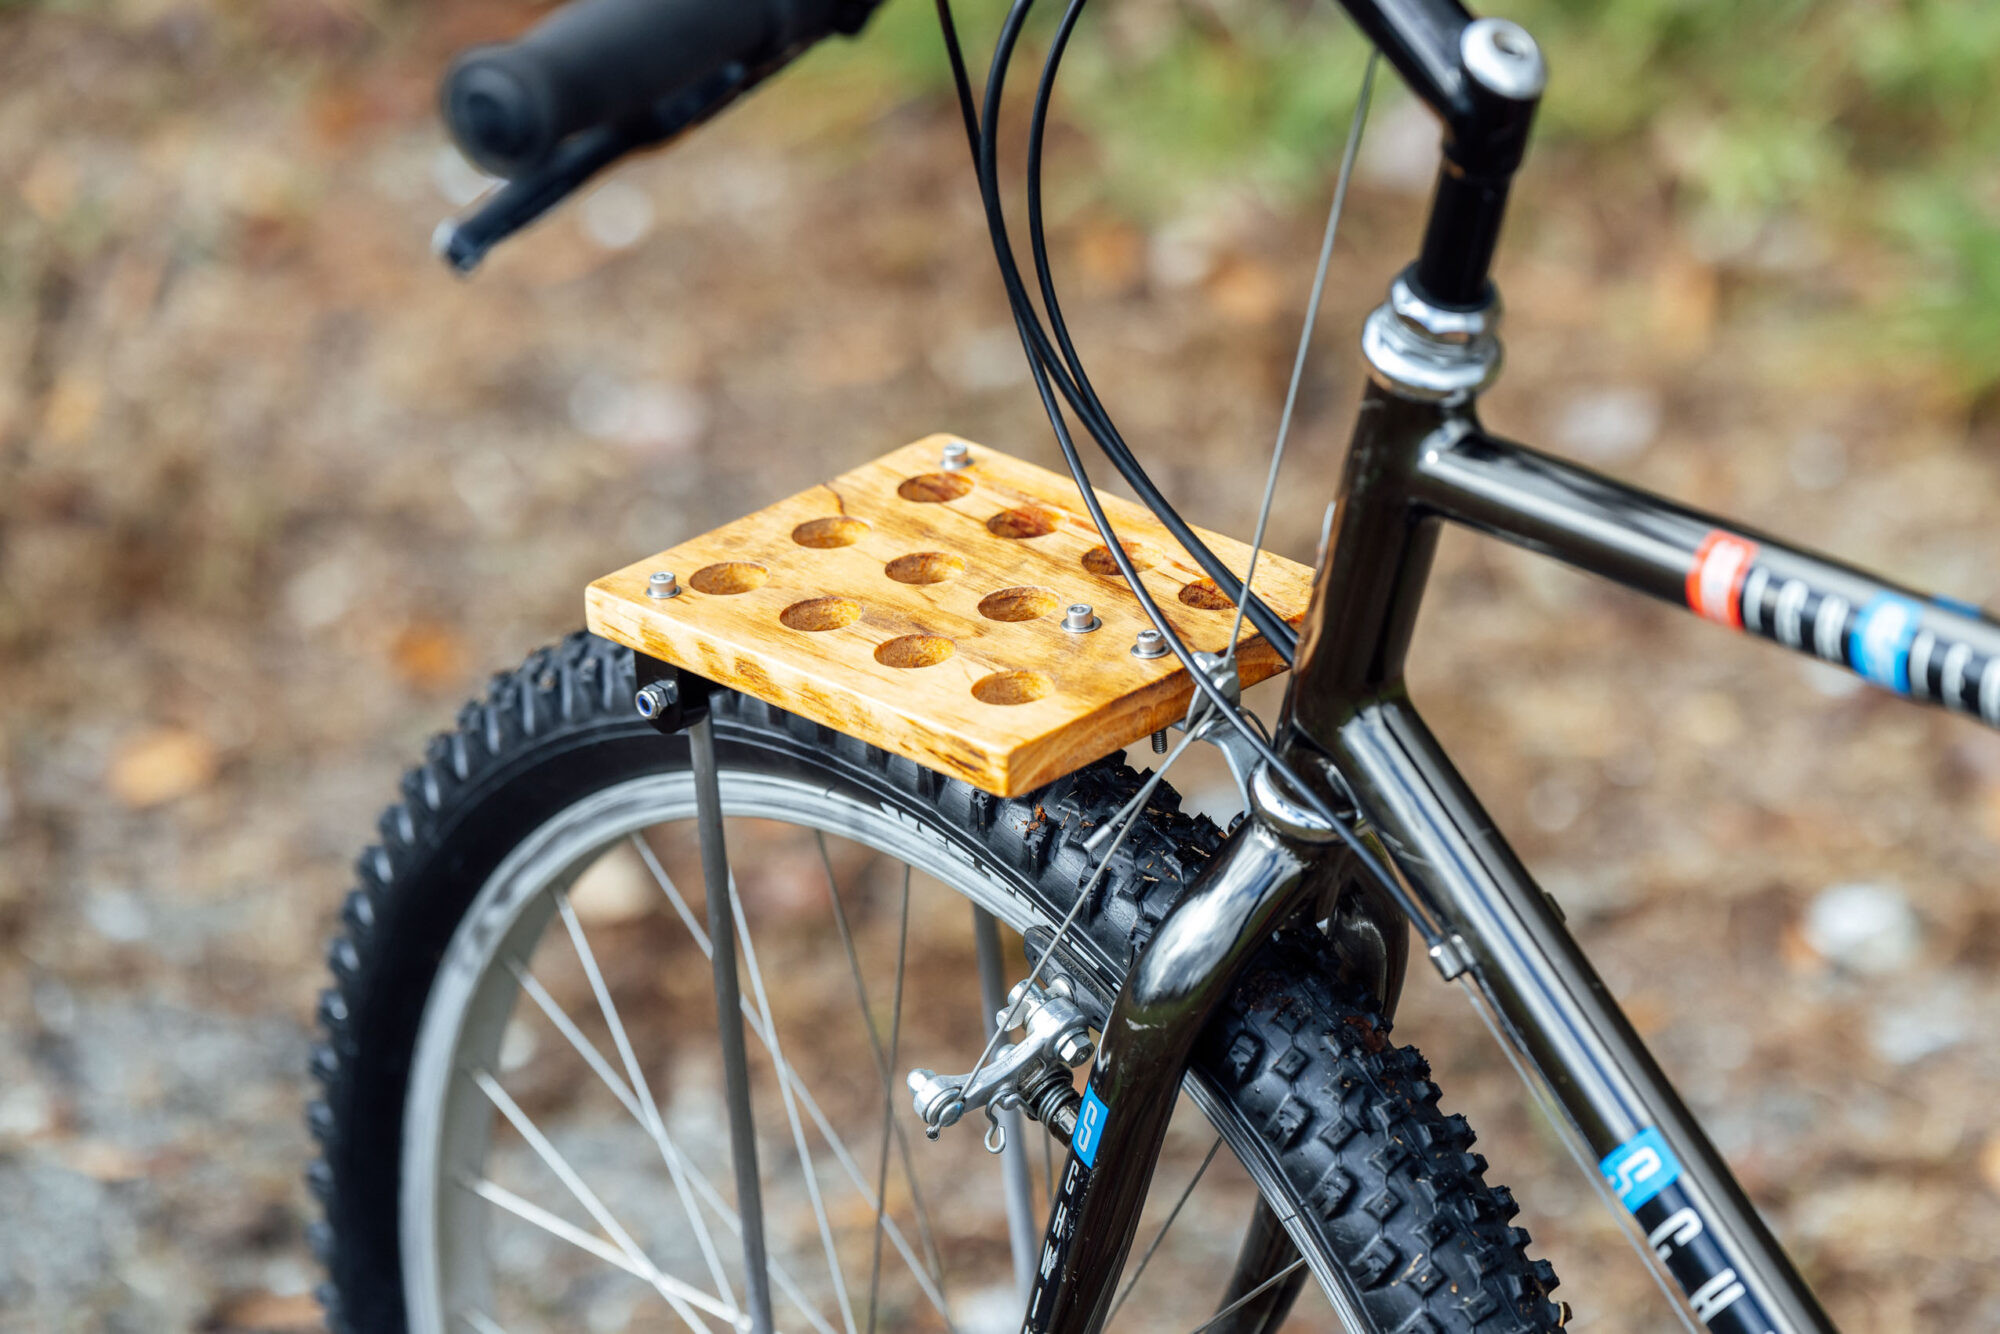
8. Basket Modification for Your Front Wooden Bike Rack (Optional)
When planning the bolt placement and dimensions for the front wooden bike rack, the integration of a Wald 137 Half Basket was considered. The aim was a more refined basket attachment method than zip ties or straps. To achieve this, leftover aluminum bar stock from another bike rack project was utilized. These were cut to length, matching holes were drilled, and they were positioned to overlap the wire basket grid, effectively clamping the basket securely to the wooden bike rack platform.
Conclusion: The Benefits of Building Your Own Wooden Bike Rack
The entire construction process for these DIY wooden bike racks took approximately three hours, roughly an hour and a half per rack. The resulting racks exceeded expectations. Their robustness and stability make them suitable for extended tours. The three coats of tung oil appear to provide adequate weather protection for the wooden platforms.
Interestingly, the front wooden bike rack, despite using solid steel struts, is only slightly heavier than the rear rack, which utilizes aluminum struts (from spare parts). Despite the sturdy struts, the front wooden bike rack weighs less than commercial options like the 649-gram Tumbleweed T Rack and the 638-gram Old Man Mountain Elkhorn. While these DIY racks lack the three-pack cage mounts found on some commercial racks, they are significantly more cost-effective and relatively simple to fabricate. Building a wooden bike rack is a rewarding DIY project that offers customization, cost savings, and a unique aesthetic.
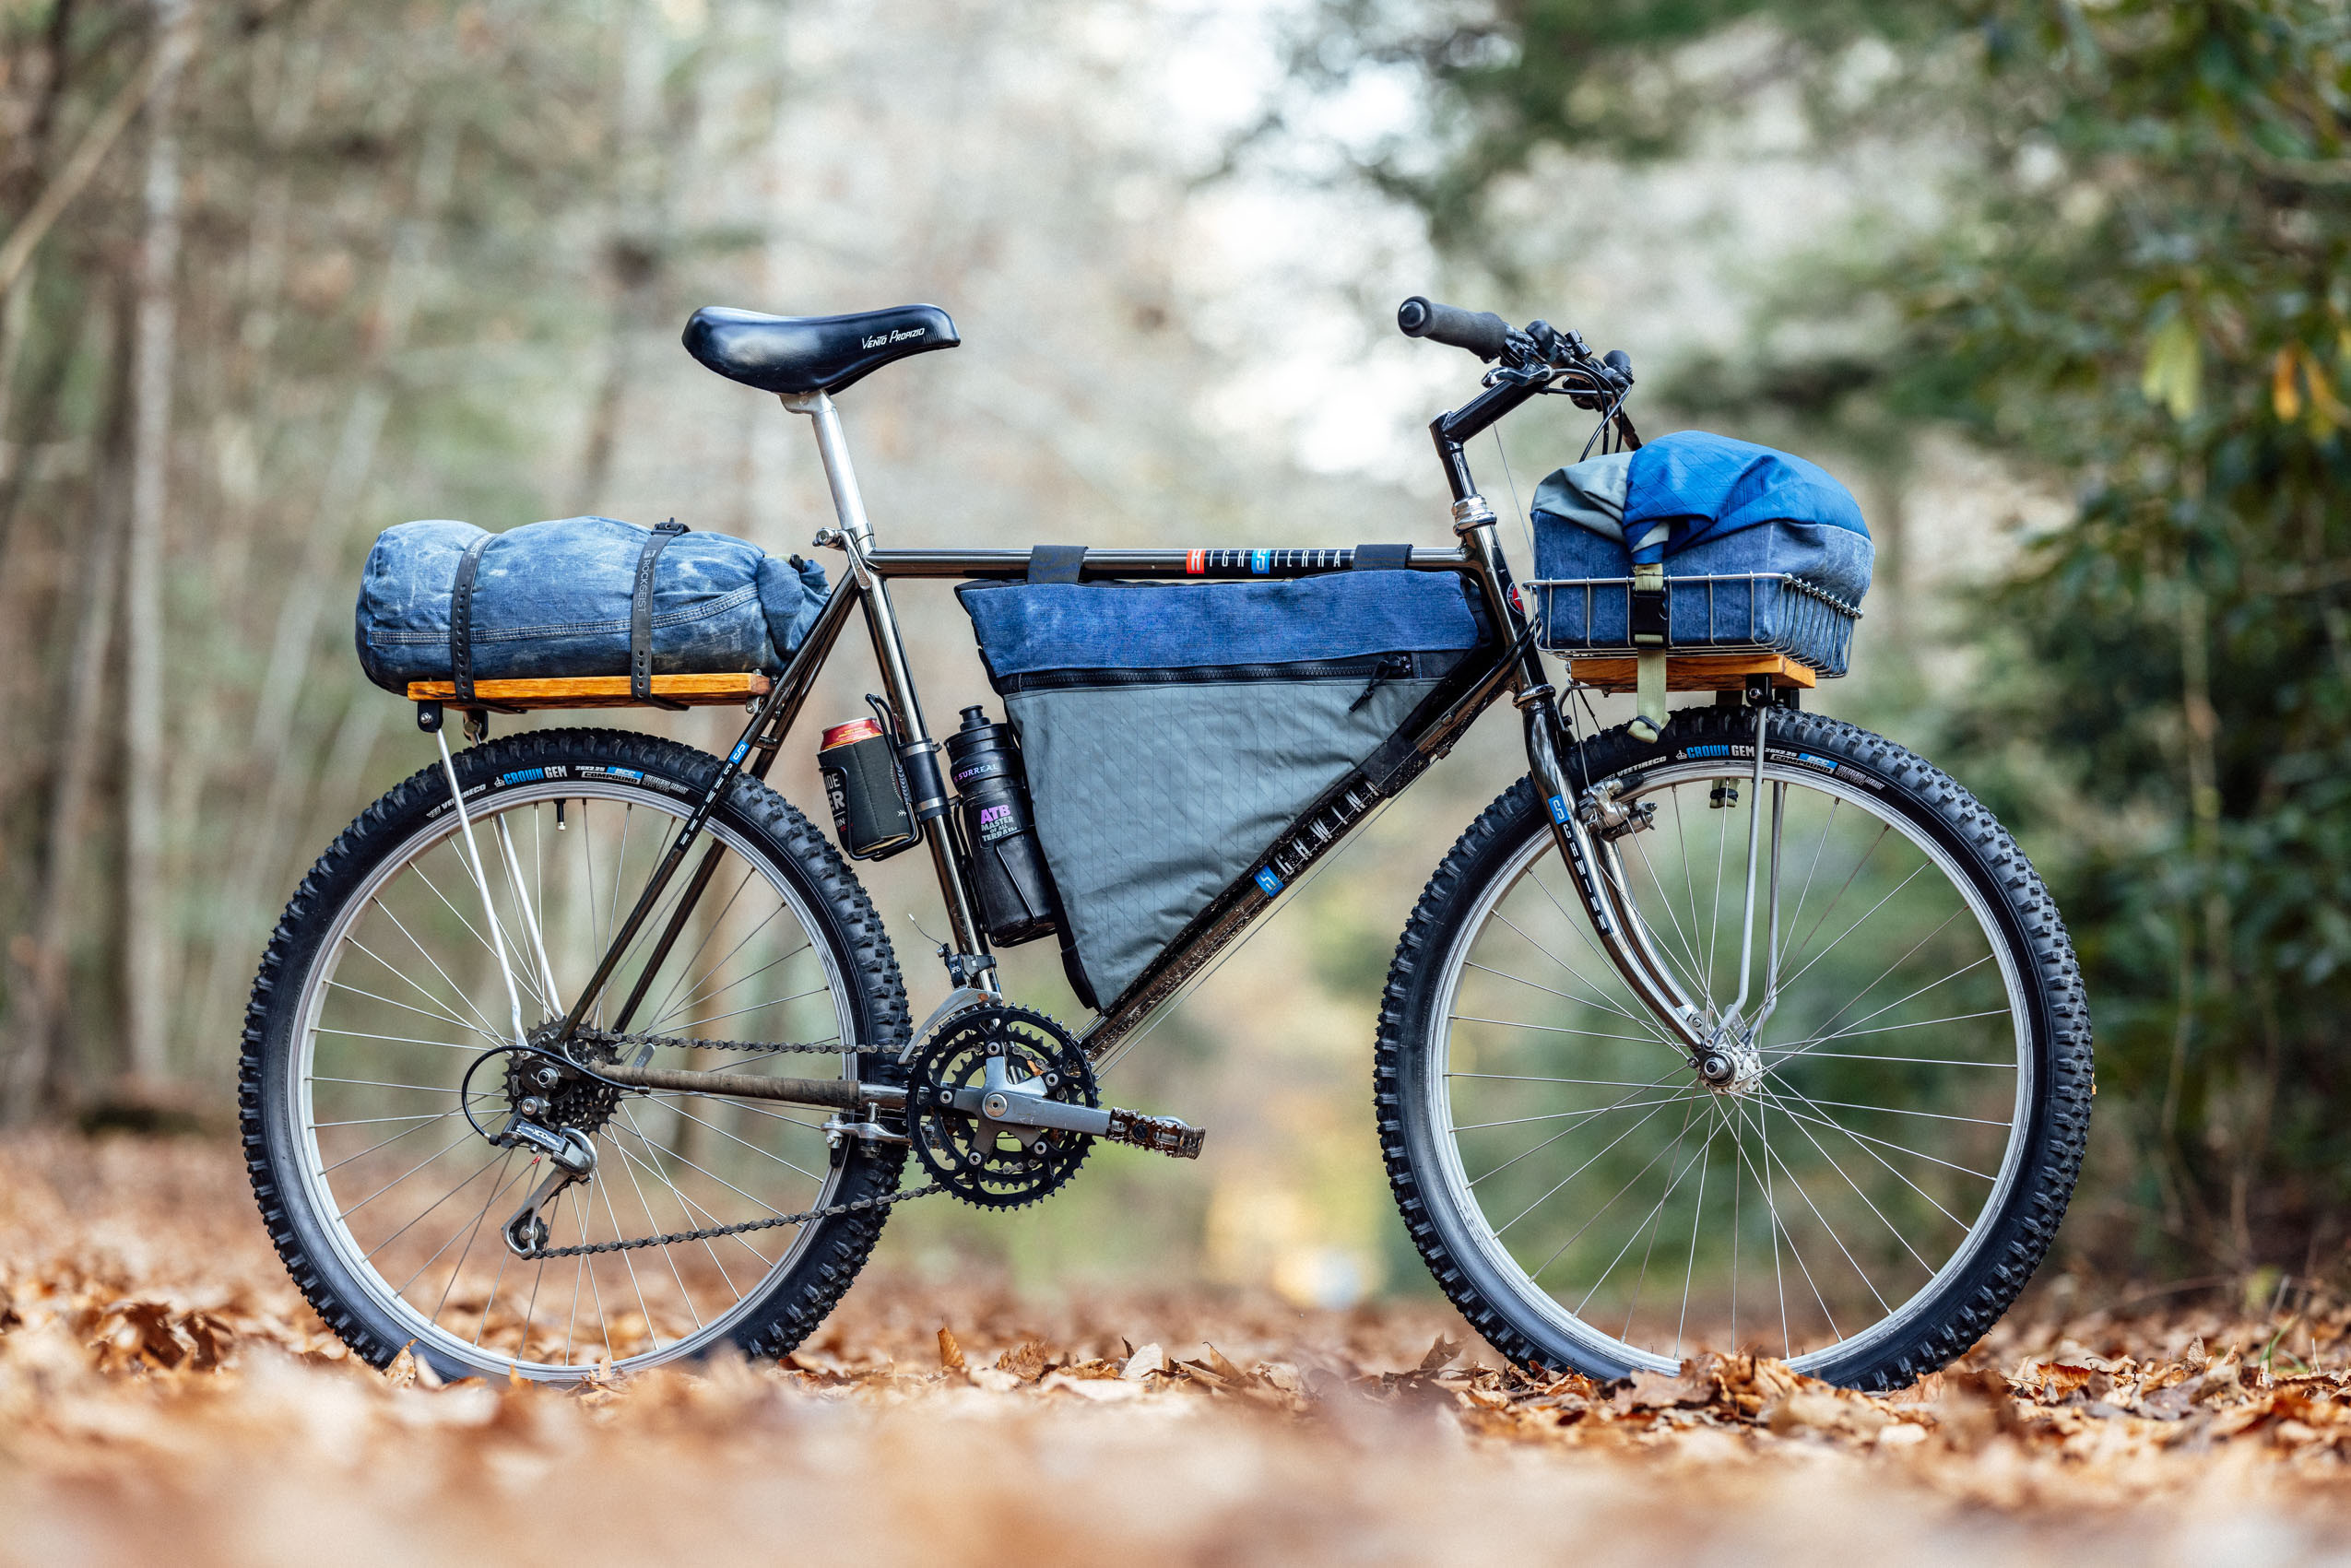
 Full view of the Schwinn High Sierra bike with DIY wooden front and rear bike racks, loaded with bikepacking gear and a Wald basket.
Do you have any tips or insights on building a wooden bike rack or DIY bike racks in general? Share your thoughts in the comments below! If you’ve built your own rack, please share a photo!
Further Reading for DIY Bike Rack Inspiration
Explore these related articles for further information and inspiration for your DIY bike rack projects…
[ 1988 Schwinn High Sierra, Budget Bikepacking Build-Off Logan Watts63
Bikepacking Bikes
Budget Bikepacking Build-Off: Logan’s 1988 Schwinn High Sierra](https://bikepacking.com/bikes/1988-schwinn-high-sierra-build-off-logan-watts/)
[ DIY Pants Leg Stuff Sack Rack Bag10
Bikepacking Bags
DIY Pants-Leg Stuff Sack (Rack Bag)](https://bikepacking.com/gear/diy-pants-leg-stuff-sack-rack-bag/)
[ rear bike racks Bikepacking138
Accessories
Rear Bike Racks: Lightweight Options for Bikepacking (List & Guide)](https://bikepacking.com/index/rear-bike-racks-bikepacking/)
[ Stranahan skateboard front rack15
Accessories
Make Your Own Skate Deck Front Rack](https://bikepacking.com/gear/skateboard-front-rack/)
[ Hunter Cycles shop visit16
Field Trips
Inside Hunter Cycles (and Rick’s Brain via Five Bikes)](https://bikepacking.com/plog/inside-hunter-cycles/)
[ Make Your Own Stuff Sack, MYOG, MYOBG, Dave Helbig14
Bikepacking Bags
Make Your Own Cylindrical Stuff Sack](https://bikepacking.com/gear/make-cylindrical-stuff-sack/)
FILED IN (CATEGORIES & TAGS)
[