Cycling is a fantastic way to stay fit, explore the outdoors, and commute efficiently. However, to truly enjoy your bike and ensure it performs reliably, understanding and practicing regular Bike Maintenance is crucial. Many cyclists, especially beginners, often overlook bike maintenance, but it’s a fundamental aspect of bike ownership. Learning essential bike maintenance not only keeps your ride smoother and safer but also saves you money in the long run by preventing costly repairs and extending the lifespan of your components.
While professional servicing at your local bike shop is recommended periodically, you can significantly improve your bike’s performance and longevity with consistent home maintenance. This guide will walk you through key bike maintenance tips, empowering you to take care of your bicycle and avoid being stranded miles from home due to a simple issue. Whether you’re a seasoned rider or just starting out, mastering these basic maintenance skills is an investment in your cycling enjoyment and safety. Let’s dive into the essential bike maintenance practices that every cyclist should know.
Gather the Right Bike Maintenance Tools
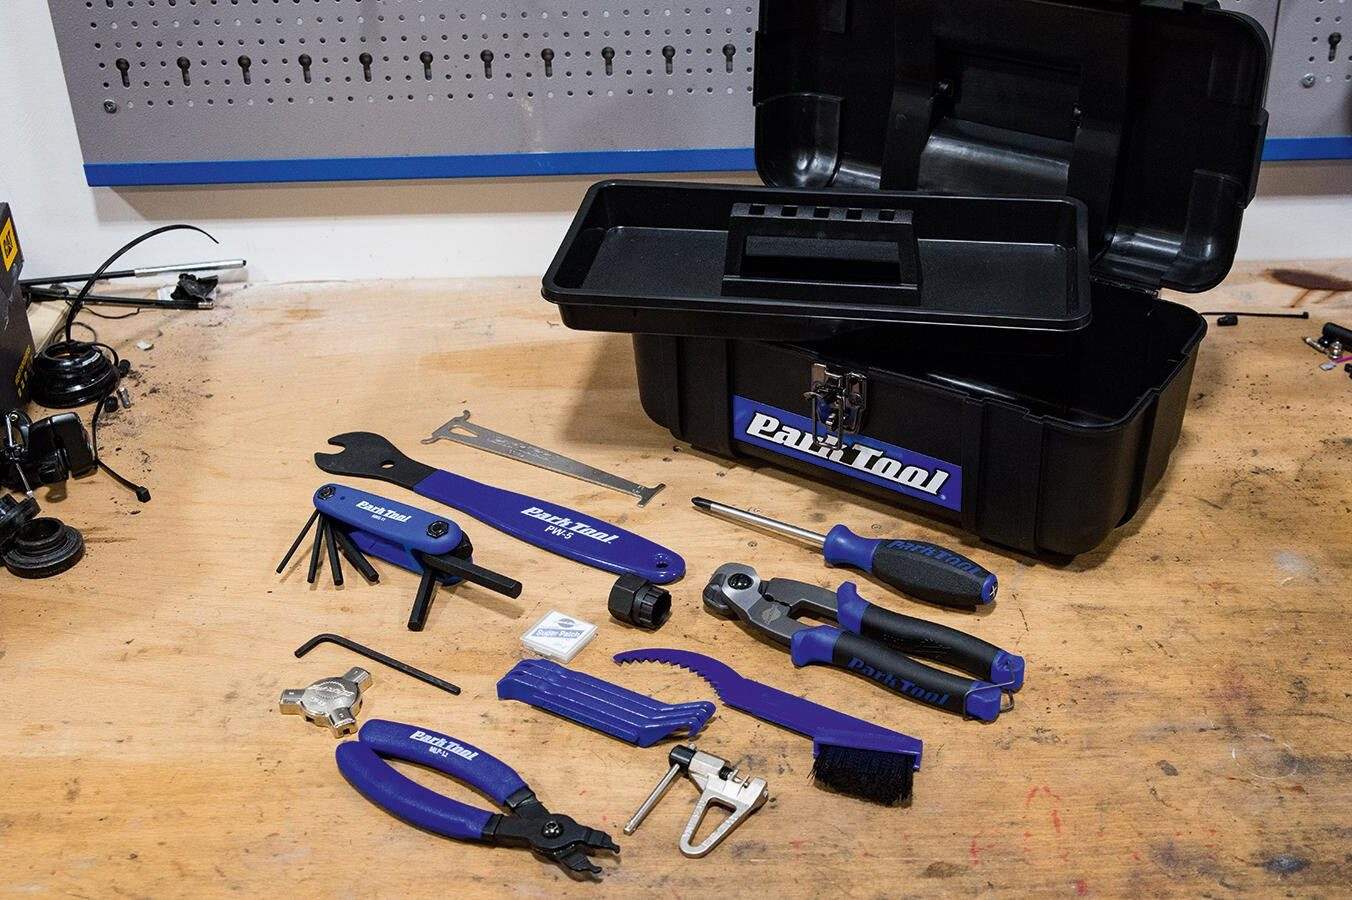 alt=”Essential bike maintenance tools kit, including hex keys, torque wrench, chain breaker, and pump, laid out for home bicycle repairs.”
Before you start any bike maintenance, having the right tools is paramount. While some basic tasks can be done with common household tools, bicycle-specific tools are designed for precision and ease of use, ultimately making maintenance more efficient and preventing damage to your bike. Investing in quality tools from the outset is a wise decision. They not only make the job easier but also minimize the risk of damaging components like stripping bolts.
A multi-tool is a great companion for rides and quick adjustments on the go, but for thorough home maintenance, a dedicated set of tools is invaluable. Consider starting with essential individual tools and gradually expanding your collection as you become more confident with bike maintenance. Alternatively, a comprehensive bike tool kit can be a cost-effective way to acquire most of the necessary tools in one go. When selecting tools, prioritize quality and durability to ensure they withstand regular use and provide reliable performance.
Here’s a list of essential tools to get you started with bike maintenance:
- Multi-tool: For on-the-road adjustments and minor fixes.
- Bike Pump: A track pump (floor pump) for accurate inflation at home and a mini-pump for carrying on rides.
- Tyre Levers: For safely removing tyres from rims without damaging them.
- Puncture Repair Kit: Includes patches and glue for repairing inner tubes.
- Hex Key Set (Allen Keys): Essential for tightening and loosening most bolts on a bike. Consider a set with ball ends for easier access in tight spots.
- Torx Key Set: Increasingly common, especially on disc brake systems and newer components.
- Torque Wrench: Crucial, especially for carbon fiber bikes, to prevent over-tightening and damaging components. Recommended for all modern bikes for accurate bolt tightening.
- Chain Breaker: For separating and joining bike chains, necessary for chain maintenance and replacement.
- Chain Checker (Chain Wear Indicator): To measure chain stretch and determine when it needs replacing, preventing wear on cassettes and chainrings.
- Shock Pump (High-Pressure Pump): If you own a mountain bike with air suspension, this is needed to adjust air pressure in forks and shocks.
- Cable Cutters: For clean cuts on brake and gear cables.
- Bottom Bracket Tool, Cassette Tool, Crank Puller: These are more advanced tools but necessary for replacing these components. You can acquire these as your maintenance skills progress.
Conduct a Regular M-Check for Bike Safety
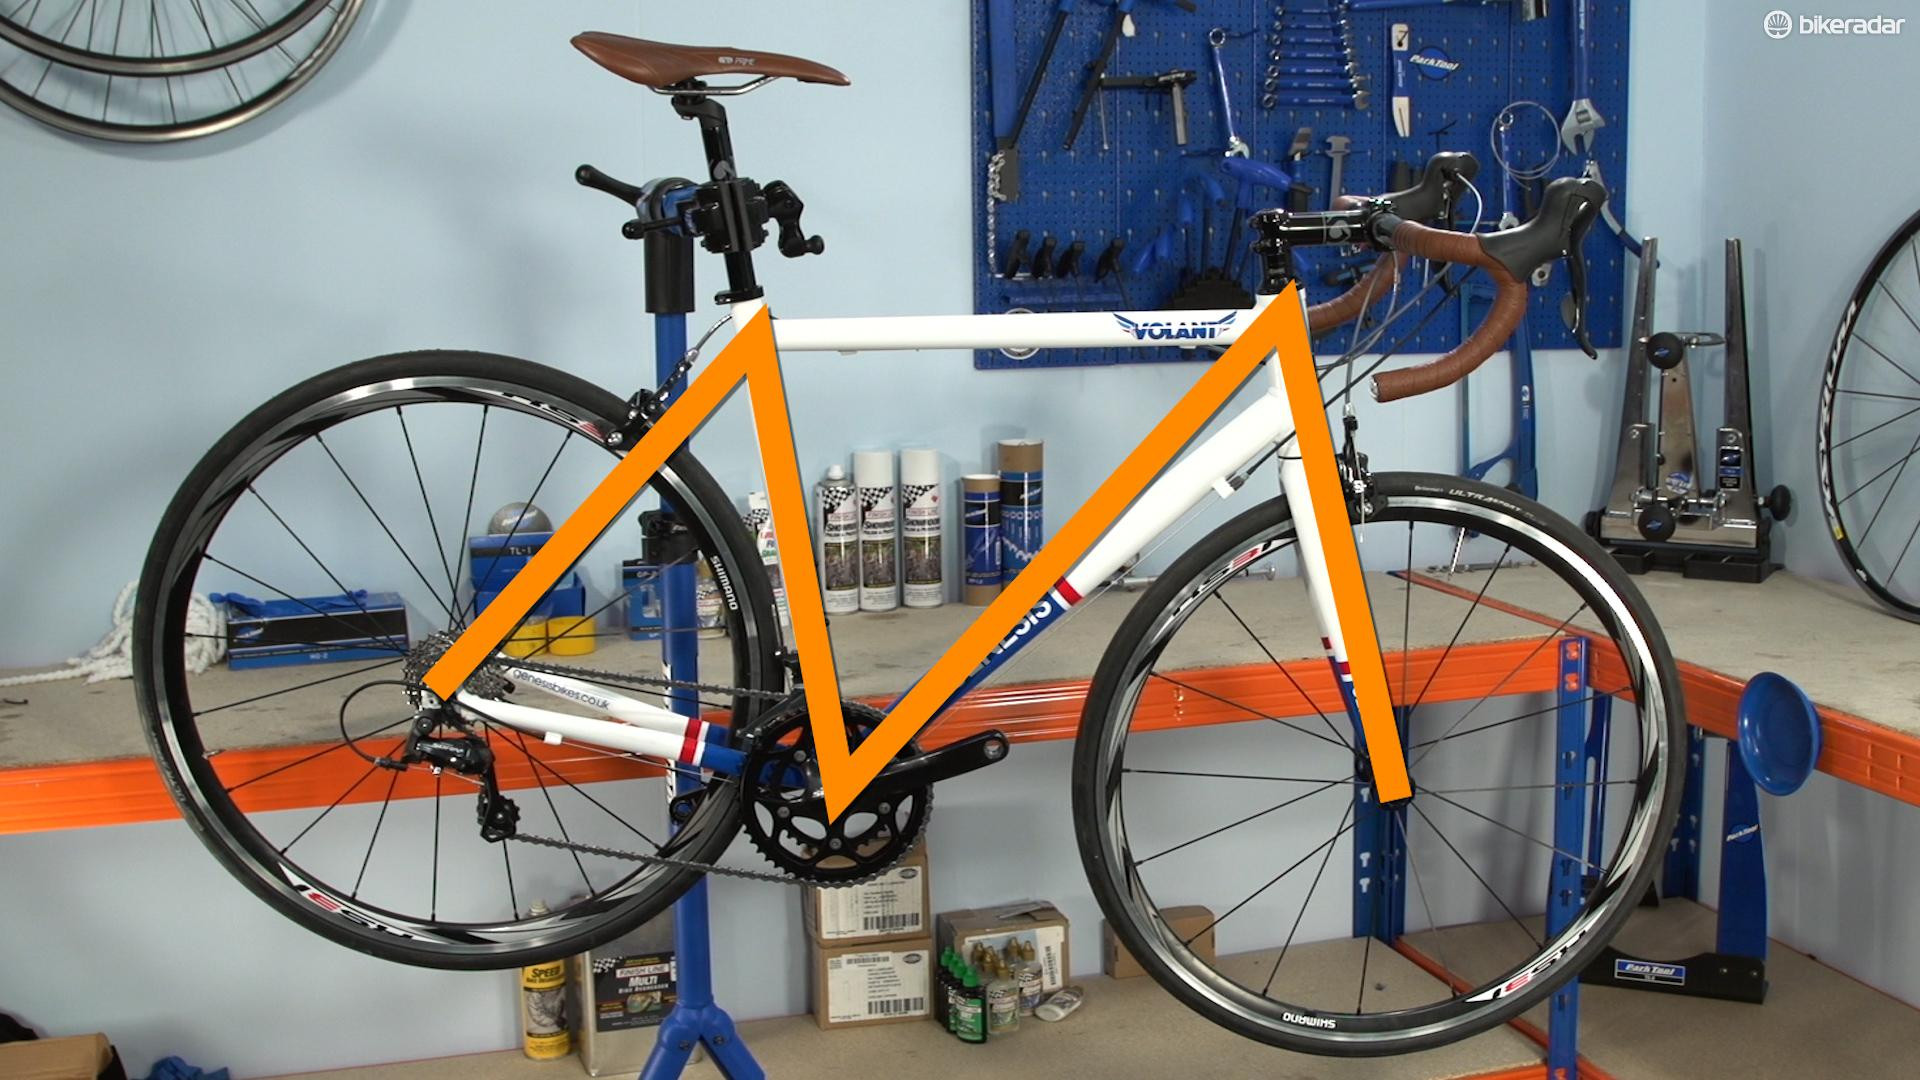 alt=”Cyclist performing an M-Check on a bicycle, systematically checking different parts of the bike for safety and maintenance.”
The M-Check is a systematic and quick safety inspection you should perform regularly, ideally before each ride. This simple check helps identify potential issues before they become major problems on the road or trail. Named for the ‘M’ shape your hand traces as you move through the check points on the bike, the M-Check covers all critical parts of your bicycle in a logical sequence.
Performing an M-Check is especially important if your bike hasn’t been ridden in a while or if you’ve just purchased a used bike. It allows you to catch any wear and tear, loose components, or damage that could compromise your safety and riding experience. This routine check should only take a few minutes but can provide significant peace of mind and prevent mechanical failures during your ride.
Here’s how to perform an M-Check:
- Front Wheel: Start at the front wheel. Check the tyre for proper inflation and damage. Squeeze the tyre to feel for adequate pressure. Inspect the wheel for damage and ensure it is securely mounted in the fork. Spin the wheel to check for trueness and listen for any unusual noises.
- Front Brakes: Move up to the front brakes. Squeeze the front brake lever and check if the brake engages effectively and smoothly. Inspect brake pads for wear and ensure they are not rubbing against the tyre when the brake is not applied. Check brake cable condition and housing.
- Handlebars and Headset: Inspect the handlebars and stem for tightness. Gently try to rock the handlebars back and forth to check for play in the headset bearings. Ensure handlebar grips are secure.
- Frame: Examine the frame, particularly around the welds and joints, for any cracks, dents, or damage.
- Bottom Bracket and Cranks: Check the cranks for tightness on the bottom bracket axle. Try to move the cranks side to side to feel for play in the bottom bracket bearings. Inspect pedals for secure attachment and smooth rotation.
- Chain and Drivetrain: Look at the chain for rust, stiffness, and lubrication. Inspect the cassette and chainrings for excessive wear. Shift through gears to ensure smooth and accurate shifting.
- Rear Brakes: Move to the rear brakes and repeat the brake lever and pad inspection process as done for the front brakes.
- Rear Wheel: Finally, check the rear wheel in the same way as the front wheel – tyre pressure and condition, wheel security, and trueness.
- Saddle and Seatpost: Ensure the saddle is at the correct height and is securely clamped to the seatpost. Check the seatpost clamp is tight enough to prevent slippage but not over-tightened.
Master the Art of Fixing a Puncture
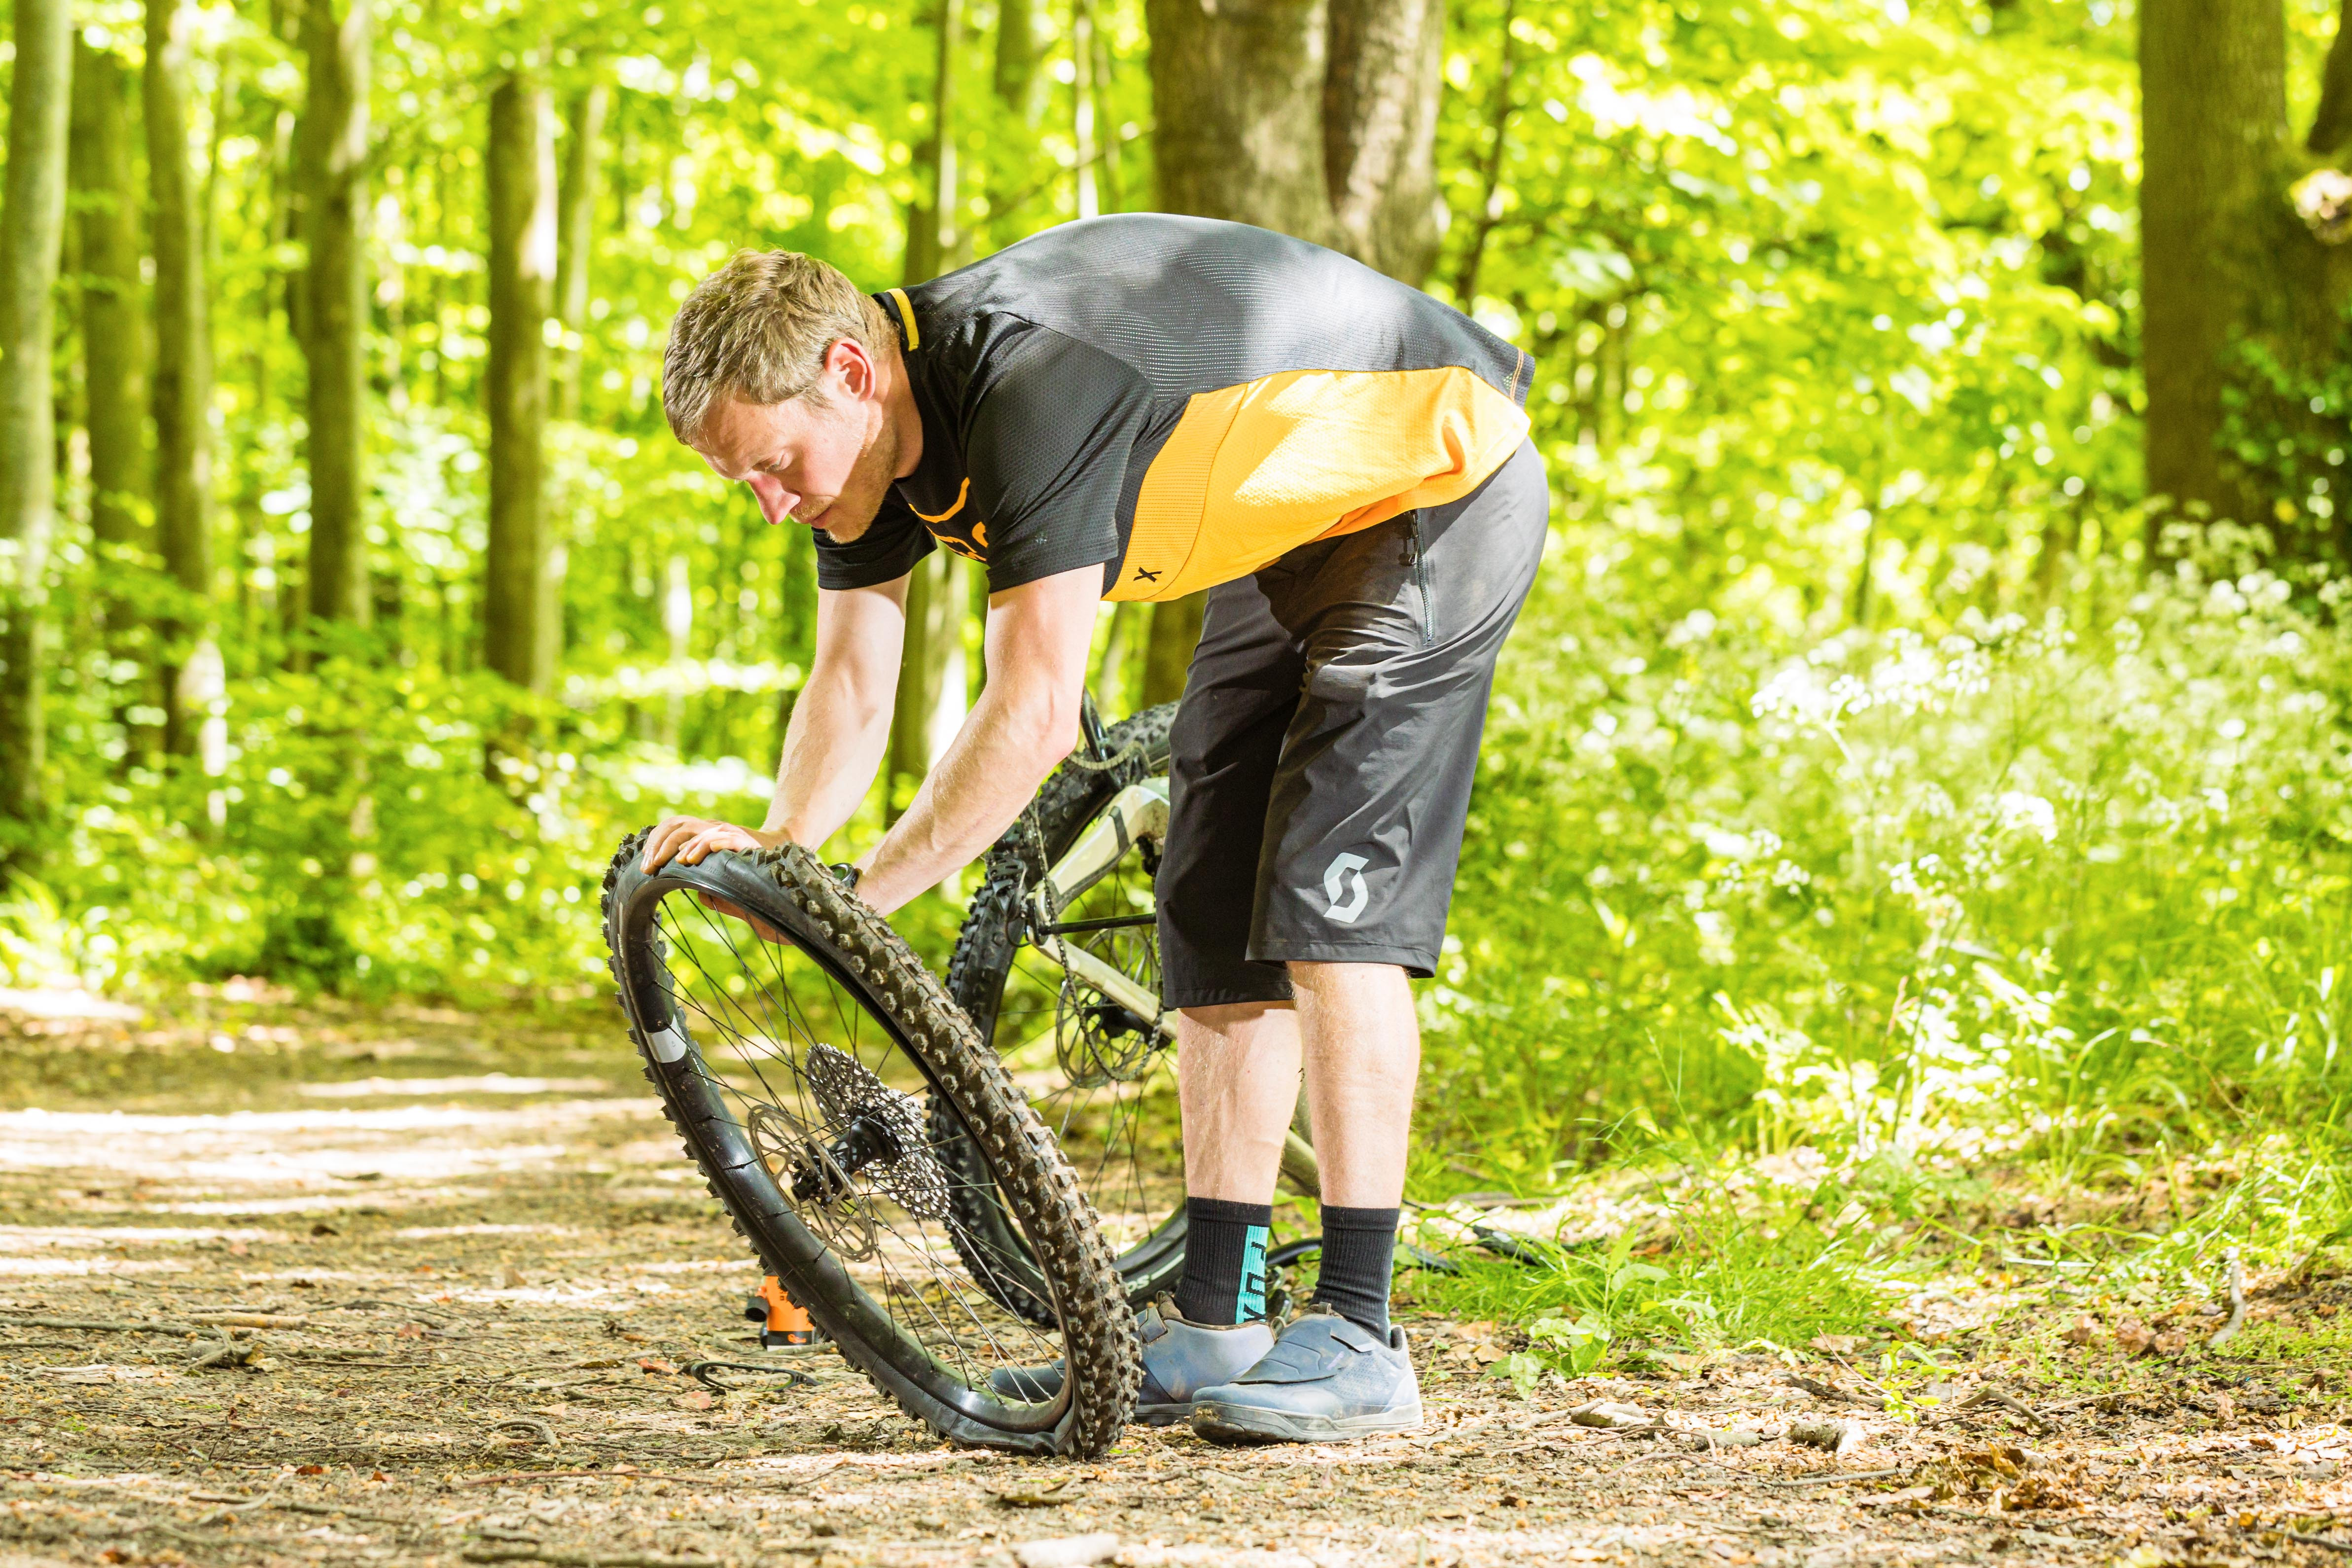 alt=”Cyclist repairing a flat tire on a roadside, using tyre levers to remove the tyre and access the inner tube for puncture repair.”
Punctures are an inevitable part of cycling. Knowing how to fix a puncture is an essential skill that empowers you to handle flat tyres independently, preventing ride interruptions and costly call-outs for assistance. Being self-sufficient in puncture repair means you can quickly get back on your bike and continue your ride, whether you are on a leisurely path or a challenging trail.
At a minimum, always carry a spare inner tube, tyre levers, and a pump on every ride. For longer rides or more remote locations, it’s wise to also carry a puncture repair kit. A repair kit allows you to patch a punctured tube if you experience multiple flats or run out of spare tubes, providing a cost-effective way to get home or to the nearest bike shop. Practice fixing punctures at home in a comfortable setting before you need to do it on the road. This will build your confidence and speed when you face a real puncture situation.
Steps to fix a puncture:
- Safety First: Pull over to a safe location away from traffic.
- Remove the Wheel: Use quick releases or tools to remove the wheel with the puncture.
- Remove the Tyre: Deflate the tyre completely. Use tyre levers to carefully pry one side of the tyre off the rim. Insert a second lever a short distance away and run it around the rim to remove one side of the tyre completely.
- Remove the Inner Tube: Pull out the inner tube from under the tyre. Inspect the tyre for the cause of the puncture (glass, thorn, etc.) and remove it carefully to prevent another flat.
- Inspect the Tube and Tyre: Inflate the tube slightly to locate the puncture by listening for escaping air or using water to spot bubbles. Check the tyre inside and out for any embedded objects that caused the puncture.
- Repair or Replace the Tube: If using a spare tube, inflate it slightly to give it shape and insert it into the tyre, starting at the valve. Carefully push the tyre back onto the rim, starting opposite the valve, using tyre levers if necessary for the last section, being careful not to pinch the tube. If patching, roughen the area around the hole, apply glue, let it become tacky, and apply the patch firmly.
- Inflate the Tyre: Inflate the tyre to the recommended pressure (printed on the tyre sidewall). Check that the tyre is seated correctly in the rim all the way around.
- Reinstall the Wheel: Put the wheel back into the frame or fork, ensuring it is securely fastened.
- Test the Brakes: Check that your brakes are working correctly after reinstalling the wheel before riding off.
Regularly Check Your Bike Tyre Pressure
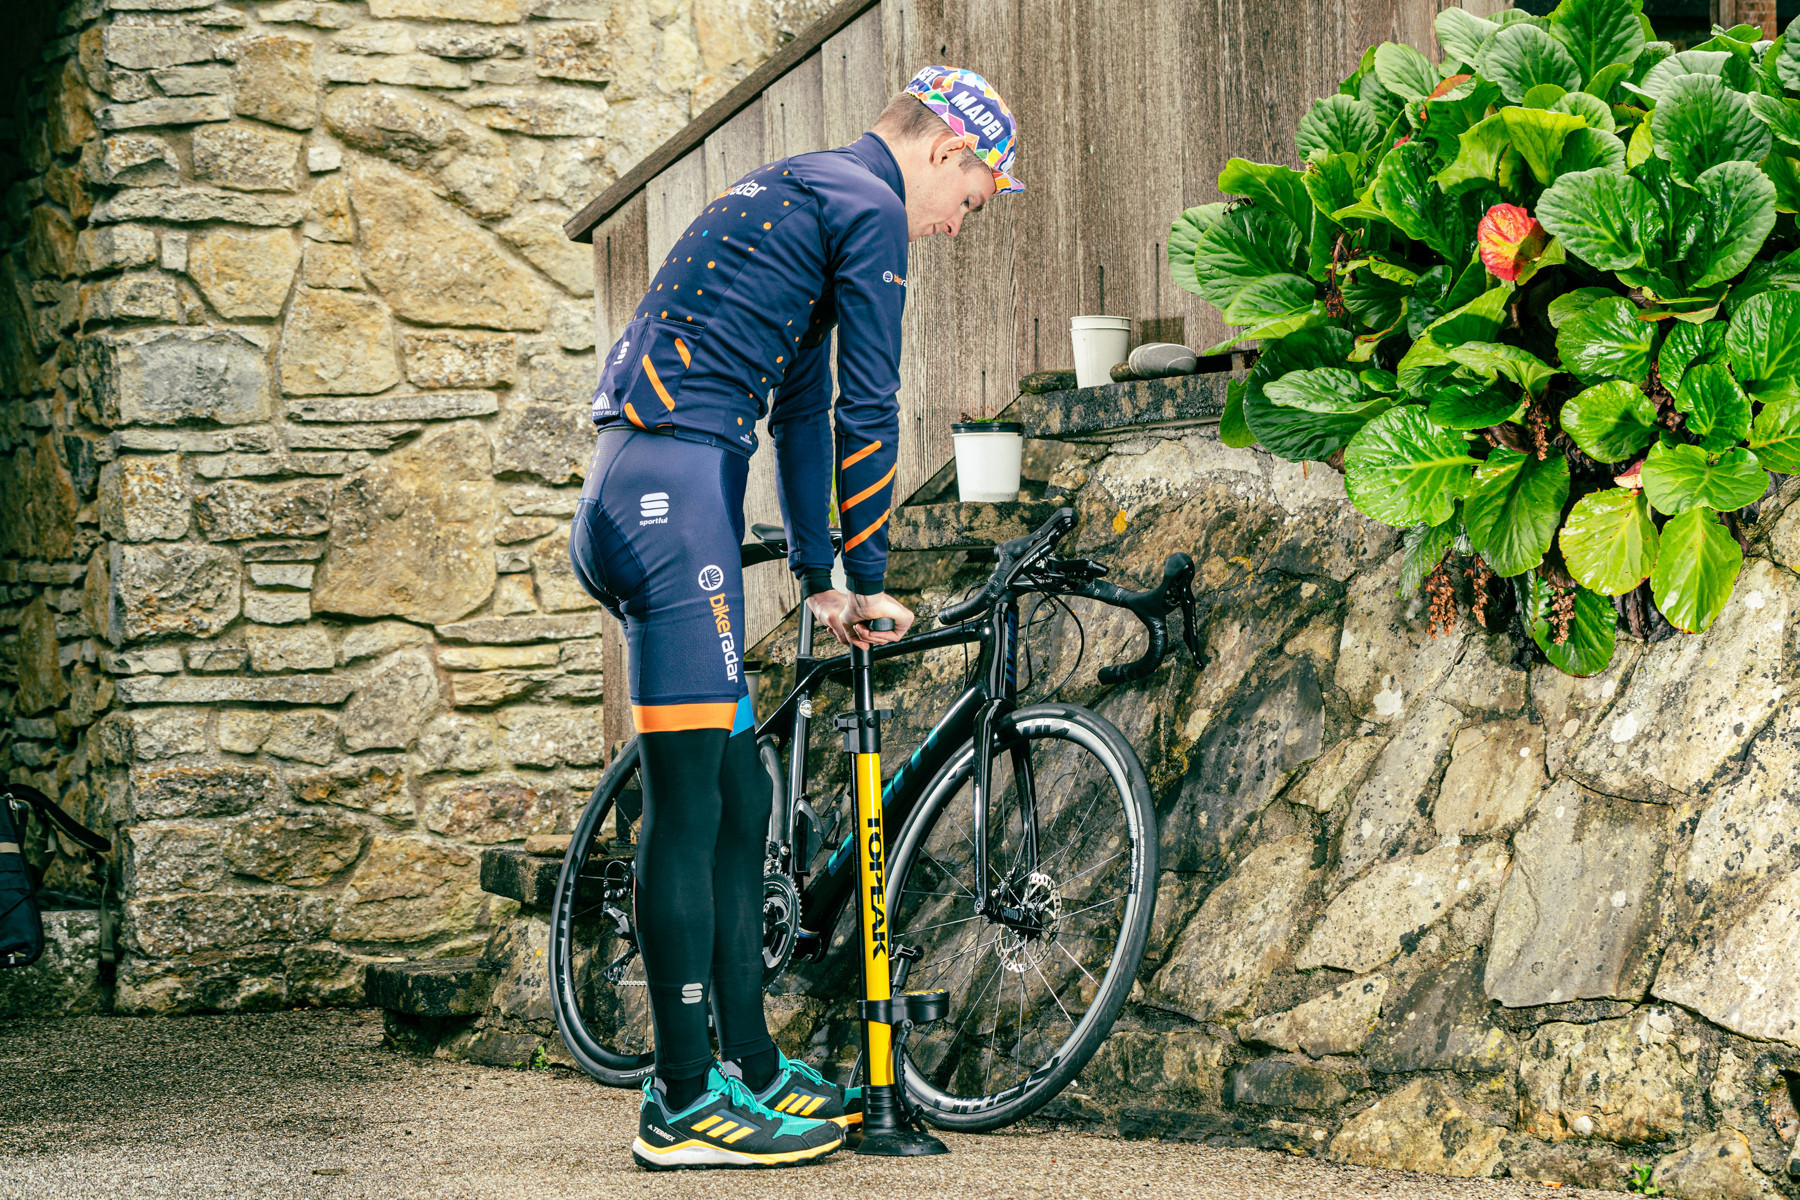 alt=”Cyclist checking tire pressure on a road bike using a floor pump with a gauge, ensuring optimal inflation for the ride.”
Maintaining correct tyre pressure is a fundamental aspect of bike maintenance that significantly impacts ride quality, comfort, efficiency, and puncture resistance. Riding with incorrect tyre pressure, whether too high or too low, is a common mistake that can diminish your cycling experience and potentially damage your tyres or rims. Checking your tyre pressure before each ride is a quick and easy habit that pays dividends in performance and safety.
Under-inflated tyres increase rolling resistance, making you work harder and feel sluggish. They also increase the risk of pinch flats (snakebite punctures) where the tube gets pinched between the rim and the road on impacts. Over-inflated tyres, on the other hand, provide a harsh and uncomfortable ride, reducing grip and potentially leading to skidding, especially on uneven surfaces. Investing in a good quality bike pump with a pressure gauge is essential for accurately inflating your tyres.
How to check and adjust tyre pressure:
- Find Recommended Pressure: Look for the recommended pressure range printed on the sidewall of your tyre. This is usually given in PSI (pounds per square inch) or BAR.
- Use a Pump with Gauge: Use a track pump with a built-in pressure gauge for accurate inflation at home. Some mini-pumps also have gauges, but they are generally less accurate.
- Check Before Each Ride: Before each ride, use your pump to check the tyre pressure. Even if tyres look inflated, they can lose pressure over time.
- Inflate to Recommended Pressure: Inflate your tyres to within the recommended pressure range. You can adjust within this range based on your weight, riding conditions, and personal preference. Lower pressures offer more comfort and grip on rough surfaces, while higher pressures are faster on smooth roads.
- Consider Tyre Pressure Calculators: For more precise pressure recommendations, especially for road bikes, consider using online tyre pressure calculators that take into account your weight, tyre width, and riding conditions.
Keep Your Bike Clean for Optimal Performance
 alt=”Step-by-step guide to cleaning a bicycle, showing various stages from washing the frame to lubricating the chain for maintenance.”
Regular bike cleaning is not just about aesthetics; it’s a vital part of bike maintenance that significantly extends the life of your components and maintains smooth operation. Dirt, grime, road salt, and grit act as abrasives, accelerating wear on moving parts, especially the drivetrain. A clean bike runs more efficiently, shifts smoother, and requires less frequent and costly component replacements.
While cleaning your bike might seem like a chore, it can be a quick and straightforward process if done regularly. Aim to clean your bike at least once a week during the summer and more frequently, ideally after every ride, during the wetter and grittier winter months. Making it a routine, perhaps right after your ride before you relax indoors, makes it less of a burden. Avoid using high-pressure washers directly on bearings as they can force water and degreaser into sealed areas, washing out grease and causing premature wear.
Steps to clean your bike effectively:
- Rinse the Bike: Use a hose with a gentle spray or a bucket of water and sponge to wet the bike and remove loose dirt.
- Apply Bike Cleaner: Use a bike-specific cleaner or mild soapy water. Apply it to the frame, wheels, and components. Let it soak for a few minutes to loosen grime.
- Clean the Drivetrain: Focus on the drivetrain (chain, cassette, chainrings, derailleurs) as it accumulates the most grime. Use a degreaser specifically designed for bike chains. Apply it to the chain and use a chain cleaning tool or brush to scrub away dirt. Let the degreaser work for a few minutes.
- Scrub and Rinse: Use brushes, sponges, or cloths to scrub all parts of the bike, paying attention to hard-to-reach areas. Rinse the bike thoroughly with clean water to remove all cleaner and degreaser.
- Dry the Bike: Use a clean cloth to dry the bike thoroughly. Pay special attention to drying the chain and drivetrain to prevent rust. Air drying in the sun is also effective.
- Lubricate the Chain: Once the chain is dry, apply chain lube to the inside of the chain as you backpedal. Wipe off excess lube with a clean cloth. Choose a lube type appropriate for your riding conditions (wet or dry lube).
Learn to Adjust Your Bike Brakes
 alt=”Close-up of a cyclist adjusting disc brakes on a bike, showing the caliper and rotor, highlighting brake maintenance.”
Brakes are arguably the most critical safety component on your bike. Properly functioning brakes are essential for safe cycling, and learning basic brake adjustments is a key bike maintenance skill. Regularly checking and adjusting your brakes ensures reliable stopping power and prevents potential accidents. Different types of brakes require slightly different maintenance procedures, but the fundamental principles remain the same: ensuring effective engagement, sufficient pad material, and smooth cable or hydraulic operation.
For bikes with rim brakes, regularly inspect brake pad wear and replace them before they become too thin. Check the brake cable for fraying and ensure it has sufficient tension. The brake lever should not pull all the way to the handlebar when applied. For disc brakes, inspect disc brake pad thickness and rotor condition regularly. Disc brakes also benefit from occasional cleaning with a specific disc brake cleaner to remove contamination and prevent squealing.
Basic brake adjustment tips:
- Rim Brakes Adjustment:
- Centering: Ensure brake arms are centered over the rim. Adjust centering screws if necessary.
- Pad Clearance: Adjust cable tension or barrel adjusters to set the brake pad clearance – the distance between the pads and the rim when brakes are not applied. It should be minimal but without rubbing.
- Cable Tension: Adjust cable tension using the barrel adjuster to fine-tune brake lever feel and responsiveness.
- Disc Brakes Adjustment:
- Pad Wear Inspection: Check pad thickness regularly. Replace pads when they are worn down to the minimum indicated level.
- Caliper Alignment: Ensure the caliper is aligned correctly over the rotor to prevent rubbing. Loosen caliper bolts slightly, spin the wheel, apply the brake and hold, then retighten bolts.
- Brake Bleeding (Hydraulic Brakes): For hydraulic disc brakes, occasional bleeding may be necessary to remove air bubbles from the system and maintain optimal performance. This is a more advanced task, often best done by a bike shop or with specific bleed kits and knowledge.
Index Your Bike Gears for Smooth Shifting
 alt=”Mechanic indexing gears on a bicycle, adjusting the derailleur and shifter to ensure smooth and accurate gear changes.”
Properly indexed gears are essential for efficient and enjoyable cycling. Gear indexing refers to the adjustment of your derailleurs so that gear changes are smooth, precise, and quiet. Over time, cables can stretch, and components can shift slightly, leading to mis-shifting, chain skipping, or noisy gear changes. Learning to index your gears is a valuable bike maintenance skill that keeps your drivetrain performing optimally.
Gear indexing adjustments are primarily done using barrel adjusters, which are typically located on the derailleurs, shifters, or in-line along the cable housing. These adjusters change cable tension, which in turn affects how the derailleurs move the chain across the cassette and chainrings. Start by identifying the barrel adjuster related to the derailleur you need to adjust (rear or front). Small adjustments are usually sufficient to resolve most indexing issues.
Steps to index your gears:
- Start with the Rear Derailleur: Shift the chain to the smallest cog (highest gear) on the rear cassette.
- Check Cable Tension: Inspect the rear derailleur cable. It should have slight tension but not be overly tight.
- Adjust Barrel Adjuster (Rear): If the chain is hesitating to shift up to larger cogs (lower gears) or shifting is slow, turn the rear derailleur barrel adjuster counter-clockwise (outward) to increase cable tension. If the chain is shifting too far or too quickly, or is noisy in certain gears, turn the barrel adjuster clockwise (inward) to decrease tension. Make small adjustments and test shifting after each adjustment.
- Shift Through Gears: After each adjustment, shift through the gears to check if shifting is smoother and more accurate. Listen for smooth transitions between cogs without hesitation or noise.
- Adjust Limit Screws (If Necessary): Limit screws (usually marked ‘H’ for high gear and ‘L’ for low gear on the rear derailleur) set the derailleur’s range of motion. Only adjust these if the chain is falling off the cassette into the spokes (low limit screw) or off the smallest cog (high limit screw). Limit screw adjustments are usually only needed if there are significant shifting problems or after derailleur replacement.
- Front Derailleur Indexing: Front derailleur indexing is similar but often more sensitive. Adjust the barrel adjuster on the front shifter or derailleur to fine-tune front shifting, ensuring the chain shifts smoothly between chainrings without rubbing the derailleur cage in different gears.
Regularly Check Your Bike Chain for Wear
 alt=”Close-up of a chain checker tool measuring bike chain wear, indicating when a chain replacement is needed for bike maintenance.”
The bike chain is a critical component that endures significant stress and wear. Over time, chain links stretch due to friction and load. A worn chain not only leads to poor shifting performance but also accelerates wear on the cassette and chainrings. Regularly checking your chain for wear and replacing it when necessary is a cost-effective bike maintenance practice that prevents more expensive drivetrain replacements down the line.
Investing in a chain checker tool (chain wear indicator) is a small investment that can save you a lot of money in the long run. These tools accurately measure chain stretch and indicate when it’s time for replacement. Replacing a chain before it’s excessively worn prevents it from damaging the more expensive cassette and chainrings, significantly extending the life of your entire drivetrain.
How to check chain wear:
- Use a Chain Checker Tool: Place the chain checker tool on the chain as directed by the tool’s instructions. Most tools have two ends; one end will indicate if the chain is at 0.5% wear, and the other at 0.75% or 1% wear, depending on the tool and your drivetrain type.
- Check for Wear Percentage: If the tool indicates 0.5% wear, it’s usually time to consider replacing the chain, especially for 11 or 12-speed drivetrains which are more sensitive to chain wear. If it indicates 0.75% or 1% wear, chain replacement is definitely needed to prevent damage to the cassette and chainrings.
- Frequency of Checking: Check your chain for wear regularly, especially if you ride frequently or in harsh conditions. A good interval is every month or every few hundred miles, depending on your riding habits.
- Chain Replacement: When the chain checker indicates it’s time, replace the chain with a new chain of the correct type and speed for your drivetrain. Replacing the chain is a straightforward task with a chain breaker and chain quick link.
Learn How to Fix a Broken Bike Chain
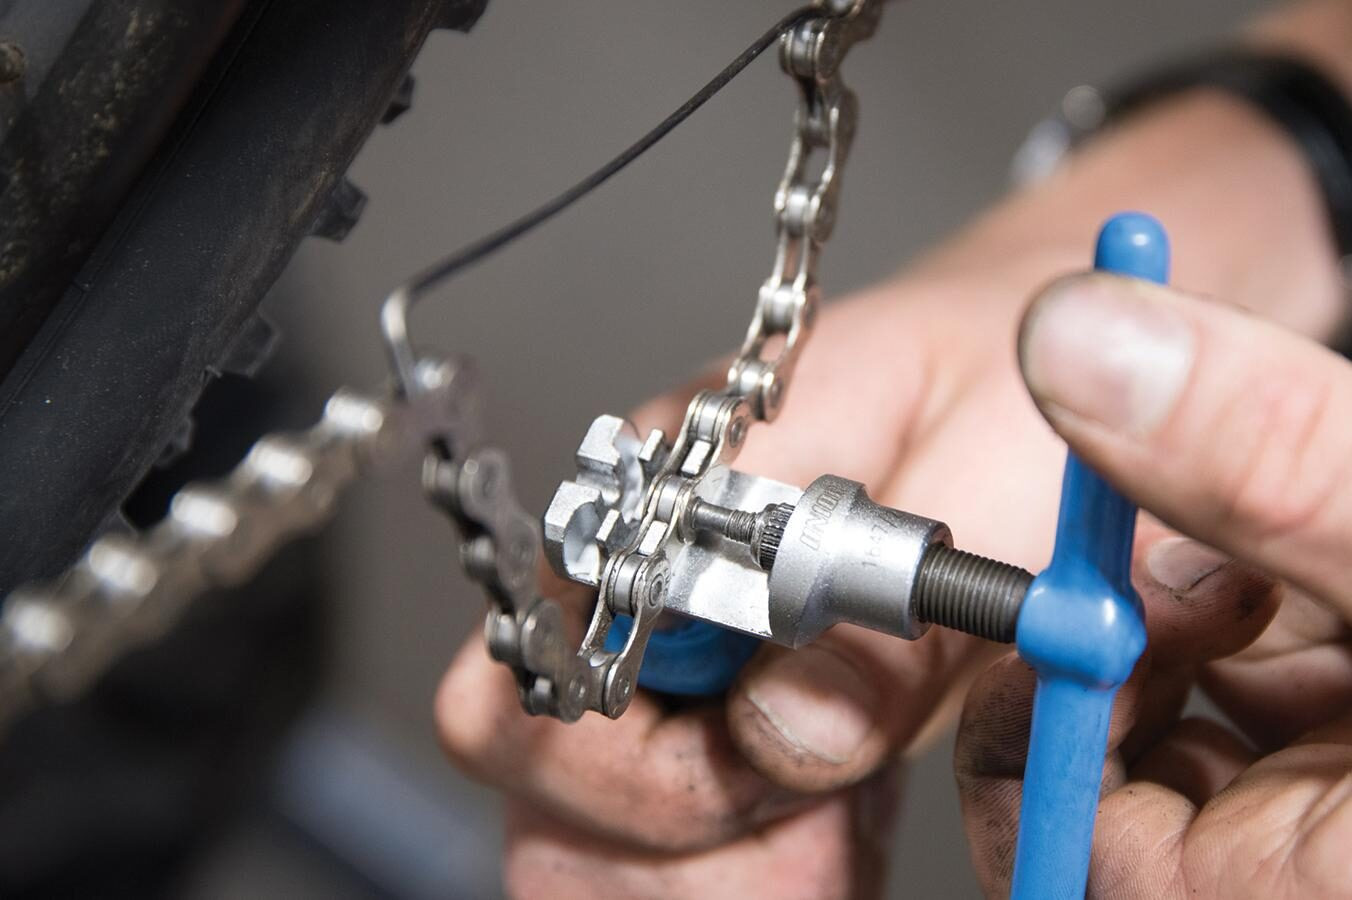 alt=”Cyclist repairing a broken bike chain on a trail, using a chain breaker tool to rejoin the chain for emergency bike maintenance.”
A broken chain can happen unexpectedly, often at the most inconvenient time. However, a broken chain doesn’t have to end your ride if you are prepared with the right tools and knowledge. Knowing how to fix a broken chain is a valuable skill for any cyclist, allowing you to perform a trailside repair and get back home or to a place where you can make a more permanent fix.
Carrying a multi-tool with a chain breaker function and spare chain quick links or chain pins is essential for dealing with broken chains on the road or trail. Quick links are generally easier to use than chain pins for trailside repairs. If the chain breaks cleanly without bent links, you can often rejoin it using a quick link or chain pin. If links are bent or damaged, you may need to remove the damaged section of the chain, effectively shortening it to get you home. A shortened chain may not work through all gears, but it should allow you to pedal and get back to safety.
Steps to fix a broken chain on the trail:
- Assess the Damage: Examine the broken chain. If links are bent or severely damaged, you may need to remove them. If the break is clean, you can rejoin the existing chain.
- Use a Chain Breaker Tool: Position the chain breaker tool on the chain at the broken point or at a link you need to remove if damaged. Follow the tool instructions to push out the chain pin and separate the chain.
- Remove Damaged Links (If Necessary): If links are bent, use the chain breaker to remove the damaged section of the chain.
- Rejoin the Chain: Use a spare chain quick link or chain pin to rejoin the chain. If using a quick link, insert each end of the chain into the quick link halves and then use hand pressure or the chain breaker tool to press the quick link together until it clicks into place. If using a chain pin, carefully align the chain ends and use the chain breaker to push the new pin through the links to rejoin the chain. Be careful not to push the pin too far.
- Check the Repair: Ensure the repaired chain section moves freely and smoothly.
- Test Ride Carefully: Pedal gently and test the repaired chain, especially when shifting gears. Be aware that a shortened chain or a chain repaired with a quick link may not be as strong as a new chain, so ride cautiously and plan to replace the chain properly as soon as possible.
Consider Attending a Bike Maintenance Class
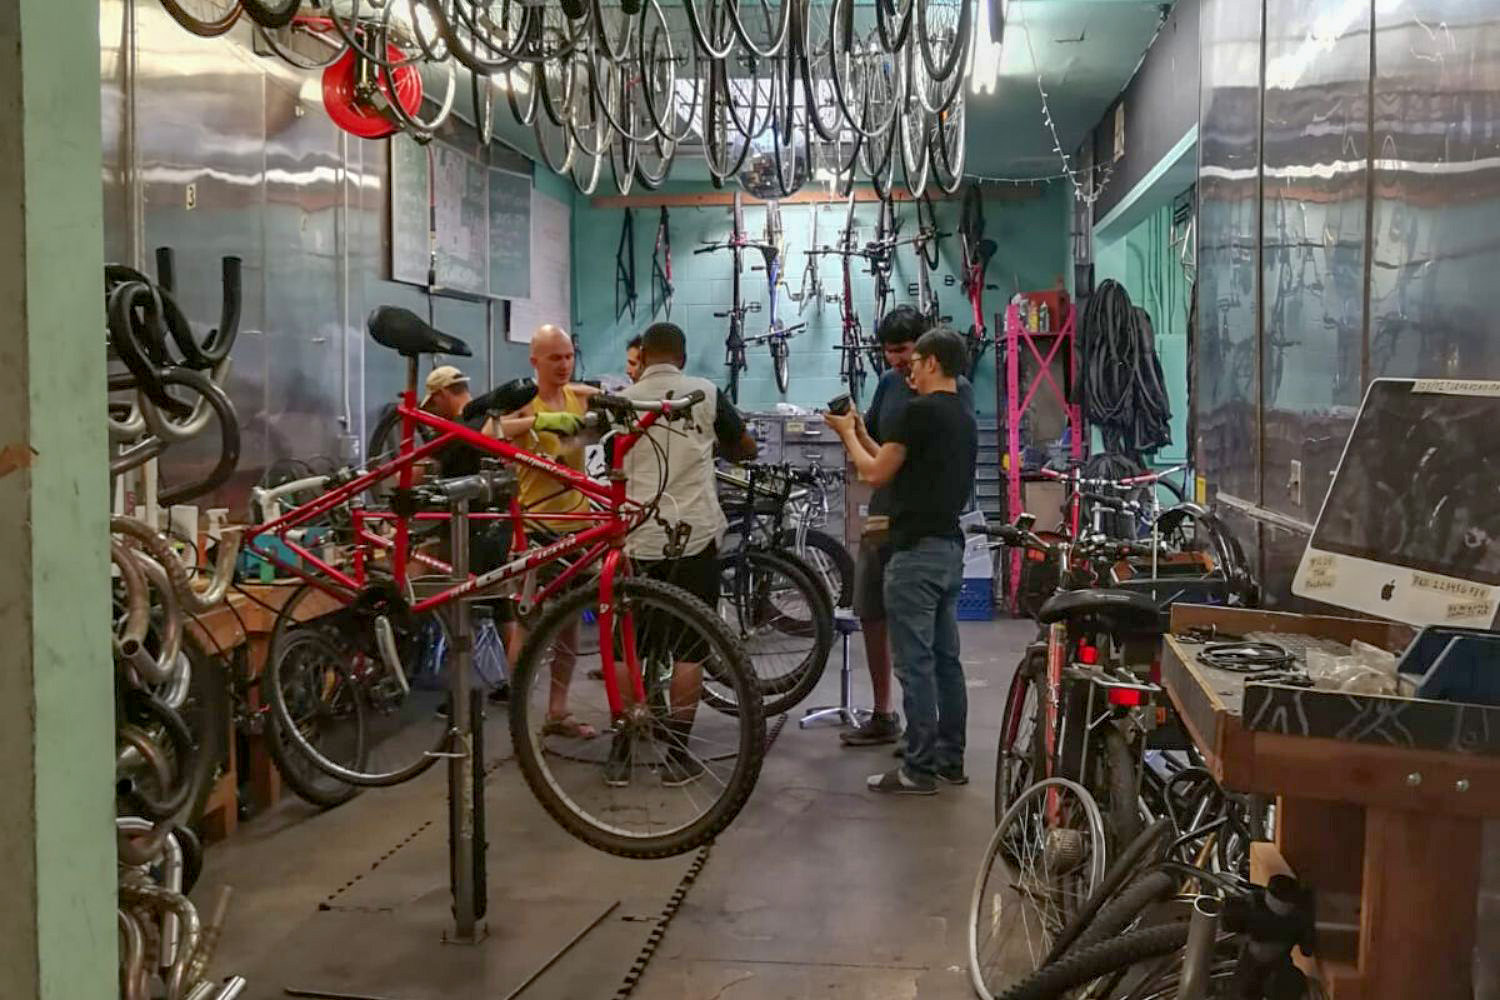 alt=”Participants in a bike maintenance class learning hands-on bicycle repair skills from an instructor in a workshop setting.”
For cyclists looking to deepen their understanding of bike maintenance and gain hands-on skills, attending a bike maintenance class is an excellent option. Bike maintenance classes offer structured learning environments where experienced mechanics guide you through various maintenance tasks, from basic to more advanced procedures. These classes are beneficial for all levels of cyclists, from beginners wanting to learn the basics to experienced riders looking to refine their skills or learn specific techniques like hydraulic brake bleeding or wheel truing.
Local bike shops, community cycling centers, and cycling clubs often host bike maintenance classes. These classes typically cover topics like puncture repair, brake and gear adjustments, chain maintenance, basic bike safety checks, and sometimes more advanced topics like wheel truing or bearing service. The hands-on nature of these classes allows you to practice under supervision, ask questions, and gain confidence in your ability to maintain your bike. Many classes also offer valuable insights, tips, and tricks that can improve your maintenance efficiency and effectiveness.
Benefits of attending a bike maintenance class:
- Hands-on Learning: Practical experience under the guidance of experienced mechanics.
- Structured Curriculum: Learn maintenance tasks in a logical and progressive manner.
- Expert Advice: Get direct answers to your specific bike maintenance questions.
- Skill Development: Build confidence and competence in performing your own bike maintenance.
- Community Connection: Meet other cyclists and learn in a collaborative environment.
- Cost Savings: Gain skills to perform regular maintenance yourself, saving on bike shop service costs in the long run.
By mastering these essential bike maintenance tips, you’ll not only keep your bike running smoothly and safely but also deepen your connection with your machine and the joy of cycling. Regular maintenance is an investment in your cycling experience, ensuring more enjoyable rides and fewer unexpected mechanical issues.