Changing the inner tube on your bike is a fundamental skill for any motorcycle enthusiast, and at usabikers.net, we are here to guide you through the process with ease. This comprehensive guide will equip you with the knowledge and confidence to tackle this task, ensuring you spend more time on the road enjoying the ride. Learn about motorcycle maintenance, biking safety, and the best biker accessories.
1. What Tools Do I Need To Change A Bike Inner Tube?
The essential tools you need to change a bike inner tube include tire levers, a pump, and a new inner tube that matches your tire size and valve type. Quality tire levers prevent damage to your rims, while a good pump makes inflation easier. Always carry these tools with you on rides.
Expanding on this, let’s dive deeper into each tool and its importance:
- Tire Levers: While some experienced riders can remove tires without levers, they are invaluable for most. Look for sturdy levers made from durable plastic to avoid damaging your rims, especially if you have carbon rims. Metal levers are generally not recommended due to the risk of scratching or denting the rim.
- Pump: A reliable pump is crucial for inflating your tires to the correct pressure. For lower pressures (below 60 psi), a hand pump might suffice, particularly for gravel bikes. However, for higher pressures, a track pump (also known as a floor pump) with a gauge is highly recommended. This ensures accurate inflation, which is essential for optimal performance and safety.
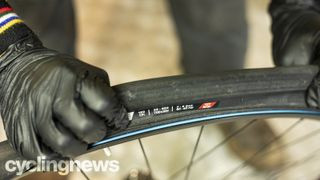
- Inner Tube: The new inner tube must be the correct size for your tire. Check the sidewall of your tire for the size information (e.g., 700x25c). Additionally, ensure the valve type (Presta or Schrader) and valve length match your rim and original tube. Using the wrong size or valve type can lead to improper inflation or even damage to the tube and rim.
It’s also a good idea to carry a multi-tool that includes Allen wrenches and other useful tools for roadside repairs. A patch kit can also be a valuable addition for minor punctures, allowing you to extend the life of your inner tubes and save money. Regularly inspect your tools to ensure they are in good working condition.
2. How To Remove A Bike Inner Tube?
To remove a bike inner tube, start by deflating the tire completely, unseating the tire from the rim, and using tire levers to carefully pry one side of the tire off the rim. Once one side is off, you can remove the inner tube. Inspect the tire for any sharp objects before installing a new tube.
Here’s a step-by-step breakdown:
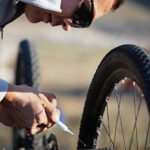
- Deflate the Tire: Use a valve tool or the cap of the valve to depress the valve core and release all air from the tube. Ensure the tire is completely flat before proceeding.
- Unseat the Tire: Work the tire bead (the edge of the tire that sits in the rim) away from the rim wall all the way around the tire on both sides. This creates slack and makes it easier to remove the tire.
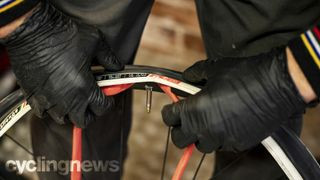
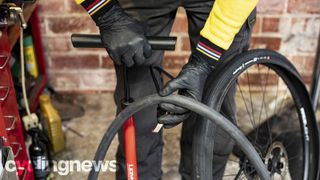
- Use Tire Levers: Insert one tire lever under the bead of the tire, hooking it onto a spoke. Insert a second lever a few inches away and pry that section of the tire off the rim. With one section of the tire off the rim, you can usually run one lever around the rim to remove the rest of that side of the tire.
- Remove the Inner Tube: Once one side of the tire is completely off the rim, gently pull the inner tube out, starting at the valve.
- Inspect the Tire: Before installing a new tube, thoroughly inspect the inside of the tire for any sharp objects, such as glass, thorns, or metal shards. Carefully run your fingers along the inside of the tire to feel for anything that could cause a puncture. Remove any debris you find.
- Check the Rim: Inspect the rim for any damage, such as cracks, dents, or sharp edges, that could damage the inner tube.
Consider these additional tips:
- If you are having difficulty unseating the tire, use a tire bead jack or pliers specifically designed for this purpose.
- When using tire levers, be gentle to avoid pinching the inner tube or damaging the rim.
- Always carry spare tire levers and inner tubes when you ride.
 Bike Tire Lever Technique
3. What Is The Best Way To Unseat A Bike Tire From The Rim?
The best way to unseat a bike tire from the rim is to squeeze the tire inwards, pushing the bead towards the center of the rim. Do this around the entire circumference of the tire on both sides. This creates slack and makes it easier to use tire levers.
Here are some techniques:
- Manual Unseating: Use your hands to firmly press the tire inwards towards the center of the rim. Start at the valve and work your way around the tire, applying consistent pressure. You should hear a slight “pop” as the bead releases from the rim wall.
- Using a Tire Bead Jack: A tire bead jack is a tool specifically designed to unseat stubborn tires. Place the tool on the tire and rim, and use the lever to push the tire bead away from the rim wall.
- Kneeling Technique: Place the wheel on the ground and kneel on the tire, using your body weight to push the tire bead inwards. This can provide more leverage and force for difficult tires.
Additional Tips:
- Make sure the tire is fully deflated before attempting to unseat it.
- If the tire is particularly tight, try using warm water to soften the rubber.
- Work in a clean area to avoid getting dirt or debris inside the tire.
Remember, patience and technique are key. Avoid using excessive force, which can damage the tire or rim.
4. How To Remove A Bike Tire By Hand Without Levers?
To remove a bike tire by hand without levers, deflate the tire completely and use your hands to push the tire bead towards the center of the rim. Create slack by working the tire around the rim, then use your thumbs to push the tire over the edge of the rim. This requires practice and strength.
Here’s how to do it:
- Deflate the Tire Completely: Ensure all air is out of the tube.
- Unseat the Tire: Squeeze the tire inwards towards the center of the rim, working around the entire circumference.
- Create Slack: Use your hands to move the tire around the rim, creating as much slack as possible at one point.
- Push the Tire Over the Rim: Use your thumbs to push the tire bead over the edge of the rim. Start at the point where you have the most slack.
- Work the Tire Off: Once you have a section of the tire off the rim, continue to work your thumbs around the tire, pushing the rest of the bead over the edge.
Tips for Success:
- This technique works best with tires that are not too tight on the rim.
- Practice makes perfect. The more you try, the easier it will become.
- Warm tires are generally easier to remove than cold tires.
If you are unable to remove the tire by hand, don’t hesitate to use tire levers. They are designed to make the process easier and prevent damage to your bike.
 Removing Bike Tire By Hand
5. How Do Tire Levers Help In Removing A Bike Tire?
Tire levers help in removing a bike tire by providing leverage to lift the tire bead over the rim edge. They are inserted under the tire bead and then used to pry the tire off the rim. Using multiple levers can make the process easier, especially for tight tires.
Here’s how to effectively use tire levers:
- Insert the First Lever: Insert one tire lever under the bead of the tire, hooking it onto a spoke.
- Insert the Second Lever: Insert a second lever a few inches away from the first.
- Pry the Tire Off: Use the second lever to pry that section of the tire off the rim.
- Use Multiple Levers (If Needed): If the tire is tight, you may need to use additional levers to gradually work the tire off the rim.
- Run One Lever Around the Rim: Once a section of the tire is off, you can often run one lever around the rim to remove the rest of that side of the tire.
Tips for Using Tire Levers:
- Be gentle to avoid pinching the inner tube or damaging the rim.
- Use quality tire levers that are strong and durable.
- Avoid using metal levers on carbon rims, as they can cause damage.
Tire levers are an essential tool for any cyclist. Carrying them with you on rides can save you from being stranded with a flat tire.
6. What Should I Inspect After Removing The Inner Tube?
After removing the inner tube, inspect the tire for any sharp objects or damage that may have caused the puncture, and check the rim for any cracks or sharp edges. Removing these hazards prevents future flats. Also, ensure the tire is properly seated on the rim before inflating the new tube.
Here’s a detailed checklist:
- Inspect the Tire:
- Visual Inspection: Look for any cuts, embedded objects (glass, thorns, metal shards), or signs of wear and tear.
- Tactile Inspection: Carefully run your fingers along the inside of the tire to feel for any sharp objects that may be embedded in the rubber.
- Check the Rim:
- Rim Tape/Strip: Ensure the rim tape or strip is properly covering the spoke holes. If it is damaged or misaligned, replace it.
- Rim Edges: Check for any cracks, dents, or sharp edges that could damage the inner tube.
- Inspect the Old Inner Tube:
- Locate the Puncture: Inflate the old inner tube to find the puncture. This can help you identify the cause of the flat.
- Match Puncture to Tire/Rim: Once you find the puncture, check the corresponding area of the tire and rim for any issues.
- Check Tire Seating:
- Ensure Proper Alignment: Before inflating the new tube, make sure the tire is properly seated on the rim. The tire bead should be evenly spaced around the rim.
Additional Tips:
- Carry a small flashlight to help you see inside the tire.
- Use a magnifying glass to inspect the tire for small objects.
- Replace your rim tape/strip regularly to prevent punctures.
By thoroughly inspecting the tire and rim, you can identify and address potential issues before they cause another flat.
7. How Do I Fit A Fresh Inner Tube On My Bike?
To fit a fresh inner tube on your bike, start by slightly inflating the tube to give it some shape. Insert the valve into the rim hole, then carefully tuck the tube inside the tire, ensuring it’s not twisted or pinched. Finally, seat the tire back onto the rim, starting opposite the valve.
Here’s a step-by-step guide:
- Slightly Inflate the Tube: Inflate the inner tube just enough to give it some shape. This will help prevent it from getting pinched between the tire and rim.
- Insert the Valve: Insert the valve into the valve hole in the rim. Make sure the valve is straight and fully seated.
- Tuck the Tube Inside the Tire: Carefully tuck the inner tube inside the tire, working your way around the rim. Ensure the tube is evenly distributed and not twisted or pinched.
- Seat the Tire: Start seating the tire back onto the rim opposite the valve. Use your thumbs to push the tire bead over the edge of the rim.
- Work Your Way Around the Rim: Continue working your thumbs around the rim, gradually seating the tire. If the tire is tight, you may need to use tire levers to help get the last section of the tire over the rim.
- Check for Pinches: Before fully inflating the tire, double-check that there are no pinches or bulges in the inner tube.
- Inflate the Tire: Inflate the tire to the recommended pressure, as indicated on the tire sidewall.
Tips for Success:
- Use talcum powder on the inner tube to help it slide inside the tire more easily.
- When seating the tire, start opposite the valve to ensure even distribution.
- Be careful not to pinch the inner tube with tire levers.
Fitting a fresh inner tube can be quick and easy with the right technique. Practice makes perfect.
 Fitting Fresh Inner Tube
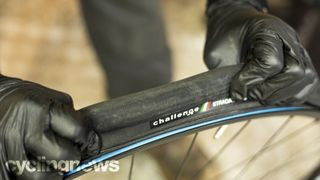
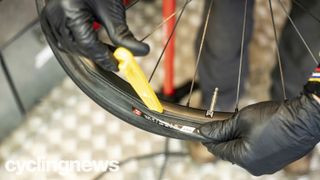
8. Why Should I Align The Tire Logo With The Valve?
Aligning the tire logo with the valve is a useful practice because it makes it easier to locate the valve quickly, provides a reference point for finding punctures, and gives the bike a cleaner, more professional look. While not essential, it’s a simple touch that many cyclists appreciate.
Here are the benefits:
- Easy Valve Location: Aligning the tire logo with the valve makes it easier to find the valve when you need to inflate the tire.
- Puncture Reference Point: If you get a flat, you can use the logo as a reference point to help locate the puncture in the tire.
- Aesthetics: Aligning the logo with the valve gives the bike a cleaner, more professional appearance.
While aligning the tire logo with the valve is not critical for performance or safety, it is a simple and effective way to improve the overall look and functionality of your bike.
9. How Much Should I Inflate The Inner Tube Before Fitting?
You should inflate the inner tube just enough to give it some shape before fitting, typically until it feels slightly firm. This helps prevent it from getting pinched between the tire and rim during installation and makes it easier to handle.
Here are the benefits:
- Prevents Pinches: A slightly inflated tube is less likely to get pinched between the tire and rim, which can cause a flat.
- Easier Handling: A slightly inflated tube is easier to handle and position inside the tire.
- Even Distribution: A slightly inflated tube is more likely to distribute evenly inside the tire, which helps prevent bulges and uneven wear.
How much to inflate:
- Inflate the tube until it feels slightly firm to the touch.
- You should be able to easily insert the valve into the valve hole in the rim without the tube collapsing.
- Avoid over-inflating the tube, as this can make it difficult to seat the tire on the rim.
Inflating the inner tube to the proper pressure before fitting is a simple step that can save you time and frustration.
 Inflating Inner Tube
10. How Do I Seat The Second Side Of The Bike Tire?
To seat the second side of the bike tire, start opposite the valve and use your thumbs to push the tire bead over the rim. Work your way around the tire, using tire levers if needed for tight spots. Ensure the inner tube is not pinched between the tire and rim.
Here’s a detailed guide:
- Start Opposite the Valve: Begin seating the tire on the rim opposite the valve.
- Use Your Thumbs: Use your thumbs to push the tire bead over the edge of the rim. Apply firm, consistent pressure.
- Work Your Way Around the Tire: Continue working your thumbs around the tire, gradually seating the tire on the rim.
- Use Tire Levers (If Needed): If the tire is tight, you may need to use tire levers to help get the last section of the tire over the rim. Insert the levers carefully under the tire bead and gently pry the tire over the rim.
- Ensure No Pinches: Before fully seating the tire, double-check that there are no pinches or bulges in the inner tube.
- Final Check: Once the tire is fully seated, inspect the tire to ensure it is evenly spaced around the rim. The tire bead should be visible and consistent.
Tips for Success:
- Use talcum powder on the inner tube to help it slide inside the tire more easily.
- When seating the tire, start opposite the valve to ensure even distribution.
- Be careful not to pinch the inner tube with tire levers.
Seating the second side of the bike tire can be challenging, but with the right technique and a little patience, you can get it done quickly and easily.
11. When Should I Use Tire Levers To Seat A Bike Tire?
You should use tire levers to seat a bike tire when you cannot get the last section of the tire over the rim using your thumbs alone. This is common with tight-fitting tires. Use the levers carefully to avoid pinching the inner tube.
Here’s when and how to use them effectively:
- Difficulty with Thumbs Alone: If you are unable to get the last section of the tire over the rim using your thumbs alone, it’s time to use tire levers.
- Tight-Fitting Tires: Some tires are designed to fit very tightly on the rim, making it difficult to seat them without levers.
- Using Tire Levers: Insert the levers carefully under the tire bead and gently pry the tire over the rim. Work your way around the tire, using multiple levers if needed.
Tips for Using Tire Levers:
- Be gentle to avoid pinching the inner tube or damaging the rim.
- Use quality tire levers that are strong and durable.
- Avoid using metal levers on carbon rims, as they can cause damage.
Tire levers are an essential tool for any cyclist. Carrying them with you on rides can save you from being stranded with a flat tire.
 Seating Bike Tire With Tire Levers
12. What Are The Final Checks After Fitting A New Inner Tube?
After fitting a new inner tube, the final checks include ensuring the tire is properly seated on the rim, checking for any bulges or pinches in the tube, and inflating the tire to the recommended pressure. Spin the wheel to check for alignment and ensure a smooth ride.
Here’s a detailed checklist:
- Tire Seating:
- Visual Inspection: Inspect the tire to ensure it is evenly spaced around the rim. The tire bead should be visible and consistent.
- Listen for Clicks: As you inflate the tire, listen for clicks or pops as the tire bead seats properly on the rim.
- Check for Bulges or Pinches:
- Visual Inspection: Look for any bulges or pinches in the inner tube. These can indicate that the tube is not properly seated or that it has been damaged.
- Inflate to Recommended Pressure:
- Check Tire Sidewall: Refer to the tire sidewall for the recommended pressure range.
- Use a Gauge: Use a reliable pump with a gauge to inflate the tire to the correct pressure.
- Spin the Wheel:
- Check for Alignment: Spin the wheel to check for alignment. The wheel should spin smoothly and evenly.
- Listen for Rubbing: Listen for any rubbing or scraping sounds, which can indicate that the tire is not properly seated or that the wheel is out of true.
Additional Tips:
- After your first ride, check the tire pressure again to ensure it has not dropped.
- Regularly inspect your tires for wear and tear, and replace them as needed.
By performing these final checks, you can ensure that your new inner tube is properly installed and that your bike is safe to ride.
13. How Important Is Tire Pressure For Bike Safety?
Tire pressure is extremely important for bike safety. Proper inflation ensures optimal grip, reduces the risk of punctures, and improves rolling efficiency. Under-inflated tires can lead to poor handling and pinch flats, while over-inflated tires can reduce grip and increase the risk of blowouts.
Here’s why tire pressure matters:
- Optimal Grip: Proper tire pressure ensures that the tire has the correct contact patch with the road, providing optimal grip for cornering and braking.
- Reduces Puncture Risk: Properly inflated tires are less likely to get pinch flats, which occur when the tire is compressed against the rim, pinching the inner tube.
- Improved Rolling Efficiency: Properly inflated tires roll more efficiently, reducing rolling resistance and making it easier to maintain speed.
- Handling: Correct tire pressure ensures stable and predictable handling.
- Prevents Blowouts: Over-inflating tires can increase the risk of blowouts, which can be dangerous, especially at high speeds.
Tips for Maintaining Proper Tire Pressure:
- Check the tire sidewall for the recommended pressure range.
- Use a reliable pump with a gauge to inflate the tire to the correct pressure.
- Check your tire pressure before each ride.
- Adjust your tire pressure based on your weight, riding conditions, and tire type.
Maintaining proper tire pressure is one of the most important things you can do to ensure your safety and enjoy your ride.
 Inflating Bike Tire Pressure
14. What Are The Different Types Of Bike Tire Valves?
The different types of bike tire valves are Presta and Schrader. Presta valves are narrow and typically found on road bikes, requiring a special pump adapter. Schrader valves are wider and similar to those on car tires, making them compatible with standard gas station pumps.
Here’s a breakdown of the two valve types:
- Presta Valves:
- Narrow Design: Presta valves are narrower than Schrader valves, making them lighter and more aerodynamic.
- Locking Nut: Presta valves have a locking nut that must be loosened before inflating and tightened after inflating.
- Special Pump Adapter: Presta valves require a special pump adapter to inflate them.
- Common on Road Bikes: Presta valves are commonly found on road bikes and high-performance bikes.
- Schrader Valves:
- Wider Design: Schrader valves are wider than Presta valves, making them more durable and easier to use.
- Spring-Loaded Core: Schrader valves have a spring-loaded core that opens when the pump is attached and closes when the pump is removed.
- Compatible with Standard Pumps: Schrader valves are compatible with standard gas station pumps, making them convenient to inflate.
- Common on Mountain Bikes and Hybrid Bikes: Schrader valves are commonly found on mountain bikes, hybrid bikes, and kids’ bikes.
Choosing the Right Valve:
- The type of valve you need depends on your rim and your personal preference.
- If your rim has a narrow valve hole, you will need to use a Presta valve.
- If your rim has a wider valve hole, you can use either a Presta or a Schrader valve.
Understanding the different types of bike tire valves can help you choose the right tube for your bike and ensure that you have the proper pump and adapter for inflation.
15. How Do I Prevent Future Bike Tire Punctures?
To prevent future bike tire punctures, maintain proper tire pressure, inspect tires regularly for wear and debris, use tire liners or sealant, and avoid riding through hazardous areas. These practices will significantly reduce the likelihood of flats.
Here are detailed strategies:
- Maintain Proper Tire Pressure:
- Check Tire Sidewall: Refer to the tire sidewall for the recommended pressure range.
- Use a Gauge: Use a reliable pump with a gauge to inflate the tire to the correct pressure.
- Check Regularly: Check your tire pressure before each ride.
- Inspect Tires Regularly:
- Visual Inspection: Look for any cuts, embedded objects (glass, thorns, metal shards), or signs of wear and tear.
- Tactile Inspection: Carefully run your fingers along the inside of the tire to feel for any sharp objects that may be embedded in the rubber.
- Use Tire Liners or Sealant:
- Tire Liners: Tire liners are strips of durable material that are installed between the tire and the inner tube, providing an extra layer of protection against punctures.
- Tire Sealant: Tire sealant is a liquid that is injected into the inner tube or tubeless tire, which seals small punctures as they occur.
- Avoid Hazardous Areas:
- Road Debris: Avoid riding through areas with a lot of road debris, such as glass, thorns, and metal shards.
- Construction Zones: Be careful when riding through construction zones, where there may be sharp objects on the road.
- Use Durable Tires:
- Puncture-Resistant Tires: Consider using tires that are specifically designed to be puncture-resistant. These tires often have an extra layer of protection under the tread.
By implementing these strategies, you can significantly reduce the likelihood of getting a flat tire and enjoy a safer, more enjoyable ride.
At usabikers.net, we understand the importance of reliable information for motorcycle enthusiasts. Whether you’re looking for the latest in motorcycle maintenance, tips for safe biking, or the best biker accessories, we’ve got you covered.
Address: 801 Sturgis Main St, Sturgis, SD 57785, United States.
Phone: +1 (605) 347-2000.
Website: usabikers.net.
FAQ Section
1. What are the most common causes of bike tire punctures?
The most common causes of bike tire punctures include sharp objects on the road (glass, thorns, metal shards), pinch flats (when the tire is compressed against the rim), and under-inflated tires.
2. Can I use a car tire pump for my bike?
Yes, you can use a car tire pump for your bike if you have a Schrader valve. However, you will need a special adapter to use a car tire pump for a Presta valve. It’s also important to note that car tire pumps can sometimes over-inflate bike tires, so use caution and check the pressure frequently.
3. How often should I replace my bike tires?
You should replace your bike tires when they show signs of wear and tear, such as cuts, cracks, or worn tread. The frequency of replacement depends on how often you ride, the type of riding you do, and the quality of your tires.
4. What is the recommended tire pressure for my bike?
The recommended tire pressure for your bike depends on your weight, riding conditions, and tire type. Refer to the tire sidewall for the recommended pressure range.
5. Can I repair a punctured inner tube?
Yes, you can repair a punctured inner tube using a patch kit. However, it’s important to properly clean and prepare the area around the puncture before applying the patch.
6. What is the difference between tubed and tubeless tires?
Tubed tires use an inner tube to hold air, while tubeless tires do not. Tubeless tires offer several advantages over tubed tires, including lower rolling resistance, better puncture resistance, and the ability to run lower tire pressures.
7. How do I choose the right size inner tube for my bike?
To choose the right size inner tube for your bike, refer to the tire sidewall for the tire size information. The inner tube size should match the tire size.
8. What are tire liners and how do they help prevent punctures?
Tire liners are strips of durable material that are installed between the tire and the inner tube, providing an extra layer of protection against punctures.
9. What is tire sealant and how does it work?
Tire sealant is a liquid that is injected into the inner tube or tubeless tire, which seals small punctures as they occur.
10. How do I properly store my bike tires when not in use?
To properly store your bike tires when not in use, keep them in a cool, dry place away from direct sunlight. This will help prevent the rubber from deteriorating.
Ready to take your passion to the next level? Visit usabikers.net today to explore our extensive collection of articles, join our vibrant community, and discover everything you need to know about motorcycles and biker culture in the USA. Don’t just ride – live the biker life with usabikers.net!