
Understanding how to measure your bike frame is crucial, whether you’re buying a new bicycle, assessing a used one, or simply trying to understand your current ride better. Accurate measurements ensure you select a bike that fits correctly and suits your riding style, leading to more comfortable and efficient cycling experiences. Bike frame dimensions might seem complex, but by focusing on key measurements, you can confidently determine the right size and geometry for your needs.
Before diving into the specifics of how to measure a bike frame, let’s familiarize ourselves with the essential components and measurements that define a bike’s geometry. These measurements play a vital role in determining the bike’s handling, comfort, and overall performance.
Here are the key bike geometry measurements you’ll need to understand:
- Top Tube Length: This is the horizontal distance from the center of the head tube to the center of the seatpost. It’s a primary factor in determining the bike’s reach and overall fit.
- Seat Tube Length: Measured from the center of the bottom bracket to the top of the seat tube, this measurement often dictates frame size, although it can be less consistent across different bike styles.
- Reach: Reach is the horizontal distance from the center of the bottom bracket to the top center of the head tube. It’s a critical measurement for determining the bike’s cockpit length and rider position.
- Stack: Stack refers to the vertical distance from the center of the bottom bracket to the top center of the head tube. It influences handlebar height and the rider’s uprightness or aggressiveness.
- Wheelbase: The wheelbase is the distance between the front and rear wheel axles. It affects stability and handling, with longer wheelbases generally offering more stability.
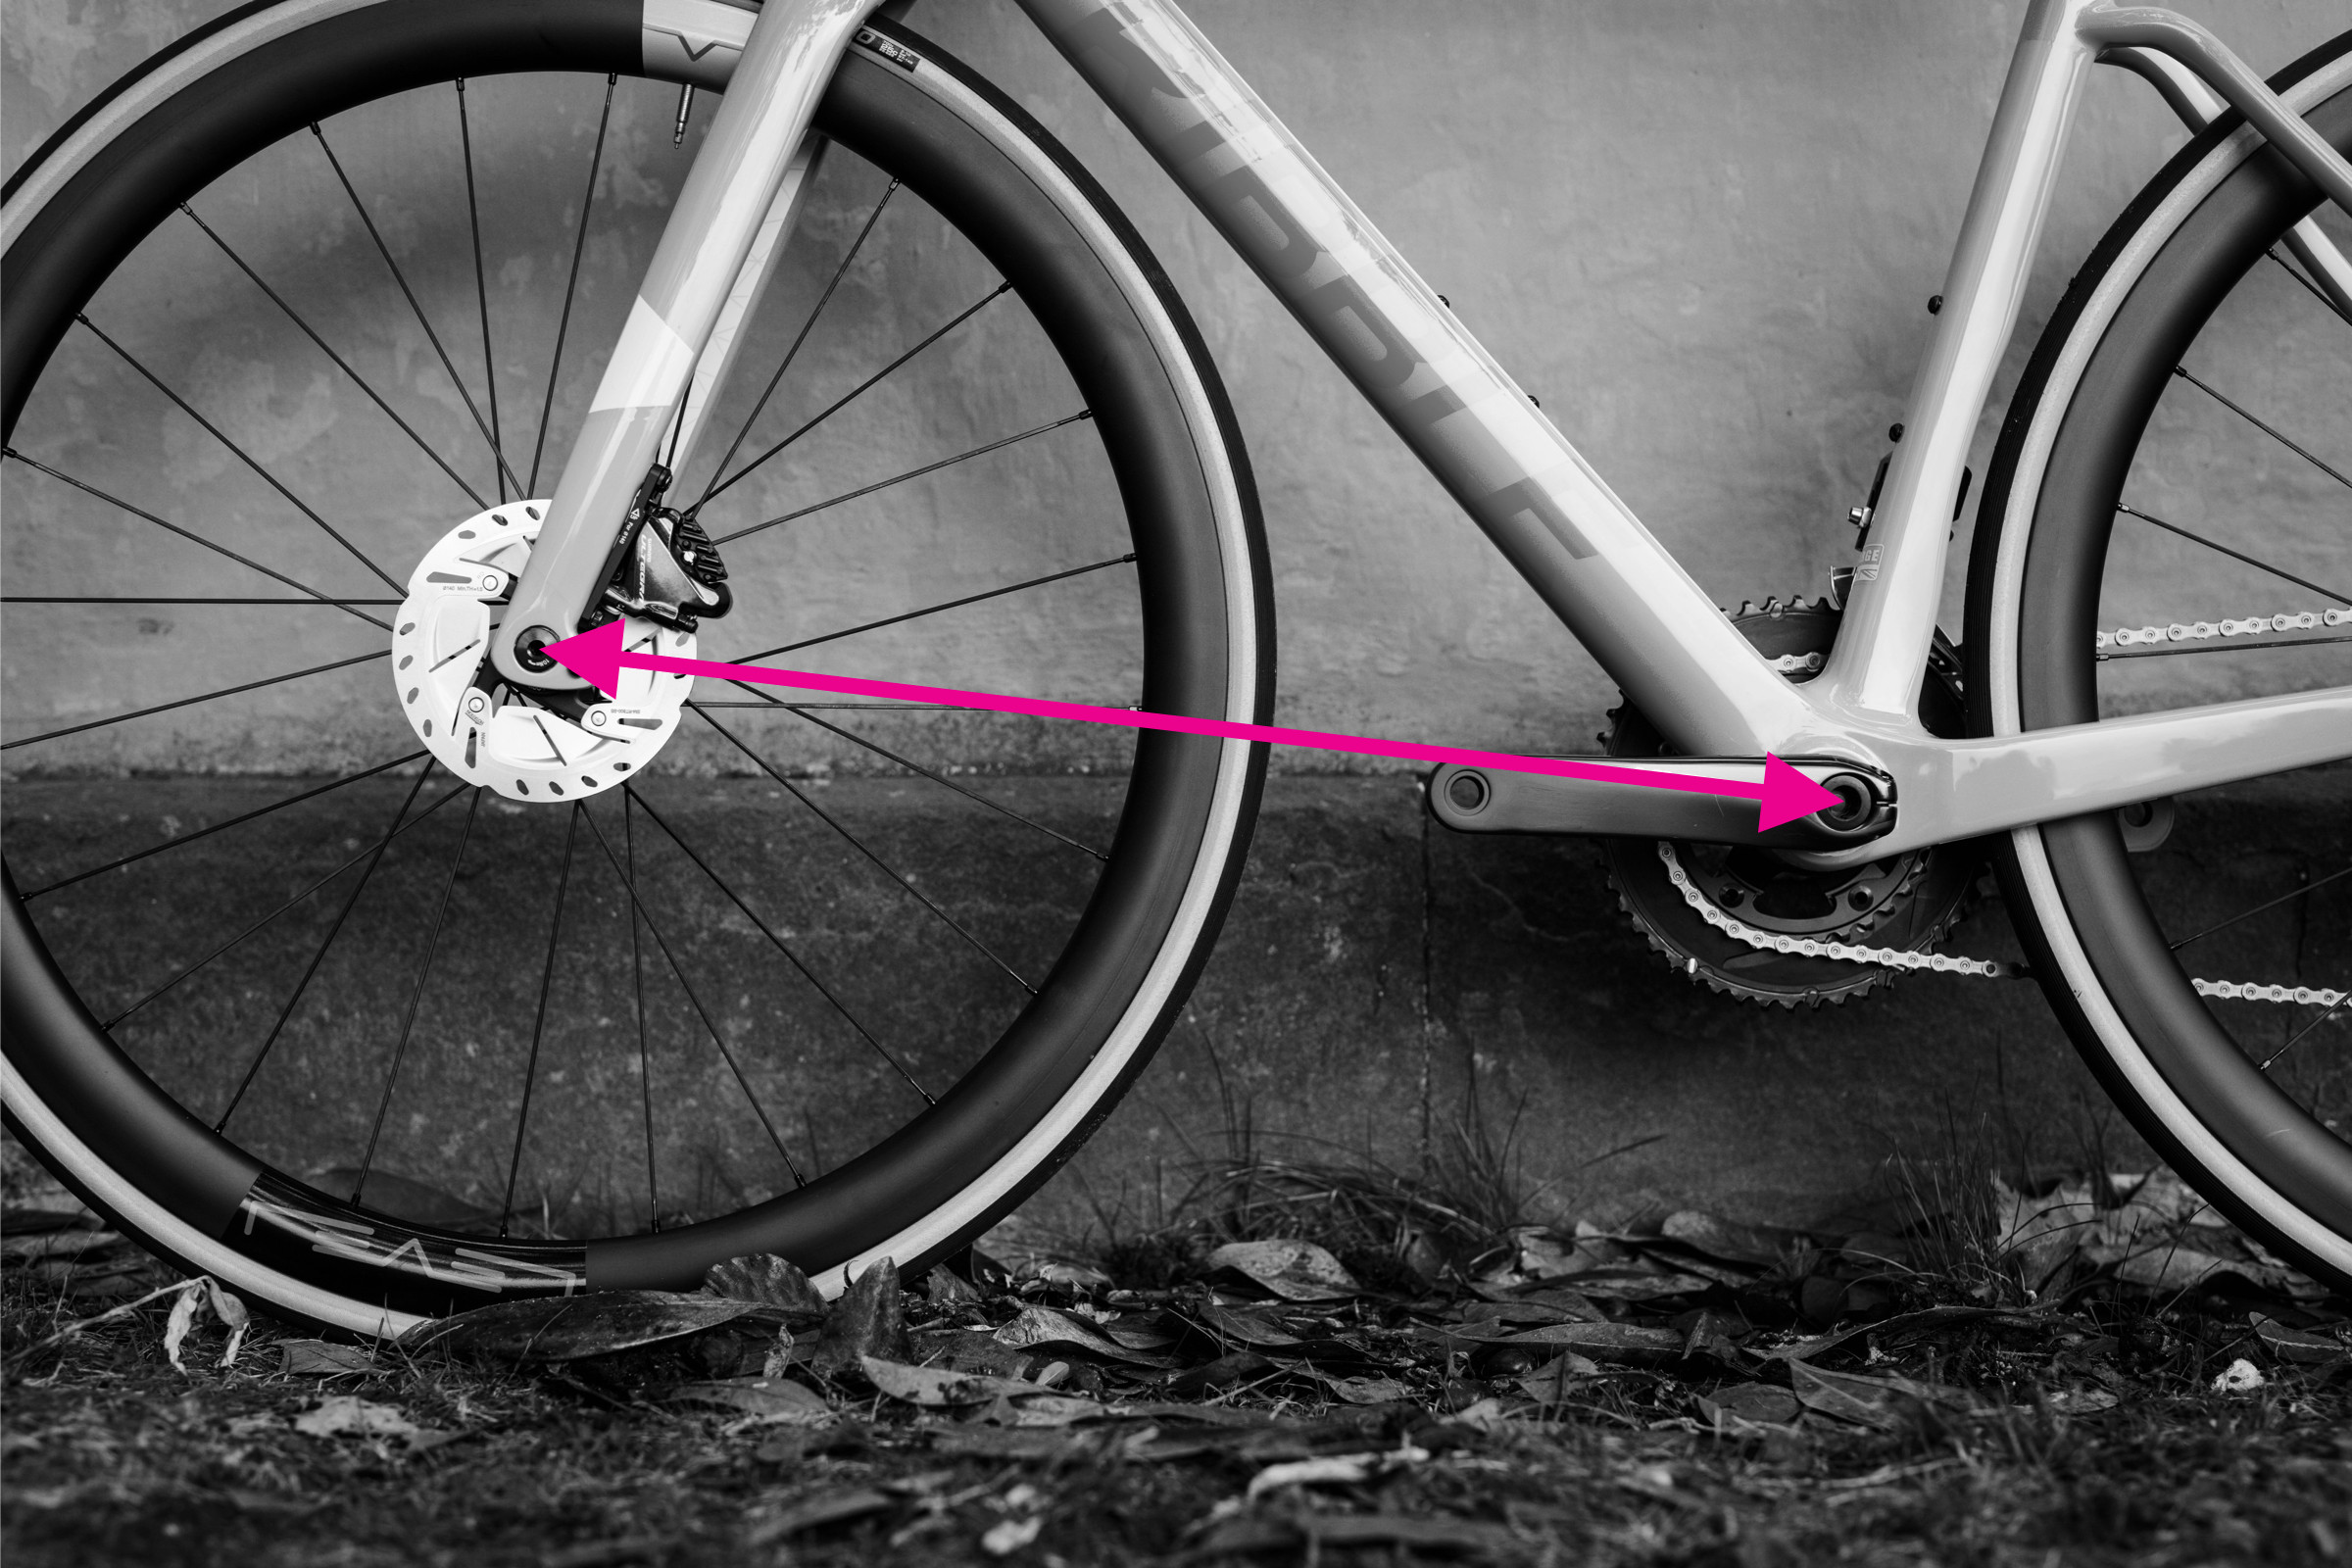
- Chainstay Length: This is the distance from the center of the bottom bracket to the rear axle. Chainstay length impacts handling responsiveness and climbing ability.
- Front Centre: The front center is measured from the center of the bottom bracket to the front axle. It affects weight distribution and stability, particularly at higher speeds.
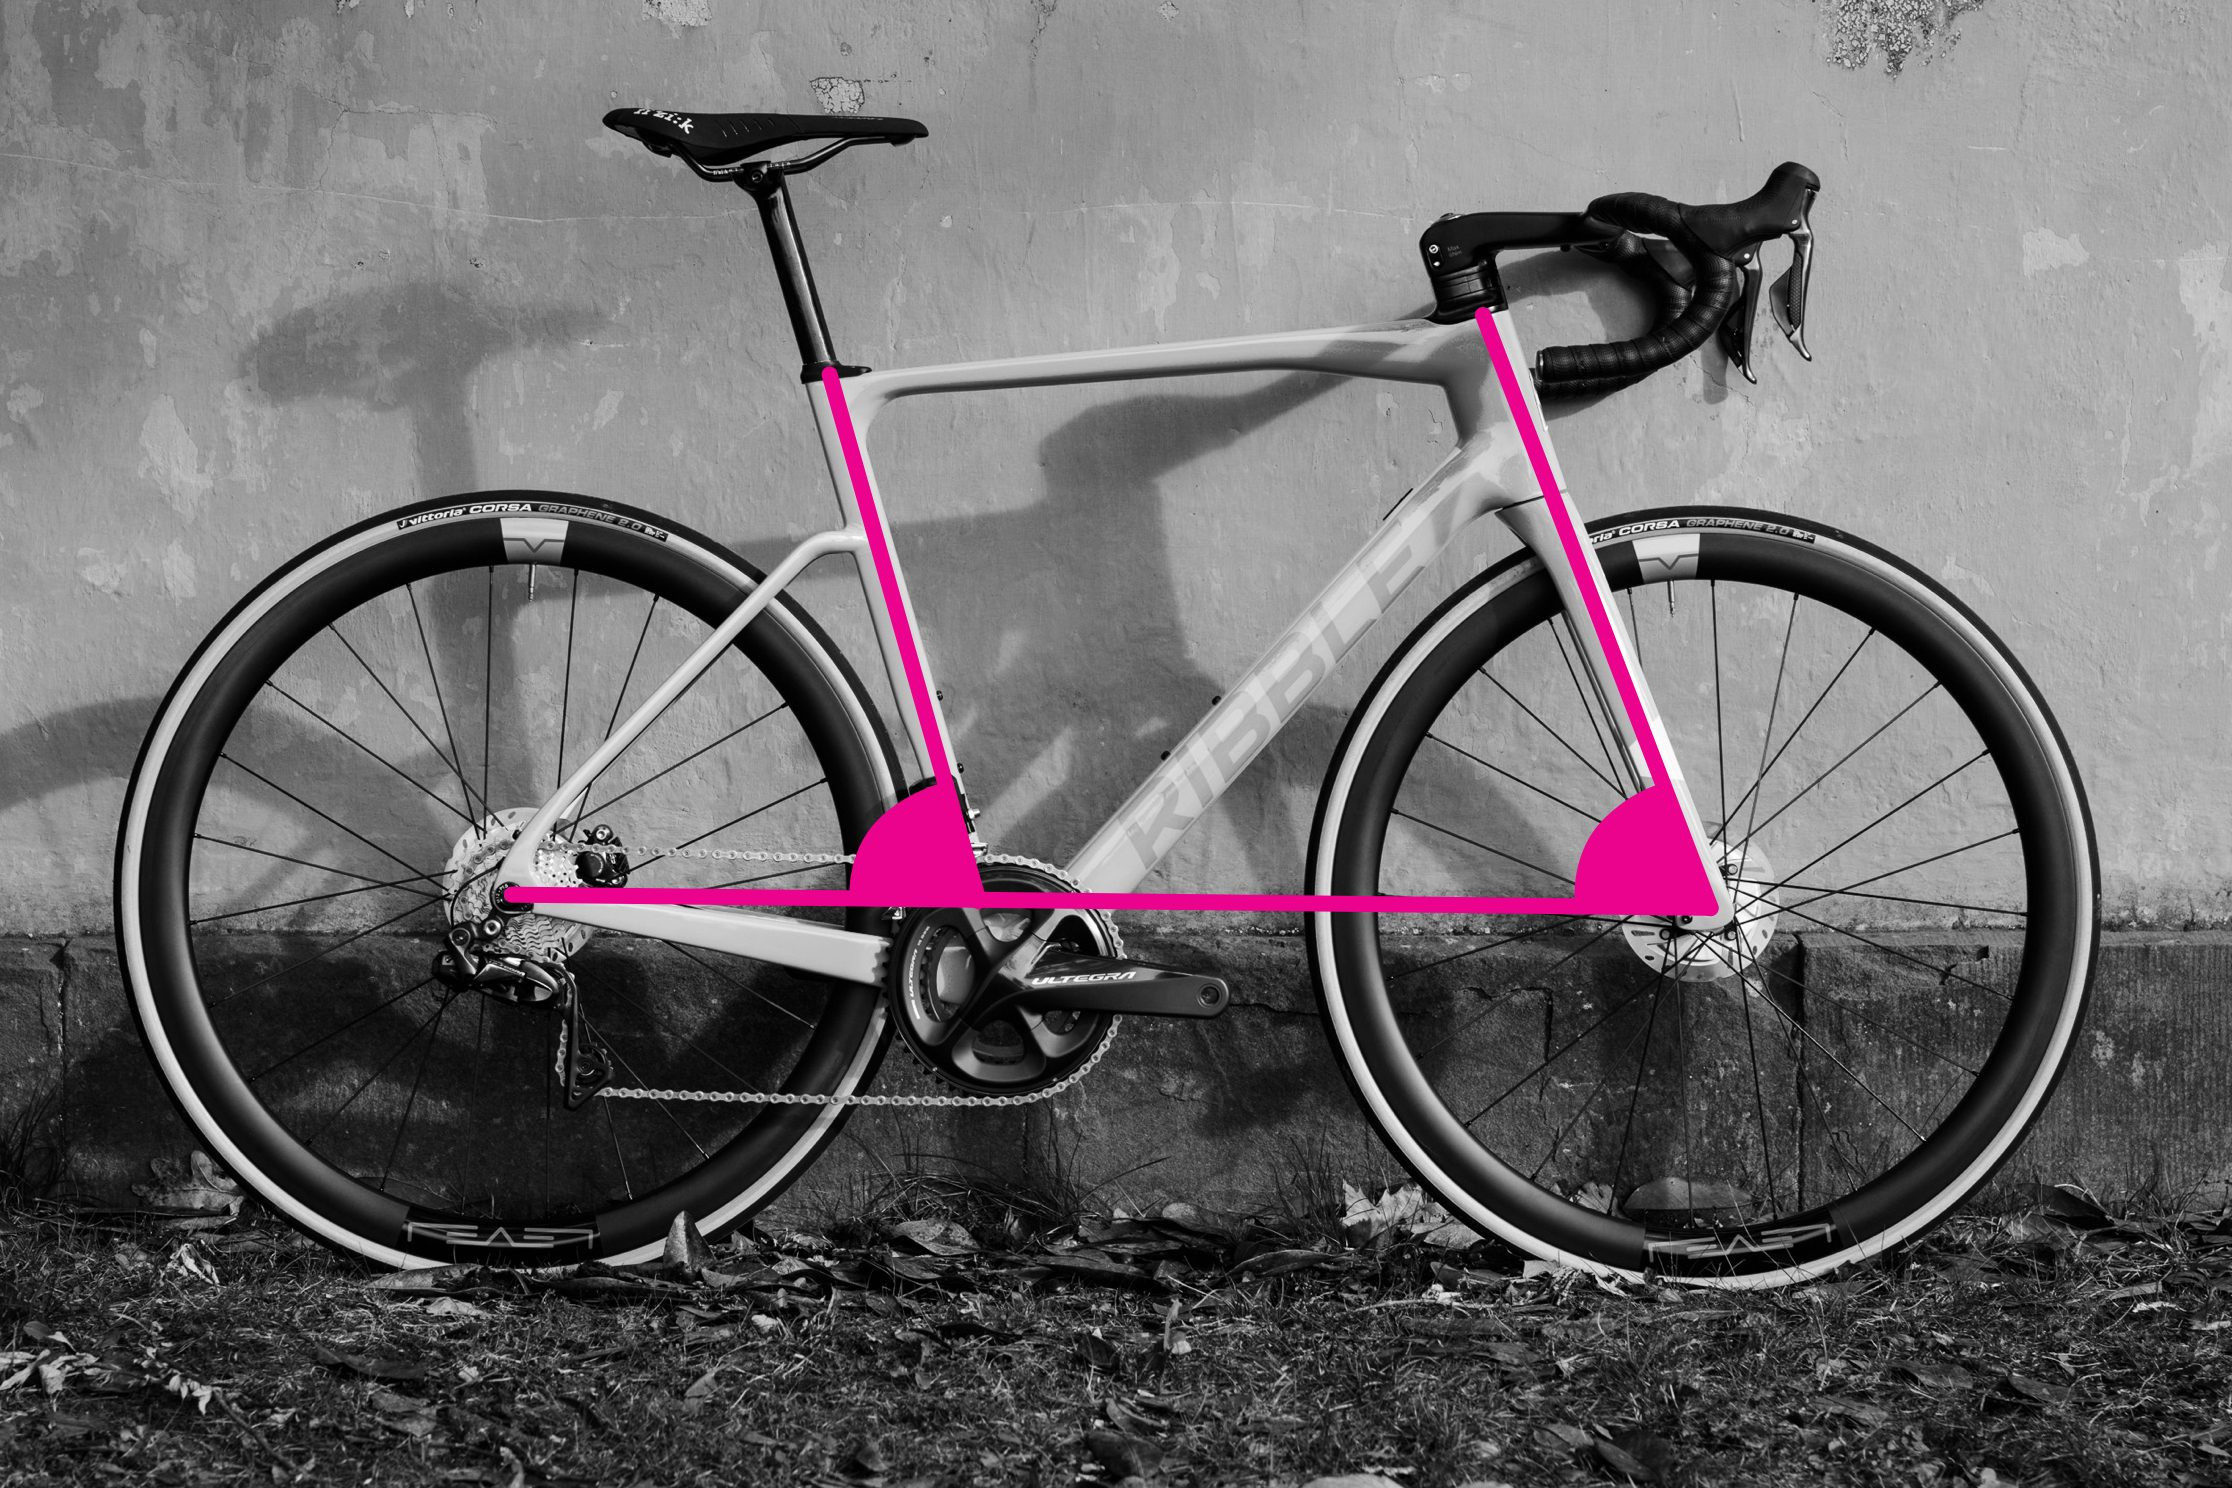
- Seat Tube Angle: This angle, measured between the seat tube and a horizontal line, influences pedaling efficiency and rider position over the bottom bracket.
- Head Tube Angle: The head tube angle, between the head tube and a horizontal line, is crucial for steering responsiveness and handling stability.
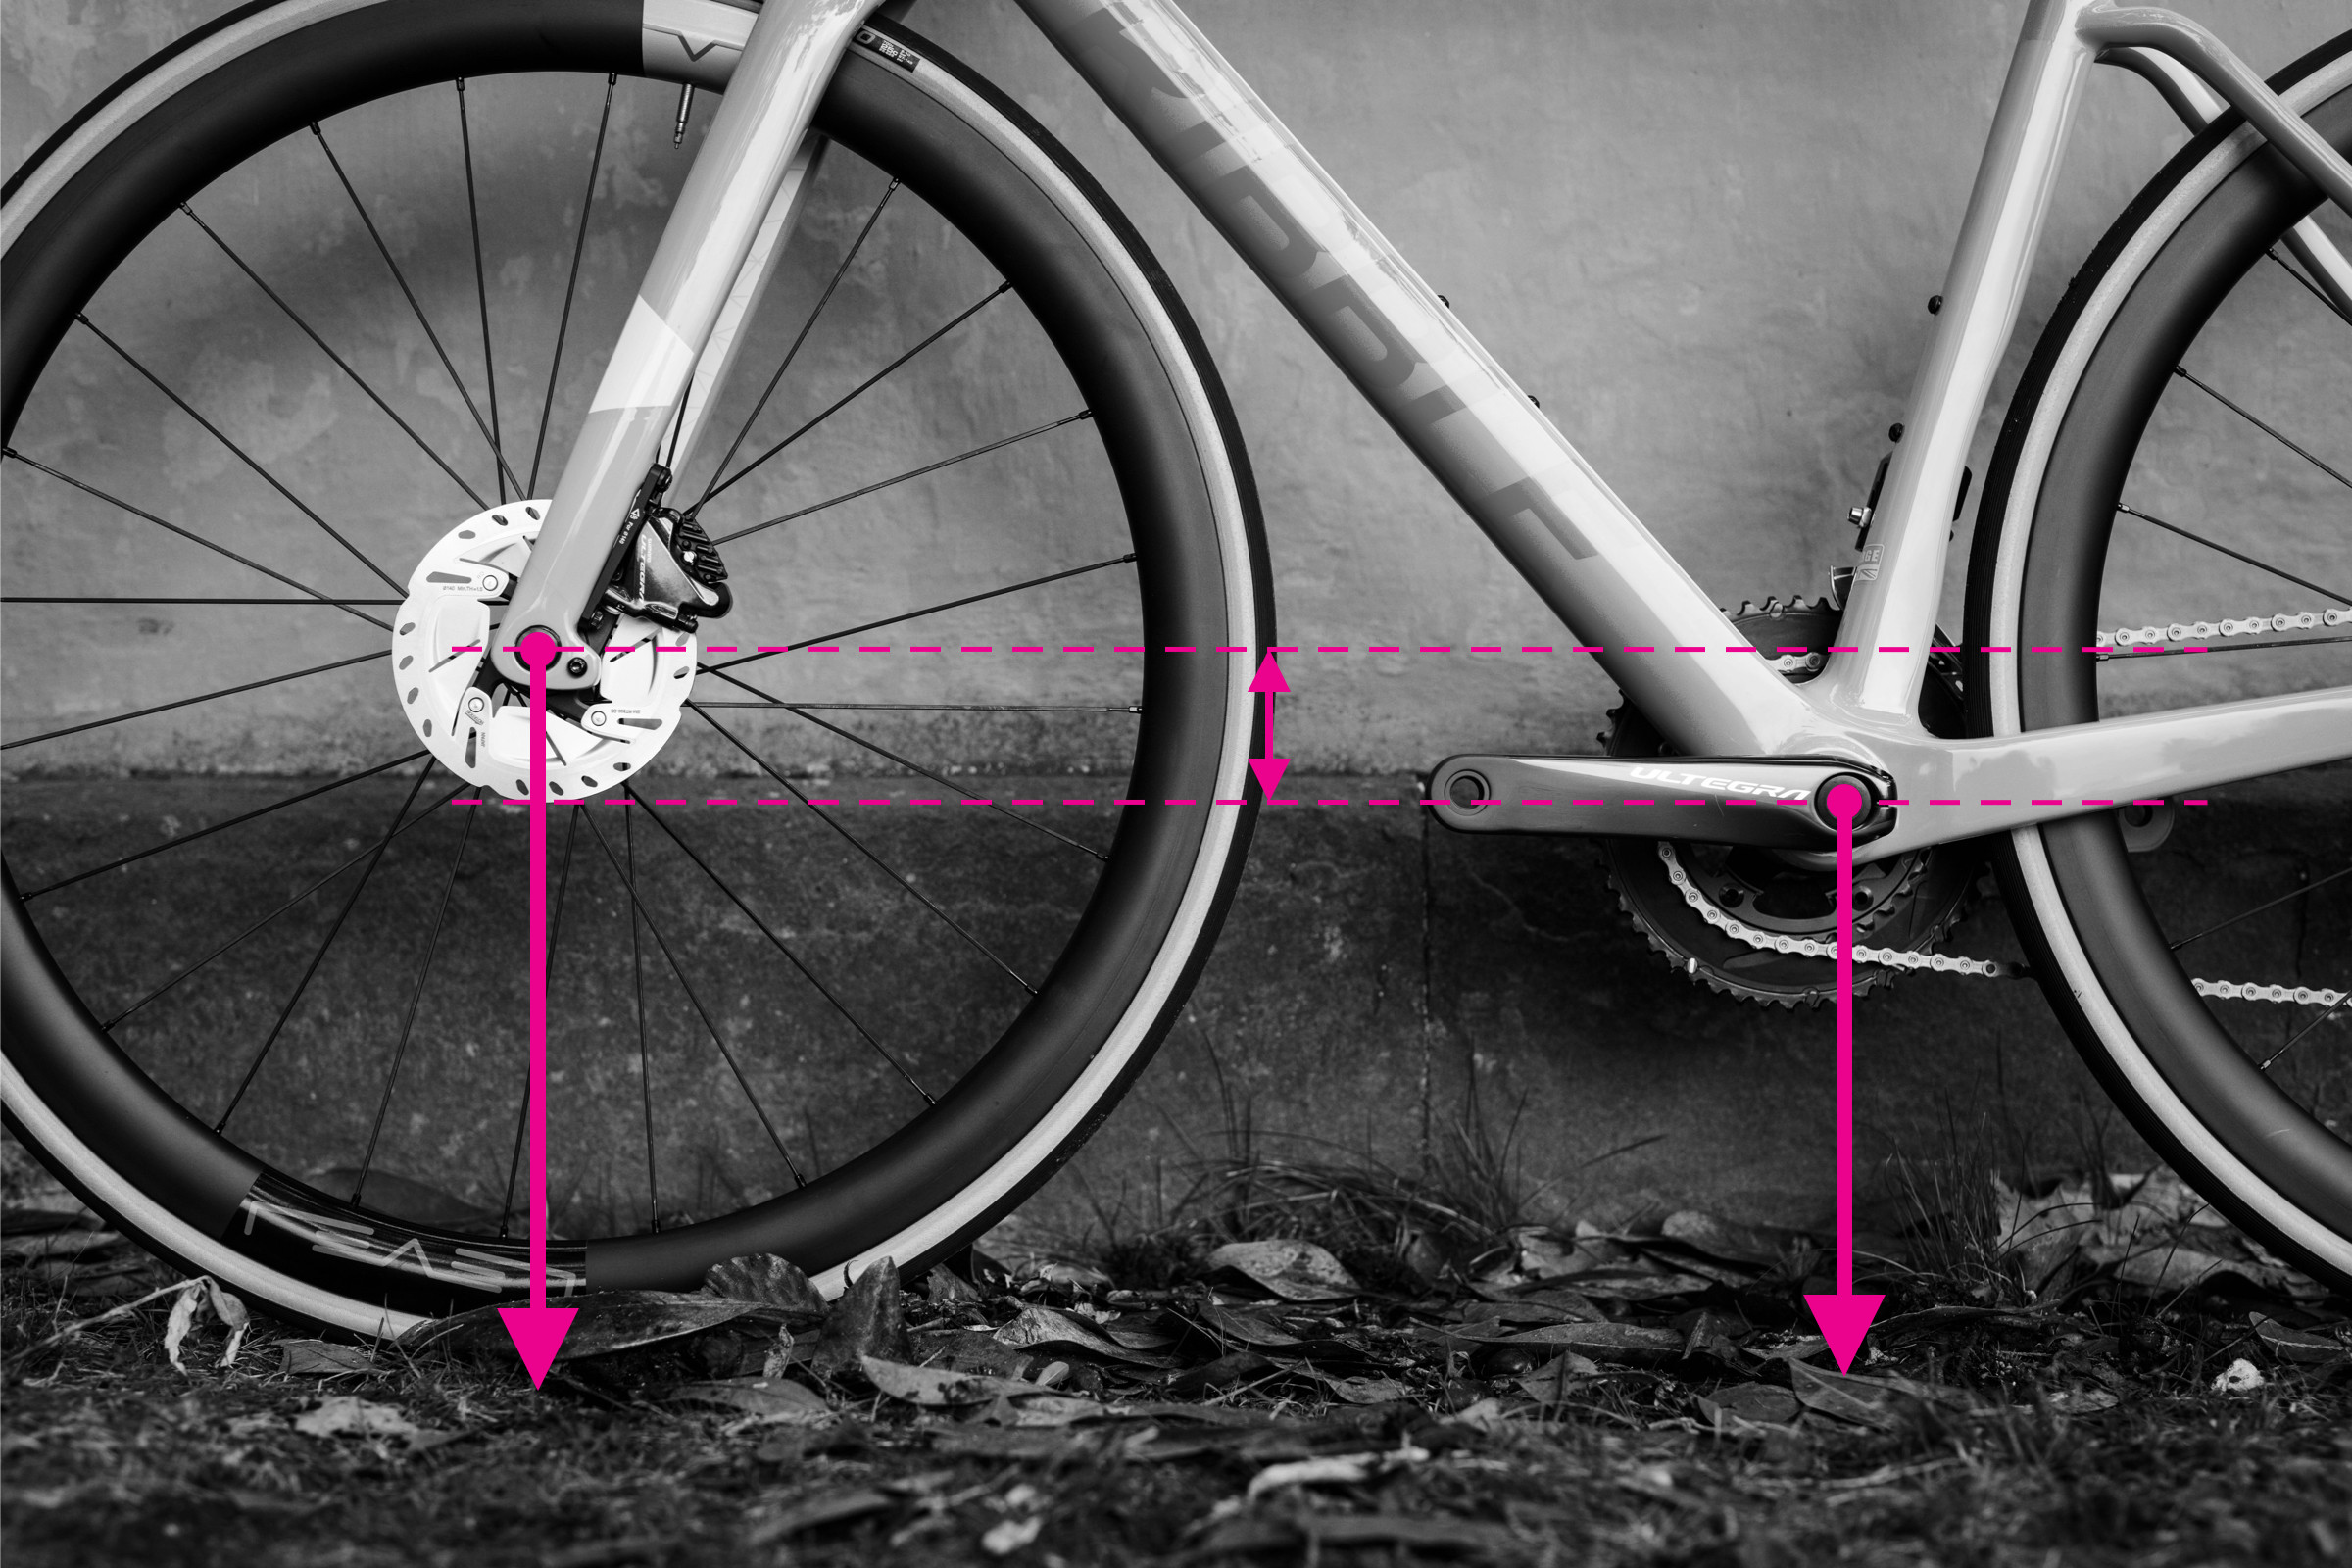
- Bottom Bracket Drop: Bottom bracket drop is the vertical distance the bottom bracket sits below the wheel axles. It affects stability and cornering ability.
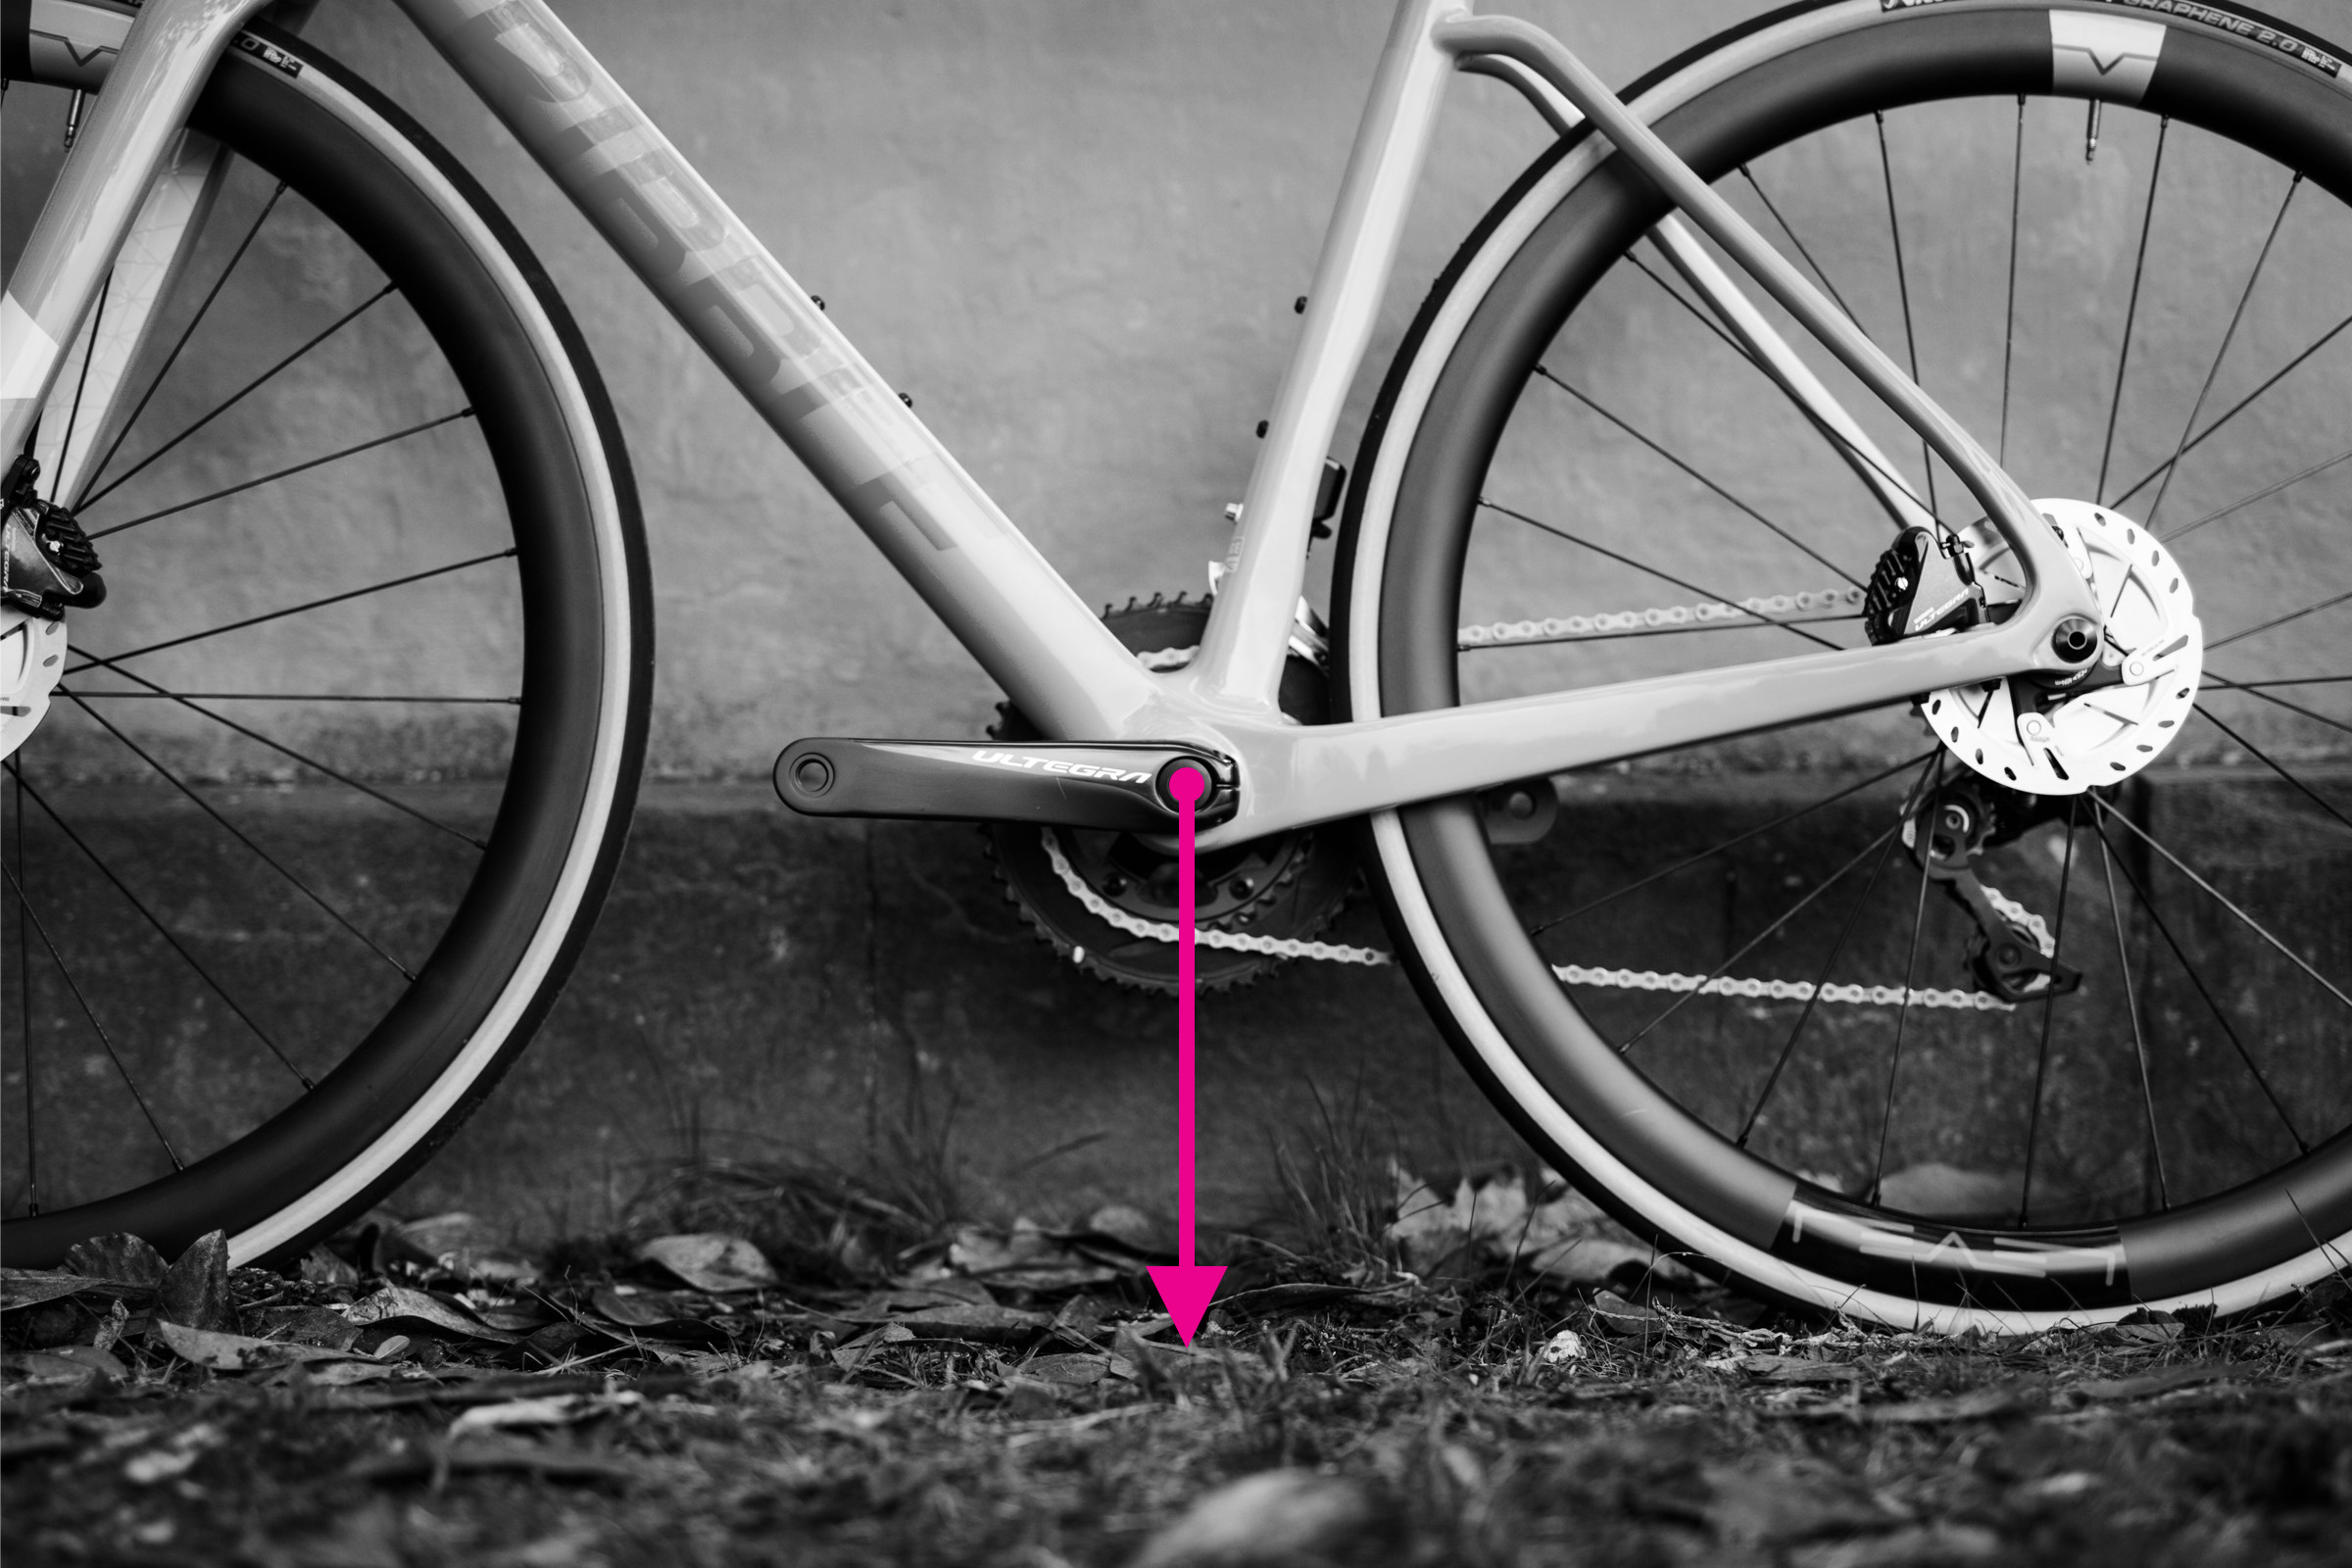
- Bottom Bracket Height: This is the vertical distance from the ground to the center of the bottom bracket. Bottom bracket height influences clearance over obstacles and stability.
To accurately measure a bike frame, you will need a few basic tools:
- Tape Measure: Essential for measuring distances in metric units (centimeters or millimeters) for accuracy.
- Clinometer: A tool for measuring angles. Smartphone apps are readily available and work effectively.
- Spirit Level: Used to ensure measurements are horizontal or vertical. A long spirit level or a straight piece of wood combined with a clinometer app will work.
- Plumb Line: Helps to establish a vertical reference. You can create one with string and a small weight like Blu Tack or any small heavy object.
While some manufacturers might still use inches, especially for mountain bike sizing, metric units (centimeters) are generally preferred for consistency and precision in bike frame measurements. If necessary, you can convert centimeters to inches by dividing by 2.54. It’s always beneficial to consult the manufacturer’s geometry chart for your specific bike model if available, as these charts provide accurate measurements and can be a valuable reference point.
How to Measure Top Tube Length Accurately
 Top tube measurement demonstrated on a bike frame
The top tube length is a fundamental measurement for bike fit. Modern bikes often feature sloping top tubes, making the traditional measurement less consistent. Therefore, we focus on the effective top tube length or virtual top tube length. This is the horizontal distance between the center of the head tube and the center of the seatpost.
Steps to measure top tube length:
- Identify the center of your head tube and seatpost. These are your starting and ending points.
- Use your spirit level or clinometer app to ensure you are measuring a perfectly horizontal line.
- Measure the horizontal distance from the head tube center to the seatpost center using your tape measure. This measurement is your effective top tube length.
It’s important to note that top tube length measurements can vary slightly between brands, even for bikes labeled the same size. Some manufacturers, like Colnago, use slightly different methods that can result in shorter measurements compared to others. Always compare geometry charts and consider reach and stack measurements for a more accurate size comparison.
Measuring Seat Tube Length: Step-by-Step
 Seat tube measurement demonstrated on a bicycle frame
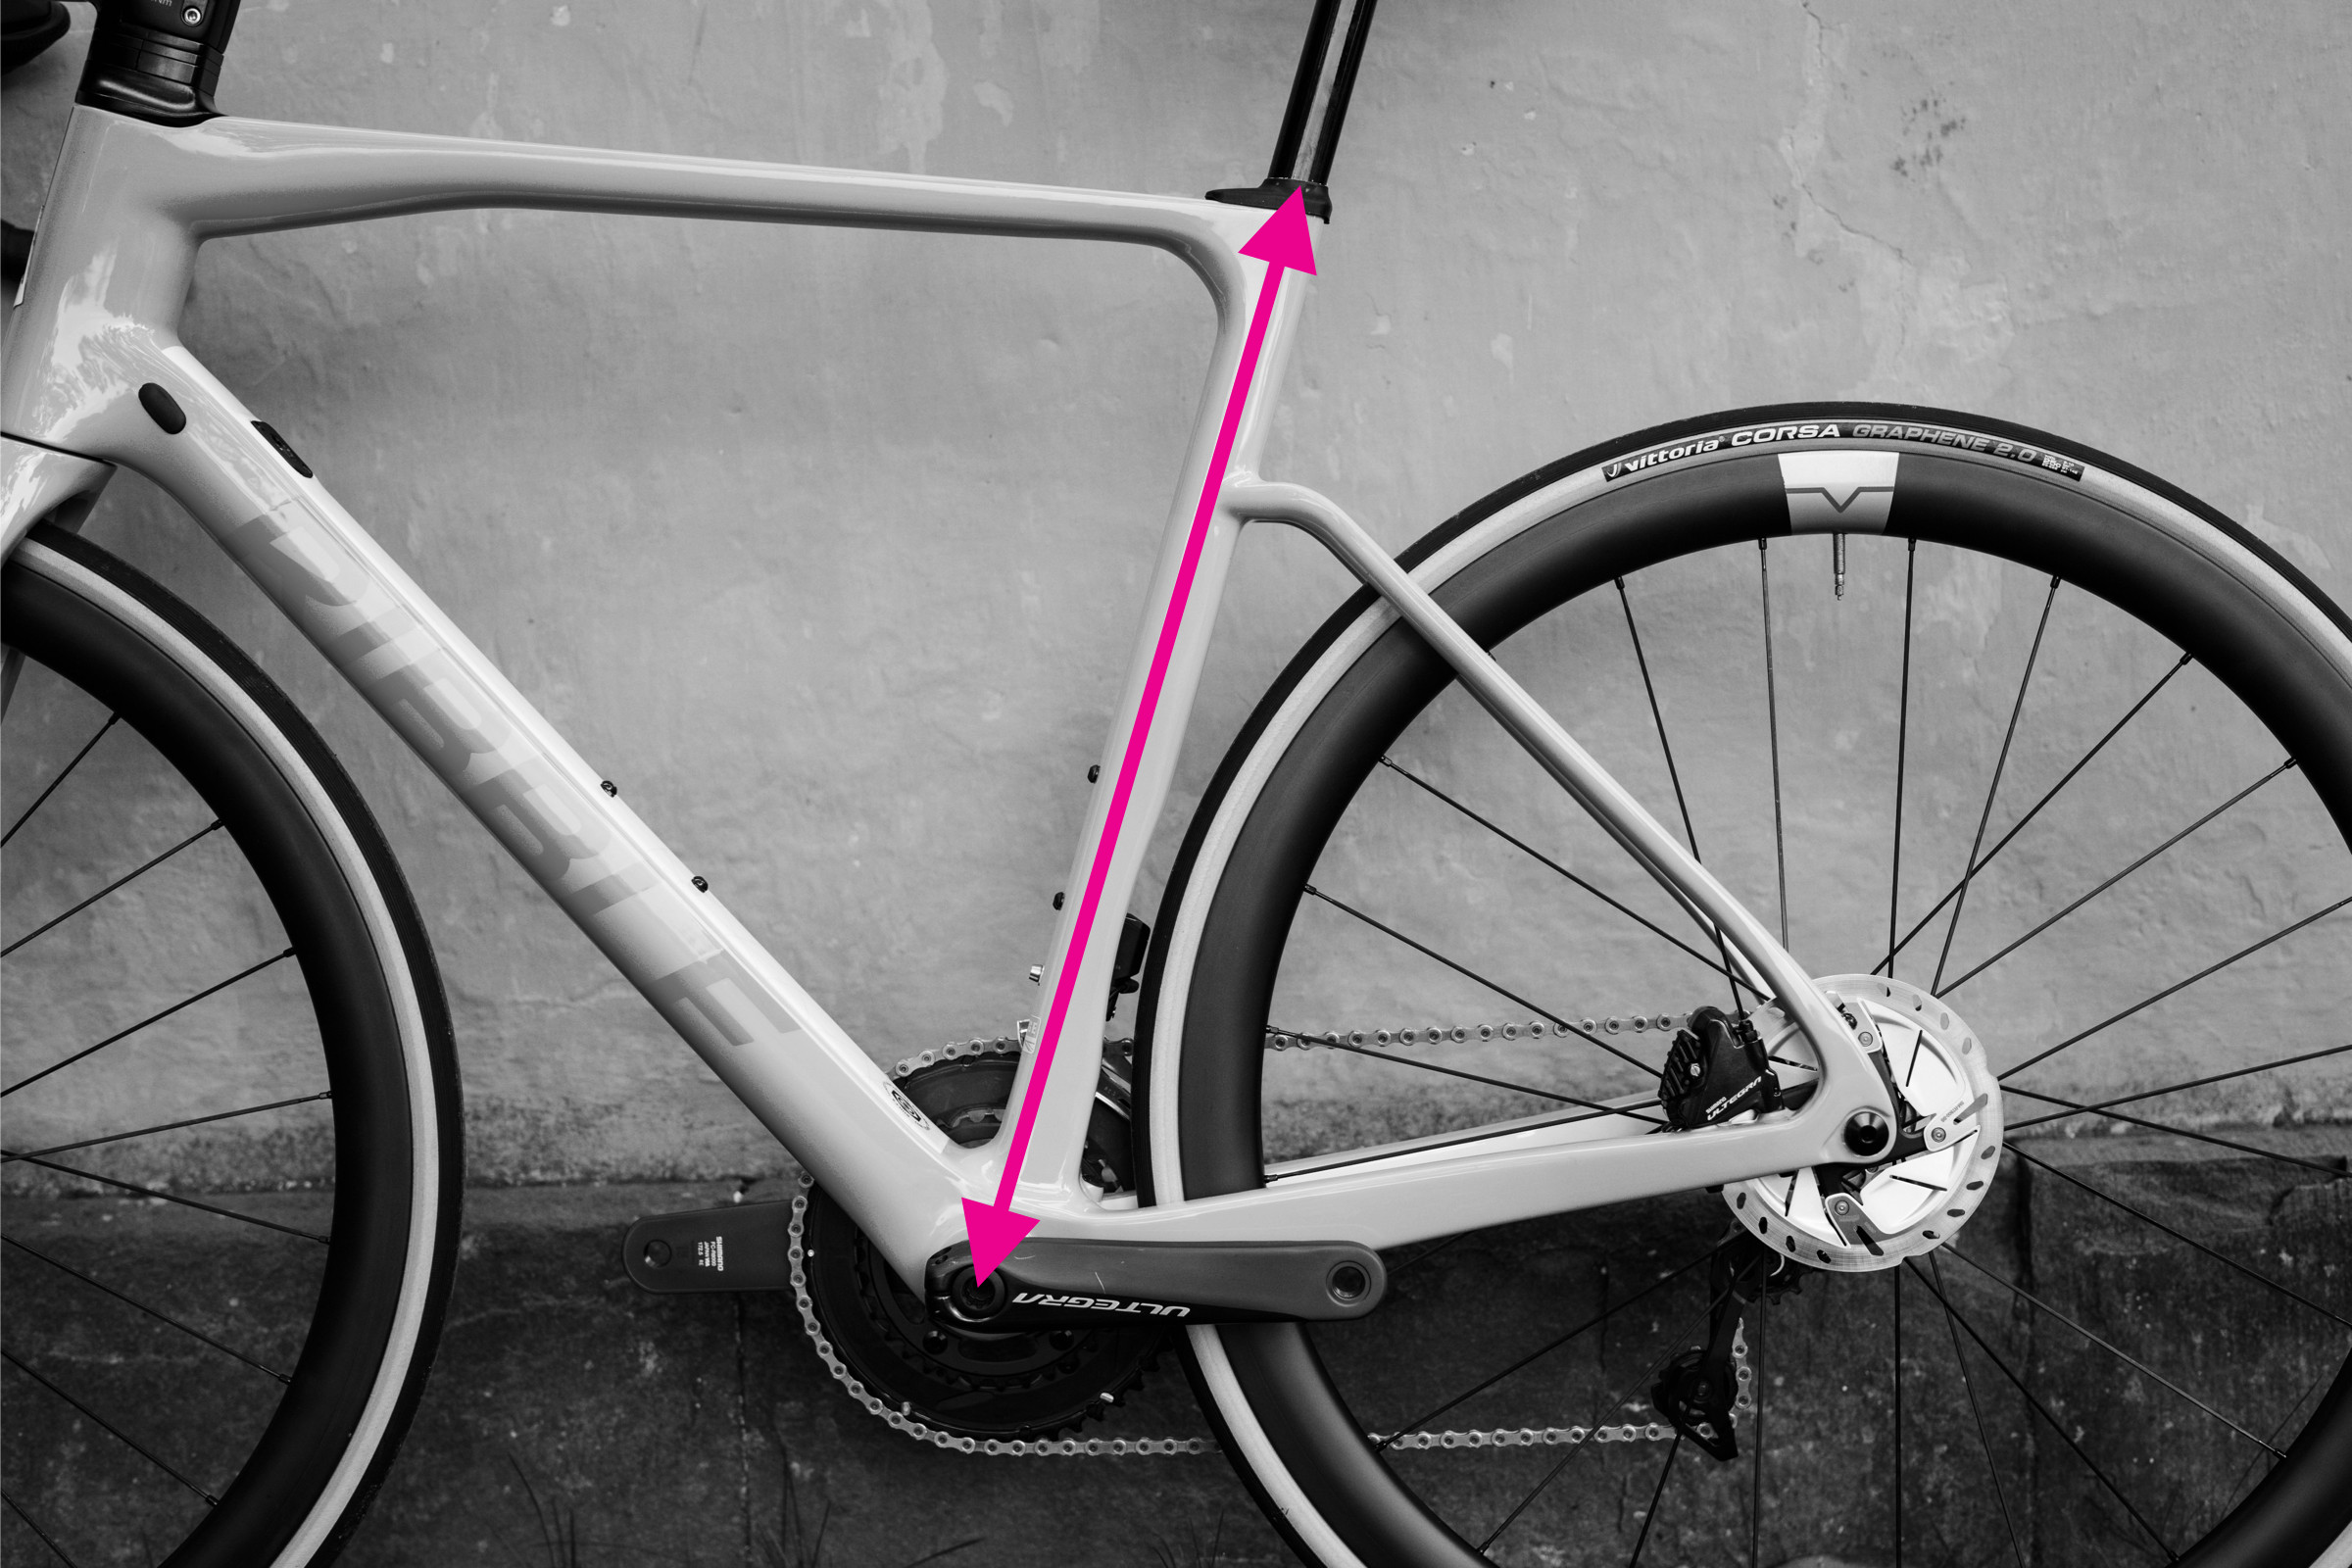
Seat tube length is measured as a straight line from the center of the bottom bracket to the top of the seat tube. While seemingly straightforward, bike designs with seat tube extensions or kinks can make this measurement a bit more nuanced.
How to measure seat tube length correctly:
- Locate the center of the bottom bracket. This is usually marked or can be estimated at the center of the crank axle.
- Find the top of the seat tube. This is the point where the seatpost enters the frame.
- Align your straight edge from the bottom bracket center to the top of the seat tube.
- Measure the straight-line distance along this line. This is your seat tube length. Avoid following the tube itself if it’s kinked, as this will give an incorrect, longer measurement.
How to Measure Reach and Stack for Bike Fit
 Stack and reach measurement demonstrated on a bike frame
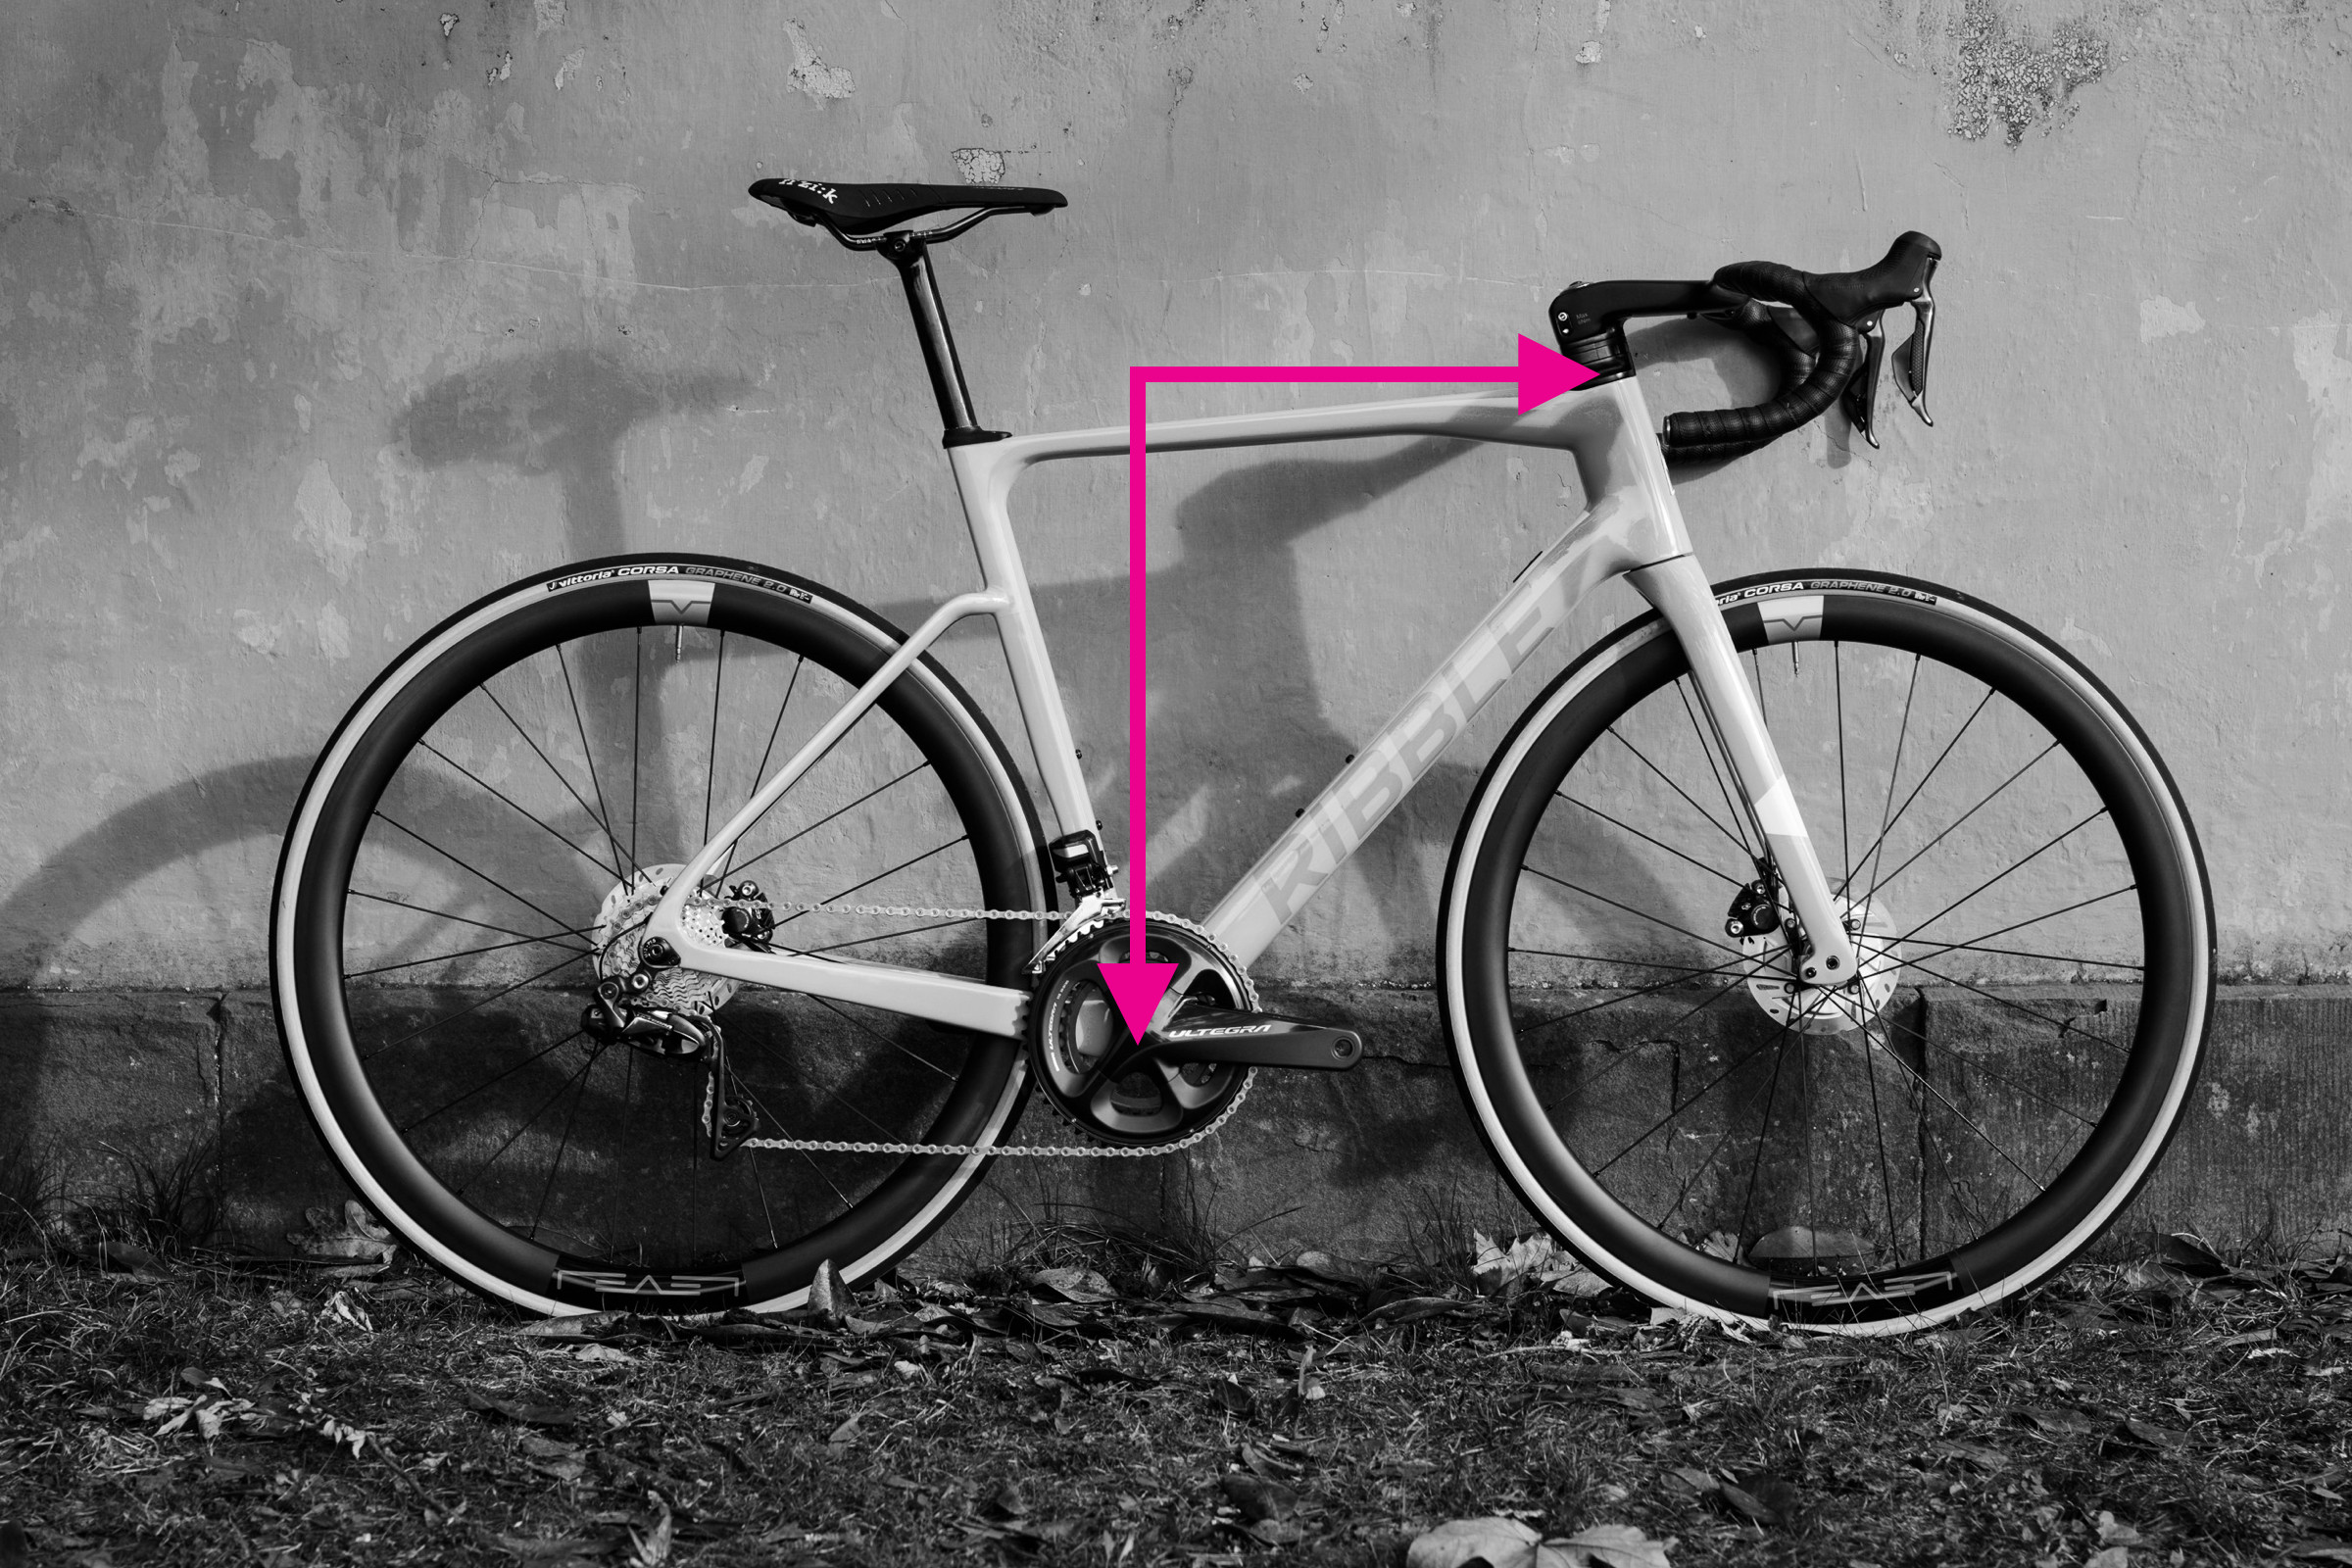
Reach and stack provide a more consistent and design-independent way to compare bike frame sizes. They measure the horizontal and vertical distances, respectively, between the bottom bracket and the top of the head tube. These measurements are crucial for determining bike fit because they directly relate to rider position.
Measuring Reach:
- Position your spirit level at the top of the head tube, ensuring it extends horizontally forward.
- Attach a plumb line to the end of the spirit level, allowing it to hang freely. Ensure the plumb line is stable and hangs straight down.
- Adjust the level until the plumb line intersects precisely with the center of the bottom bracket spindle.
- Measure the horizontal distance from the top of the head tube to the plumb line. This is your reach measurement.
Measuring Stack:
- Once you have your setup for reach, the stack is measured along the plumb line.
- Measure the vertical distance from the spirit level (aligned with the top of the head tube) down to the center of the bottom bracket. This vertical measurement is your stack.
Alternatively, you can measure stack and reach by positioning the bike against a wall and measuring distances to the wall from the head tube and bottom bracket, then calculating the differences. Due to the precision required, it is often helpful to have a second person assist with these measurements to ensure accuracy.
Measuring Wheelbase for Ride Quality Assessment
 Wheelbase measurement demonstrated on a bike frame
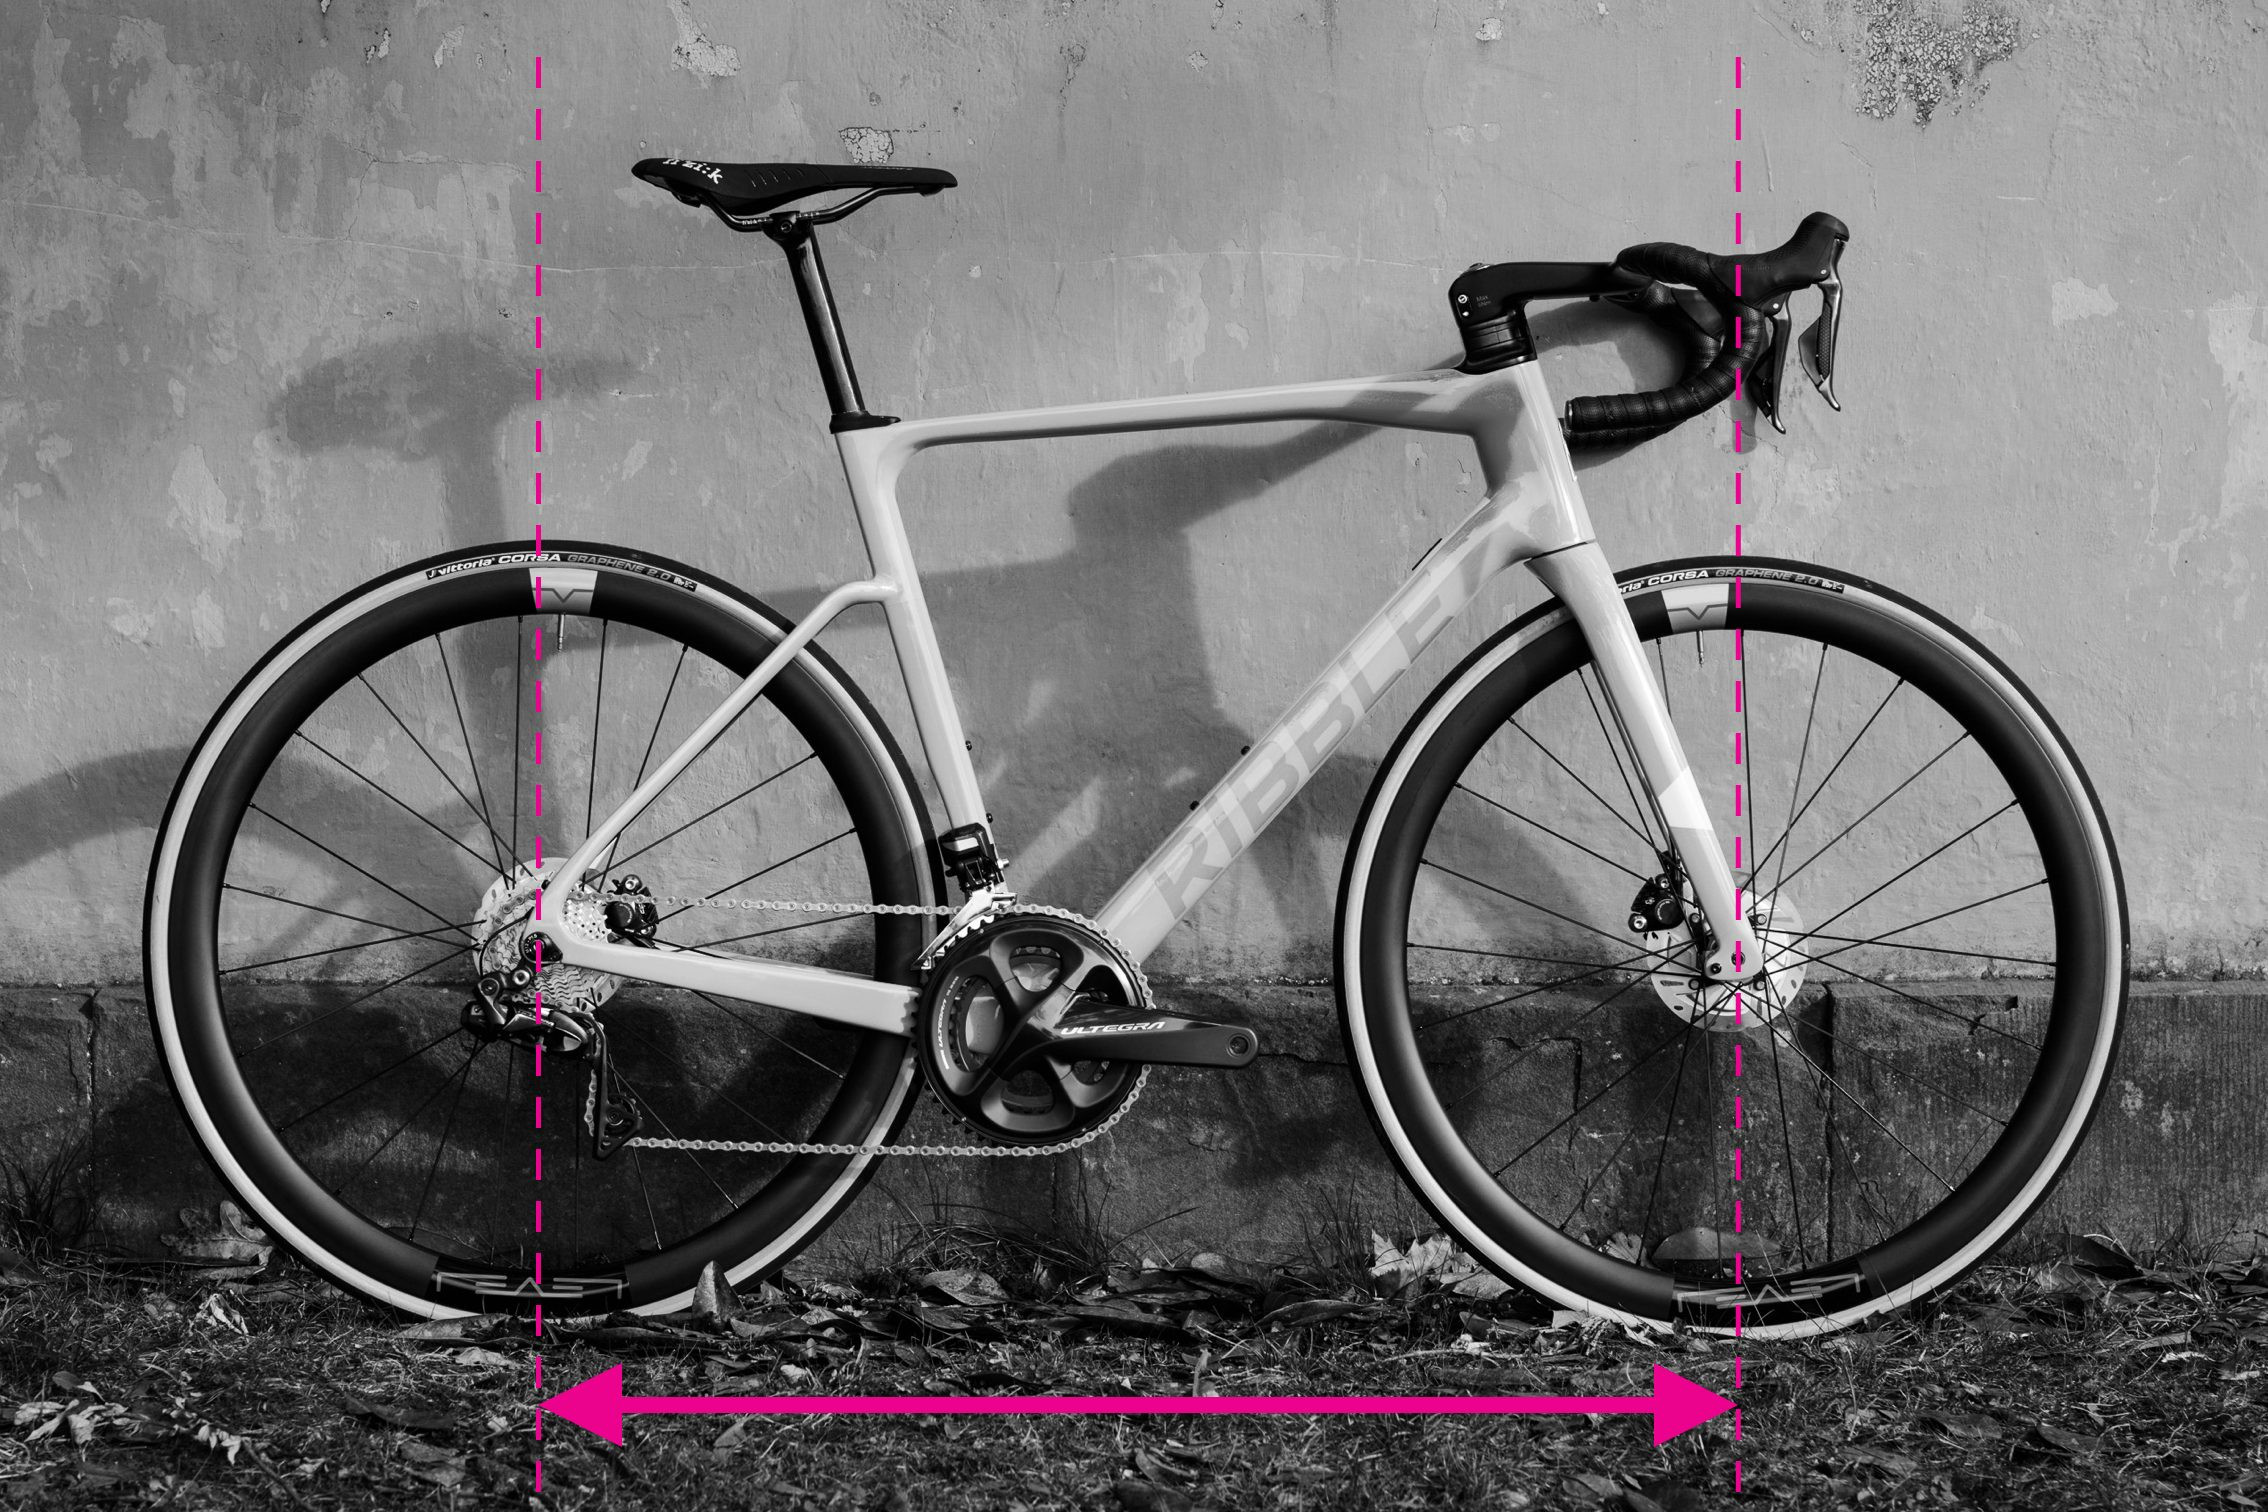
The wheelbase is the distance between the front and rear axles. It’s a key indicator of a bike’s stability and handling characteristics. A longer wheelbase usually means a more stable ride, while a shorter wheelbase can make a bike feel more agile.
Steps to measure wheelbase:
- Ensure your front fork is pointing straight ahead. Misalignment will result in an incorrect measurement.
- Measure the distance from the center of the front axle to the center of the rear axle using your tape measure.
- Repeat the measurement on both sides of the bike and take the average to compensate for any slight fork misalignment.
How to Measure Chainstay Length for Handling Characteristics
 Chainstay length measurement demonstrated on a bike frame
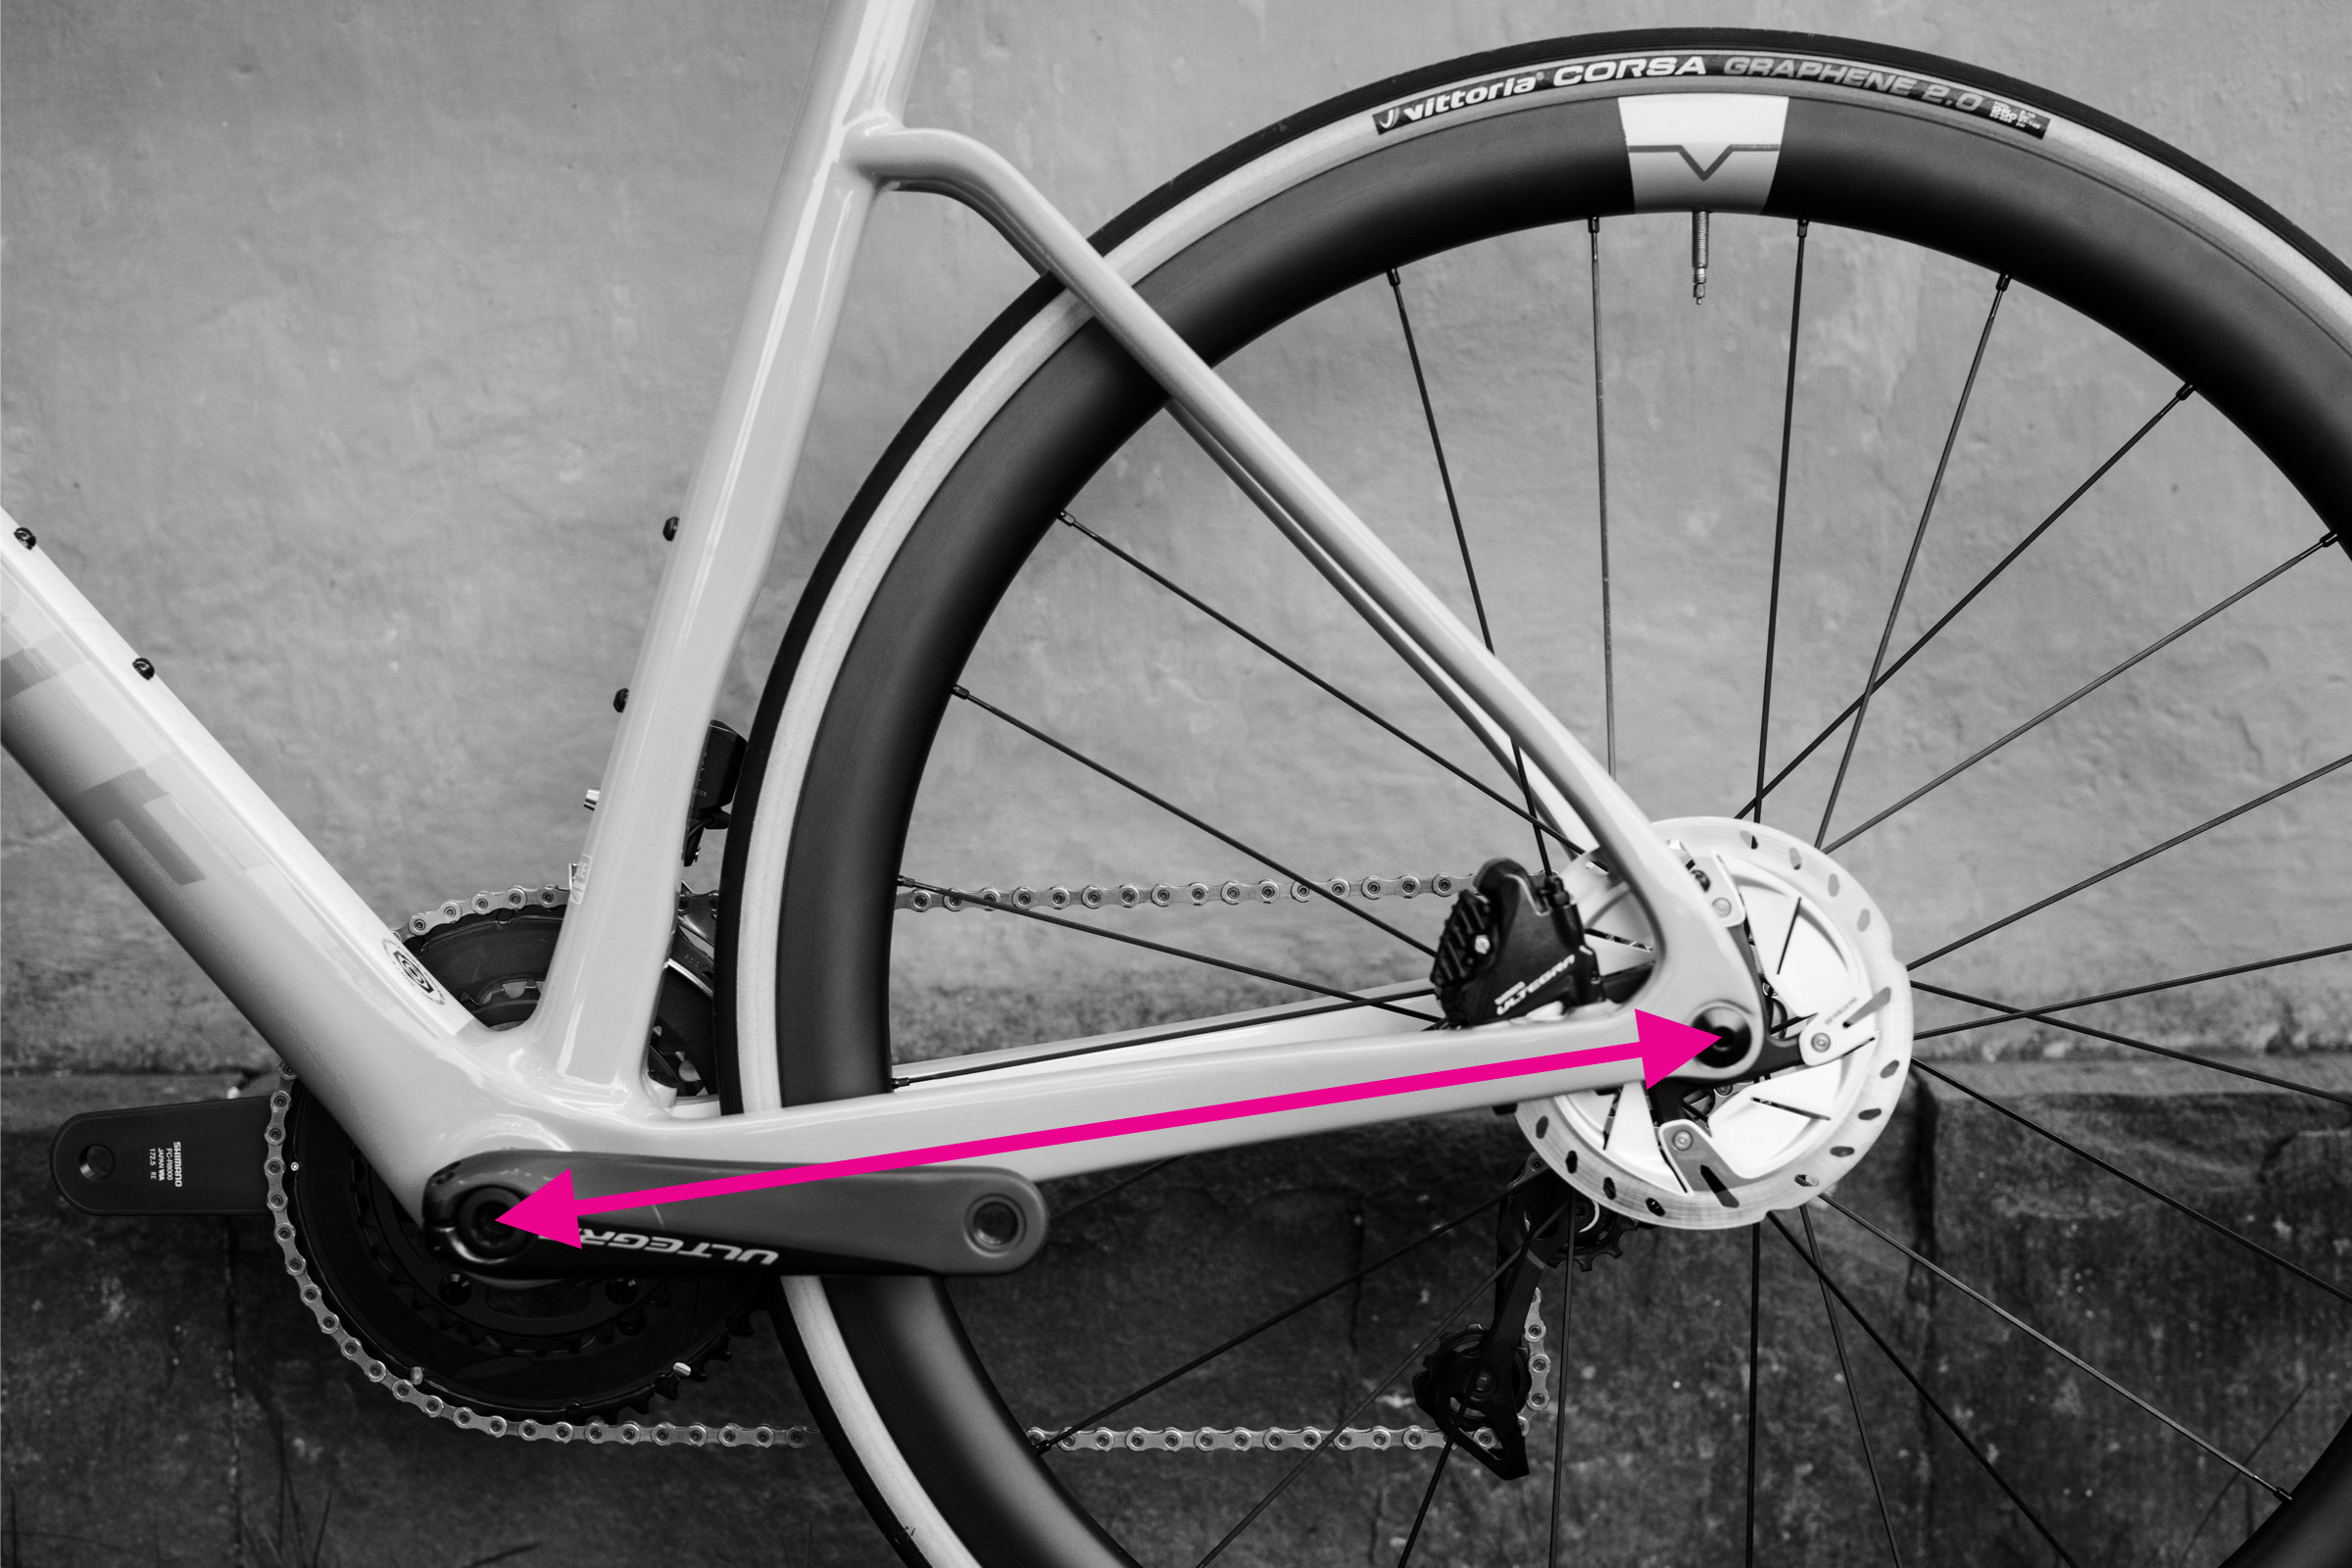
Chainstay length is the distance from the center of the bottom bracket axle to the center of the rear dropout. This measurement significantly affects a bike’s handling, particularly its responsiveness and climbing efficiency. Shorter chainstays generally result in a more lively and responsive feel.
Measuring chainstay length:
- Locate the center of the bottom bracket axle and the center of the rear dropout.
- Measure the straight-line distance between these two points using your tape measure. This is your chainstay length.
Measuring Front Centre for Balance and Handling
 Front centre measurement demonstrated on a bike frame
Front centre is the distance from the center of the bottom bracket to the front axle. Along with chainstay length, it makes up the wheelbase and influences weight distribution, handling, and toe overlap (the potential for your shoe to hit the front wheel during sharp turns).
Steps to measure front centre:
- Identify the center of the bottom bracket axle and the center of the front dropout.
- Measure the straight-line distance between these points. This is your front centre measurement.
While not always provided in bike geometry charts, front center is a useful measurement for understanding a bike’s overall geometry and handling balance.
Measuring Seat Tube and Head Tube Angles for Handling Nuances
 Seat and head tube measurements demonstrated on a bike frame
Seat tube and head tube angles are critical for defining a bike’s handling characteristics. Steeper angles generally lead to quicker, more nimble handling, while slacker angles provide more stability, especially at higher speeds and on rough terrain.
Measuring Seat Tube Angle:
- Ensure your bike is vertical and on a level surface.
- Place your smartphone with the clinometer app against the seat tube. If the seat tube is straight, align the phone directly against it.
- If there’s a kink in the seat tube, use a straight edge to create a line from the bottom bracket shell to the top of the seat tube and place your phone against the straight edge.
- Read the angle from your clinometer app. This is your seat tube angle.
Measuring Head Tube Angle:
- Keep the bike vertical and on a level surface.
- Place your smartphone with the clinometer app against the head tube. For tapered head tubes, try to align with the center line or use a straight edge connecting the top and bottom centers of the head tube.
- Alternatively, if your fork legs are straight, you can measure the angle of the fork legs, which will be the same as the head tube angle.
- Read the angle from your clinometer app. This is your head tube angle. You can also measure against the steerer tube extension above the head tube.
How to Measure Bottom Bracket Drop for Stability
 BB drop measurement demonstrated on a bike frame
Bottom bracket drop is the vertical distance that the bottom bracket sits below the wheel axles. A larger bottom bracket drop lowers the center of gravity, enhancing stability and cornering ability.
Measuring bottom bracket drop:
- Measure the height of the rear axle from the ground.
- Measure the height of the center of the bottom bracket from the ground.
- Subtract the bottom bracket height from the rear axle height. This difference is your bottom bracket drop.
Measuring Bottom Bracket Height for Clearance
 Bottom bracket height measurement demonstrated on bike frame
Bottom bracket height is the vertical distance from the ground to the center of the bottom bracket shell. This measurement is important for determining ground clearance and can affect pedal strike risk, especially on uneven terrain.
Measuring bottom bracket height:
- Ensure your tires are inflated to your usual riding pressure, as tire pressure slightly affects this measurement.
- Measure the vertical distance from the ground to the center of the bottom bracket shell. This is your bottom bracket height.
By understanding and measuring these key bike frame dimensions, you can make informed decisions when purchasing a new or used bike, ensuring a comfortable, efficient, and enjoyable riding experience. Keep these measurements handy for future reference, whether you’re considering upgrades or simply want to better understand your bike’s geometry. With these measurements, you’re well-equipped to choose the perfect road bike, mountain bike, commuting bike, or gravel bike that fits you perfectly.