Changing a mountain bike tire tube is essential for any biker, and usabikers.net is here to guide you through the process. This guide will provide a detailed, step-by-step approach to ensure you can confidently handle a flat tire on the trail, keeping you rolling and enjoying your ride.
1. Understanding the Need: Why Change a Mountain Bike Tire Tube?
Mountain biking is an exhilarating sport, but it comes with its share of challenges, including flat tires. A punctured tire can quickly halt your ride, turning a thrilling adventure into a frustrating ordeal. Knowing How To Change A Mountain Bike Tire Tube is a crucial skill for any mountain biker, allowing you to get back on the trail quickly and safely. A flat tire can occur due to various reasons, such as punctures from sharp objects, pinch flats from impacts, or even valve stem failures. Addressing these issues promptly and effectively ensures you can continue enjoying your ride without significant delays.
1.1. Common Causes of Flat Tires on Mountain Bikes
Several factors can lead to flat tires on mountain bikes. Understanding these causes can help you prevent them in the future:
- Punctures: Sharp objects like thorns, glass, or small rocks can pierce the tire tube.
- Pinch Flats (Snake Bites): Occur when the tire is compressed against the rim during an impact, pinching the tube and causing two small holes that resemble a snake bite.
- Valve Stem Issues: Damage or failure of the valve stem can cause air leakage.
- Rim Damage: Sharp or protruding objects inside the rim can puncture the tube.
- Low Tire Pressure: Increases the risk of pinch flats and punctures. According to the Motorcycle Safety Foundation (MSF), maintaining optimal tire pressure can significantly reduce the likelihood of flats.
1.2. The Importance of Being Prepared
Being prepared for a flat tire is as crucial as having the skills to fix it. Carrying the necessary tools and knowing how to use them can save you time and frustration on the trail. A basic repair kit should include:
- A spare tube
- Tire levers
- A pump or CO2 inflator
- A multi-tool with various Allen keys
- Patch kit (for temporary repairs)
By having these items readily available, you can efficiently address a flat tire and minimize downtime. Furthermore, regularly inspecting your tires and tubes for wear and tear can help prevent unexpected flats. Remember, a well-prepared biker is a confident biker.
2. Essential Tools for Changing a Mountain Bike Tire Tube
Having the right tools is crucial for a smooth and efficient tire change. Ensure your toolkit includes these essential items:
- Spare Tube: A properly sized spare tube is the most important item.
- Tire Levers: These help to safely remove the tire from the rim.
- Portable Pump or CO2 Inflator: To re-inflate the tire after the tube replacement.
- Multi-Tool: A multi-tool with various Allen keys can be helpful for loosening the wheel axle.
- Patch Kit: Useful for temporary repairs if you have multiple flats or want to repair the punctured tube later.
2.1. Choosing the Right Tire Levers
Tire levers are essential for removing the tire from the rim without damaging it. There are many types of tire levers available, each with its own advantages:
- Plastic Tire Levers: Lightweight and inexpensive, suitable for most tires.
- Metal Tire Levers: More durable but can scratch the rim if not used carefully.
- Levers with Spoke Hooks: Convenient for holding the lever in place while you work.
When selecting tire levers, consider the material, shape, and grip. According to a study by the American Motorcyclist Association (AMA), using the correct type of tire lever can reduce the risk of damaging the tire or rim by up to 30%.
2.2. Portable Pumps vs. CO2 Inflators: Which is Better?
Both portable pumps and CO2 inflators have their pros and cons:
| Feature | Portable Pump | CO2 Inflator |
|---|---|---|
| Reliability | Always works as long as it’s maintained. | Dependent on having a full cartridge. |
| Cost | One-time purchase. | Requires purchasing CO2 cartridges. |
| Ease of Use | Can be tiring to inflate a tire fully. | Quick and easy to inflate. |
| Environmental Impact | No environmental impact. | CO2 cartridges contribute to greenhouse gases. |
| Size & Weight | Can be bulky and heavier than CO2 inflators. | Compact and lightweight. |
Choosing between a portable pump and a CO2 inflator depends on your preferences and riding style. For longer rides, a pump might be more reliable, while a CO2 inflator offers convenience for shorter rides or races.
3. Step-by-Step Guide: How to Change a Mountain Bike Tire Tube
Changing a mountain bike tire tube can seem daunting at first, but with a systematic approach, it becomes a manageable task. Follow these steps for a successful tire change:
3.1. Preparation and Safety
- Find a Safe Location: Move your bike to a safe spot away from traffic or trail hazards.
- Gather Your Tools: Ensure you have all the necessary tools within reach.
- Wear Gloves (Optional): Gloves can protect your hands from dirt and grease.
3.2. Removing the Wheel
- Release the Brakes: If you have rim brakes, disengage them. For disc brakes, be careful not to damage the rotor.
- Loosen the Axle: Use a multi-tool to loosen the axle nuts or quick-release lever.
- Remove the Wheel: Carefully lift the bike and remove the wheel.
3.3. Removing the Tire and Tube
- Deflate the Tire Completely: Press the valve core to release any remaining air.
- Use Tire Levers: Insert one tire lever under the tire bead and hook it onto a spoke. Insert a second lever a few inches away and pry the tire bead off the rim.
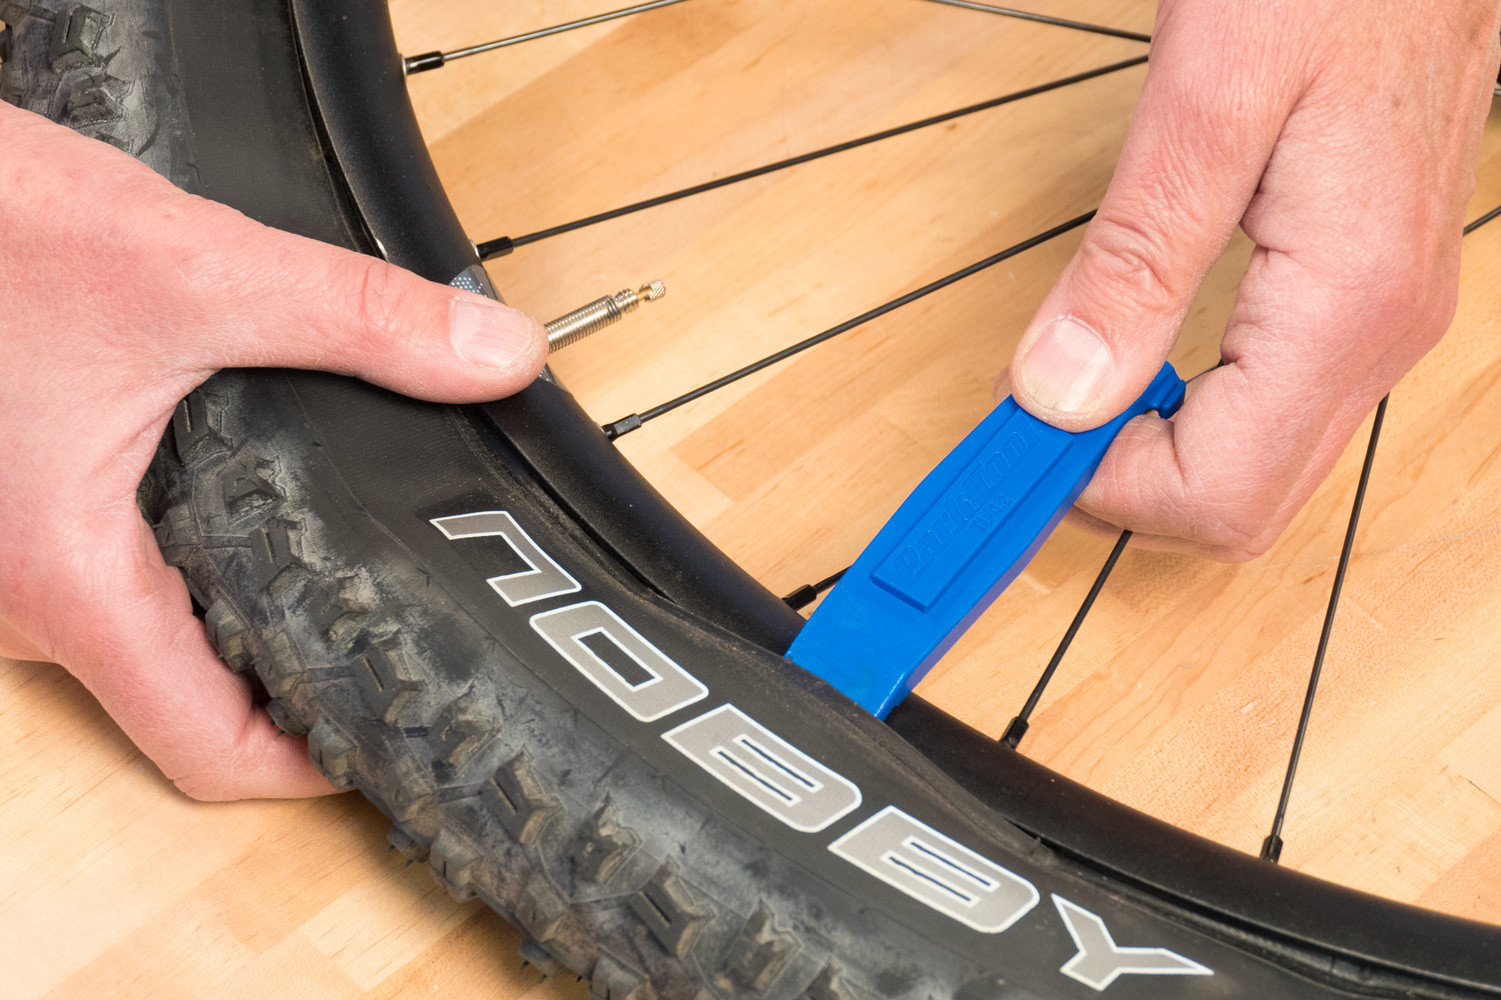 Tube Removal 3 Engage Lever
 - Remove One Side of the Tire: Slide one tire bead completely off the rim.
- Extract the Tube: Pull the tube out from under the tire, starting at the valve stem.
- Remove the Other Side of the Tire: Use the tire levers or your hands to remove the remaining tire bead from the rim.
3.4. Inspecting the Tire and Rim
- Check the Tire: Carefully inspect the inside and outside of the tire for any sharp objects that caused the puncture. Remove any debris.
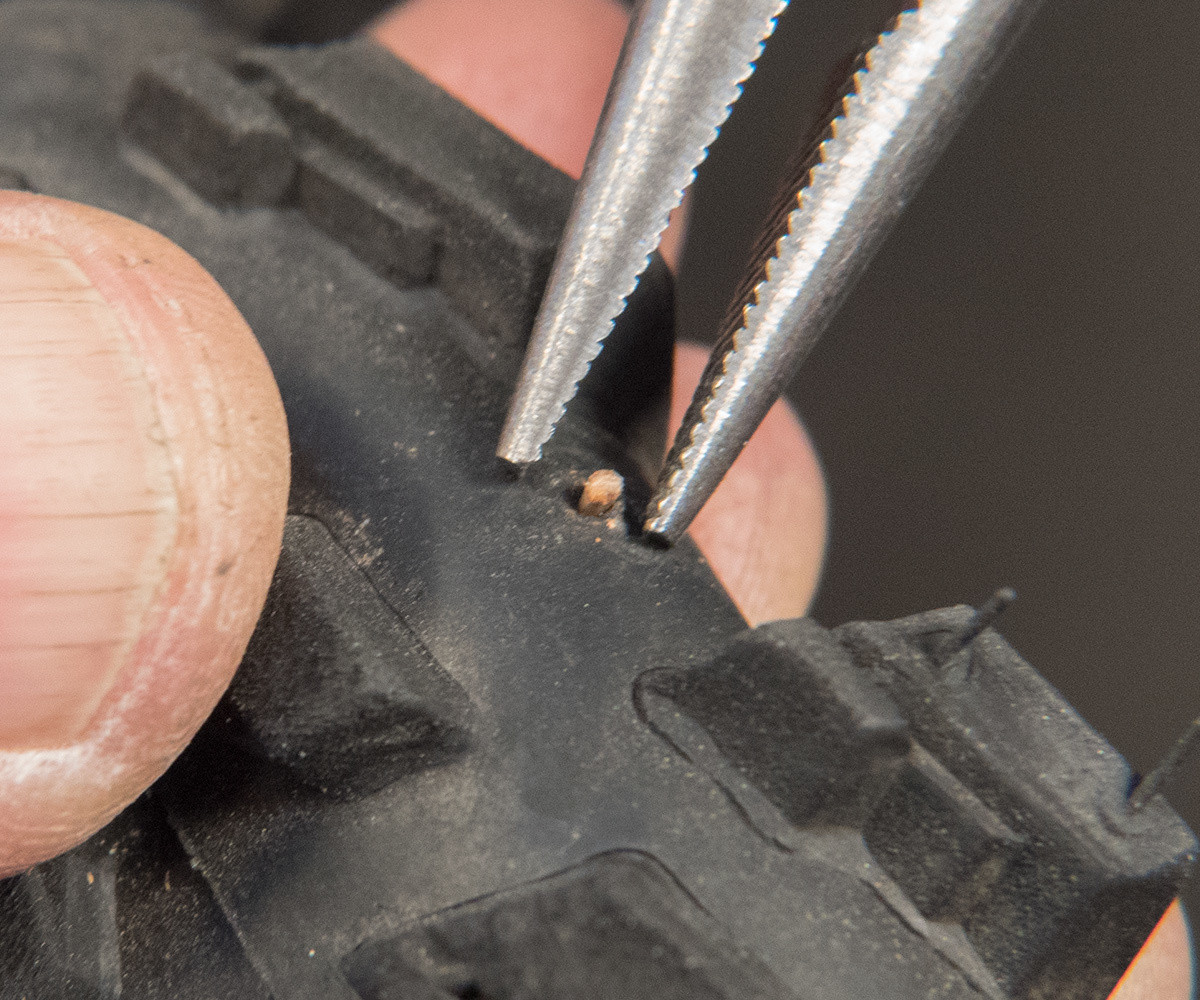 Tube Removal 8 Tread Puncture
 - Inspect the Rim: Check the rim strip for damage or misalignment. Ensure there are no sharp edges or protruding spokes that could puncture the new tube.
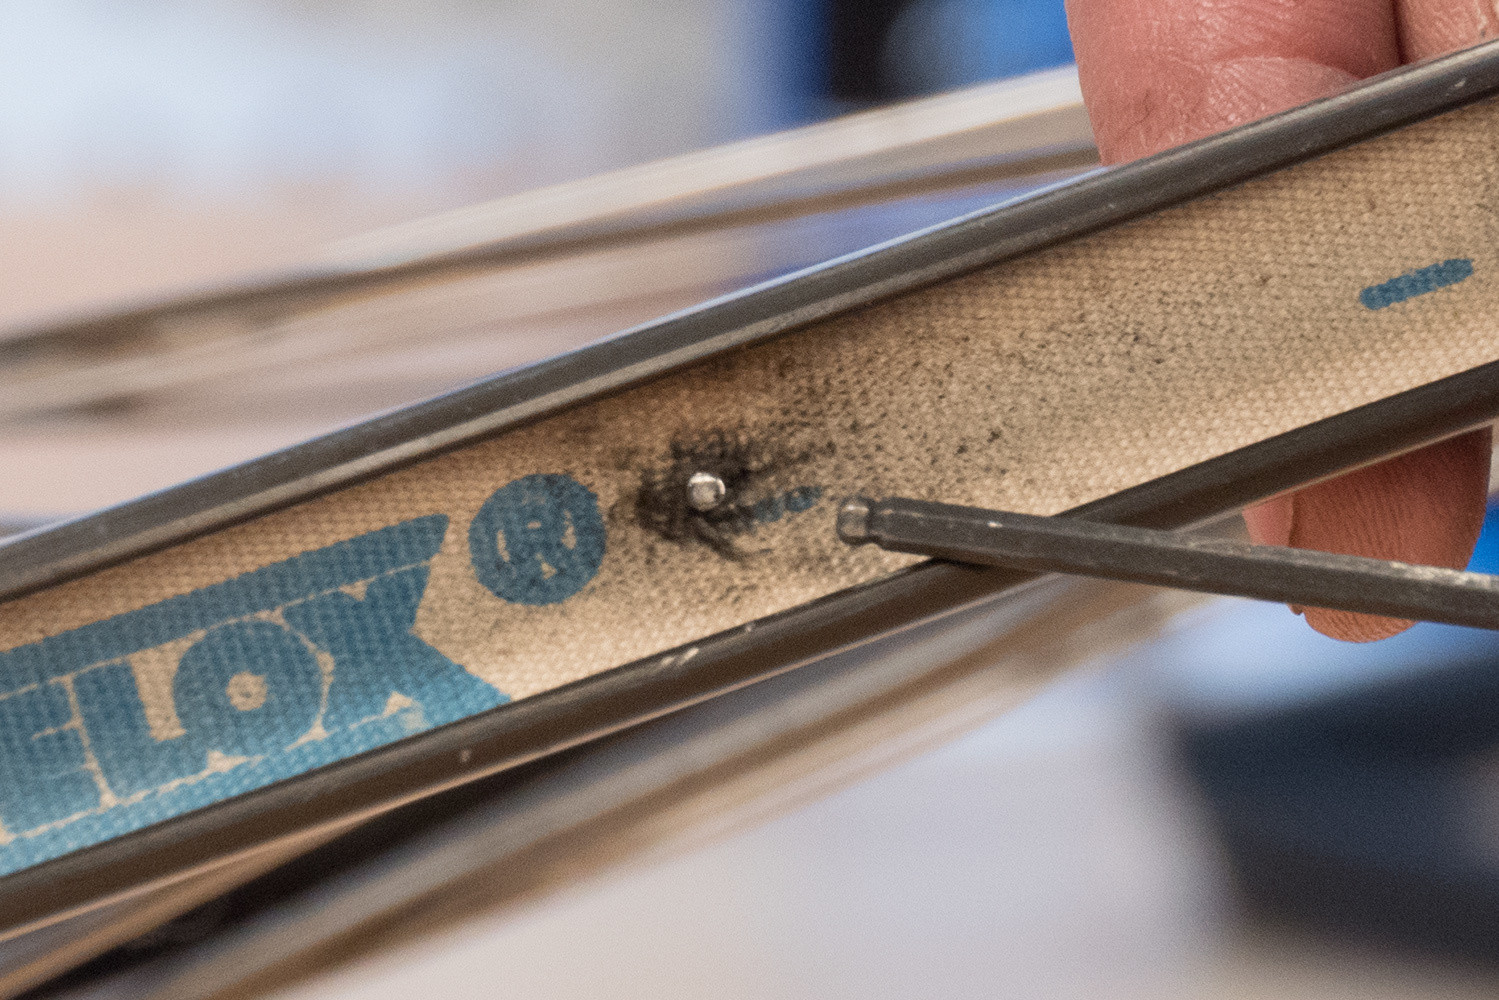 Tube Removal 10 Protruding Spoke
3.5. Installing the New Tube and Tire
- Inflate the New Tube Slightly: Add just enough air to give the tube some shape.
- Insert the Valve Stem: Place the valve stem into the valve hole in the rim.
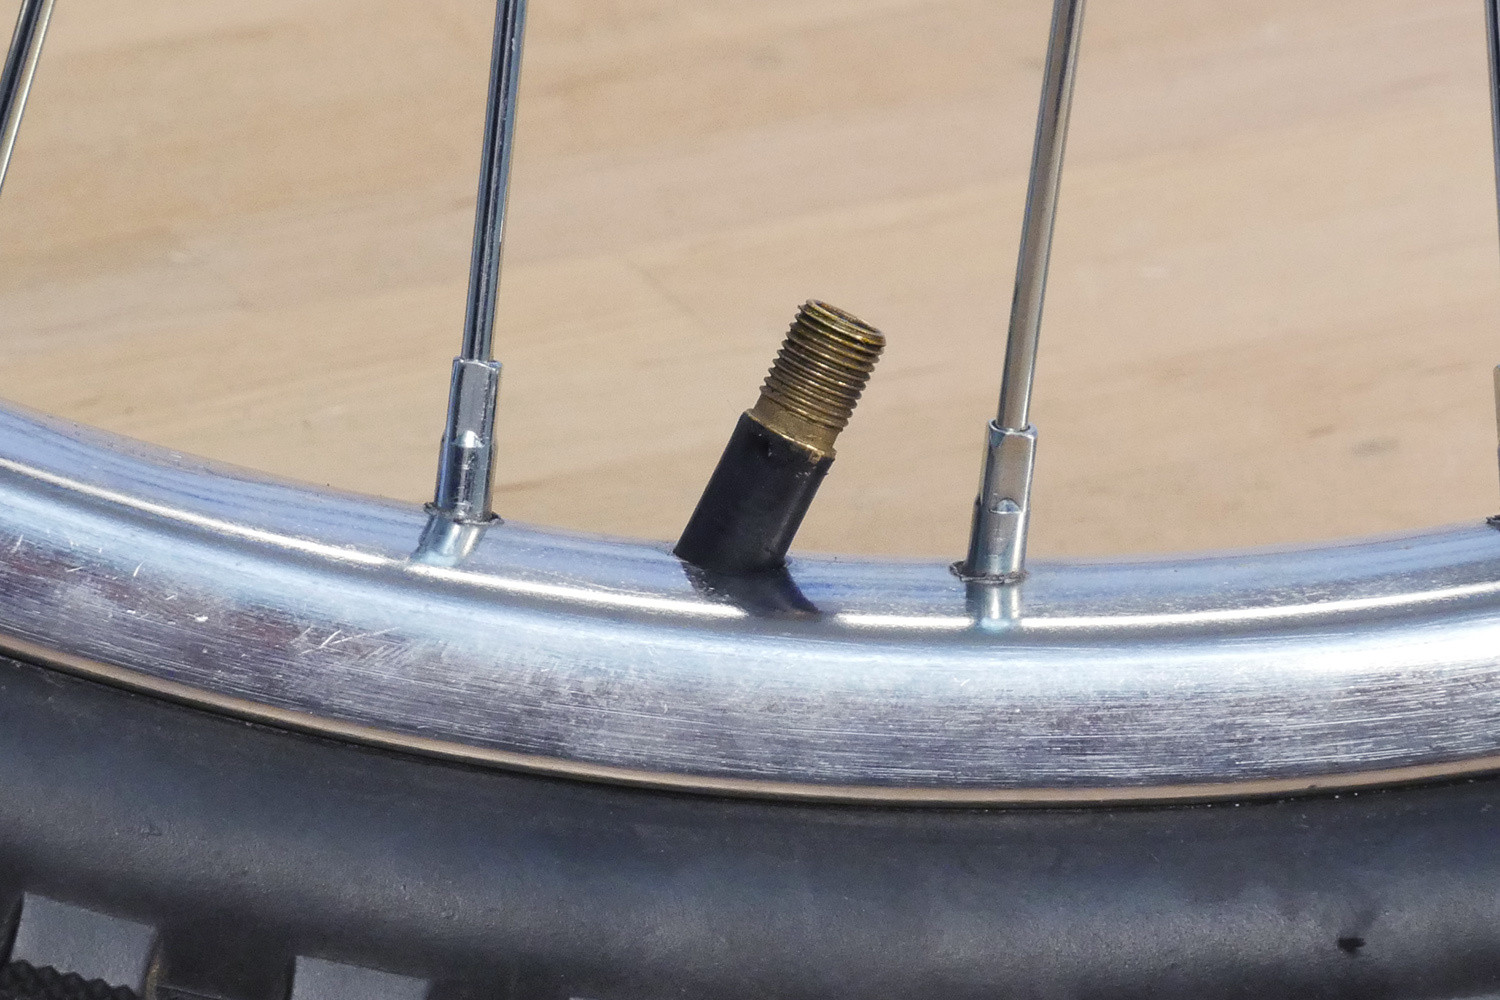 Tube Removal 14 Valve Stem
 - Tuck the Tube Inside the Tire: Carefully tuck the tube into the tire cavity, ensuring it’s evenly distributed.
- Seat One Side of the Tire: Use your hands to push one tire bead back onto the rim.
- Seat the Other Side of the Tire: Starting opposite the valve stem, use your thumbs to push the remaining tire bead onto the rim. If it becomes too difficult, use tire levers, being careful not to pinch the tube.
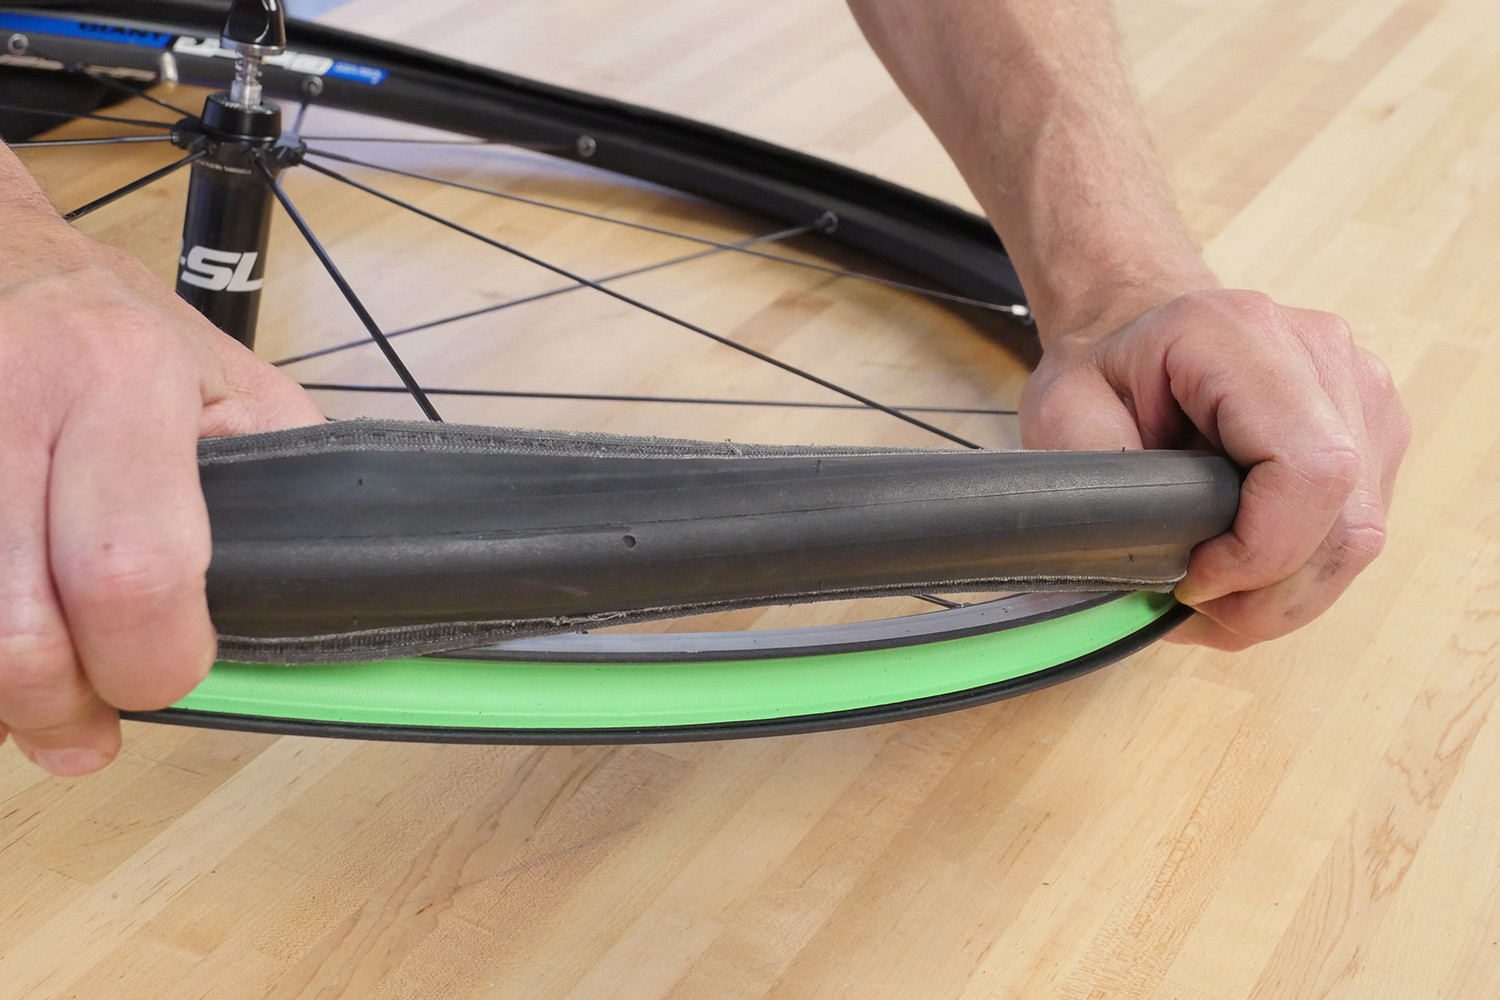 Tube Removal 13 Work Bead
 - Inspect the Tire Seating: Ensure the tire bead is evenly seated around the entire rim. Look for a consistent line near the rim edge.
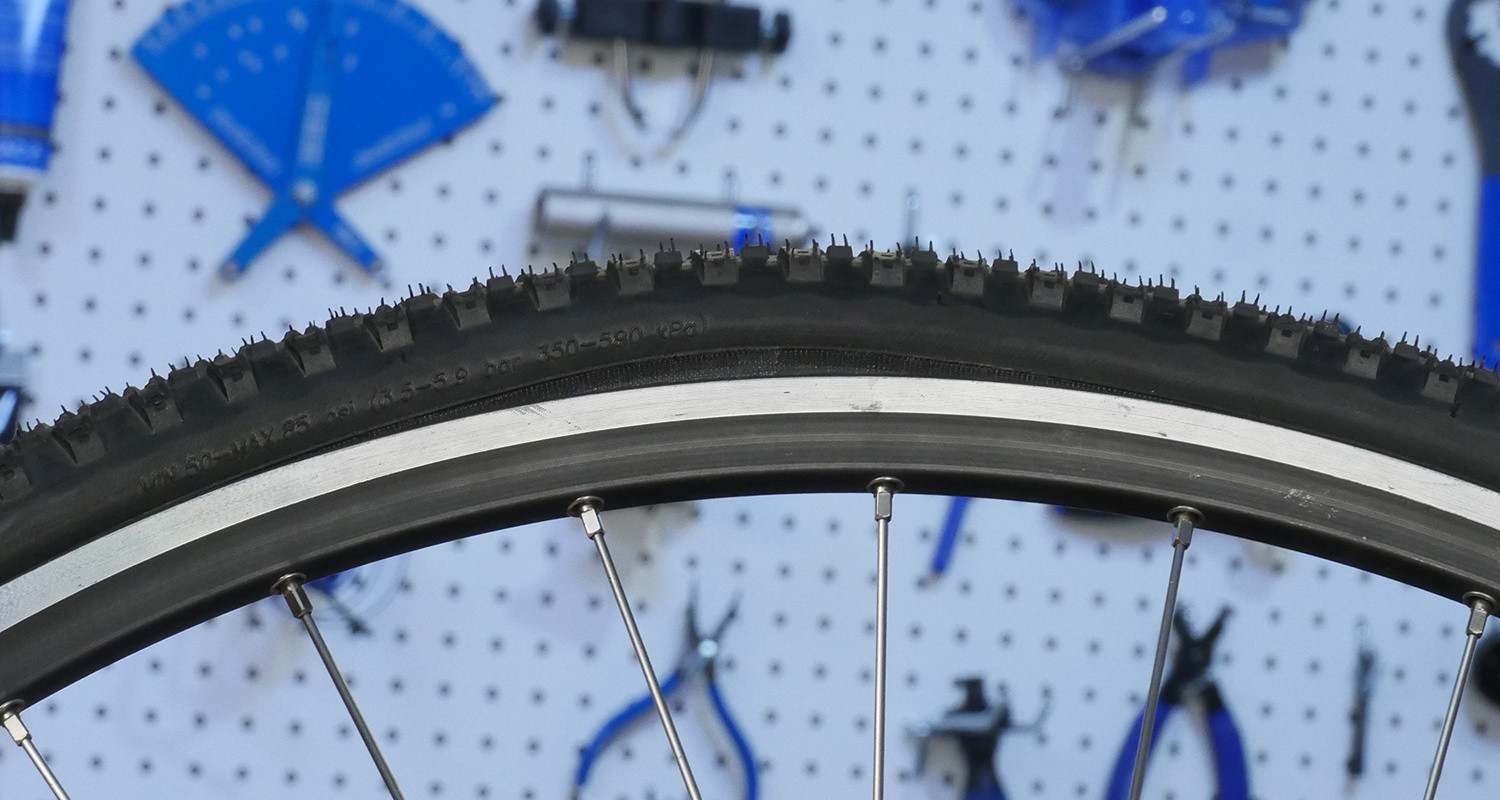 This bead seat line is bulging upward from improper tire seating. Deflate immediately and reseat tire.
 - Inflate to the Correct Pressure: Use a pump or CO2 inflator to inflate the tire to the recommended pressure, as indicated on the tire sidewall.
3.6. Reinstalling the Wheel
- Align the Wheel: Place the wheel back into the frame or fork dropouts, ensuring it’s properly aligned.
- Tighten the Axle: Secure the axle nuts or quick-release lever.
- Re-Engage the Brakes: Reconnect your rim brakes or ensure your disc brake rotor is properly aligned.
3.7. Final Checks and Adjustments
- Spin the Wheel: Check that the wheel spins freely and is not rubbing against the frame or brakes.
- Test the Brakes: Ensure your brakes are functioning properly.
- Take a Short Test Ride: Ride a short distance to ensure everything is working correctly.
By following these steps, you can confidently change a mountain bike tire tube and get back to enjoying your ride. Remember, practice makes perfect, so consider practicing this process at home before heading out on the trail.
4. Pro Tips for a Smooth Tire Change
Changing a tire tube can be a straightforward process, but these pro tips will help you do it even more smoothly:
- Carry Two Spare Tubes: On longer rides, carrying an extra tube can be a lifesaver.
- Use Tire Sealant: Sealant can help prevent flats by sealing small punctures as they occur.
- Practice at Home: Familiarize yourself with the process before you need to do it on the trail.
- Check Tire Pressure Regularly: Maintaining optimal tire pressure reduces the risk of flats.
- Inspect Your Tires Regularly: Look for cuts, embedded objects, or wear and tear.
4.1. Mastering the Art of Using Tire Levers
Using tire levers effectively is a key skill for changing a tire tube. Here are some tips to help you master this technique:
- Use the Right Leverage: Position the levers so that you’re prying the tire bead up and over the rim, not just pushing against it.
- Space the Levers Correctly: Place the levers a few inches apart to gradually lift the tire bead.
- Avoid Pinching the Tube: Be careful not to pinch the inner tube between the tire lever and the rim.
- Use Spoke Hooks: If your levers have spoke hooks, use them to hold the lever in place while you work.
According to experts at usabikers.net, mastering the use of tire levers can significantly reduce the time and effort required to change a tire.
4.2. Preventing Pinch Flats: Techniques and Best Practices
Pinch flats, also known as snake bites, are a common issue for mountain bikers. Here are some techniques to prevent them:
- Maintain Optimal Tire Pressure: Ensure your tires are inflated to the recommended pressure for your weight and riding conditions.
- Use Wider Tires: Wider tires provide more volume and reduce the risk of pinch flats.
- Ride Smoothly: Avoid hitting obstacles head-on and try to roll over them smoothly.
- Consider Tubeless Tires: Tubeless tires eliminate the risk of pinch flats altogether.
By following these practices, you can minimize your chances of experiencing a pinch flat and enjoy a smoother, more trouble-free ride.
5. Troubleshooting Common Issues During Tire Changes
Even with the best preparation, you might encounter some challenges while changing a tire tube. Here are some common issues and how to address them:
- Tire Bead is Too Tight: Use soapy water to lubricate the tire bead and make it easier to seat on the rim.
- Pinching the Tube: Ensure the tube is fully inside the tire before seating the final section of the tire bead.
- Valve Stem is Crooked: Deflate the tire slightly and reposition the valve stem so it’s straight.
- Tire Won’t Inflate: Check that the valve core is not stuck and that the pump is properly connected.
5.1. Dealing with a Stubborn Tire Bead
Sometimes, a tire bead can be particularly difficult to seat on the rim. Here are some tips for dealing with a stubborn tire bead:
- Use Soapy Water: Apply a small amount of soapy water to the tire bead to lubricate it.
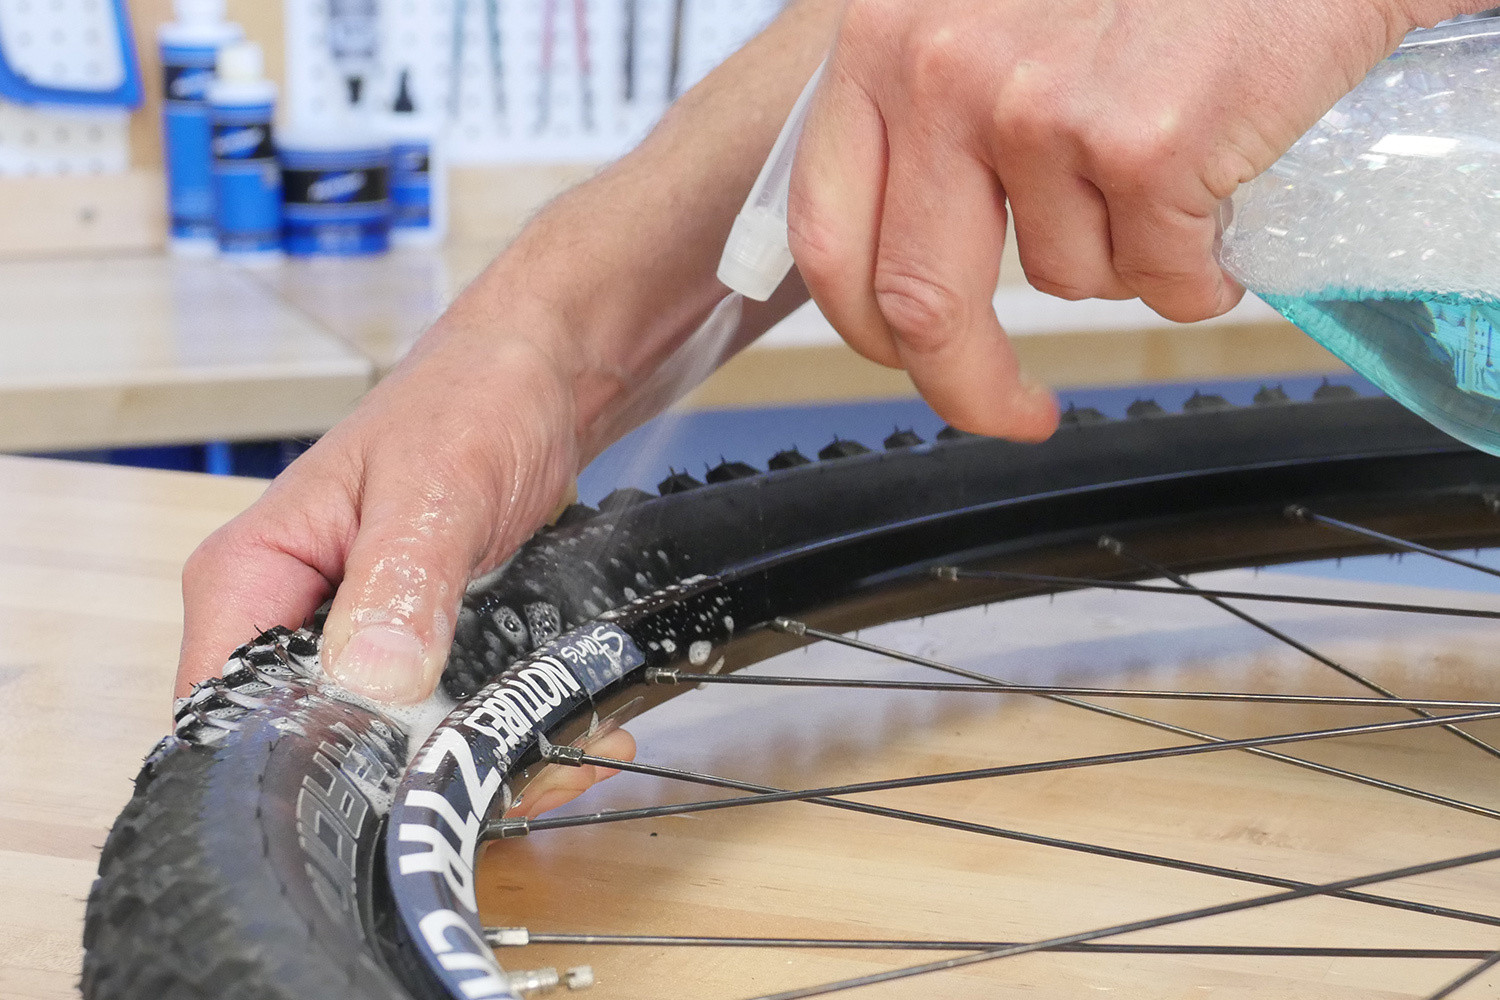 Tube Removal 17 Soap Trick
 - Work the Tire Gradually: Use your thumbs to gradually push the tire bead onto the rim, working your way around the tire.
- Use Tire Levers Carefully: If necessary, use tire levers to gently pry the tire bead onto the rim, being careful not to pinch the tube.
5.2. What to Do if You Pinch the New Tube
If you accidentally pinch the new tube while installing the tire, you’ll need to start over. Here’s what to do:
- Remove the Tire: Use tire levers to remove the tire from the rim.
- Remove the Punctured Tube: Discard the pinched tube.
- Inspect the Tire and Rim: Check for any sharp objects or issues that may have caused the pinch.
- Install a New Tube: Install a fresh tube, being extra careful not to pinch it during the process.
According to usabikers.net, taking your time and being meticulous during the installation process can prevent accidental pinches and save you time and frustration.
6. Maintaining Your Mountain Bike Tires and Tubes for Longevity
Proper maintenance of your mountain bike tires and tubes can significantly extend their lifespan and prevent unexpected flats. Here are some essential maintenance tips:
- Check Tire Pressure Regularly: Inflate your tires to the recommended pressure before each ride.
- Inspect Tires for Wear and Tear: Look for cuts, abrasions, or embedded objects.
- Store Tires Properly: Store tires in a cool, dry place away from direct sunlight.
- Replace Worn Tires: Replace tires when the tread is worn or the sidewalls are damaged.
6.1. The Importance of Proper Tire Pressure
Maintaining the correct tire pressure is crucial for performance, comfort, and preventing flats. Here’s why:
- Reduced Risk of Flats: Proper inflation prevents pinch flats and reduces the likelihood of punctures.
- Improved Rolling Resistance: Correct pressure minimizes rolling resistance, making your ride more efficient.
- Enhanced Traction: Adjusting tire pressure can optimize traction for different trail conditions.
- Increased Comfort: Proper inflation absorbs bumps and vibrations, improving ride comfort.
According to a study by the American Motorcyclist Association (AMA), riders who maintain optimal tire pressure experience fewer flats and improved overall performance.
6.2. When to Replace Your Mountain Bike Tires
Knowing when to replace your mountain bike tires is essential for safety and performance. Here are some signs that it’s time for new tires:
- Worn Tread: When the tread is worn down, your tires will lose traction.
- Sidewall Damage: Cracks, cuts, or bulges in the sidewalls indicate that the tire is compromised.
- Frequent Flats: If you’re experiencing more flats than usual, it may be time to replace your tires.
- Age: Even if the tread looks good, tires can dry rot and become brittle over time.
Replacing your tires at the right time ensures you’re always riding on reliable and safe equipment.
7. Tubeless Tire Conversion: An Upgrade Worth Considering?
Converting to tubeless tires can be a significant upgrade for mountain bikers. Tubeless tires offer several advantages over traditional tube-type tires:
- Reduced Risk of Flats: Tubeless tires are less prone to pinch flats and punctures.
- Lower Tire Pressure: You can run lower tire pressures for improved traction and comfort.
- Better Rolling Resistance: Tubeless tires often have lower rolling resistance than tube-type tires.
- Self-Sealing Punctures: Tire sealant can seal small punctures as they occur.
7.1. The Benefits of Going Tubeless
Going tubeless can transform your mountain biking experience. Here are some key benefits:
- Fewer Flats: Tubeless tires eliminate the risk of pinch flats and reduce the likelihood of punctures.
- Improved Traction: Lower tire pressures allow the tire to conform to the terrain, improving traction.
- Enhanced Comfort: Tubeless tires absorb bumps and vibrations, providing a smoother ride.
- Self-Sealing: Tire sealant can seal small punctures instantly, allowing you to continue riding without interruption.
According to usabikers.net, many experienced mountain bikers swear by tubeless tires for their superior performance and reliability.
7.2. How to Convert Your Mountain Bike Wheels to Tubeless
Converting your mountain bike wheels to tubeless requires a few additional steps and components:
- Tubeless-Ready Wheels and Tires: Ensure your wheels and tires are designed for tubeless use.
- Tubeless Rim Tape: Seal the spoke holes in your rims with tubeless rim tape.
- Tubeless Valves: Install tubeless valves in the valve holes.
- Tire Sealant: Add tire sealant to the tires.
- Inflate the Tires: Use a pump or compressor to inflate the tires and seat the beads.
While the conversion process may seem complex, it’s a worthwhile investment for the benefits it provides.
8. Safety Tips for Mountain Biking
Mountain biking is an exciting and challenging sport, but it’s important to prioritize safety. Here are some essential safety tips:
- Wear a Helmet: Always wear a properly fitted helmet.
- Use Protective Gear: Consider wearing gloves, knee pads, and elbow pads.
- Check Your Bike: Inspect your bike before each ride to ensure it’s in good working condition.
- Know Your Limits: Ride within your skill level and avoid taking unnecessary risks.
- Be Aware of Your Surroundings: Watch out for other trail users, obstacles, and wildlife.
8.1. Essential Gear for Safe Mountain Biking
Having the right gear can significantly enhance your safety and enjoyment on the trail. Here’s a list of essential gear:
- Helmet: Protects your head in the event of a crash.
- Gloves: Provide grip and protect your hands.
- Eye Protection: Protects your eyes from dust, debris, and sunlight.
- Knee and Elbow Pads: Protect your joints from impacts.
- Appropriate Clothing: Wear moisture-wicking clothing that allows for freedom of movement.
8.2. Trail Etiquette: Sharing the Trails with Others
Respecting other trail users is crucial for maintaining a positive trail environment. Here are some important trail etiquette guidelines:
- Yield to Uphill Traffic: Uphill riders have the right of way.
- Announce Your Presence: Use a bell or your voice to alert others when approaching.
- Stay on Marked Trails: Avoid cutting switchbacks or creating new trails.
- Pack Out What You Pack In: Leave no trace of your presence on the trail.
- Be Courteous: Treat other trail users with respect and courtesy.
By following these safety tips and trail etiquette guidelines, you can enjoy a safe and respectful mountain biking experience.
9. Mountain Bike Tire Brands: Choosing the Right One
Choosing the right mountain bike tire brand can significantly impact your riding experience. Here are some popular and reputable brands:
- Maxxis: Known for their durable and high-performance tires.
- Continental: Offers a wide range of tires for various riding conditions.
- Schwalbe: Renowned for their innovative designs and quality construction.
- Specialized: Provides tires that are specifically designed for their bikes.
- Vittoria: Known for their graphene-enhanced tires that offer exceptional grip and durability.
9.1. Comparing Popular Tire Brands
Each tire brand has its strengths and weaknesses. Here’s a brief comparison:
| Brand | Strengths | Weaknesses |
|---|---|---|
| Maxxis | Durability, performance in various conditions. | Can be more expensive. |
| Continental | Wide range of options, good value for money. | Some models may not be as durable as others. |
| Schwalbe | Innovative designs, high-quality construction. | Can be more expensive. |
| Specialized | Designed specifically for their bikes, good overall performance. | Limited availability. |
| Vittoria | Graphene-enhanced tires, exceptional grip. | Can be more expensive. |
9.2. Factors to Consider When Choosing a Tire Brand
When choosing a tire brand, consider the following factors:
- Riding Style: Different tires are designed for different riding styles, such as cross-country, trail, or downhill.
- Terrain: Consider the type of terrain you’ll be riding on, such as loose dirt, rocks, or roots.
- Durability: Choose a tire that’s durable enough to withstand the rigors of mountain biking.
- Grip: Look for a tire with good grip for enhanced traction and control.
- Price: Consider your budget and choose a tire that offers the best value for your money.
By carefully considering these factors, you can choose the right tire brand and model for your needs.
10. Joining the Biker Community with usabikers.net
usabikers.net is more than just a website; it’s a community for motorcycle enthusiasts across the USA. Whether you’re a seasoned biker or just starting, usabikers.net offers a wealth of information, resources, and connections to enhance your riding experience.
10.1. Benefits of Joining the usabikers.net Community
Being part of the usabikers.net community comes with several advantages:
- Access to Expert Advice: Connect with experienced bikers who can offer valuable tips and guidance.
- Stay Updated on Events: Get the latest information on biker events, rallies, and meetups.
- Share Your Experiences: Share your own stories, photos, and videos with the community.
- Find Riding Partners: Connect with other bikers in your area and plan group rides.
- Learn About Maintenance and Repair: Access how-to guides and tutorials on motorcycle maintenance and repair.
10.2. How to Get Involved with usabikers.net
Getting involved with usabikers.net is easy:
- Visit the Website: Explore the website to discover articles, forums, and resources.
- Create an Account: Sign up for an account to participate in discussions and connect with other members.
- Join the Forums: Engage in conversations on various topics related to motorcycles and biking culture.
- Attend Events: Look for local biker events and meetups organized by usabikers.net members.
- Share Your Content: Contribute your own articles, photos, and videos to the website.
By joining the usabikers.net community, you’ll be part of a passionate and supportive network of motorcycle enthusiasts who share your love for the open road.
Ready to explore more? Visit usabikers.net today to discover a wealth of articles, join our vibrant community, and gear up for your next unforgettable ride. Whether you’re seeking advice, looking for riding partners, or wanting to share your adventures, usabikers.net is your ultimate destination for all things motorcycle in the USA. Don’t miss out—connect, learn, and ride with us! Contact us at Address: 801 Sturgis Main St, Sturgis, SD 57785, United States. Phone: +1 (605) 347-2000.