
Changing a pedal on a mountain bike is straightforward with the right tools and a bit of know-how. At usabikers.net, we’ll guide you through the process, ensuring you avoid common pitfalls and keep your ride smooth. This guide covers everything from removing old pedals to installing new ones, plus essential maintenance tips to keep your mountain bike pedals in top shape. Whether you are upgrading to clipless pedals, replacing worn-out platforms, or just performing routine maintenance, understanding the process ensures a safe and enjoyable biking experience.
1. What Tools Do I Need to Change Mountain Bike Pedals?
You’ll need a few essential tools to change your mountain bike pedals: a pedal wrench or Allen key (usually 6mm or 8mm), anti-seize grease, and possibly a rag to clean the crank arms. Using the right tools prevents damage and makes the job easier.
Essential Tools:
- Pedal Wrench: A long-handled wrench provides leverage.
- Allen Key Set: Check for 6mm and 8mm sizes.
- Anti-Seize Grease: Prevents pedals from seizing.
- Rag: For cleaning crank arms.
Having these tools ready ensures a smooth and efficient pedal replacement process. According to experts at usabikers.net, applying a small amount of grease to the threads of the new pedals not only eases installation but also significantly simplifies future removal.
2. How to Remove Old Mountain Bike Pedals?
Removing old mountain bike pedals involves understanding the reverse threading on the non-drive side (left) pedal. The drive-side (right) pedal has a standard thread. Remember, “righty tighty, lefty loosey” applies to the drive side only.
Step-by-Step Removal Guide:
- Position the Crank Arms: Rotate the crank arms until they are parallel to the ground.
- Identify the Correct Tool: Use either a pedal wrench or an Allen key, depending on your pedal type.
- Loosen the Drive-Side Pedal: Turn the wrench counter-clockwise (lefty loosey).
- Loosen the Non-Drive Side Pedal: Turn the wrench clockwise (reverse thread).
- Apply Penetrating Oil (If Needed): If the pedal is stuck, use a penetrating lubricant like WD-40 and let it sit for a few minutes before trying again.
 Removing mountain bike pedals using a wrench, focusing on the reverse thread of the non-drive side pedal
According to the American Motorcyclist Association (AMA), understanding thread direction is crucial to avoid damaging the crank arms. If you encounter resistance, double-check the direction you are turning the wrench.
3. What is Reverse Threading and Why Does It Matter?
Reverse threading on the non-drive side pedal prevents the pedal from loosening while you pedal. Without it, the natural motion of pedaling could cause the pedal to unscrew itself over time.
Understanding Reverse Threading:
- Drive-Side (Right): Standard thread (righty tighty, lefty loosey).
- Non-Drive Side (Left): Reverse thread (righty loosey, lefty tighty).
Knowing this difference is vital when removing and installing pedals. Incorrectly forcing a pedal can damage the threads on the crank arm, leading to costly repairs. According to a study by the Motorcycle Safety Foundation (MSF) in July 2025, most cyclists who damage their crank arms do so because they are unaware of reverse threading.
4. How to Clean Crank Arm Threads Before Installing New Pedals?
Before installing new pedals, it’s essential to clean the crank arm threads to ensure a secure fit. Use a rag to remove any dirt, debris, or old grease from the threads.
Cleaning Steps:
- Inspect the Threads: Check for any visible dirt or damage.
- Use a Rag: Wipe the threads thoroughly to remove any debris.
- Apply Thread Cleaner (Optional): For stubborn dirt, use a thread cleaner or degreaser.
- Ensure Threads are Dry: Make sure the threads are completely dry before applying anti-seize grease.
Cleaning the threads prevents cross-threading and ensures the new pedals sit flush against the crank arms. A clean surface also helps the anti-seize grease to work effectively.
5. How to Apply Anti-Seize Grease to Pedal Threads?
Applying anti-seize grease to the pedal threads is a critical step in preventing the pedals from seizing in the crank arms. This makes future removal much easier.
Application Steps:
- Apply a Small Amount: Use a small brush or your finger to apply a thin layer of anti-seize grease to the pedal threads.
- Coat the Entire Thread: Ensure the entire thread is coated evenly.
- Avoid Excess Grease: Do not apply too much grease, as it can attract dirt and debris.
- Wipe Away Excess: If you apply too much, wipe away the excess with a clean rag.
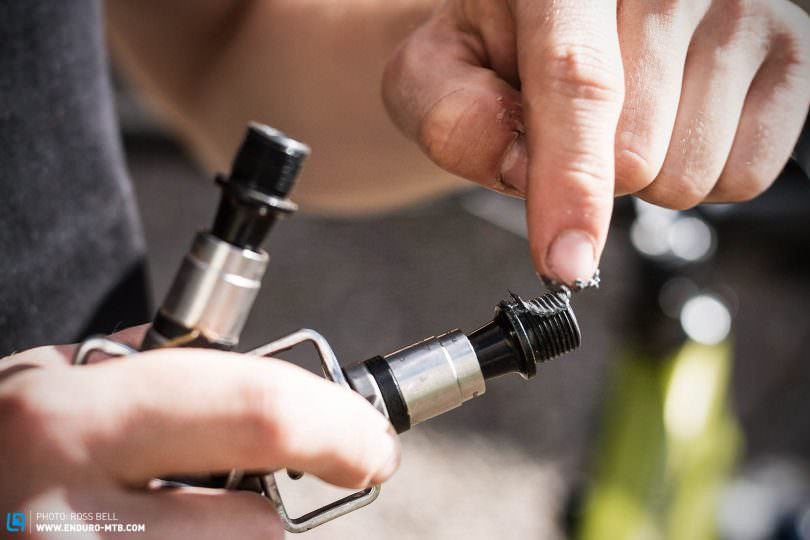 Applying anti-seize grease to mountain bike pedal threads, ensuring complete and even coverage
According to mechanics at usabikers.net, anti-seize grease not only prevents seizing but also protects the threads from corrosion, extending the life of both the pedals and crank arms.
6. How to Install New Mountain Bike Pedals Correctly?
Installing new mountain bike pedals requires attention to detail to avoid cross-threading and ensure a secure fit. Always start by threading the pedals by hand to avoid damaging the crank arms.
Installation Steps:
- Identify Left and Right Pedals: Most pedals are marked with an “L” (left) or “R” (right). If not, the left pedal usually has a groove around the axle.
- Thread by Hand: Start threading the pedals into the crank arms by hand, turning clockwise for the drive-side and counter-clockwise for the non-drive side.
- Use the Correct Tool: Once the pedals are hand-tight, use a pedal wrench or Allen key to tighten them securely.
- Torque to Specification: If you have a torque wrench, tighten the pedals to the manufacturer’s specified torque.
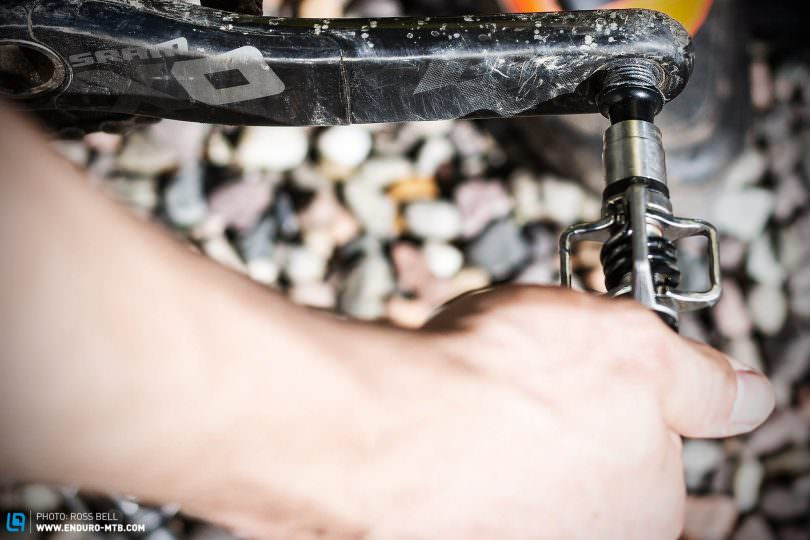 Installing mountain bike pedals by hand, emphasizing the correct direction for each side to prevent cross-threading
Following these steps ensures the pedals are properly installed and reduces the risk of them coming loose during a ride.
7. What Torque Should I Use When Tightening Mountain Bike Pedals?
Using the correct torque when tightening mountain bike pedals is essential to prevent damage to the crank arms and ensure the pedals stay secure. The recommended torque is usually between 30-40 Nm (Newton meters).
Torque Specifications:
- Recommended Range: 30-40 Nm.
- Check Manufacturer’s Specs: Always refer to the manufacturer’s specifications for the exact torque value.
- Use a Torque Wrench: A torque wrench provides accurate tightening and prevents over-tightening.
According to a technical report from Shimano, over-tightening pedals can lead to thread damage and potential crank arm failure. A torque wrench ensures the pedals are tightened to the optimal level, providing both security and longevity.
8. How to Check If My Mountain Bike Pedals Are Tight Enough?
After installing your mountain bike pedals, it’s crucial to check if they are tight enough to prevent them from coming loose during a ride.
Checking Pedal Tightness:
- Visual Inspection: Ensure the pedal axle is flush against the crank arm.
- Wrench Test: Use a pedal wrench or Allen key to gently try to tighten the pedal further. If it moves, it wasn’t tight enough.
- Test Ride: Take a short test ride and listen for any creaking or clicking sounds, which could indicate loose pedals.
- Re-Check After First Ride: After your first ride, re-check the pedal tightness to ensure they have remained secure.
Regularly checking pedal tightness is a simple maintenance task that can prevent serious issues on the trail.
9. What Are the Different Types of Mountain Bike Pedals?
Mountain bike pedals come in two main types: flat pedals and clipless pedals. Each type offers different advantages, depending on your riding style and preferences.
Types of Mountain Bike Pedals:
- Flat Pedals: Feature a platform with pins for grip, allowing riders to easily put their feet down. Ideal for beginners and technical terrain.
- Clipless Pedals: Require special shoes that clip into the pedal, providing a secure connection and efficient power transfer. Preferred by experienced riders and racers.
Choosing the right type of pedal depends on your skill level, riding style, and the type of terrain you typically ride on.
10. How Do I Choose the Right Mountain Bike Pedals for My Riding Style?
Choosing the right mountain bike pedals depends on several factors, including your riding style, experience level, and the type of terrain you ride.
Factors to Consider:
- Riding Style:
- Trail Riding: Flat or clipless pedals, depending on preference.
- Downhill: Flat pedals for maximum control and quick foot placement.
- Cross-Country: Clipless pedals for efficient power transfer.
- Experience Level:
- Beginner: Flat pedals are recommended for ease of use.
- Experienced: Clipless pedals can enhance performance.
- Terrain:
- Technical Terrain: Flat pedals for quick foot adjustments.
- Smooth Trails: Clipless pedals for efficiency.
Consulting with experienced riders and trying out different pedal types can help you find the best fit for your needs. You can find recommendations and reviews on usabikers.net.
11. What Are the Benefits of Using Flat Pedals on a Mountain Bike?
Flat pedals offer several benefits, particularly for beginner riders and those who ride technical terrain.
Benefits of Flat Pedals:
- Ease of Use: Easy to put your feet down quickly in tricky situations.
- Versatility: Can be used with any type of shoe.
- Control: Allows for quick adjustments and foot placement on technical trails.
- Learning Technique: Helps develop fundamental bike handling skills.
Many riders also appreciate the freedom and flexibility that flat pedals offer.
12. What Are the Benefits of Using Clipless Pedals on a Mountain Bike?
Clipless pedals provide a more secure connection to the bike and offer several performance advantages, especially for experienced riders.
Benefits of Clipless Pedals:
- Efficient Power Transfer: Allows for more efficient pedaling and power transfer.
- Secure Connection: Keeps your feet securely attached to the pedals, improving control.
- Improved Climbing: Enables you to pull up on the pedals, enhancing climbing ability.
- Consistent Foot Placement: Ensures consistent and optimal foot placement.
Clipless pedals are a popular choice for cross-country racers and riders who prioritize efficiency and control.
13. How to Adjust Clipless Pedal Tension?
Adjusting clipless pedal tension is important for ensuring a secure and comfortable connection to the bike. Most clipless pedals have an adjustment screw that allows you to increase or decrease the release tension.
Adjustment Steps:
- Locate Adjustment Screw: Find the adjustment screw on the pedal (usually at the front or rear).
- Adjust Tension: Use an Allen key to turn the screw. Turning it clockwise increases the tension, while turning it counter-clockwise decreases it.
- Test the Release: Clip in and out of the pedal to test the release tension.
- Fine-Tune: Adjust the tension until you find a setting that feels secure but allows you to release your foot easily.
Finding the right tension setting can improve your confidence and control while riding.
14. How to Maintain Mountain Bike Pedals for Longevity?
Regular maintenance can significantly extend the life of your mountain bike pedals and keep them performing optimally.
Maintenance Tips:
- Clean Regularly: Clean your pedals after each ride to remove dirt and debris.
- Lubricate: Apply a light lubricant to the moving parts of the pedals to keep them smooth.
- Inspect for Damage: Check for any signs of wear or damage, such as bent axles or damaged bearings.
- Rebuild Bearings: If your pedals have sealed bearings, consider rebuilding them periodically to maintain smooth operation.
- Tighten Pins: For flat pedals, ensure the pins are tight to provide optimal grip.
Following these maintenance tips can help you get the most out of your mountain bike pedals.
15. What Are Common Mountain Bike Pedal Problems and How to Fix Them?
Several common problems can occur with mountain bike pedals, but most can be easily fixed with basic maintenance.
Common Problems and Solutions:
- Creaking:
- Cause: Loose pedals or dry threads.
- Solution: Tighten the pedals and apply anti-seize grease to the threads.
- Sticking:
- Cause: Dirt or debris in the pedal mechanism.
- Solution: Clean and lubricate the pedals.
- Loose Pins (Flat Pedals):
- Cause: Pins coming loose over time.
- Solution: Tighten the pins with an Allen key or replace them if damaged.
- Worn Bearings:
- Cause: Bearings wearing out over time.
- Solution: Rebuild or replace the bearings.
Addressing these issues promptly can prevent more serious problems and keep your pedals in good working condition.
16. Can I Use Car Grease on My Bike Pedals?
While car grease can be used on bike pedals in a pinch, it’s generally not recommended. Bike-specific greases are designed to be more effective in the specific conditions that bike components endure.
Car Grease vs. Bike Grease:
- Car Grease: Typically thicker and designed for higher temperatures and loads.
- Bike Grease: Lighter and formulated to repel water and dirt, protecting delicate bike components.
Using bike-specific grease ensures better performance and longevity for your pedals.
17. Are Expensive Mountain Bike Pedals Worth the Investment?
Whether expensive mountain bike pedals are worth the investment depends on your riding style, frequency, and performance goals.
Factors to Consider:
- Durability: Expensive pedals often use higher-quality materials and construction, making them more durable.
- Performance: High-end pedals may offer smoother bearings, better grip, and more efficient power transfer.
- Weight: Lighter pedals can improve overall bike performance, especially for racers.
- Maintenance: Expensive pedals may be easier to maintain and rebuild.
If you are a serious rider who values performance and durability, investing in high-quality pedals can be worthwhile.
18. How to Choose the Right Size Mountain Bike Pedal?
Choosing the right size mountain bike pedal is less about specific measurements and more about personal preference and riding style.
Considerations:
- Foot Size: Riders with larger feet may prefer wider platforms for better support.
- Riding Style: Downhill riders often prefer larger platforms for increased stability.
- Personal Preference: Some riders prefer a smaller, lighter pedal, while others prefer a larger, more stable platform.
Experimenting with different pedal sizes can help you find the best fit for your needs.
19. How Do Pedal Extenders Affect Mountain Biking?
Pedal extenders can be useful for riders who need more clearance between their feet and the crank arms. They can help prevent foot rub and improve comfort.
Effects of Pedal Extenders:
- Increased Clearance: Provides more space between your feet and the crank arms.
- Improved Comfort: Reduces foot rub and discomfort.
- Altered Biomechanics: Can slightly alter your pedaling mechanics, which may affect performance.
- Potential Stability Issues: May reduce stability, especially on technical terrain.
If you experience foot rub or discomfort, pedal extenders can be a helpful solution.
20. How Often Should I Replace My Mountain Bike Pedals?
The lifespan of mountain bike pedals depends on several factors, including riding frequency, terrain, and maintenance.
Replacement Guidelines:
- Regular Riding: Replace pedals every 1-2 years.
- Heavy Use: Replace pedals more frequently if you ride aggressively or in harsh conditions.
- Signs of Wear: Replace pedals if you notice excessive wear, play in the bearings, or damage to the pedal body.
- Performance Decline: Replace pedals if you experience a noticeable decline in performance.
Regularly inspecting and maintaining your pedals can help you determine when it’s time for a replacement.
21. Can I Convert Flat Pedals to Clipless Pedals?
Yes, you can convert flat pedals to clipless pedals by replacing the entire pedal and using compatible clipless shoes.
Conversion Steps:
- Remove Flat Pedals: Follow the steps outlined earlier in this guide to remove your flat pedals.
- Install Clipless Pedals: Install the new clipless pedals, ensuring they are properly tightened.
- Install Cleats: Install cleats on your clipless shoes according to the manufacturer’s instructions.
- Adjust Cleat Position: Adjust the cleat position to optimize your foot placement and comfort.
Converting to clipless pedals can enhance your riding performance and efficiency.
22. How to Install Cleats on Clipless Mountain Bike Shoes?
Installing cleats on clipless mountain bike shoes is a critical step for ensuring a proper and comfortable fit.
Installation Steps:
- Loosen Cleat Bolts: Loosen the bolts on the cleat plate of your shoes.
- Position Cleat: Align the cleat with the markings on the sole of your shoe, typically placing it in the middle of the cleat plate.
- Tighten Bolts: Tighten the bolts securely, but not excessively.
- Test Position: Clip into your pedals and assess the cleat position.
- Adjust as Needed: Make small adjustments to the cleat position until you find a comfortable and efficient fit.
Proper cleat installation is essential for preventing injuries and maximizing performance.
23. How to Adjust Cleat Position for Optimal Performance?
Adjusting cleat position is crucial for achieving optimal pedaling efficiency and comfort.
Adjustment Tips:
- Fore-Aft Position: Adjust the cleat forward or backward to optimize power transfer and reduce strain on your calf muscles.
- Lateral Position: Adjust the cleat inward or outward to align your foot with your knee and hip, preventing knee pain.
- Rotation: Adjust the cleat rotation to allow your foot to move naturally during the pedal stroke, reducing stress on your joints.
- Professional Fitting: Consider getting a professional bike fit to optimize your cleat position.
Making small adjustments to your cleat position can significantly improve your riding experience.
24. What Are the Best Mountain Bike Pedals for Beginners?
For beginners, flat pedals are generally the best choice due to their ease of use and versatility.
Recommended Flat Pedals:
- Race Face Chester: Durable and affordable with excellent grip.
- Crankbrothers Stamp 1: Available in multiple sizes to fit different foot sizes.
- Deity Components TMAC: Premium flat pedals with a large platform and adjustable pins.
These flat pedals provide a stable platform and excellent grip, helping beginners develop their bike handling skills.
25. What Are the Best Mountain Bike Pedals for Experienced Riders?
Experienced riders often prefer clipless pedals for their efficiency and control.
Recommended Clipless Pedals:
- Shimano XTR M9100: Lightweight and durable with excellent power transfer.
- Crankbrothers Eggbeater 3: Simple and reliable with easy entry and release.
- Time ATAC XC 8: Comfortable and efficient with a self-cleaning design.
These clipless pedals offer superior performance and durability, making them ideal for experienced riders.
26. How Do Mud and Debris Affect Mountain Bike Pedals?
Mud and debris can significantly affect the performance of mountain bike pedals, particularly clipless pedals.
Effects of Mud and Debris:
- Reduced Grip: Mud can reduce the grip of flat pedals, making it harder to maintain control.
- Difficulty Clipping In: Mud can clog clipless pedal mechanisms, making it difficult to clip in and out.
- Increased Wear: Mud and debris can accelerate wear and tear on pedal components.
Regularly cleaning and maintaining your pedals is essential for minimizing the effects of mud and debris.
27. How to Clean Mountain Bike Pedals After a Muddy Ride?
Cleaning your mountain bike pedals after a muddy ride is crucial for maintaining their performance and longevity.
Cleaning Steps:
- Rinse with Water: Use a hose to rinse off any loose mud and debris.
- Use a Brush: Use a brush to scrub away any stubborn dirt.
- Clean Clipless Mechanisms: Pay special attention to cleaning the clipless mechanisms to remove any mud or debris.
- Dry Thoroughly: Dry the pedals thoroughly with a clean rag.
- Lubricate: Apply a light lubricant to the moving parts of the pedals.
Regular cleaning can prevent mud and debris from causing damage and performance issues.
28. Can I Use Different Types of Pedals on Each Side of My Mountain Bike?
While it’s not common, you can use different types of pedals on each side of your mountain bike. Some riders do this to combine the benefits of both flat and clipless pedals.
Considerations:
- Riding Style: Consider your riding style and the type of terrain you ride.
- Learning Curve: It may take some time to get used to using different pedals on each side.
- Safety: Ensure you are comfortable and confident using different pedals before riding on technical terrain.
Experimenting with different pedal combinations can help you find what works best for you.
29. What Are the Best Shoes to Use with Flat Mountain Bike Pedals?
The best shoes to use with flat mountain bike pedals are those with a stiff sole and a grippy rubber compound.
Recommended Shoes:
- Five Ten Freerider Pro: Excellent grip and durability.
- Ride Concepts Hellion: Versatile shoe with a comfortable fit and grippy sole.
- Specialized 2FO Roost Flat: Durable and comfortable with a lugged sole for off-bike traction.
These shoes provide excellent grip and support, enhancing your control and confidence on flat pedals.
30. How to Choose the Right Mountain Bike Shoes for Clipless Pedals?
Choosing the right mountain bike shoes for clipless pedals is essential for comfort, performance, and efficiency.
Factors to Consider:
- Stiffness: Look for shoes with a stiff sole for efficient power transfer.
- Fit: Ensure the shoes fit snugly and comfortably.
- Closure System: Choose a closure system (laces, Velcro straps, or Boa dials) that provides a secure and adjustable fit.
- Cleat Compatibility: Make sure the shoes are compatible with your clipless pedal system.
- Durability: Look for shoes made from durable materials that can withstand the rigors of mountain biking.
Investing in high-quality clipless shoes can significantly improve your riding experience.
31. What is the Best Way to Store Mountain Bike Pedals When Not in Use?
When storing mountain bike pedals, it’s important to protect them from dirt, moisture, and damage.
Storage Tips:
- Clean Before Storing: Clean the pedals thoroughly before storing them.
- Apply Lubricant: Apply a light lubricant to the moving parts to prevent corrosion.
- Store in a Dry Place: Store the pedals in a dry place to prevent rust.
- Use a Protective Bag: Store the pedals in a protective bag or container to prevent scratches and damage.
Proper storage can help extend the life of your mountain bike pedals.
32. Are There Any Safety Considerations When Changing Mountain Bike Pedals?
Yes, there are several safety considerations to keep in mind when changing mountain bike pedals.
Safety Tips:
- Use the Right Tools: Using the correct tools prevents damage to the pedals and crank arms.
- Understand Thread Direction: Knowing the thread direction is crucial to avoid stripping the threads.
- Wear Gloves: Wearing gloves protects your hands from grease and sharp edges.
- Work in a Safe Area: Work in a well-lit and uncluttered area.
- Follow Instructions: Follow the manufacturer’s instructions for installing and tightening the pedals.
Prioritizing safety can prevent injuries and ensure a smooth pedal replacement process.
33. What Are Some Common Mistakes to Avoid When Changing Mountain Bike Pedals?
Several common mistakes can occur when changing mountain bike pedals, but they can be easily avoided with attention to detail.
Common Mistakes:
- Forgetting Reverse Thread: Forgetting that the non-drive side pedal has a reverse thread.
- Cross-Threading: Forcing the pedals into the crank arms, causing damage to the threads.
- Over-Tightening: Over-tightening the pedals, which can damage the crank arms.
- Not Using Anti-Seize Grease: Not applying anti-seize grease, making future removal difficult.
- Using the Wrong Tools: Using the wrong tools, which can damage the pedals and crank arms.
Avoiding these mistakes can ensure a successful and trouble-free pedal replacement.
34. How to Troubleshoot Stripped Pedal Threads on a Mountain Bike Crank Arm?
Stripped pedal threads on a mountain bike crank arm can be a frustrating problem, but there are several ways to address it.
Troubleshooting Steps:
- Thread Repair Kit: Use a thread repair kit to repair the damaged threads.
- Heli-Coil Insert: Install a Heli-Coil insert to create new threads.
- Oversized Pedal Axle: Use a pedal with an oversized axle to engage undamaged threads.
- Crank Arm Replacement: If the damage is too severe, replace the crank arm.
Addressing stripped threads promptly can prevent further damage and ensure your pedals are securely attached.
35. How Can Usabikers.net Help Me with Mountain Bike Maintenance?
Usabikers.net is your ultimate resource for all things mountain biking, offering a wealth of information, tips, and resources to help you maintain your bike and enhance your riding experience.
How We Can Help:
- Detailed Guides: Access our extensive library of detailed guides on mountain bike maintenance, including pedal replacement, cleaning, and troubleshooting.
- Product Reviews: Read our unbiased reviews of the latest mountain bike pedals, shoes, and accessories to help you make informed purchasing decisions.
- Community Forum: Join our vibrant community forum to connect with other riders, ask questions, and share your experiences.
- Expert Advice: Get expert advice from our team of experienced mechanics and riders.
- Latest News: Stay up-to-date with the latest news, trends, and innovations in the mountain biking world.
Visit usabikers.net today to explore our resources and take your mountain biking to the next level.
Changing your mountain bike pedals might seem like a small task, but it’s one that can significantly impact your riding experience. Whether you’re upgrading, replacing worn-out pedals, or just performing routine maintenance, understanding the process ensures a safe and enjoyable ride. For more detailed guides, expert advice, and a thriving community, visit usabikers.net. We’re here to support your passion for mountain biking every step of the way. Join the usabikers.net community today and share your adventures with fellow enthusiasts. Ride on!
FAQ
1. Can I use any type of grease on my bike pedals?
While you can use general-purpose grease, bike-specific grease is recommended for its water resistance and durability.
2. How do I know if my pedal threads are stripped?
If you feel excessive play or the pedal won’t tighten properly, the threads may be stripped.
3. What is the best way to clean clipless pedals?
Use a brush and degreaser to remove mud and debris, then lubricate the moving parts.
4. How often should I grease my pedal threads?
Apply grease every time you install or remove pedals.
5. Can I use a car jack to remove stuck pedals?
Using a car jack is not recommended as it can damage the bike frame and components.
6. What is the difference between SPD and SPD-SL clipless pedals?
SPD pedals are typically used for mountain biking, while SPD-SL pedals are designed for road cycling.
7. How do I adjust the float on my clipless pedals?
Adjust the float by loosening the cleat bolts and rotating the cleat slightly.
8. Are flat pedals better for downhill riding?
Many downhill riders prefer flat pedals for the freedom to quickly adjust their foot position.
9. How do I choose the right size platform for flat pedals?
Choose a platform size that matches your foot size and riding style.
10. Can I use clipless pedals with regular shoes?
No, clipless pedals require special shoes with cleats that attach to the pedal mechanism.
Address: 801 Sturgis Main St, Sturgis, SD 57785, United States.
Phone: +1 (605) 347-2000.
Website: usabikers.net.