
Changing your bike seat height is crucial for comfort, performance, and preventing injuries on your motorcycle, and usabikers.net is here to guide you. This guide provides a comprehensive approach to adjusting your bike seat, ensuring a perfect fit for any rider whether you’re a casual rider or a seasoned biker, with insights into bike ergonomics, seat adjustment techniques, and motorcycle maintenance. For optimal seat comfort and a more enjoyable riding experience, understanding the principles of proper bike seat height is essential, so stick around.
1. Understanding the Importance of Bike Seat Height
Why does bike seat height matter so much? Let’s dive into the specifics.
Adjusting your bike seat height correctly is vital for several reasons, particularly for riders looking to maximize comfort, efficiency, and safety. Understanding the impact of seat height on your riding experience can transform your motorcycle adventures from a potential pain to a pure pleasure.
1.1. Enhancing Comfort on Long Rides
A correctly adjusted bike seat significantly enhances comfort, especially on long rides. When your seat is at the right height, your legs can extend properly, reducing strain on your knees, hips, and back. This is essential for preventing fatigue and discomfort, allowing you to enjoy your journey without the distraction of physical pain. According to the American Motorcyclist Association (AMA), proper ergonomics, including seat height, is a key factor in reducing rider fatigue and improving overall comfort.
1.2. Maximizing Pedaling Efficiency
Optimal seat height plays a crucial role in maximizing pedaling efficiency. When your legs can fully extend without overreaching or feeling cramped, you can generate more power with each pedal stroke. This is particularly important for long-distance riding or tackling challenging terrains where every bit of energy counts. Studies in sports biomechanics have shown that riders with properly adjusted seat heights exhibit improved power output and reduced energy expenditure.
1.3. Preventing Injuries and Strain
Incorrect seat height can lead to various injuries and strains. A seat that’s too low can cause knee pain due to excessive bending, while a seat that’s too high can result in overextension and potential hamstring issues. The Motorcycle Safety Foundation (MSF) emphasizes the importance of proper bike fit, including seat height, to prevent common cycling injuries. Ensuring your seat is at the right height helps maintain the correct alignment of your joints, reducing the risk of long-term physical problems.
1.4. Improving Bike Control and Balance
Proper seat height also contributes to better bike control and balance. When your feet can comfortably reach the ground while seated, you have more stability and control, especially in stop-and-go traffic or when navigating tricky spots. This is particularly beneficial for new riders who are still developing their balance and coordination. A well-adjusted seat ensures that you can confidently handle your bike in various riding conditions, enhancing your overall safety.
1.5. Boosting Confidence on the Road
Lastly, a correctly adjusted seat height boosts confidence on the road. Knowing that your bike is properly fitted to your body can reduce anxiety and improve your focus, allowing you to ride more confidently and enjoy the experience to the fullest. Whether you’re cruising down the highway or exploring winding backroads, a comfortable and well-fitted bike enhances your sense of control and well-being.
By understanding and prioritizing the importance of bike seat height, you can transform your riding experience, making it more comfortable, efficient, and enjoyable.
2. Essential Tools for Adjusting Your Bike Seat
Before you start adjusting your bike seat, make sure you have the right tools on hand. Having the right equipment not only makes the job easier but also ensures that you can make adjustments safely and accurately.
2.1. Wrenches (Allen or Hex Keys)
Wrenches, particularly Allen or hex keys, are essential for loosening and tightening the bolts that secure your seatpost. The size of the wrench you need will vary depending on your bike, but a set of Allen wrenches is a versatile addition to any biker’s toolkit. Look for a set that includes a range of sizes to accommodate different bolt types. High-quality wrenches are less likely to strip the bolts, ensuring a smooth and secure adjustment process.
2.2. Torque Wrench
A torque wrench is crucial for tightening bolts to the manufacturer’s specified torque. Overtightening can damage the seatpost or frame, while undertightening can cause the seat to slip during a ride. A torque wrench provides precise control over the amount of force applied, helping you avoid these issues. Digital torque wrenches are particularly useful as they provide a clear readout of the torque value.
2.3. Measuring Tape
A measuring tape is necessary for accurately measuring the distance from the top of the seat to the pedals or the ground. This measurement helps you determine the optimal seat height based on your leg length and riding style. Look for a tape measure that is easy to read and has both metric and imperial units.
2.4. Level
A level ensures that your seat is horizontally aligned. This is important for comfort and preventing uneven pressure on your sit bones. A small bubble level can be placed on the seat to check its alignment before tightening the bolts.
2.5. Grease or Anti-Seize Compound
Applying a small amount of grease or anti-seize compound to the seatpost before inserting it into the frame can prevent corrosion and make future adjustments easier. This is especially important for bikes with aluminum or carbon fiber frames, as these materials can corrode when in contact with steel seatposts.
2.6. Soft Cloth or Rag
A soft cloth or rag is useful for cleaning the seatpost and frame before making adjustments. Removing dirt and grime ensures a clean and secure fit, preventing slippage and damage. It can also be used to wipe away excess grease or anti-seize compound.
2.7. Bike Stand (Optional)
While not essential, a bike stand can make the adjustment process much easier. It allows you to keep the bike stable and at a comfortable working height, freeing your hands to make adjustments. If you frequently work on your bike, a bike stand is a worthwhile investment.
Having these essential tools on hand will streamline the process of adjusting your bike seat, ensuring that you can make accurate and safe adjustments to improve your riding experience. With the right tools, you can confidently fine-tune your seat height for optimal comfort and performance on every ride.
3. Step-by-Step Guide to Adjusting Bike Seat Height
Adjusting your bike seat height might seem daunting, but with the right steps, it’s a straightforward process. Follow this comprehensive guide to achieve the perfect seat height for your motorcycle.
3.1. Loosening the Seat Collar
The first step in adjusting your bike seat height is to loosen the seat collar. This collar secures the seatpost to the frame, allowing you to raise or lower the seat.
Quick Release Collar: If your bike has a quick release collar, simply open the lever by pulling it outward. Hold the seatpost with one hand while opening the lever with the other. Once open, ensure the seatpost is free to move by wiggling it gently.
Bolt-Style Clamp: For bikes with a seat clamp bolt, locate the correct-sized wrench, typically a 4mm, 5mm, or 6mm hex key or a T25 Torx wrench. Hold the seat with one hand and use the wrench to loosen the clamp bolt by turning it counterclockwise. Wiggle the seat to ensure it’s free to move once the bolt is loose.
3.2. Finding the Right Height
Determining the correct seat height is crucial for comfort and efficiency. Here are a few methods to help you find the optimal height:
Heel Method: Sit on your bike with your heel on the pedal at the bottom of the stroke. Your leg should be fully extended. When you move your foot to the ball of your foot (the normal riding position), your knee should have a slight bend.
Hip Method: While sitting on your bike, place your heel on the pedal at the lowest point of the pedal stroke. Your leg should be straight. As you pedal, there should be a slight bend in your knee at the bottom of the stroke.
Measuring Method: Measure from the center of the crank to the top of the seat along the seat tube. This measurement can be compared to your inseam length. Typically, the seat height should be about 88% of your inseam.
3.3. Adjusting the Seatpost
Once you’ve determined the correct height, adjust the seatpost accordingly.
Raising the Seat: If you need to raise the seat, gently pull the seatpost upward. Ensure that you do not exceed the maximum insertion mark on the seatpost. This mark indicates the minimum amount of seatpost that must remain inside the frame to ensure stability and prevent damage.
Lowering the Seat: If you need to lower the seat, push the seatpost downward into the frame. Make sure that the seatpost is inserted far enough into the frame to provide adequate support.
3.4. Ensuring Straight Alignment
After adjusting the height, ensure that the seat is aligned straight with the bike’s frame.
Visual Alignment: Look down from above to align the nose of the seat with the top tube of the frame. This ensures that the seat is parallel to the bike.
Using a Level: Place a level on the seat to check its horizontal alignment. Adjust the seat until the bubble is centered, indicating that the seat is level.
3.5. Tightening the Seat Collar
Once the seat is at the correct height and aligned straight, tighten the seat collar to secure it in place.
Quick Release Collar: Close the lever on the quick release collar. Ensure that the lever is tight enough to hold the seatpost securely but not so tight that it’s difficult to close.
Bolt-Style Clamp: Tighten the clamp bolt clockwise using the correct-sized wrench. Use a torque wrench to tighten the bolt to the manufacturer’s specified torque. This torque value is often printed on the seat collar or can be found in the bike’s manual.
3.6. Final Checks and Adjustments
After tightening the seat collar, perform a few final checks to ensure that the seat is secure and comfortable.
Test Ride: Take a short test ride to assess the seat height and alignment. Pay attention to any discomfort or strain in your knees, hips, or back.
Fine-Tuning: If you experience any issues during the test ride, make small adjustments to the seat height or alignment as needed. Repeat the process until you achieve the perfect fit.
Safety Check: Before embarking on a long ride, double-check that the seat collar is properly tightened and the seat is secure. This ensures your safety and prevents any unexpected issues during your ride.
By following these step-by-step instructions, you can confidently adjust your bike seat height for optimal comfort, efficiency, and safety.
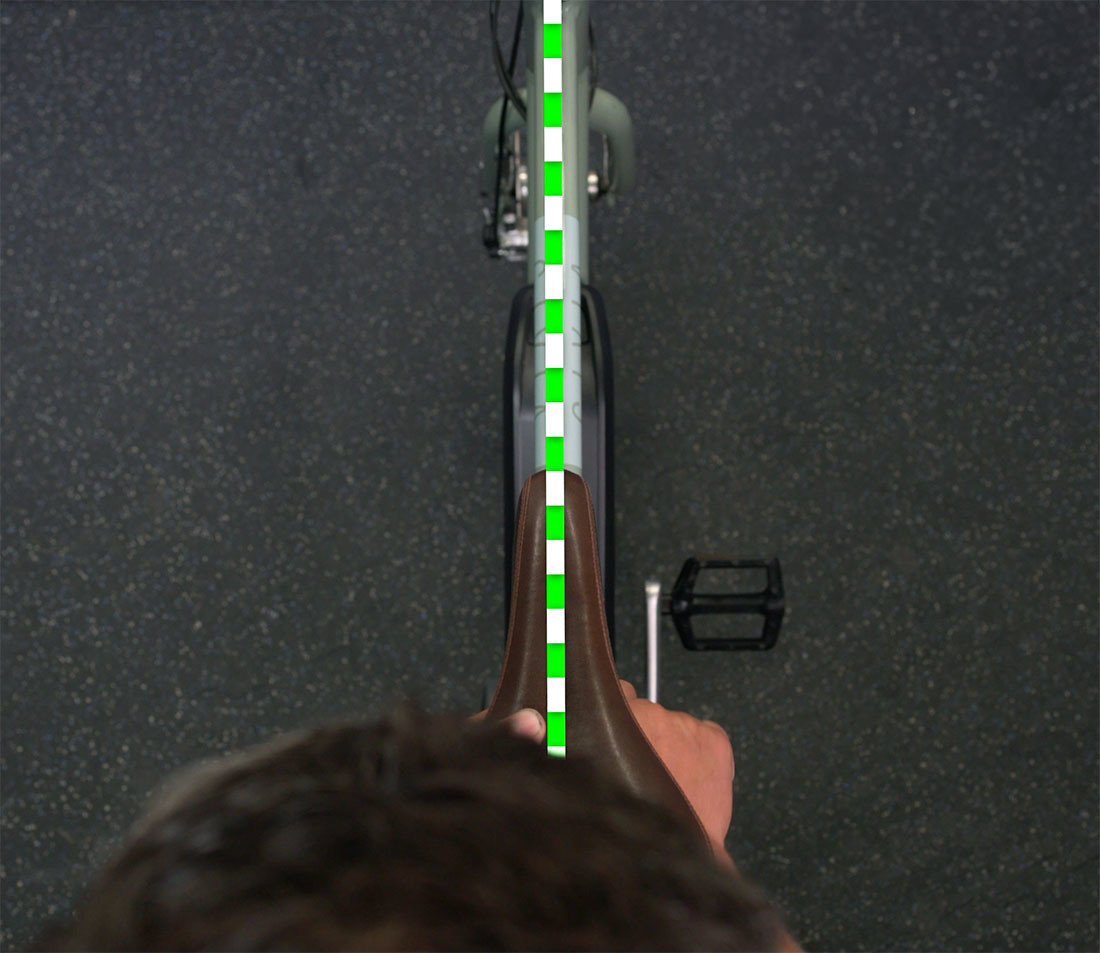 Align the nose of the saddle with the top tube of the frame
4. Fine-Tuning: Fore-Aft and Angle Adjustments
Once you’ve adjusted the height of your bike seat, it’s time to fine-tune the fore-aft position and angle for optimal comfort and performance. These adjustments can make a significant difference in how your bike feels and how efficiently you can ride.
4.1. Understanding Fore-Aft Adjustment
Fore-aft adjustment refers to the horizontal positioning of your seat. Moving the seat forward or backward can affect your balance, power output, and the pressure distribution on your sit bones.
Importance of Fore-Aft Adjustment:
- Knee Alignment: Proper fore-aft positioning ensures that your knee is aligned over the pedal spindle when the crank is in the horizontal position.
- Comfort: Adjusting the fore-aft position can alleviate pressure points and improve overall comfort, especially on long rides.
- Power Output: Optimal fore-aft positioning allows you to generate more power with each pedal stroke.
4.2. Adjusting Fore-Aft Position
Most seats have rails that are clamped by the head of the seatpost, allowing for some forward and backward movement. Note that there is a limit to this movement, as most seats have max adjustment lines marked on the rails.
Steps for Adjusting Fore-Aft Position:
- Loosen the Mounting Bolts: Begin by loosening the mounting bolts that clamp the seatpost onto the seat rails. If the seatpost features two mounting bolts, loosen both evenly until the seat is able to move forward or backwards.
- Positioning the Seat: Slide the seat forward or backward to the desired position. Use the max adjustment lines on the rails as a guide.
- Tighten the Mounting Bolts: Retighten all fasteners evenly to the appropriate torque specification. Ensure that the seat is securely clamped to the seatpost.
4.3. Understanding Angle Adjustment
Angle adjustment refers to the tilt of your seat. Adjusting the angle can affect the pressure distribution on your perineum and sit bones, as well as your overall comfort.
Importance of Angle Adjustment:
- Pressure Relief: Proper angle adjustment can relieve pressure on sensitive areas, preventing discomfort and numbness.
- Stability: Adjusting the angle can improve your stability and control, especially when climbing or descending.
- Comfort: Fine-tuning the angle can enhance your overall comfort, allowing you to ride longer without pain.
4.4. Adjusting Seat Angle
Adjusting seat angle is very similar to changing the fore and aft position. On many designs, simply loosen the mounting bolts, adjust the angle, and re-tighten.
Steps for Adjusting Seat Angle:
- Loosen the Mounting Bolts: Begin by loosening the mounting bolts that secure the seat to the seatpost.
- Adjust the Angle: Adjust the angle of the seat to the desired position. A slight upward or downward tilt can make a significant difference in comfort.
- Tighten the Mounting Bolts: Retighten the mounting bolts to the recommended torque specification. Ensure that the seat is securely clamped to the seatpost.
Specific Seatpost Designs:
- Two Vertical Inline Bolts: For seatposts with two vertical inline bolts, loosen and tighten the front and rear bolts in tandem to adjust the angle. To angle the seat upwards, loosen the front bolt and tighten the rear. To angle the seat downwards, loosen the rear bolt and tighten the front.
- Separate Adjustment Bolt: Some newer seatpost designs feature a separate adjustment bolt for angle adjustment. Loosen the mounting bolts, adjust the angle with the adjustment bolt, and re-tighten the mounting bolts to manufacturer specs.
4.5. Final Checks and Adjustments
After adjusting the fore-aft position and angle, perform a few final checks to ensure that the seat is secure and comfortable.
Test Ride: Take a short test ride to assess the fore-aft position and angle. Pay attention to any discomfort or pressure points.
Fine-Tuning: If you experience any issues during the test ride, make small adjustments to the fore-aft position or angle as needed. Repeat the process until you achieve the perfect fit.
Safety Check: Before embarking on a long ride, double-check that the mounting bolts are properly tightened and the seat is secure. This ensures your safety and prevents any unexpected issues during your ride.
By following these steps, you can fine-tune the fore-aft position and angle of your bike seat for optimal comfort, performance, and safety.
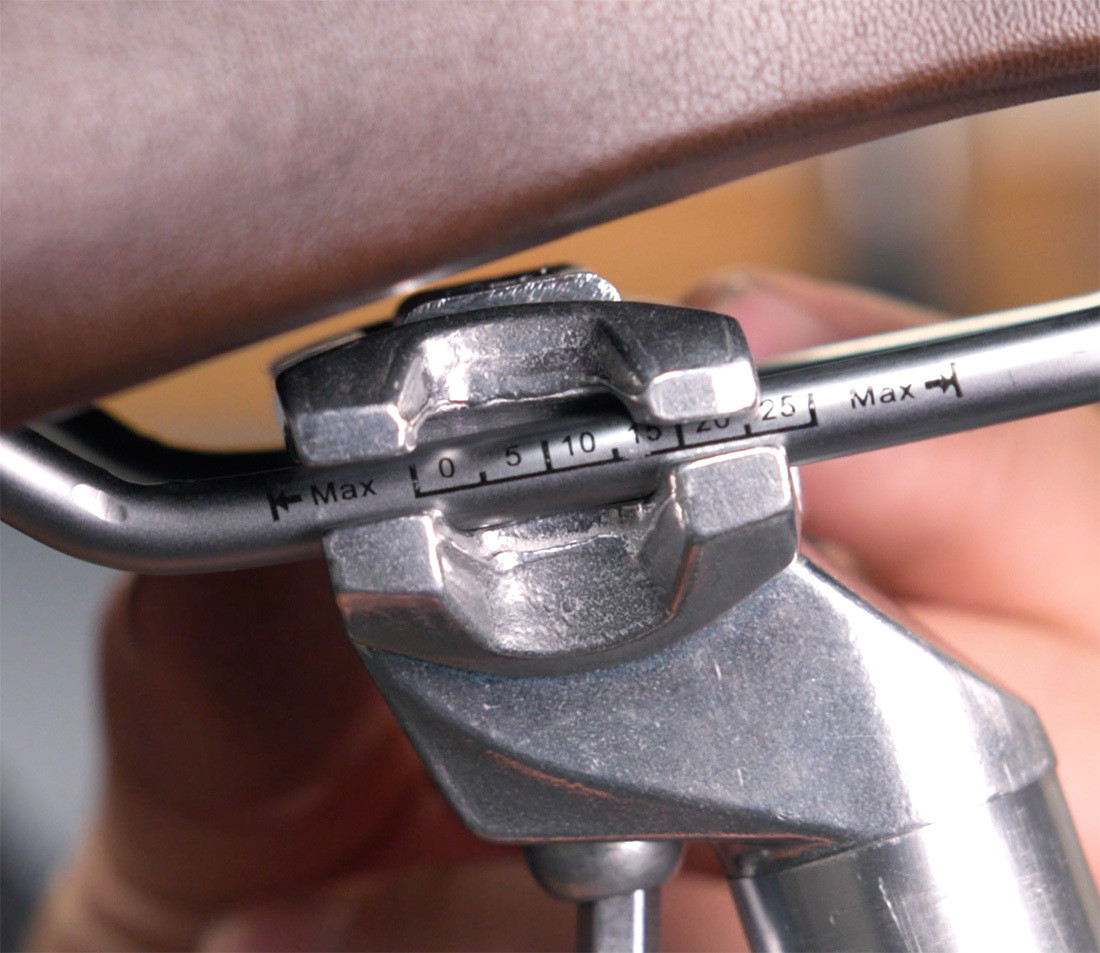 Saddle Adjustment Fore and Aft Max
5. Advanced Tips for Optimizing Your Bike Seat
Once you’ve mastered the basic adjustments, consider these advanced tips to optimize your bike seat for maximum comfort and performance. These insights can help you fine-tune your riding experience and prevent common issues.
5.1. Understanding Saddle Types and Their Impact
Different saddles are designed for different riding styles and body types. Understanding the nuances of saddle types can help you choose the right one for your needs.
Types of Saddles:
- Road Bike Saddles: Typically narrow and lightweight, designed for aggressive riding positions.
- Mountain Bike Saddles: Often wider and more padded, offering better support for varied terrain.
- Touring Saddles: Generally wider and more comfortable, designed for long-distance riding.
- Gel Saddles: Feature gel padding for added cushioning, ideal for riders who prioritize comfort.
- Cutout Saddles: Have a central cutout to relieve pressure on the perineum, reducing the risk of numbness.
Choosing the Right Saddle:
- Consider Your Riding Style: Choose a saddle that matches your typical riding style and terrain.
- Get Measured: Visit a bike shop to get your sit bone width measured. This measurement will help you choose a saddle that provides adequate support.
- Test Ride: Whenever possible, test ride different saddles to see which one feels most comfortable.
5.2. Addressing Common Issues with Seat Discomfort
Seat discomfort is a common issue among bikers, but there are several strategies you can use to alleviate it.
Common Issues:
- Numbness: Often caused by pressure on the perineum. Consider a cutout saddle or adjusting the seat angle.
- Soreness: Can result from prolonged pressure on the sit bones. Ensure your saddle is wide enough and properly padded.
- Chafing: Typically caused by friction between your skin and the saddle. Use chamois cream and wear padded cycling shorts.
Solutions:
- Adjust Seat Angle: Experiment with small adjustments to the seat angle to relieve pressure points.
- Use Chamois Cream: Apply chamois cream to reduce friction and prevent chafing.
- Wear Padded Shorts: Invest in high-quality padded cycling shorts to provide cushioning and support.
- Take Breaks: On long rides, take regular breaks to stand up and stretch, relieving pressure on your seat.
5.3. The Importance of Professional Bike Fitting
While you can make many adjustments yourself, a professional bike fitting can provide valuable insights and ensure that your bike is perfectly tailored to your body.
Benefits of Bike Fitting:
- Optimal Positioning: A bike fitter can help you achieve the most efficient and comfortable riding position.
- Injury Prevention: Proper bike fit can reduce the risk of common cycling injuries, such as knee pain and back pain.
- Performance Enhancement: A well-fitted bike can improve your power output and overall performance.
What to Expect During a Bike Fit:
- Assessment: The bike fitter will assess your flexibility, riding style, and any existing injuries.
- Measurements: They will take detailed measurements of your body to determine the optimal bike setup.
- Adjustments: The bike fitter will adjust your seat height, fore-aft position, handlebar height, and other components to create a custom fit.
- Follow-Up: Many bike fitters offer follow-up appointments to fine-tune the fit and address any issues that arise.
5.4. Maintaining Your Seatpost and Saddle
Proper maintenance can extend the life of your seatpost and saddle and prevent common issues.
Maintenance Tips:
- Clean Regularly: Clean your seatpost and saddle regularly to remove dirt and grime.
- Grease Seatpost: Apply a thin layer of grease to the seatpost before inserting it into the frame to prevent corrosion.
- Check Bolts: Periodically check the tightness of the mounting bolts to ensure that the seat is secure.
- Replace Worn Parts: Replace worn or damaged parts, such as the saddle cover or seat rails, to maintain comfort and safety.
5.5. Using Technology to Optimize Your Seat Position
Advancements in technology have made it easier than ever to optimize your seat position.
Available Technologies:
- Pressure Mapping: Some bike shops offer pressure mapping services, which use sensors to measure the pressure distribution on your saddle. This information can help you choose the right saddle and adjust its position for optimal comfort.
- Motion Capture: Motion capture technology can be used to analyze your pedaling technique and identify areas for improvement. This information can be used to adjust your seat position and other bike components to enhance performance.
- Smartphone Apps: There are several smartphone apps available that can help you measure your seat height and other bike dimensions. These apps can be a useful tool for making basic adjustments.
By implementing these advanced tips, you can optimize your bike seat for maximum comfort, performance, and safety.
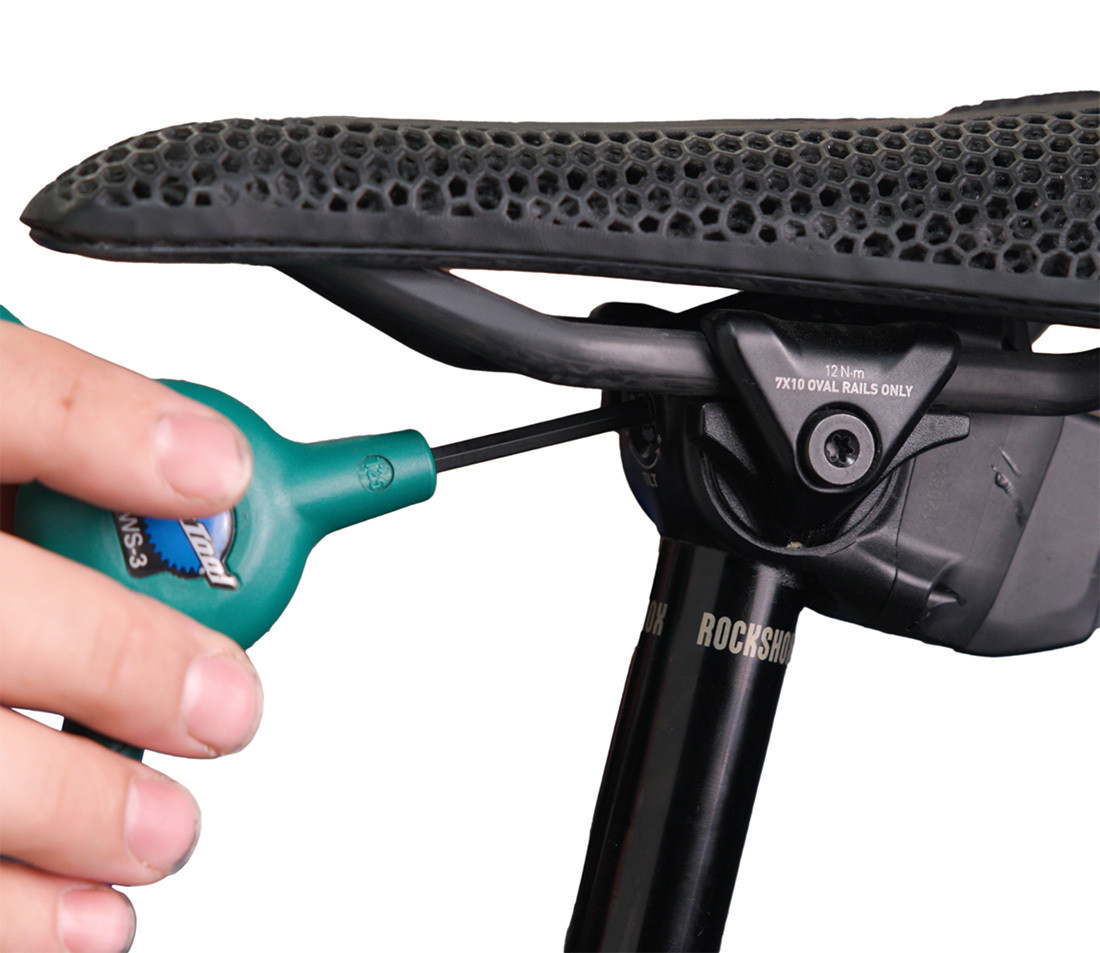 Seatpost with angle adjustment bolt
6. Common Mistakes to Avoid When Adjusting Bike Seat Height
Adjusting your bike seat height can significantly improve your riding experience, but it’s essential to avoid common mistakes that can lead to discomfort or injury. Here are some pitfalls to steer clear of when fine-tuning your seat.
6.1. Ignoring the Minimum Insertion Mark
One of the most critical mistakes to avoid is ignoring the minimum insertion mark on the seatpost. This mark indicates the minimum amount of seatpost that must remain inside the frame to ensure stability and prevent damage.
Why It’s Important:
- Structural Integrity: Exceeding the maximum height can compromise the structural integrity of the seatpost and frame, leading to breakage.
- Safety: Riding with the seatpost extended beyond the minimum insertion mark can be dangerous, potentially causing the seat to collapse during a ride.
- Warranty: Ignoring the minimum insertion mark can void the warranty on your bike or seatpost.
How to Avoid It:
- Check the Seatpost: Before adjusting your seat height, locate the minimum insertion mark on the seatpost.
- Stay Below the Mark: Ensure that the seatpost remains inserted into the frame at least up to the minimum insertion mark.
- Adjust Accordingly: If you need to raise the seat higher than the minimum insertion mark allows, consider purchasing a longer seatpost.
6.2. Overtightening or Undertightening the Seat Collar
Overtightening or undertightening the seat collar can both lead to problems. Overtightening can damage the seatpost or frame, while undertightening can cause the seat to slip during a ride.
Why It’s Important:
- Damage Prevention: Overtightening can strip the threads on the seat collar or damage the seatpost and frame.
- Safety: Undertightening can cause the seat to slip unexpectedly, leading to a loss of control and potential injury.
- Performance: Proper tightening ensures that the seat remains securely in place, allowing you to ride confidently and efficiently.
How to Avoid It:
- Use a Torque Wrench: Use a torque wrench to tighten the seat collar to the manufacturer’s specified torque.
- Check Torque Specs: Consult the bike’s manual or the seat collar itself to find the correct torque specification.
- Avoid Guesswork: Avoid guessing or relying on feel alone. Always use a torque wrench for accurate tightening.
6.3. Neglecting Fore-Aft and Angle Adjustments
Focusing solely on seat height and neglecting fore-aft and angle adjustments can result in discomfort and reduced performance.
Why It’s Important:
- Comfort: Fore-aft and angle adjustments can alleviate pressure points and improve overall comfort.
- Efficiency: Proper positioning can optimize your pedaling efficiency and power output.
- Injury Prevention: Fine-tuning these adjustments can reduce the risk of common cycling injuries.
How to Avoid It:
- Adjust Fore-Aft Position: Ensure that your knee is aligned over the pedal spindle when the crank is in the horizontal position.
- Adjust Seat Angle: Experiment with small adjustments to the seat angle to relieve pressure on sensitive areas.
- Test Ride: Take a short test ride after making these adjustments to assess their impact on your comfort and performance.
6.4. Choosing the Wrong Saddle Type
Using the wrong saddle type for your riding style and body type can lead to discomfort and pain.
Why It’s Important:
- Comfort: Different saddles are designed for different riding styles and body types.
- Performance: The right saddle can improve your pedaling efficiency and power output.
- Injury Prevention: A properly fitted saddle can reduce the risk of numbness, soreness, and chafing.
How to Avoid It:
- Consider Your Riding Style: Choose a saddle that matches your typical riding style and terrain.
- Get Measured: Visit a bike shop to get your sit bone width measured.
- Test Ride: Whenever possible, test ride different saddles to see which one feels most comfortable.
6.5. Ignoring Changes in Body Condition
Your body can change over time due to weight gain, weight loss, or changes in fitness level. Ignoring these changes and failing to adjust your seat accordingly can lead to discomfort and injury.
Why It’s Important:
- Adaptability: Your bike fit should adapt to your changing body condition.
- Comfort: Adjusting your seat can alleviate pressure points and improve overall comfort.
- Injury Prevention: Fine-tuning these adjustments can reduce the risk of common cycling injuries.
How to Avoid It:
- Regularly Assess: Regularly assess your bike fit and make adjustments as needed.
- Listen to Your Body: Pay attention to any discomfort or pain and adjust your seat accordingly.
- Seek Professional Advice: If you’re unsure how to adjust your seat, seek advice from a professional bike fitter.
By avoiding these common mistakes, you can ensure that your bike seat is properly adjusted for optimal comfort, performance, and safety.
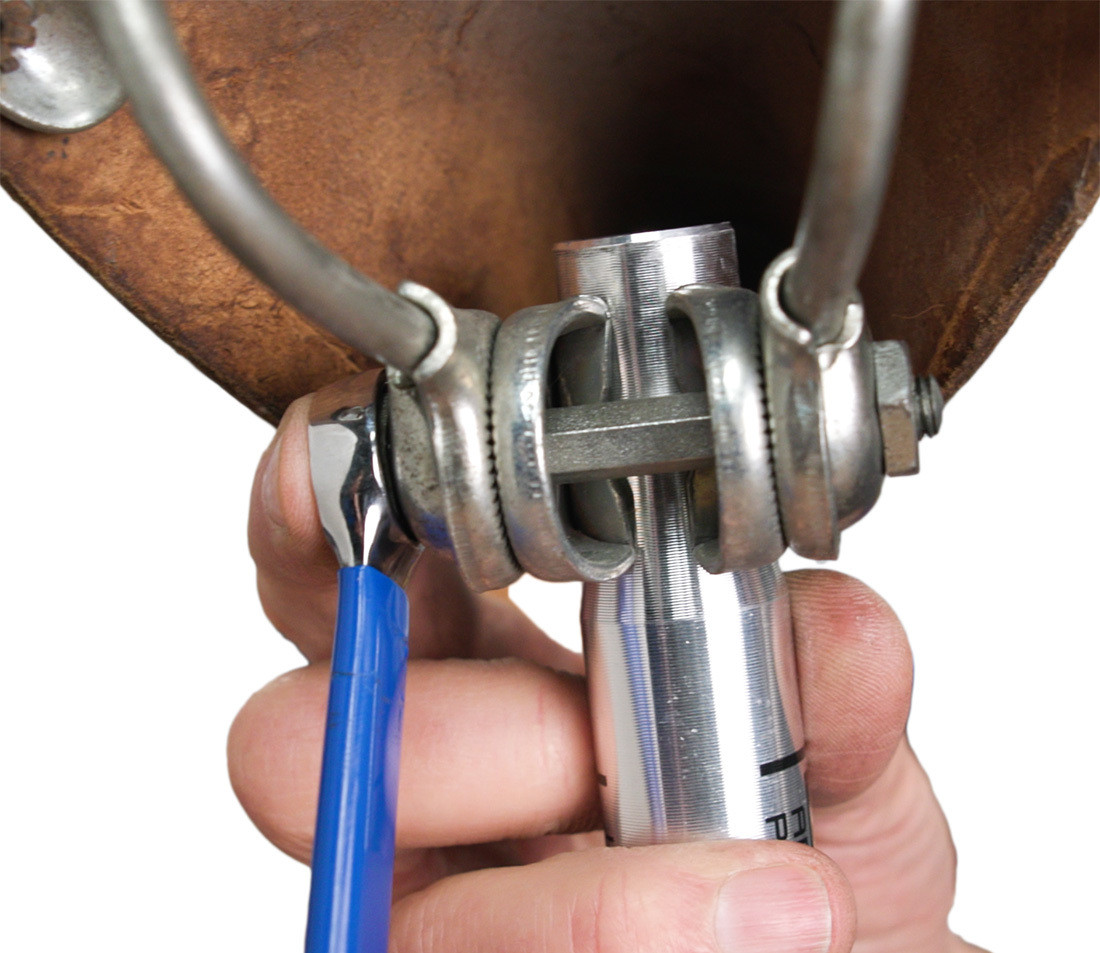 Typical torque for an old-style single horizontal bolt setup is 15-20 Nm
7. Staying Safe: Torque Specifications and Best Practices
Ensuring your bike seat is safely and securely adjusted involves understanding torque specifications and adhering to best practices. This section emphasizes the importance of these factors for your safety and the longevity of your equipment.
7.1. Understanding Torque Specifications
Torque specifications are the manufacturer-recommended values for how tightly bolts should be fastened. These values are usually measured in Newton-meters (Nm) or inch-pounds (in-lbs).
Why Torque Specifications Matter:
- Prevent Damage: Overtightening bolts can strip threads or damage components, leading to costly repairs.
- Ensure Safety: Undertightening can cause parts to loosen during a ride, posing a safety risk.
- Maintain Performance: Correct torque ensures that components function as intended, maintaining optimal performance.
Where to Find Torque Specifications:
- Bike Manual: Check your bike’s manual for torque specifications for various components, including the seatpost clamp.
- Component Markings: Some components have torque specifications printed directly on them.
- Manufacturer’s Website: Visit the manufacturer’s website for detailed information on torque specifications.
7.2. Using a Torque Wrench Correctly
A torque wrench is a specialized tool that allows you to tighten bolts to a specific torque value. Using it correctly is essential for safe and accurate adjustments.
Steps for Using a Torque Wrench:
- Set the Torque Value: Adjust the torque wrench to the desired torque value, usually by turning a dial or handle.
- Attach the Correct Socket: Attach the appropriate socket to the torque wrench to fit the bolt you’re tightening.
- Position the Wrench: Place the socket on the bolt and ensure that the wrench is properly aligned.
- Tighten Slowly: Tighten the bolt slowly and steadily until the torque wrench clicks or beeps, indicating that the desired torque has been reached.
- Avoid Overtightening: Once the torque wrench clicks, stop tightening immediately to avoid overtightening the bolt.
7.3. Best Practices for Seatpost Clamps
Seatpost clamps come in various designs, each with its own best practices for safe and secure adjustment.
Types of Seatpost Clamps:
- Quick-Release Clamps: Allow for tool-free seat height adjustments. Ensure that the lever is properly adjusted to provide sufficient clamping force.
- Bolt-On Clamps: Use a bolt to secure the seatpost. Tighten the bolt to the specified torque value using a torque wrench.
- Integrated Clamps: Are integrated into the frame. Follow the manufacturer’s instructions for adjusting these clamps.
Best Practices:
- Clean the Seatpost and Frame: Before installing the seatpost, clean both the seatpost and the inside of the frame to remove any dirt or debris.
- Apply Grease or Anti-Seize: Apply a thin layer of grease or anti-seize compound to the seatpost before inserting it into the frame to prevent corrosion and ensure smooth adjustments.
- Check for Cracks or Damage: Before tightening the clamp, inspect the seatpost and frame for any cracks or damage. Do not ride the bike if you find any issues.
7.4. Performing Regular Safety Checks
Regular safety checks are crucial for ensuring that your bike seat remains securely adjusted and safe to ride.
Checks to Perform:
- Seatpost Clamp Tightness: Check the tightness of the seatpost clamp before each ride.
- Seat Stability: Grab the seat and try to move it from side to side and up and down. If the seat moves, tighten the clamp or inspect for damage.
- Component Inspection: Inspect the seatpost, saddle, and clamp for any signs of wear, damage, or corrosion.
7.5. Knowing When to Seek Professional Help
While many seat adjustments can be performed at home, there are times when it’s best to seek professional help.
When to Seek Professional Help:
- Unsure of Torque Specifications: If you’re unsure of the correct torque specifications for your seatpost clamp, consult a professional bike mechanic.
- Difficulty Adjusting the Seatpost: If you’re having difficulty adjusting the seatpost, or if the seatpost is stuck in the frame, seek assistance from a bike shop.
- Suspect Damage: If you suspect that the seatpost, saddle, or frame is damaged, take your bike to a professional for inspection.
- Experiencing Discomfort or Pain: If you’re experiencing persistent discomfort or pain while riding, consider getting a professional bike fit.
By following these safety guidelines, you can ensure that your bike seat is properly adjusted for a safe and enjoyable riding experience.
Navigating the world of motorcycle maintenance and customization can be overwhelming. That’s why usabikers.net is your go-to resource for reliable information, expert advice, and a vibrant community of fellow riders. Whether you’re looking for detailed guides on bike maintenance, reviews of the latest gear, or tips on planning your next road trip, our website has you covered. Dive into our forums to connect with experienced bikers, share your stories, and get personalized recommendations. Don’t miss out on the wealth of knowledge and camaraderie waiting for you at usabikers.net! Visit us today at 801 Sturgis Main St, Sturgis, SD 57785, United States, or call +1 (605) 347-2000. Let usabikers.net be your trusted companion on every ride.
8. FAQ: Bike Seat Height Adjustment
8.1. What is the ideal bike seat height for beginners?
The ideal bike seat height for beginners is one where you can comfortably place your feet on the ground while seated, providing stability and confidence. This usually means your knees will have a slight bend at the bottom of the pedal stroke.
8.2. How often should I adjust my bike seat height?
You should adjust your bike seat height whenever you notice discomfort or changes in your riding efficiency. This could be due to changes in your fitness level, weight, or even the type of riding you’re doing.
8.3. Can incorrect bike seat height cause knee pain?
Yes, incorrect bike seat height is a common cause of knee pain. A seat that is too low can cause excessive bending of the knee, while a seat that is too high can lead to overextension.
8.4. What tools do I need to adjust my bike seat height?
You typically need a wrench (usually an Allen or hex key) to loosen the seat collar bolt. A torque wrench is recommended for tightening the bolt to the correct specification, ensuring it’s neither too tight nor too loose.
8.5. How do I know if my bike seat is too high?
If your bike seat is too high, you may experience rocking in your hips while pedaling, difficulty reaching the pedals at the bottom of the stroke, or pain in the back of your knees.
8.6. What is the heel method for determining bike seat height?
The heel method involves sitting on your bike with your heel on the pedal at the bottom of the stroke. Your leg should be fully extended. When you move your foot to the ball of your foot (the normal riding position), your knee should have a slight bend.
8.7. Should my bike seat be perfectly level?
While it’s common to start with a level seat, some riders find that a slight tilt, either up or down, improves comfort. Experiment to find what works best for you, but don’t tilt it so much that it causes you to slide forward or backward.
8.8. How do I adjust the fore-aft position of my bike seat?
To adjust the fore-aft position, loosen the bolts that clamp the seat to the seatpost. Slide the seat forward or backward to the desired position, ensuring the seat rails are within the marked limits. Then, retighten the bolts to the specified torque.
8.9. What is the minimum insertion mark on a seatpost?
The minimum insertion mark indicates the minimum amount of seatpost that must remain inside the frame. Exceeding this mark can compromise the structural integrity of the seatpost and frame, leading to breakage and potential injury.
8.10. When should I seek professional help for bike fitting?
You should seek professional help for bike fitting if you’re experiencing persistent discomfort or pain while riding, if you’re unsure how to make adjustments, or if you want to optimize your bike setup for maximum performance and efficiency.