Fixing a bike tire tube is a fundamental skill for any motorcycle enthusiast, ensuring you can handle unexpected flats and keep your ride smooth. This comprehensive guide, brought to you by usabikers.net, will walk you through the process, providing you with the knowledge and confidence to tackle this common issue. Mastering this skill will not only save you time and money but also enhance your self-reliance on the road.
1. Why Should You Learn How to Fix a Bike Tire Tube?
Learning how to fix a bike tire tube is essential for any motorcyclist. Being able to repair a flat tire yourself saves time, money, and keeps you self-reliant.
1.1. What Are the Benefits of Fixing Your Own Bike Tire Tube?
Fixing your own bike tire tube offers numerous advantages:
- Saves Money: Avoid costly repair shop visits.
- Increases Self-Reliance: Handle flats independently, especially during long rides.
- Saves Time: Quick repairs on the spot prevent delays.
- Enhances Knowledge: Understand your bike’s mechanics better.
- Ensures Preparedness: Carry out repairs in remote locations where professional help is unavailable.
1.2. When Is It Necessary to Fix a Bike Tire Tube?
You need to fix a bike tire tube when you experience:
- Sudden Loss of Tire Pressure: Indicates a puncture or leak.
- Visible Damage: Noticeable cuts or holes in the tube.
- Poor Bike Handling: Unstable or sluggish feel while riding.
- Regular Flat Tires: Consistent issues suggest tube damage.
1.3. How Often Should You Inspect Your Bike Tire Tubes?
Regular inspection of your bike tire tubes is crucial for safety and performance. Aim to inspect them:
- Before Every Ride: Check for visible damage and proper inflation.
- Monthly: Conduct a thorough examination for wear and tear.
- After Long Rides: Inspect for any signs of damage from extended use.
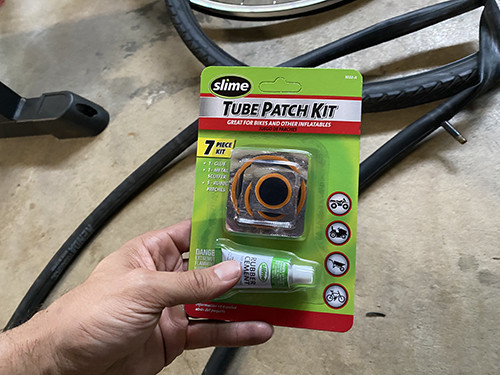
2. What Tools and Materials Do You Need to Fix a Bike Tire Tube?
Having the right tools and materials is crucial for fixing a bike tire tube efficiently. Gather these essential items to make the repair process smooth and effective.
2.1. Essential Tools for Fixing a Bike Tire Tube
- Tire Levers: Used to remove the tire from the wheel rim.
- Patch Kit: Includes patches, rubber cement, and sandpaper for repairing punctures.
- Hand Pump or CO2 Inflator: For inflating the tire after repair.
- Wrench or Multi-Tool: Needed to remove the wheel from the bike.
- Rag or Paper Towel: To clean the tube and tire.
- Container of Water: Helpful for locating small leaks.
2.2. Recommended Patch Kit Contents
A comprehensive patch kit should include:
- Pre-Glued Patches: Convenient and quick to apply.
- Rubber Cement: For traditional patch application.
- Sandpaper or Metal Scuffer: To prepare the tube surface for patching.
- Tire Levers: Essential for removing the tire.
- Valve Core Tool: To tighten or replace valve cores.
- Instructions: A step-by-step guide for proper application.
2.3. Where to Purchase Bike Tire Repair Tools and Materials
You can find bike tire repair tools and materials at:
- Local Bike Shops: Offer expert advice and a variety of products.
Address: 801 Sturgis Main St, Sturgis, SD 57785, United States
Phone: +1 (605) 347-2000
Website: usabikers.net - Online Retailers: Like Amazon, offer convenience and competitive pricing.
- Sporting Goods Stores: Stock basic repair kits and tools.
- Motorcycle Dealerships: Provide specialized tools and tubes for motorcycles.
3. How to Remove the Wheel From Your Bike
Removing the wheel from your bike is the first step in fixing a flat tire. This process involves disconnecting the brakes and using the quick-release system.
3.1. Steps to Remove the Front Wheel
- Disconnect the Brakes:
- For V-brakes, squeeze the brake arms together and unlatch the cradle from the noodle.
- For disc brakes, loosen the brake cable or remove the brake caliper if necessary.
- Flip the Bike: Turn the bike upside down to make it easier to work on the wheel.
- Loosen the Quick-Release Lever: Flip the quick-release lever open and unscrew it until there is enough space to remove the wheel.
- Remove the Wheel: Lift the bike slightly and pull the wheel out of the dropouts.
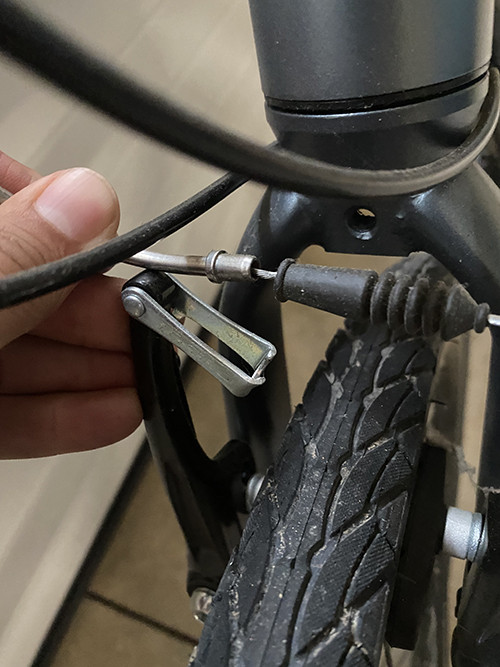 Disconnecting a V-brake to remove the wheel
3.2. Steps to Remove the Rear Wheel
- Shift to the Smallest Cog: Shift the chain to the smallest cog on the rear cassette to reduce tension.
- Disconnect the Brakes: Follow the same procedure as with the front wheel.
- Loosen the Quick-Release Lever: Flip the quick-release lever open and unscrew it until there is enough space to remove the wheel.
- Detach the Chain: Gently pull the derailleur back and lift the wheel out of the dropouts, making sure the chain clears the cassette.
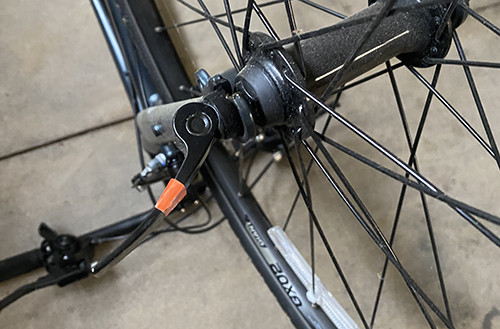 Opening the quick-release lever on a bike wheel
3.3. Tips for Handling Different Brake Systems
- V-Brakes: Easy to disconnect by squeezing the arms and unlatching the cable.
- Disc Brakes: May require loosening the brake cable or removing the caliper. Ensure the caliper is properly aligned when reinstalling the wheel.
- Coaster Brakes: Simply loosen the wheel nuts and remove the wheel. No brake disconnection is needed.
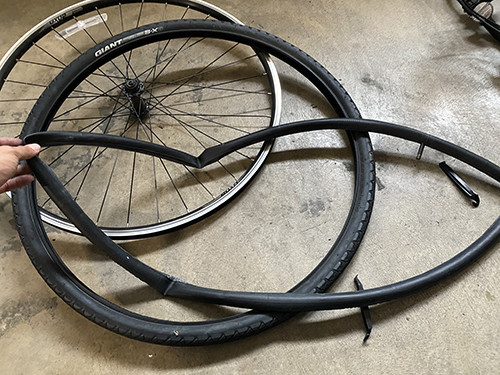
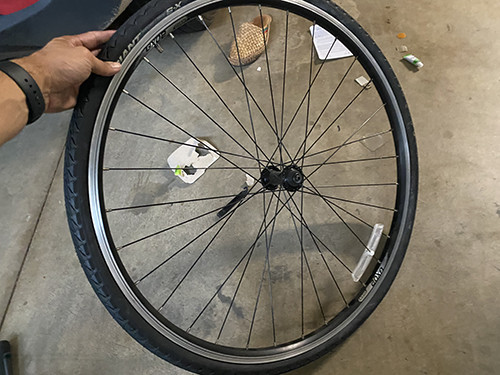
4. How to Remove the Tire From the Wheel
Removing the tire from the wheel requires tire levers to pry the tire away from the rim. This step allows you to access the inner tube and repair any punctures.
4.1. Using Tire Levers to Remove the Tire
- Insert the First Tire Lever: Place the first tire lever between the wheel and the tire, under the lip of the tire, and pry it away from the wheel.
- Secure the First Lever: Hook the tire lever into one of the spokes to keep the lip of the tire from going back into the wheel.
- Insert the Second Tire Lever: Place the second tire lever next to the first and get it under the lip of the tire.
- Slide the Second Lever: Slide the second tire lever around the wheel to separate the rest of the tire from the wheel.
- Remove the Tire: Once one side of the tire is off the rim, you can usually pull the rest of the tire off by hand.
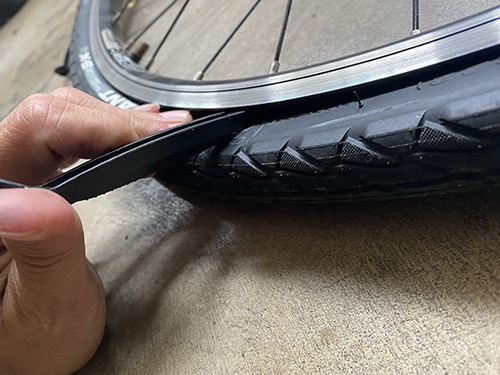 Using tire levers to separate the tire from the wheel
4.2. Alternative Methods for Removing a Tight Tire
- Use Multiple Tire Levers: Employ three levers spaced around the tire for easier removal.
- Warm the Tire: If possible, warm the tire in the sun or with a hairdryer to make it more pliable.
- Knead the Tire: Gently massage the tire sidewalls to loosen them from the rim.
- Use Tire Bead Jack: A specialized tool designed to help remove tight tires.
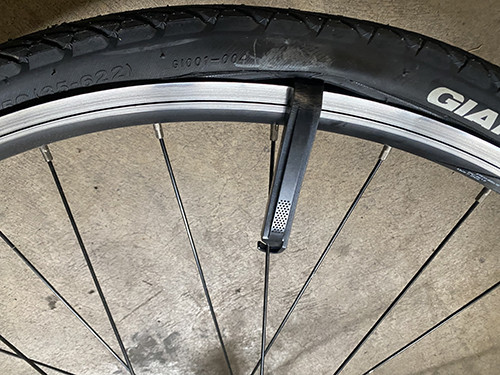 Securing a tire lever to a spoke to keep the tire separated
4.3. Avoiding Damage to the Rim and Tire During Removal
- Use Plastic Tire Levers: Metal levers can scratch or damage the rim.
- Avoid Pinching the Tube: Be careful not to pinch the inner tube between the tire and the lever.
- Work Slowly and Deliberately: Rushing can lead to mistakes and damage.
5. How to Remove the Inner Tube
Removing the inner tube from the tire involves carefully extracting it from inside the tire. Ensure you inspect the tire for any sharp objects that may have caused the puncture.
5.1. Steps to Remove the Inner Tube
- Deflate the Tube: Ensure the tube is completely deflated.
- Remove the Valve Stem: Push the valve stem through the hole in the rim.
- Pull Out the Tube: Gently pull the inner tube out from inside the tire.
 Removing the inner tube from the tire
5.2. Inspecting the Tire for Sharp Objects
- Visually Inspect: Look for any embedded objects like glass, thorns, or metal shards.
- Run Your Fingers Along the Inside: Carefully feel for any sharp objects that may be hidden.
- Use a Rag: Wipe the inside of the tire with a rag to catch any debris.
5.3. What to Do If You Find an Object
- Remove the Object: Use pliers or tweezers to carefully remove the object.
- Inspect the Tire Again: Ensure all debris is removed to prevent future punctures.
- Consider Tire Liners: Install tire liners to add an extra layer of protection.
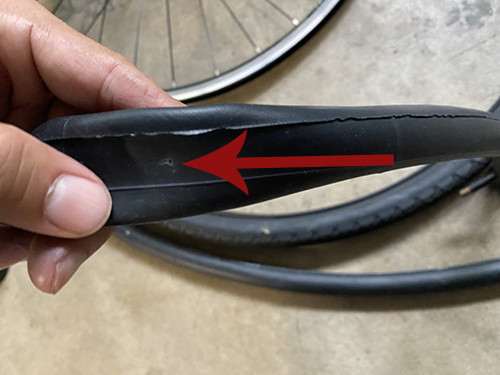
6. How to Find the Hole in the Inner Tube
Finding the hole in the inner tube is essential for a successful repair. There are several methods to locate even the smallest punctures.
6.1. Inflating the Tube to Locate the Leak
- Inflate the Tube: Partially inflate the tube to make it easier to handle.
- Listen for Hissing: Listen closely for the sound of air escaping.
- Feel for Airflow: Hold the tube close to your face to feel for any escaping air.
 Locating the hole in the inner tube
6.2. Using Water to Find the Leak
- Submerge the Tube: Submerge sections of the inflated tube in a container of water.
- Watch for Bubbles: Look for bubbles forming at the site of the leak.
- Mark the Spot: Mark the location of the leak with a pen or marker.
6.3. What to Do If You Can’t Find the Hole
- Check the Valve: Inspect the valve for leaks by submerging it in water.
- Check the Tire: Make sure there are no objects embedded in the tire.
- Replace the Tube: If you can’t find the hole, it may be too small to detect, and replacing the tube is the best option.
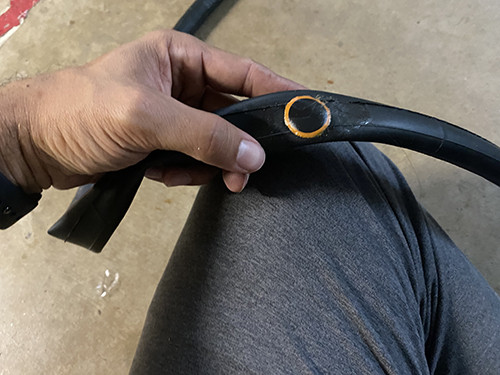
7. How to Prepare the Inner Tube for Patching
Preparing the inner tube properly ensures a strong and durable patch. This involves cleaning and roughening the surface around the hole.
7.1. Cleaning the Area Around the Hole
- Wipe with a Rag: Clean the area around the hole with a clean, dry rag to remove dirt and debris.
- Use Rubbing Alcohol: For a more thorough cleaning, use a rag dampened with rubbing alcohol.
- Ensure It’s Dry: Make sure the area is completely dry before proceeding.
7.2. Roughening the Surface for Better Adhesion
- Use Sandpaper: Gently roughen the surface around the hole with sandpaper from the patch kit.
- Metal Scuffer: If your kit includes a metal scuffer, use it to lightly abrade the surface.
- Create a Texture: The goal is to create a slightly rough texture for better adhesion.
 Preparing the inner tube for patching with a metal scuffer
7.3. Ensuring the Area Is Dry and Free of Debris
- Wipe Again: After roughening the surface, wipe it again with a clean rag to remove any debris from sanding.
- Check for Cleanliness: Ensure the area is completely clean and dry before applying the rubber cement.
8. How to Apply the Patch
Applying the patch correctly is crucial for a long-lasting repair. This involves applying rubber cement, allowing it to dry, and firmly pressing the patch onto the tube.
8.1. Applying Rubber Cement to the Prepared Area
- Apply a Thin Layer: Apply a thin, even layer of rubber cement to the roughened area around the hole.
- Extend Beyond the Hole: Make sure the cement extends about 1/2 inch beyond the hole in all directions.
- Avoid Pooling: Avoid applying too much cement, which can create pooling and weaken the bond.
 Applying rubber cement to the inner tube
8.2. Letting the Cement Dry Before Applying the Patch
- Wait for Tacky Consistency: Allow the rubber cement to dry until it becomes tacky to the touch. This usually takes a few minutes.
- Check for Shine: The cement should lose its shine and appear dull.
- Proper Drying Time: Waiting for the cement to dry properly is crucial for a strong bond.
8.3. Firmly Pressing the Patch onto the Tube
- Remove the Backing: Carefully remove the foil backing from the patch without touching the adhesive surface.
- Apply the Patch: Center the patch over the hole and firmly press it onto the tube.
- Apply Pressure: Use your fingers or a smooth, hard object to apply even pressure to the entire patch for at least one minute.
- Check the Edges: Ensure the edges of the patch are firmly sealed to the tube.
 Applying the patch to the inner tube
9. How to Reinstall the Inner Tube and Tire
Reinstalling the inner tube and tire requires careful attention to avoid pinching the tube or damaging the tire.
9.1. Inserting the Inner Tube Back Into the Tire
- Slightly Inflate the Tube: Add a small amount of air to the tube to give it shape.
- Insert the Valve Stem: Insert the valve stem into the hole in the rim.
- Tuck the Tube Inside: Carefully tuck the rest of the tube inside the tire, ensuring it is evenly distributed and not twisted.
 Inserting the inner tube back into the tire
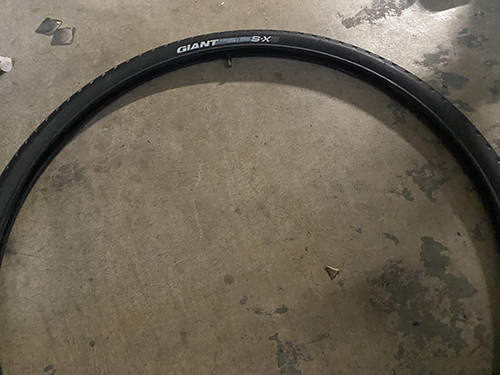
9.2. Getting the Tire Back Onto the Wheel
- Start Opposite the Valve: Begin by seating the tire bead onto the rim opposite the valve.
- Work Your Way Around: Use your thumbs to push the tire bead over the rim, working your way around the wheel.
- Use Tire Levers If Necessary: If the tire is tight, use tire levers to gently pry the last section of the bead over the rim. Be careful not to pinch the inner tube.
 Putting the tire back on the wheel
9.3. Ensuring the Tire Is Properly Seated on the Rim
- Inspect the Tire: Check that the tire bead is evenly seated around the entire rim.
- Look for the Line: Look for the molded line on the tire sidewall and ensure it is an even distance from the rim all the way around.
- Adjust as Needed: If the tire is not seated properly, deflate it slightly and use your thumbs to push the bead into place.
10. How to Inflate the Tire and Reinstall the Wheel
Inflating the tire to the correct pressure and reinstalling the wheel are the final steps in fixing a flat.
10.1. Inflating the Tire to the Correct Pressure
- Check the Tire Sidewall: Look for the recommended pressure range printed on the tire sidewall.
- Use a Pump or Inflator: Use a hand pump or CO2 inflator to inflate the tire to the recommended pressure.
- Check with a Gauge: Use a pressure gauge to ensure accurate inflation.
- Avoid Over-Inflation: Do not exceed the maximum pressure listed on the tire.
10.2. Reinstalling the Wheel on the Bike
- Align the Wheel: Align the wheel with the dropouts on the frame or fork.
- Insert the Wheel: Insert the wheel into the dropouts, making sure it is fully seated.
- Tighten the Quick-Release Lever: Close the quick-release lever, ensuring it is tight enough to securely hold the wheel in place.
- Reconnect the Brakes: Reconnect the brakes, making sure they are properly adjusted.
 Patching is complete
10.3. Checking for Proper Alignment and Brake Function
- Spin the Wheel: Spin the wheel to check for proper alignment and ensure it does not rub against the frame or fork.
- Test the Brakes: Test the brakes to ensure they are functioning properly and providing adequate stopping power.
- Adjust If Necessary: If the wheel is not aligned or the brakes are not functioning properly, make the necessary adjustments before riding.
11. Tips for Preventing Future Flat Tires
Preventing flat tires can save you time and frustration. Here are some tips to minimize your chances of getting a flat.
11.1. Regularly Checking Tire Pressure
- Maintain Proper Inflation: Keep your tires inflated to the recommended pressure.
- Use a Gauge: Check the pressure regularly with a reliable gauge.
- Avoid Under-Inflation: Under-inflated tires are more prone to punctures.
11.2. Inspecting Tires for Wear and Tear
- Check for Cuts and Bulges: Regularly inspect your tires for cuts, bulges, or excessive wear.
- Replace Worn Tires: Replace tires that are worn or damaged.
- Monitor Tread: Keep an eye on the tread depth and replace tires when the tread is low.
11.3. Using Tire Liners or Puncture-Resistant Tires
- Tire Liners: Install tire liners between the tire and the tube for added protection.
- Puncture-Resistant Tires: Use tires that are specifically designed to resist punctures.
- Consider Sealant: Use a tire sealant to automatically seal small punctures.
12. When to Replace vs. Repair Your Bike Tire Tube
Knowing when to repair or replace your bike tire tube can save you time and ensure your safety.
12.1. How Many Patches Is Too Many?
- Limit to Three Patches: As a general rule, it’s best to replace a tube after it has three patches.
- Multiple Patches Can Weaken the Tube: Too many patches can compromise the integrity of the tube.
- Consider a New Tube: If you frequently get flats, it may be time to replace the tube.
12.2. Signs That a Tube Should Be Replaced
- Large Cuts or Tears: Replace the tube if it has large cuts or tears that cannot be effectively patched.
- Valve Damage: Replace the tube if the valve is damaged or leaking.
- Old and Deteriorated Rubber: Replace the tube if the rubber is old, cracked, or deteriorated.
12.3. The Cost-Benefit of Replacing vs. Repairing
- Cost of a New Tube: New tubes are relatively inexpensive.
- Time and Effort: Consider the time and effort required to patch a tube versus the cost of a new one.
- Peace of Mind: A new tube provides greater peace of mind and reliability.
13. Common Mistakes to Avoid When Fixing a Bike Tire Tube
Avoiding common mistakes can ensure a successful repair and prevent future problems.
13.1. Pinching the Inner Tube During Tire Reinstallation
- Use Your Thumbs: Use your thumbs to carefully push the tire bead over the rim.
- Avoid Tire Levers: Minimize the use of tire levers, as they can easily pinch the tube.
- Check the Tube Position: Ensure the tube is properly seated inside the tire before inflating.
13.2. Not Properly Roughening the Tube Surface
- Rough Surface Is Essential: Roughening the tube surface is essential for proper adhesion of the patch.
- Use Sandpaper or Scuffer: Use sandpaper or a metal scuffer to create a slightly rough texture.
- Clean After Roughening: Clean the area after roughening to remove any debris.
13.3. Over or Under Inflating the Tire
- Check Recommended Pressure: Check the recommended pressure range on the tire sidewall.
- Use a Gauge: Use a pressure gauge to ensure accurate inflation.
- Avoid Extremes: Avoid over-inflating or under-inflating the tire.
14. Advanced Bike Tire Maintenance Tips
For those looking to enhance their bike maintenance skills, here are some advanced tips.
14.1. Tubeless Tire Conversion
- Benefits of Tubeless: Tubeless tires offer improved puncture resistance and lower rolling resistance.
- Conversion Process: Converting to tubeless requires special rims, tires, and sealant.
- Consider the Pros and Cons: Weigh the benefits and drawbacks before converting.
14.2. Using Tire Sealants
- Automatic Sealing: Tire sealants automatically seal small punctures.
- Types of Sealants: Different types of sealants are available for different types of tires.
- Maintenance: Sealants require periodic maintenance and replacement.
14.3. Understanding Tire Bead Seating
- Proper Seating Is Crucial: Proper tire bead seating ensures a safe and comfortable ride.
- Use Soap and Water: Use soap and water to help seat the tire bead.
- Inspect the Tire: Inspect the tire to ensure the bead is evenly seated around the entire rim.
15. Resources for Further Learning About Bike Maintenance
To deepen your knowledge of bike maintenance, here are some valuable resources.
15.1. Online Forums and Communities
- usabikers.net: Join our community forum to connect with other bikers, share tips, and ask questions.
Address: 801 Sturgis Main St, Sturgis, SD 57785, United States
Phone: +1 (605) 347-2000
Website: usabikers.net - Bike Forums: A popular online forum for all things cycling.
- Reddit Bike Communities: Subreddits like r/cycling and r/bikewrench offer a wealth of information and advice.
15.2. Books and Manuals on Bike Repair
- Zinn & the Art of Road Bike Maintenance: A comprehensive guide to road bike maintenance.
- The Complete Bicycle Maintenance Book: A detailed manual covering all aspects of bike repair.
- Park Tool Big Blue Book of Bicycle Repair: A widely used reference guide for bike mechanics.
15.3. Local Bike Shops and Workshops
- Hands-On Learning: Local bike shops often offer workshops and classes on bike repair.
Address: 801 Sturgis Main St, Sturgis, SD 57785, United States
Phone: +1 (605) 347-2000
Website: usabikers.net - Expert Advice: Get personalized advice and guidance from experienced mechanics.
- Community: Connect with other bike enthusiasts in your area.
FAQ: Your Bike Tire Tube Questions Answered
1. How do I know if my bike tire tube is punctured?
You’ll notice a sudden loss of tire pressure, making the bike difficult to handle. You might also hear a hissing sound or find a visible hole.
2. Can I use any patch kit for my bike tire tube?
It’s best to use a patch kit specifically designed for bicycle tubes. These kits include the right adhesive and patch materials for a reliable repair.
3. How long does it take for rubber cement to dry before applying a patch?
Rubber cement should dry until it becomes tacky to the touch, usually a few minutes. It should lose its shine and appear dull before you apply the patch.
4. Is it necessary to roughen the tube surface before patching?
Yes, roughening the surface with sandpaper or a metal scuffer is essential for creating a better bond between the patch and the tube.
5. How do I avoid pinching the inner tube when reinstalling the tire?
Use your thumbs to carefully push the tire bead over the rim, and ensure the tube is properly seated inside the tire before inflating. Minimize the use of tire levers, as they can easily pinch the tube.
6. What is the correct tire pressure for my bike?
Check the tire sidewall for the recommended pressure range. Use a pressure gauge to ensure accurate inflation and avoid over- or under-inflating the tire.
7. How many patches can I apply to a bike tire tube before replacing it?
As a general rule, it’s best to replace a tube after it has three patches, as multiple patches can compromise the tube’s integrity.
8. Can I use tire sealant to prevent flat tires?
Yes, tire sealant automatically seals small punctures and can be a great way to prevent flat tires. Different types of sealants are available for various tires.
9. What are the benefits of converting to tubeless tires?
Tubeless tires offer improved puncture resistance and lower rolling resistance, enhancing your riding experience.
10. Where can I find more resources for learning about bike maintenance?
Join online forums like usabikers.net, read books and manuals on bike repair, or attend workshops at your local bike shop for hands-on learning and expert advice.
In conclusion, mastering how to fix a bike tire tube is an invaluable skill for any motorcycle enthusiast. By following this comprehensive guide and utilizing the resources available on usabikers.net, you’ll be well-prepared to handle unexpected flats, ensuring a smooth and enjoyable ride every time. Remember to regularly inspect your tires, maintain proper inflation, and consider advanced techniques like tubeless conversions for enhanced performance and puncture resistance. Join the usabikers.net community today to connect with fellow riders, share your experiences, and stay updated on the latest bike maintenance tips and tricks.