
Measuring a bike frame size in inches accurately is crucial for ensuring a comfortable and efficient riding experience, something we at usabikers.net understand deeply. By understanding how to properly measure your bike frame, you’ll be equipped to make informed decisions whether you’re buying, renting, or simply adjusting your current ride. Explore bike geometry, frame measurements, and accurate sizing techniques for a confident purchase.
1. Bike Frame Geometry and Why It Matters
Bike geometry refers to the set of measurements that define the frame of a bicycle. Understanding these measurements is essential for ensuring a proper bike fit and optimizing your riding experience. These measurements influence how the bike handles, feels, and performs. Knowing how to accurately measure your bike frame size in inches is a fundamental step toward achieving a comfortable and efficient ride.
2. Key Bike Frame Measurements Explained
When discussing bike frame measurements, several key terms come into play. Each measurement provides unique insights into the bike’s characteristics and how it will fit a rider. Let’s explore these measurements in detail:
- Top Tube Length: The horizontal distance between the center of the head tube and the seatpost.
- Seat Tube Length: The distance between the center of the bottom bracket and the top of the seat tube.
- Reach: The horizontal distance between the bottom bracket and the top of the head tube.
- Stack: The vertical distance between the bottom bracket and the top of the head tube.
- Wheelbase: The distance between the front and rear axles.
- Chainstay Length: The distance between the bottom bracket and the rear dropout.
- Front Center: The distance from the bottom bracket to the front axle.
- Seat Tube Angle: The angle of the seat tube relative to the ground.
- Head Tube Angle: The angle of the head tube relative to the ground.
- Bottom Bracket Drop: The difference between the height of the wheel axle and the crank axle.
- Bottom Bracket Height: The distance from the ground to the bottom bracket.
3. Tools Needed to Measure a Bike Frame
To accurately measure a bike frame, you will need a few essential tools:
- Tape Measure: A standard tape measure is crucial for taking linear measurements.
- Clinometer: A clinometer is used to measure angles accurately. Smartphone apps are available for this purpose.
- Spirit Level: A long spirit level ensures horizontal and vertical alignment. Alternatively, a clinometer app and a straight piece of wood can be used.
- Plumb Line: A plumb line helps determine vertical alignment. A string and a weight can be used as an improvised plumb line.
4. Step-by-Step Guide: How to Measure Top Tube Length
Measuring the top tube length is a critical step in determining bike fit. Follow these steps for an accurate measurement:
4.1 Understanding Effective Top Tube Length
Many modern bikes have sloping top tubes. When measuring, it’s important to focus on the effective top tube length, also known as the virtual top tube. This measurement provides a consistent reference point, regardless of the top tube angle.
4.2 Measuring Horizontal Distance
Use a spirit level or clinometer app to ensure the measurement is perfectly horizontal. Measure the horizontal distance between the center of the head tube and the center of the seatpost.
4.3 Brand Variations
Keep in mind that different manufacturers may measure top tube length slightly differently. For example, Colnago measures the horizontal distance from the head tube to a vertical projection from the top of the seat tube, which may result in smaller numbers compared to other brands.
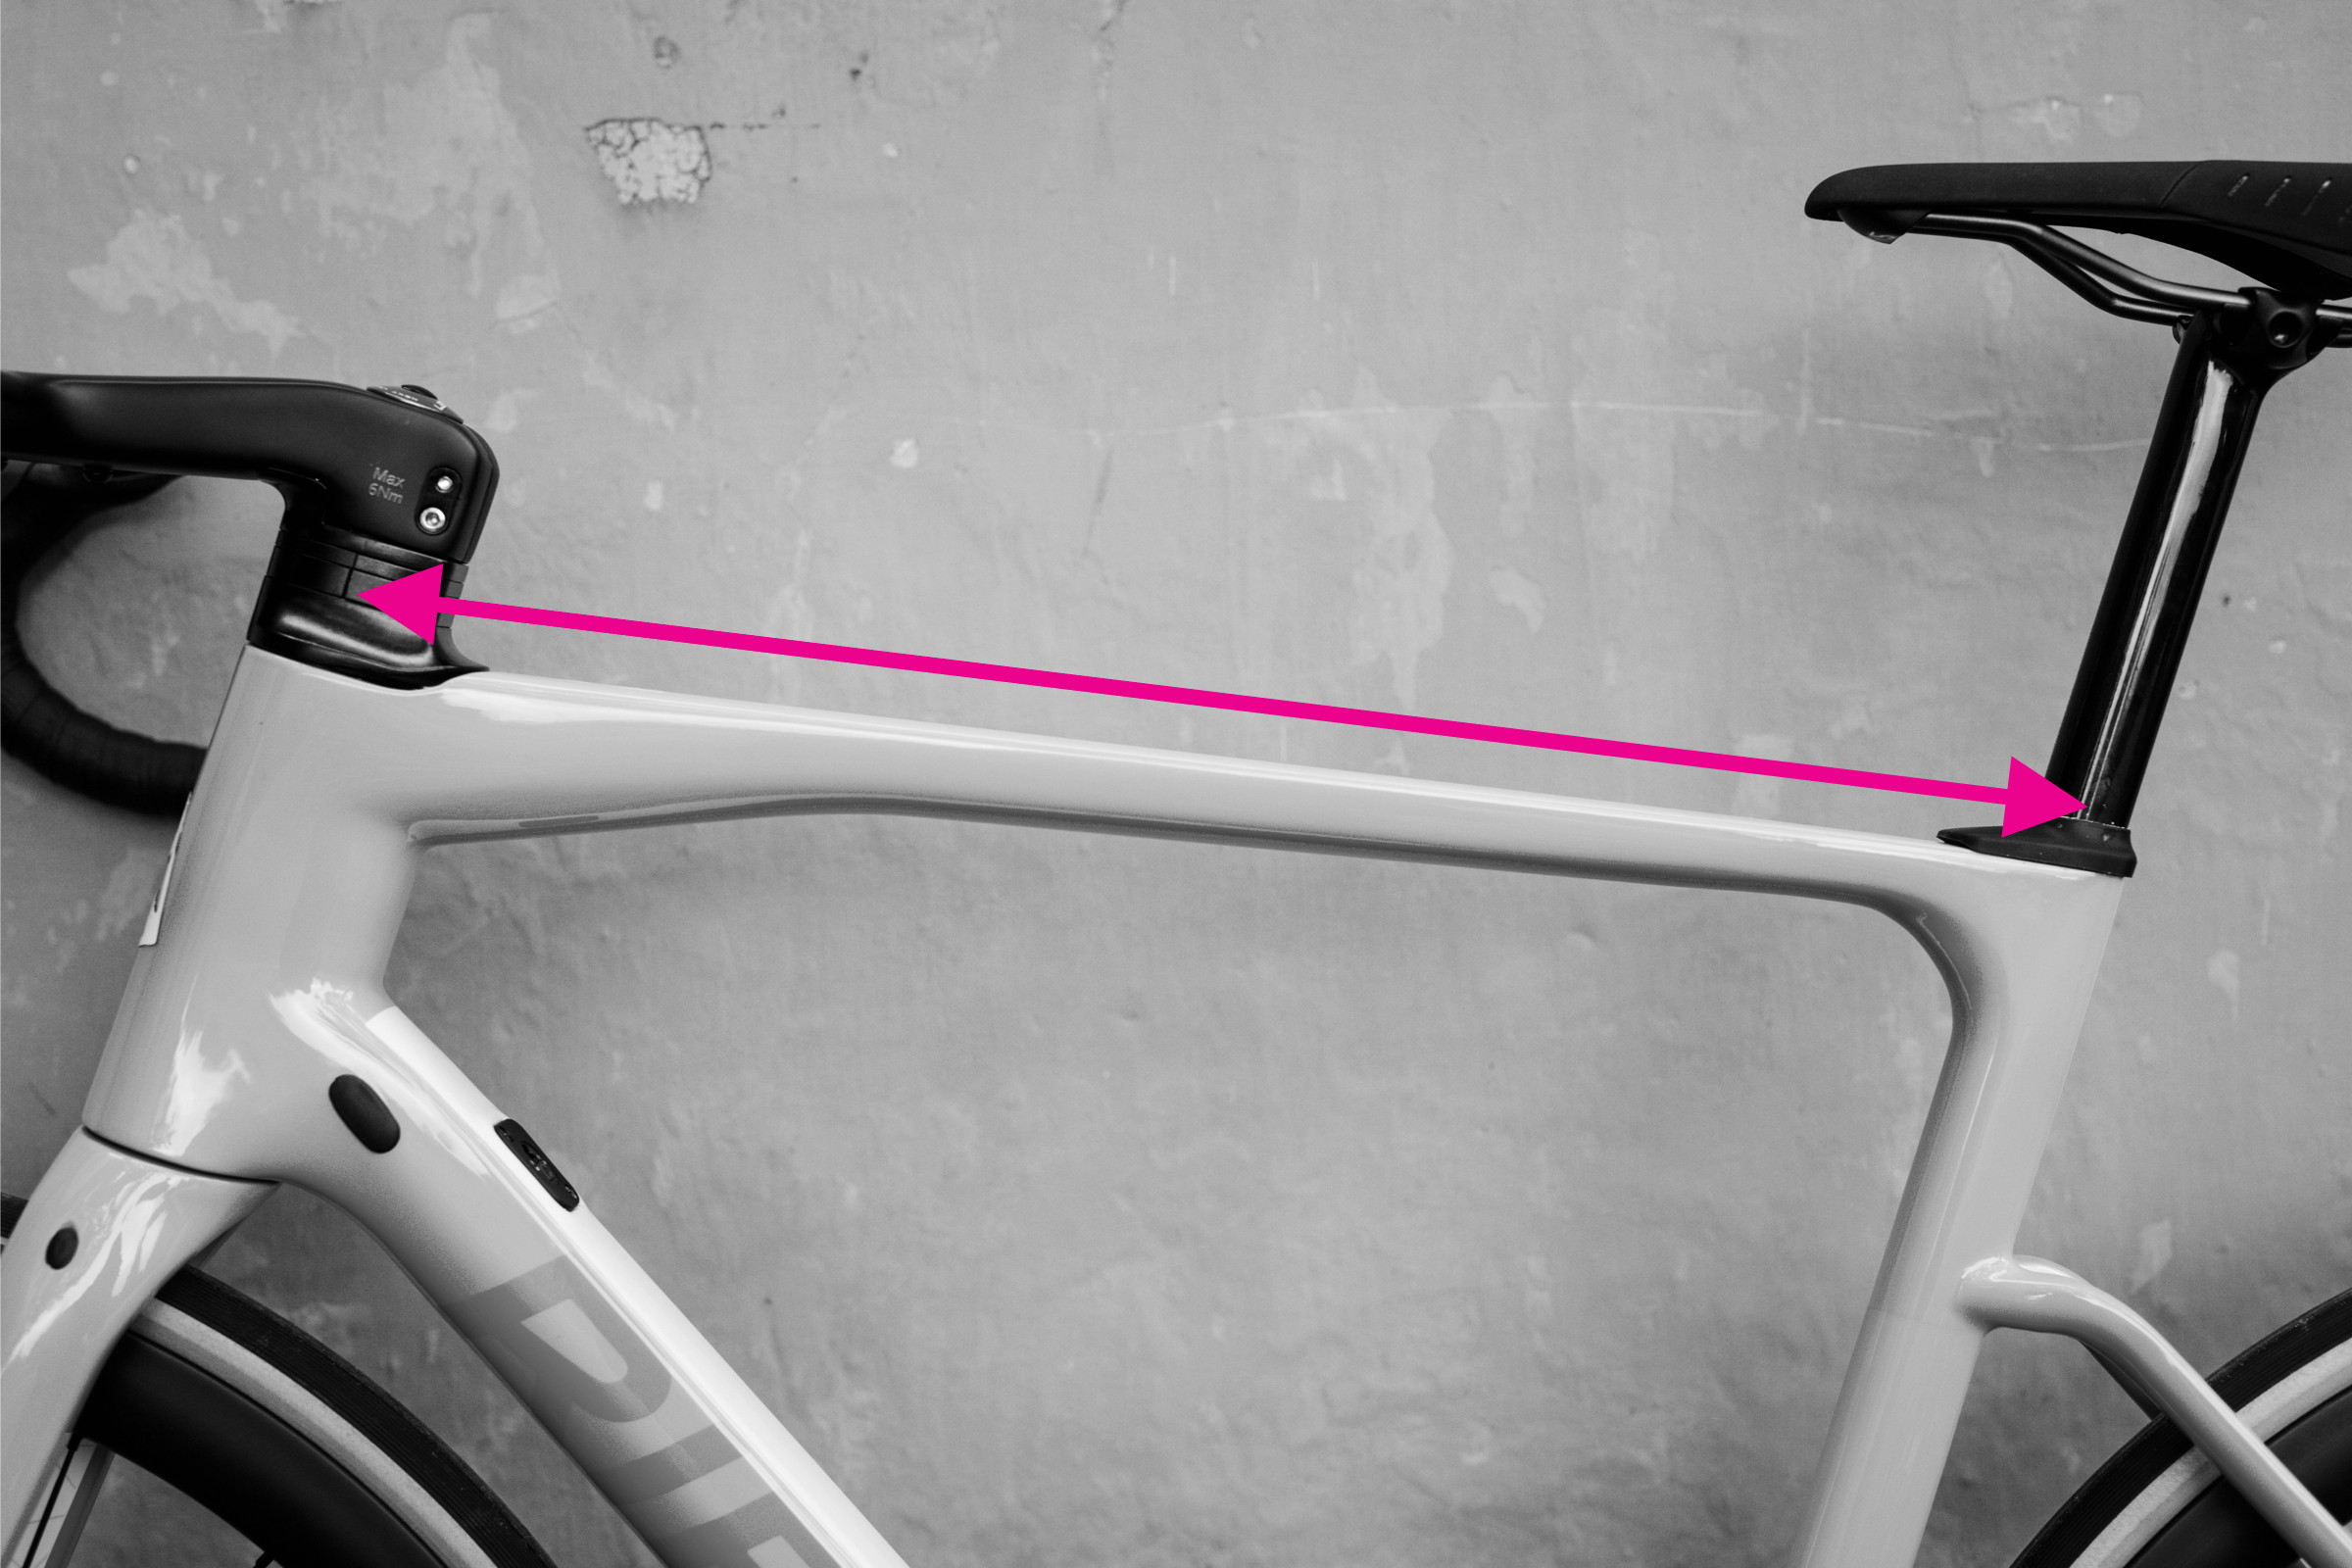 Top tube measurement demonstrated on a bike frame
5. Measuring Seat Tube Length Accurately
Seat tube length is another key measurement that affects bike fit. Here’s how to measure it accurately:
5.1 Straight-Line Distance
Seat tube length is the straight-line distance between the center of the bottom bracket and the top of the seat tube.
5.2 Accounting for Seat Tube Extensions
Some bikes, like the Trek Madone, have seat tube extensions that extend above the top tube junction. Others use a seat mast. These variations can make comparisons tricky.
5.3 Kinks in the Seat Tube
Mountain bikes often have kinks in the seat tube. Avoid following the line of the tube itself, as this will result in a longer measurement. Instead, align a straight edge with the bottom bracket center and the top of the seat tube.
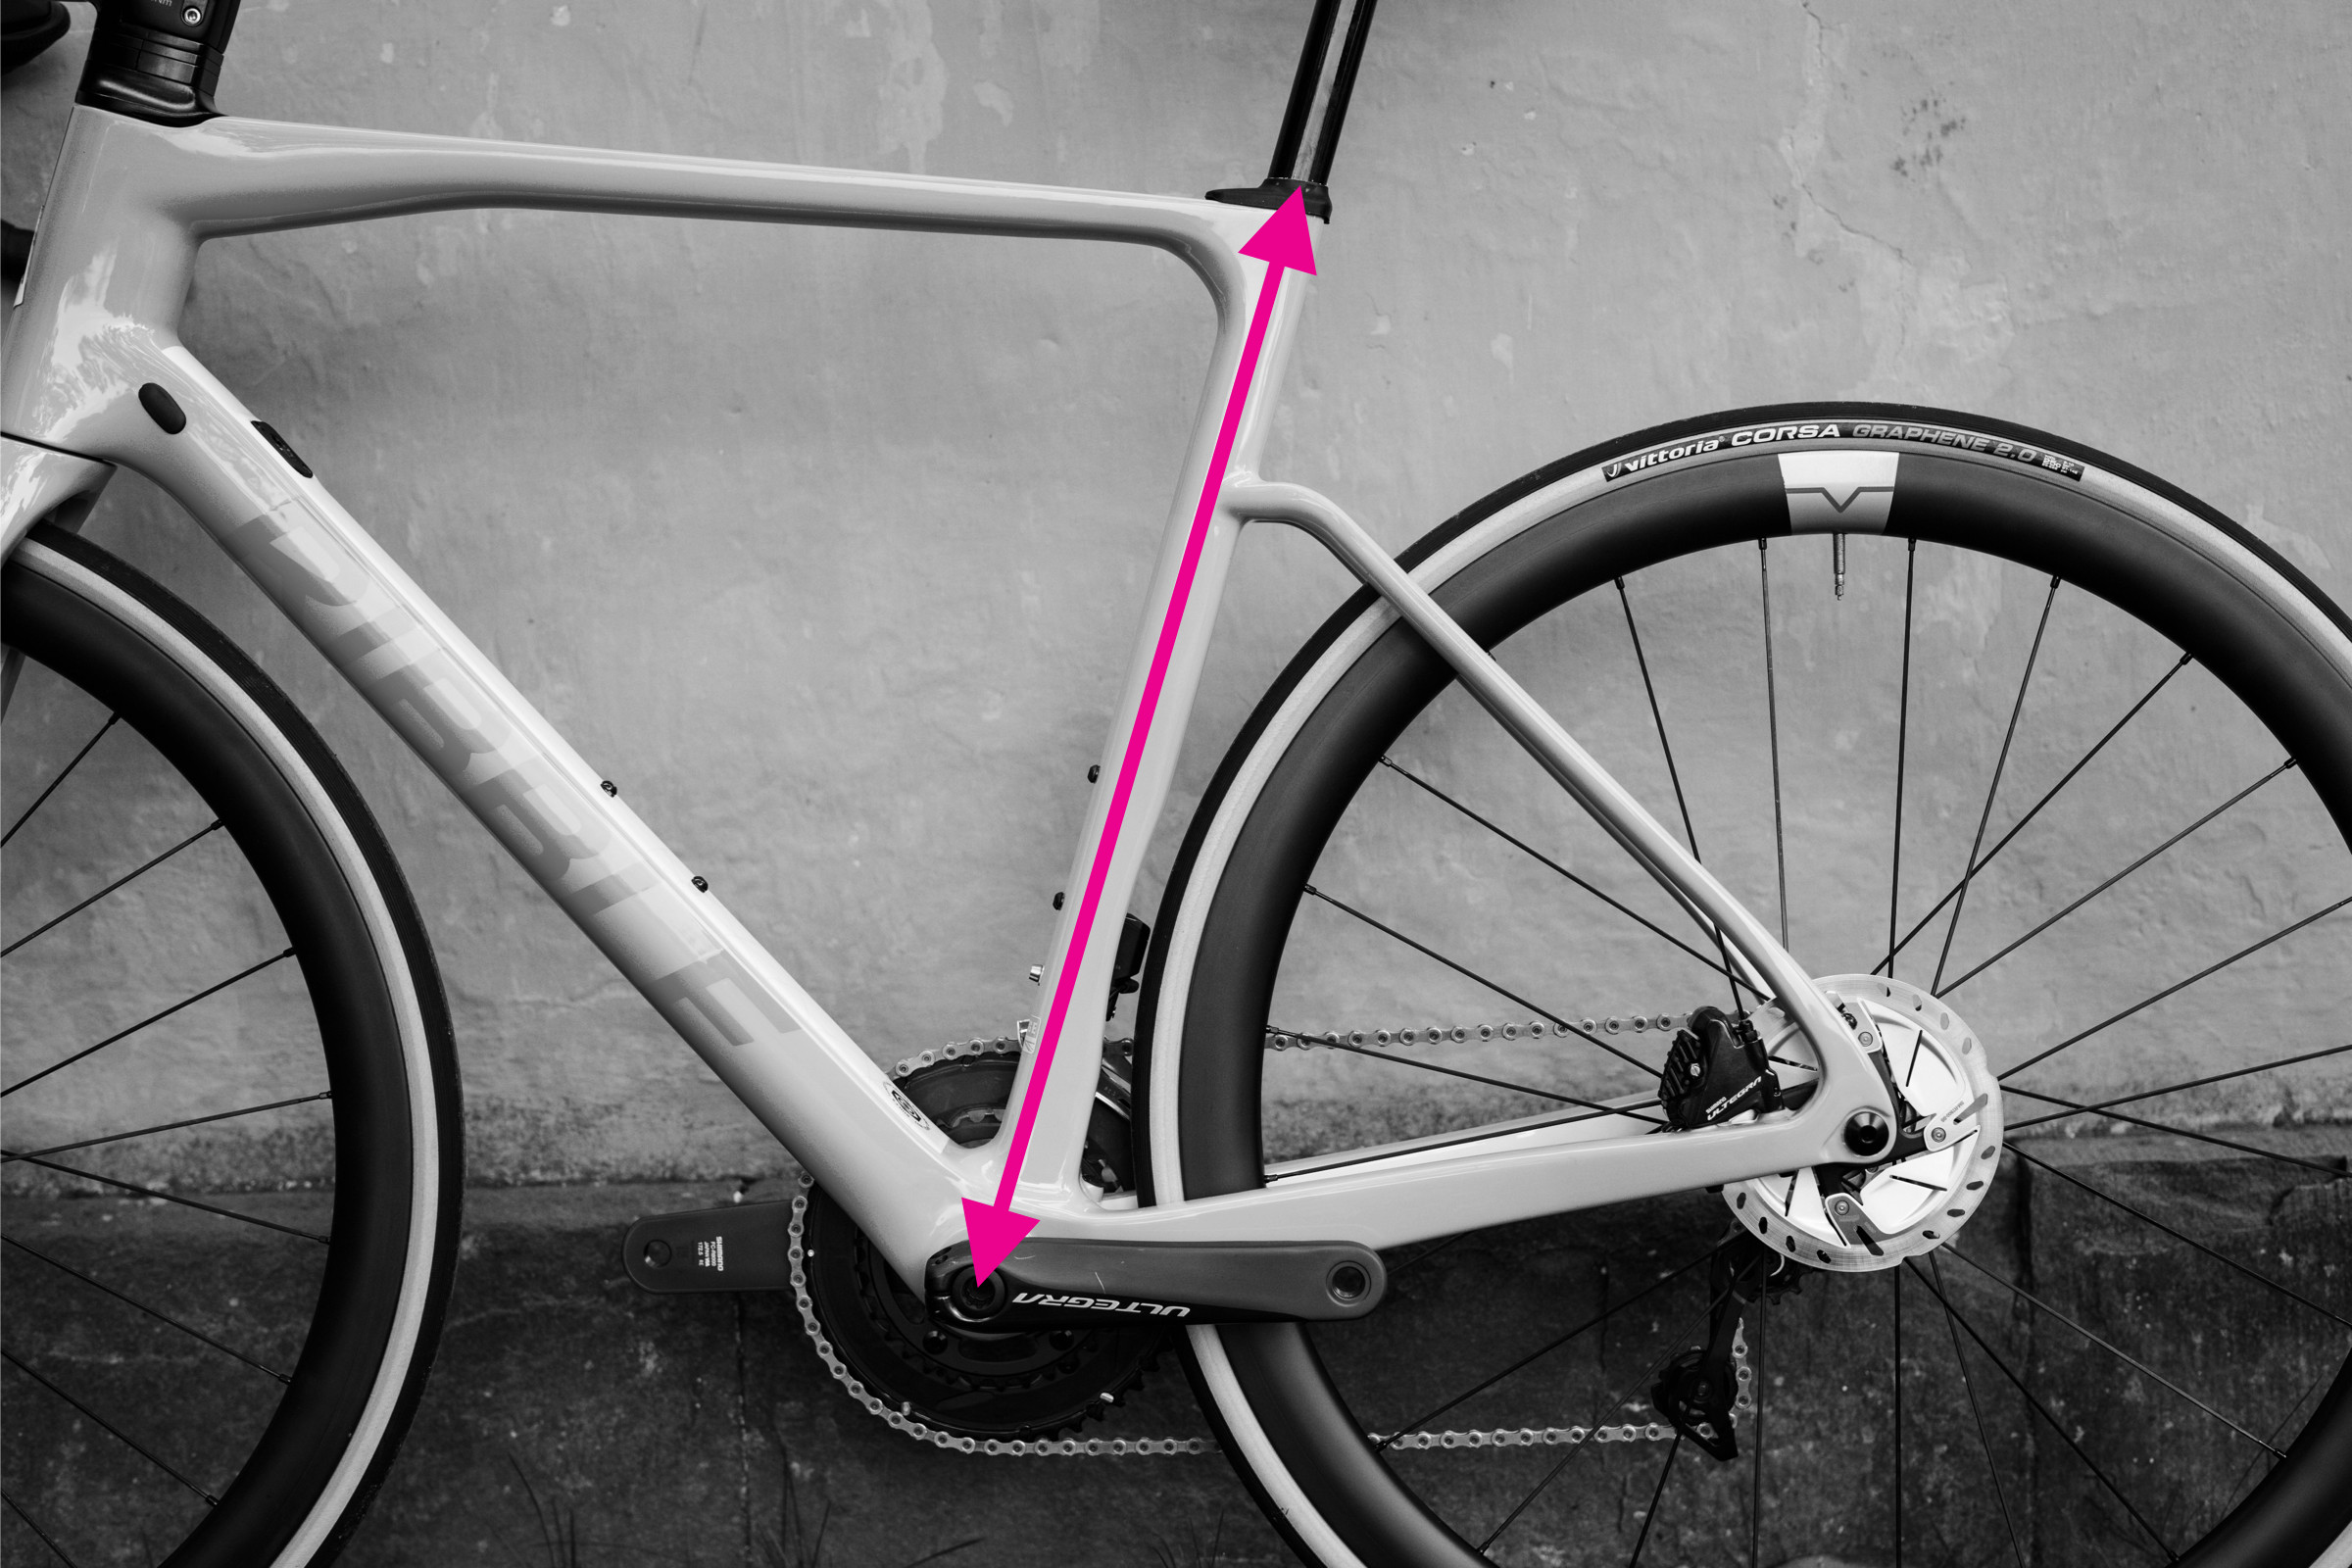 Seat tube measurement demonstrated on a bicycle frame
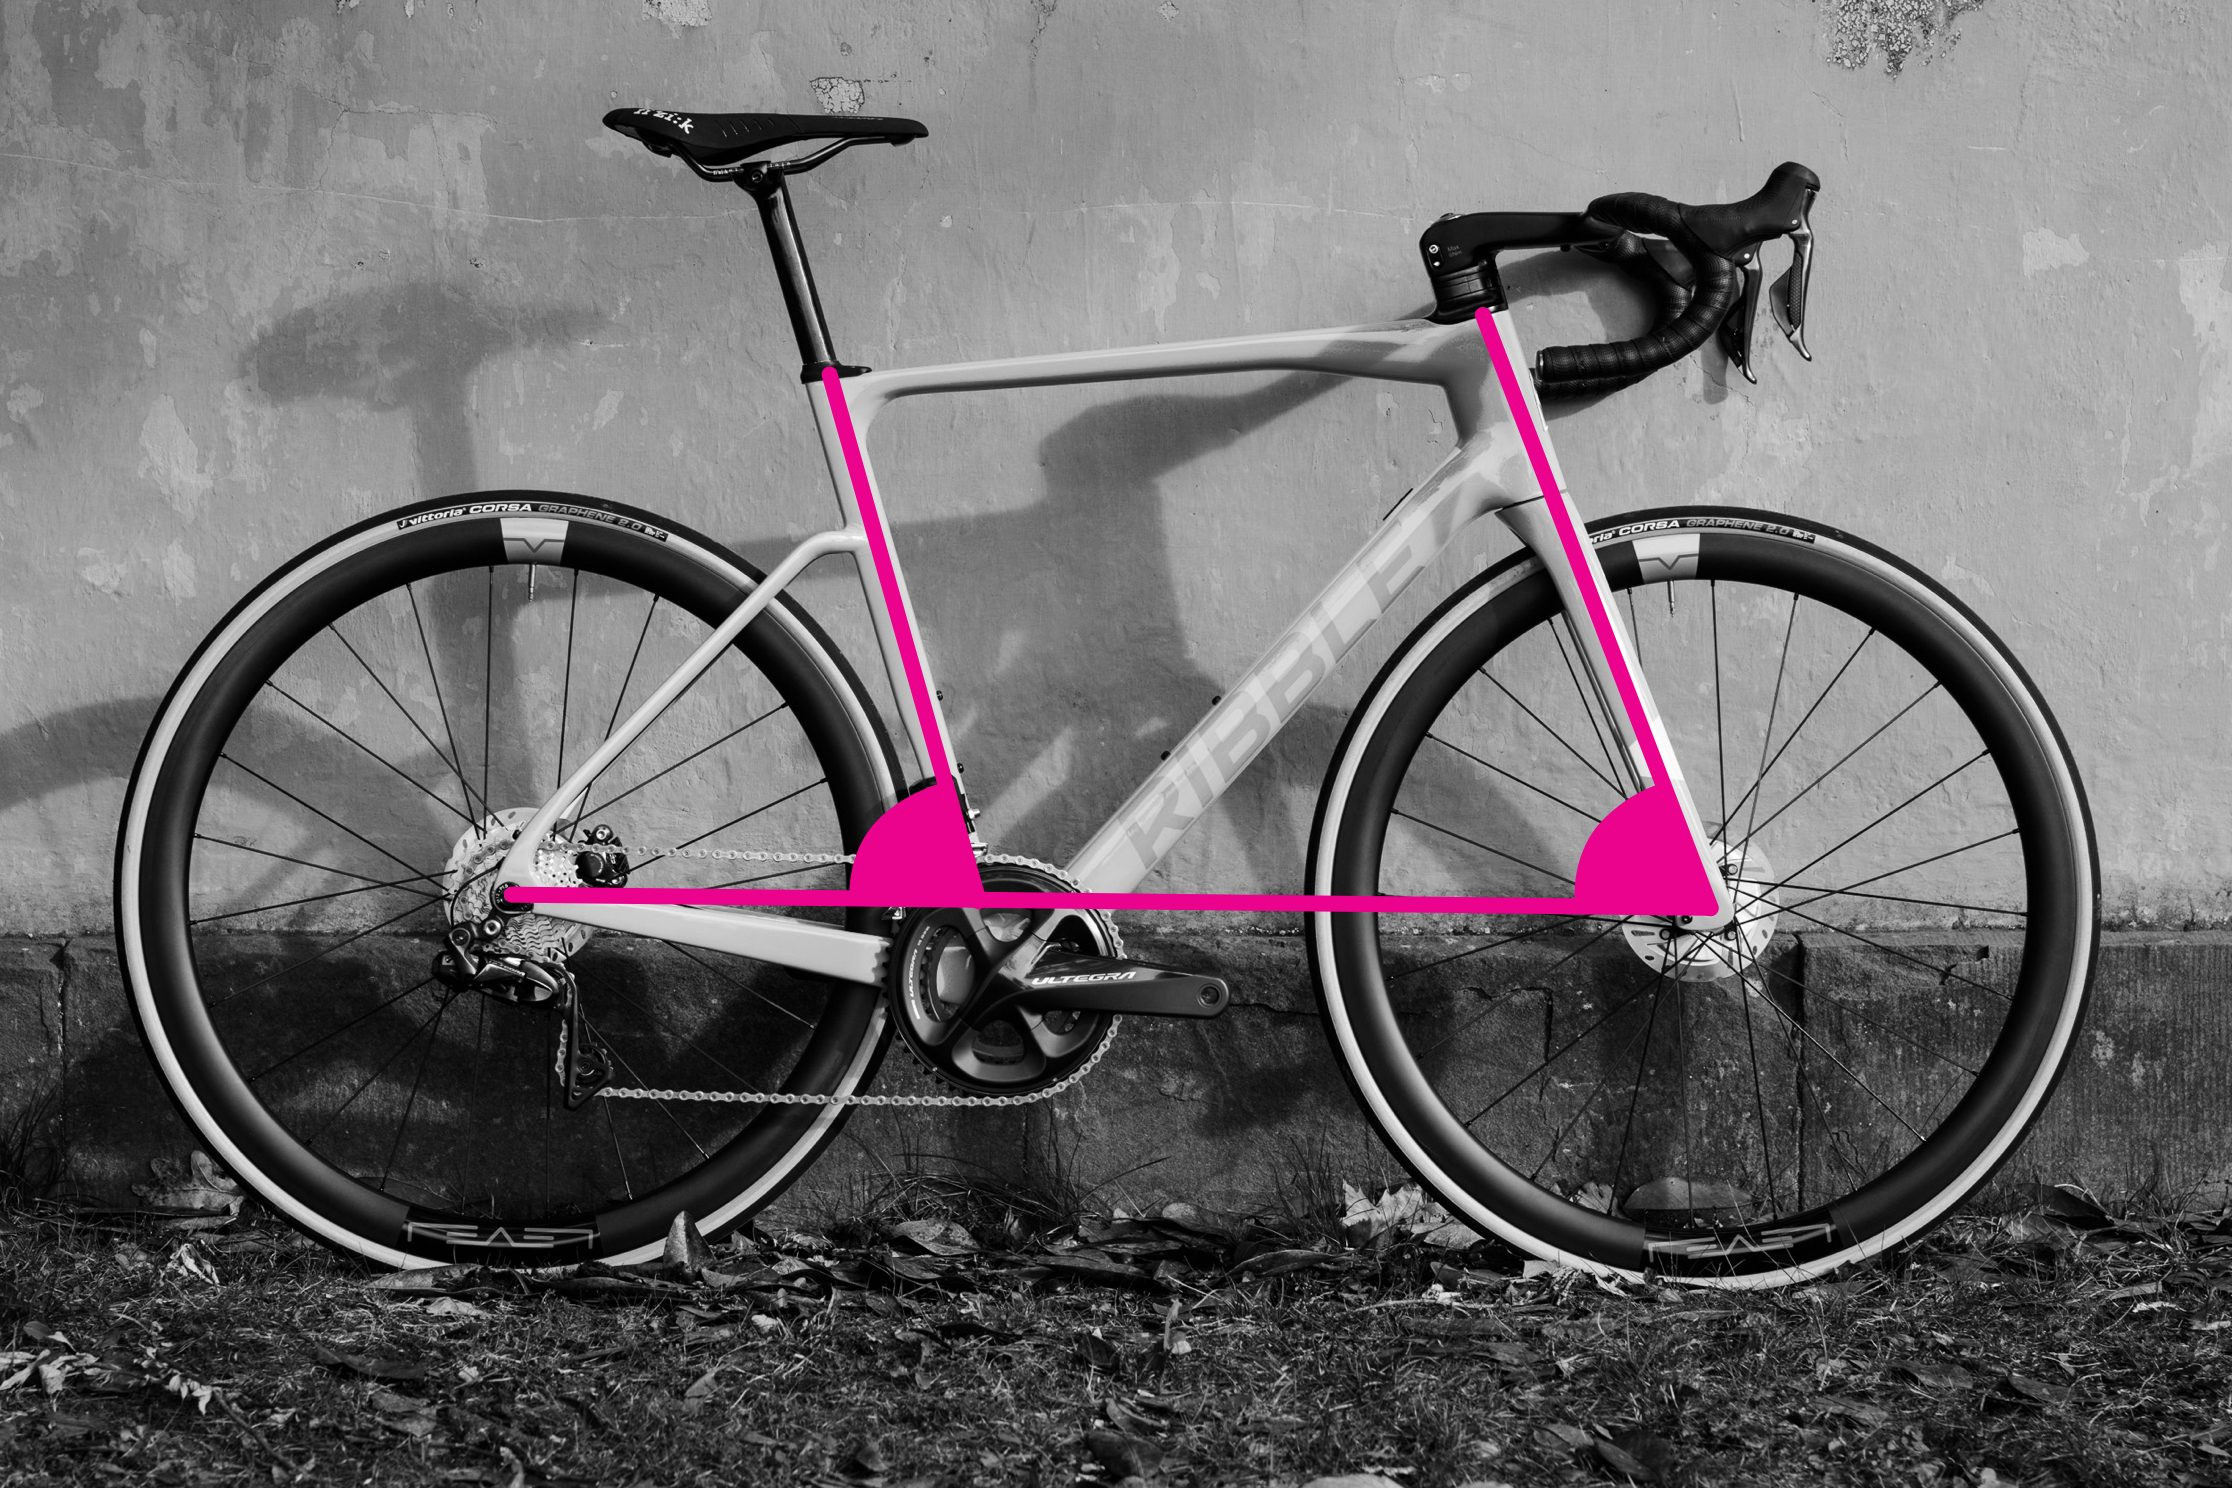
6. How to Measure Reach and Stack for Optimal Bike Fit
Reach and stack are essential measurements for comparing frames consistently. They are independent of frame design and measure the perpendicular distances between the bottom bracket and the top of the head tube.
6.1 Understanding Reach
Reach is the horizontal distance between the bottom bracket and the top of the head tube. Use a spirit level and plumb line to measure this accurately.
6.2 Measuring Reach with a Plumb Line
Attach a plumb line to the end of the spirit level. Align the top edge of the level with the center of the top of the head tube. Move the level until the plumb line intersects with the center of the bottom bracket spindle. Measure the distance between the top of the plumb line and the head tube to find the reach.
6.3 Understanding Stack
Stack is the vertical distance between the bottom bracket and the top of the head tube.
6.4 Measuring Stack with a Plumb Line
Once you’ve set up to measure reach, you can also measure stack by following the plumb line. Alternatively, measure the vertical distance from the ground to the top of the head tube, then measure the height of your bottom bracket from the ground and subtract this.
6.5 Ensuring Accuracy
Both reach and stack can be challenging to measure accurately. It’s helpful to have a second pair of hands and repeat the measurements to ensure consistency.
 Stack and reach measurement demonstrated on a bike frame
7. Measuring Wheelbase for Ride Quality
The wheelbase is the distance between the front and rear axles. It’s a key determinant of a frame’s ride quality and varies with frame size.
7.1 How to Measure Wheelbase
Measure the distance between the front and rear axles. Ensure the fork is straight ahead for an accurate measurement.
7.2 Ensuring Accuracy
Repeat the measurement several times to ensure consistency. Measuring both sides of the bike and taking the average can compensate for any slight misalignment of the fork.
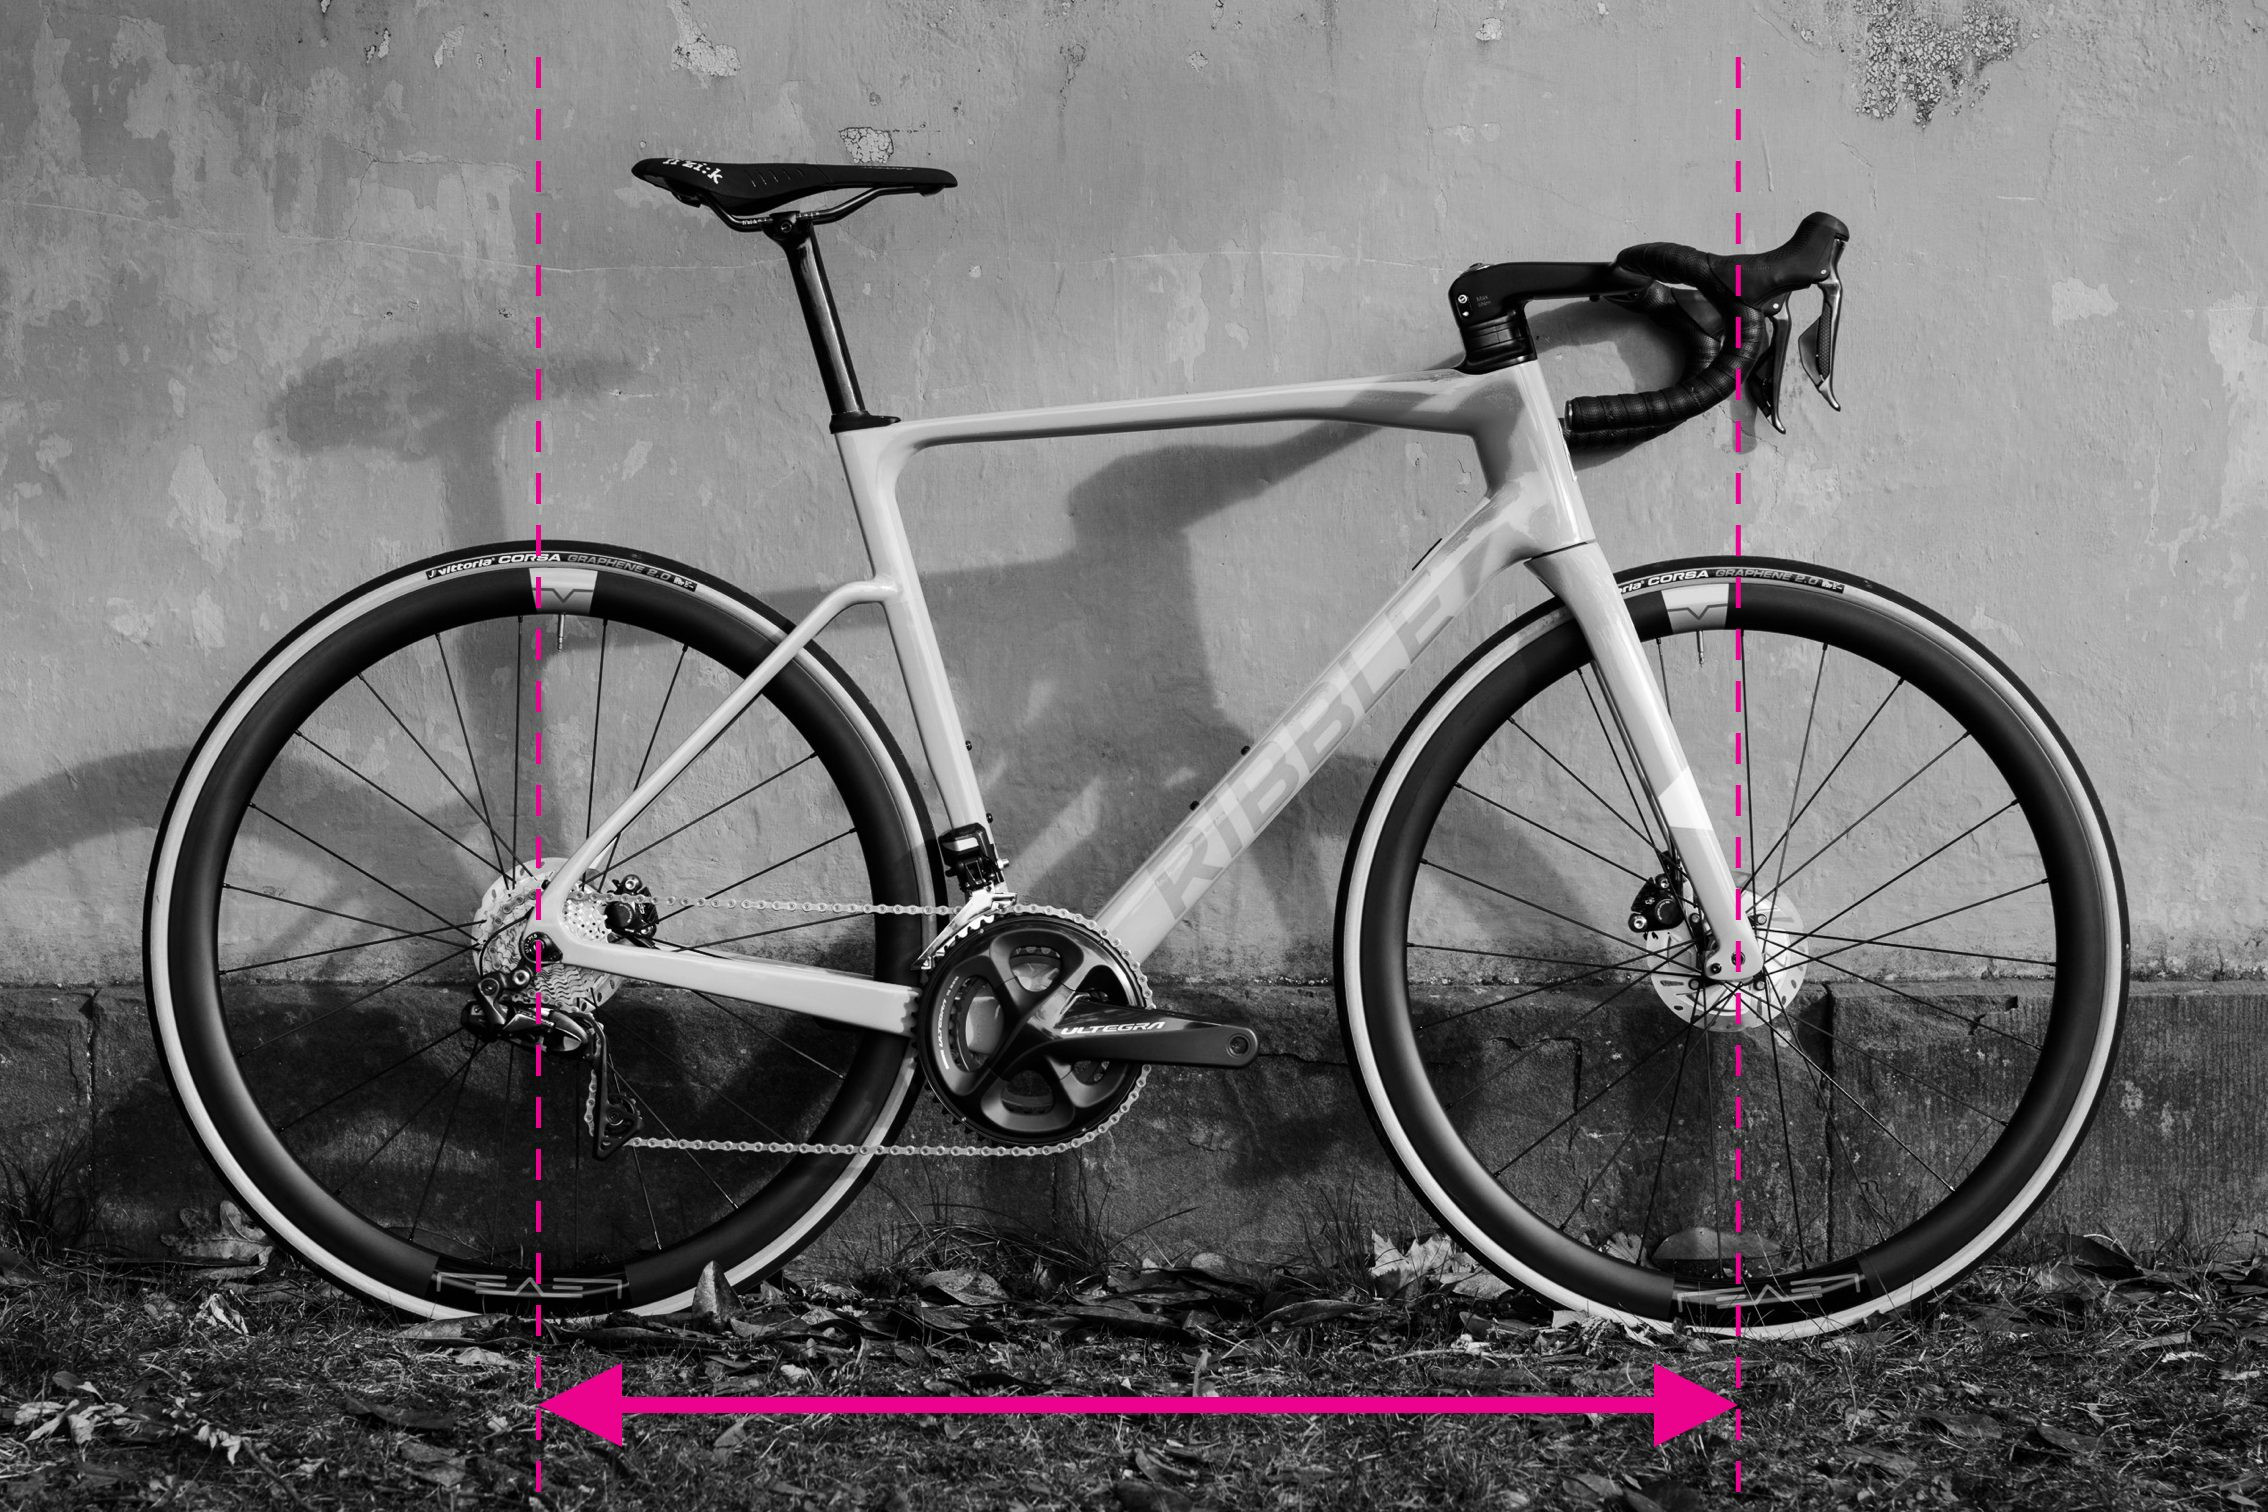 Wheelbase measurement demonstrated on a bike frame
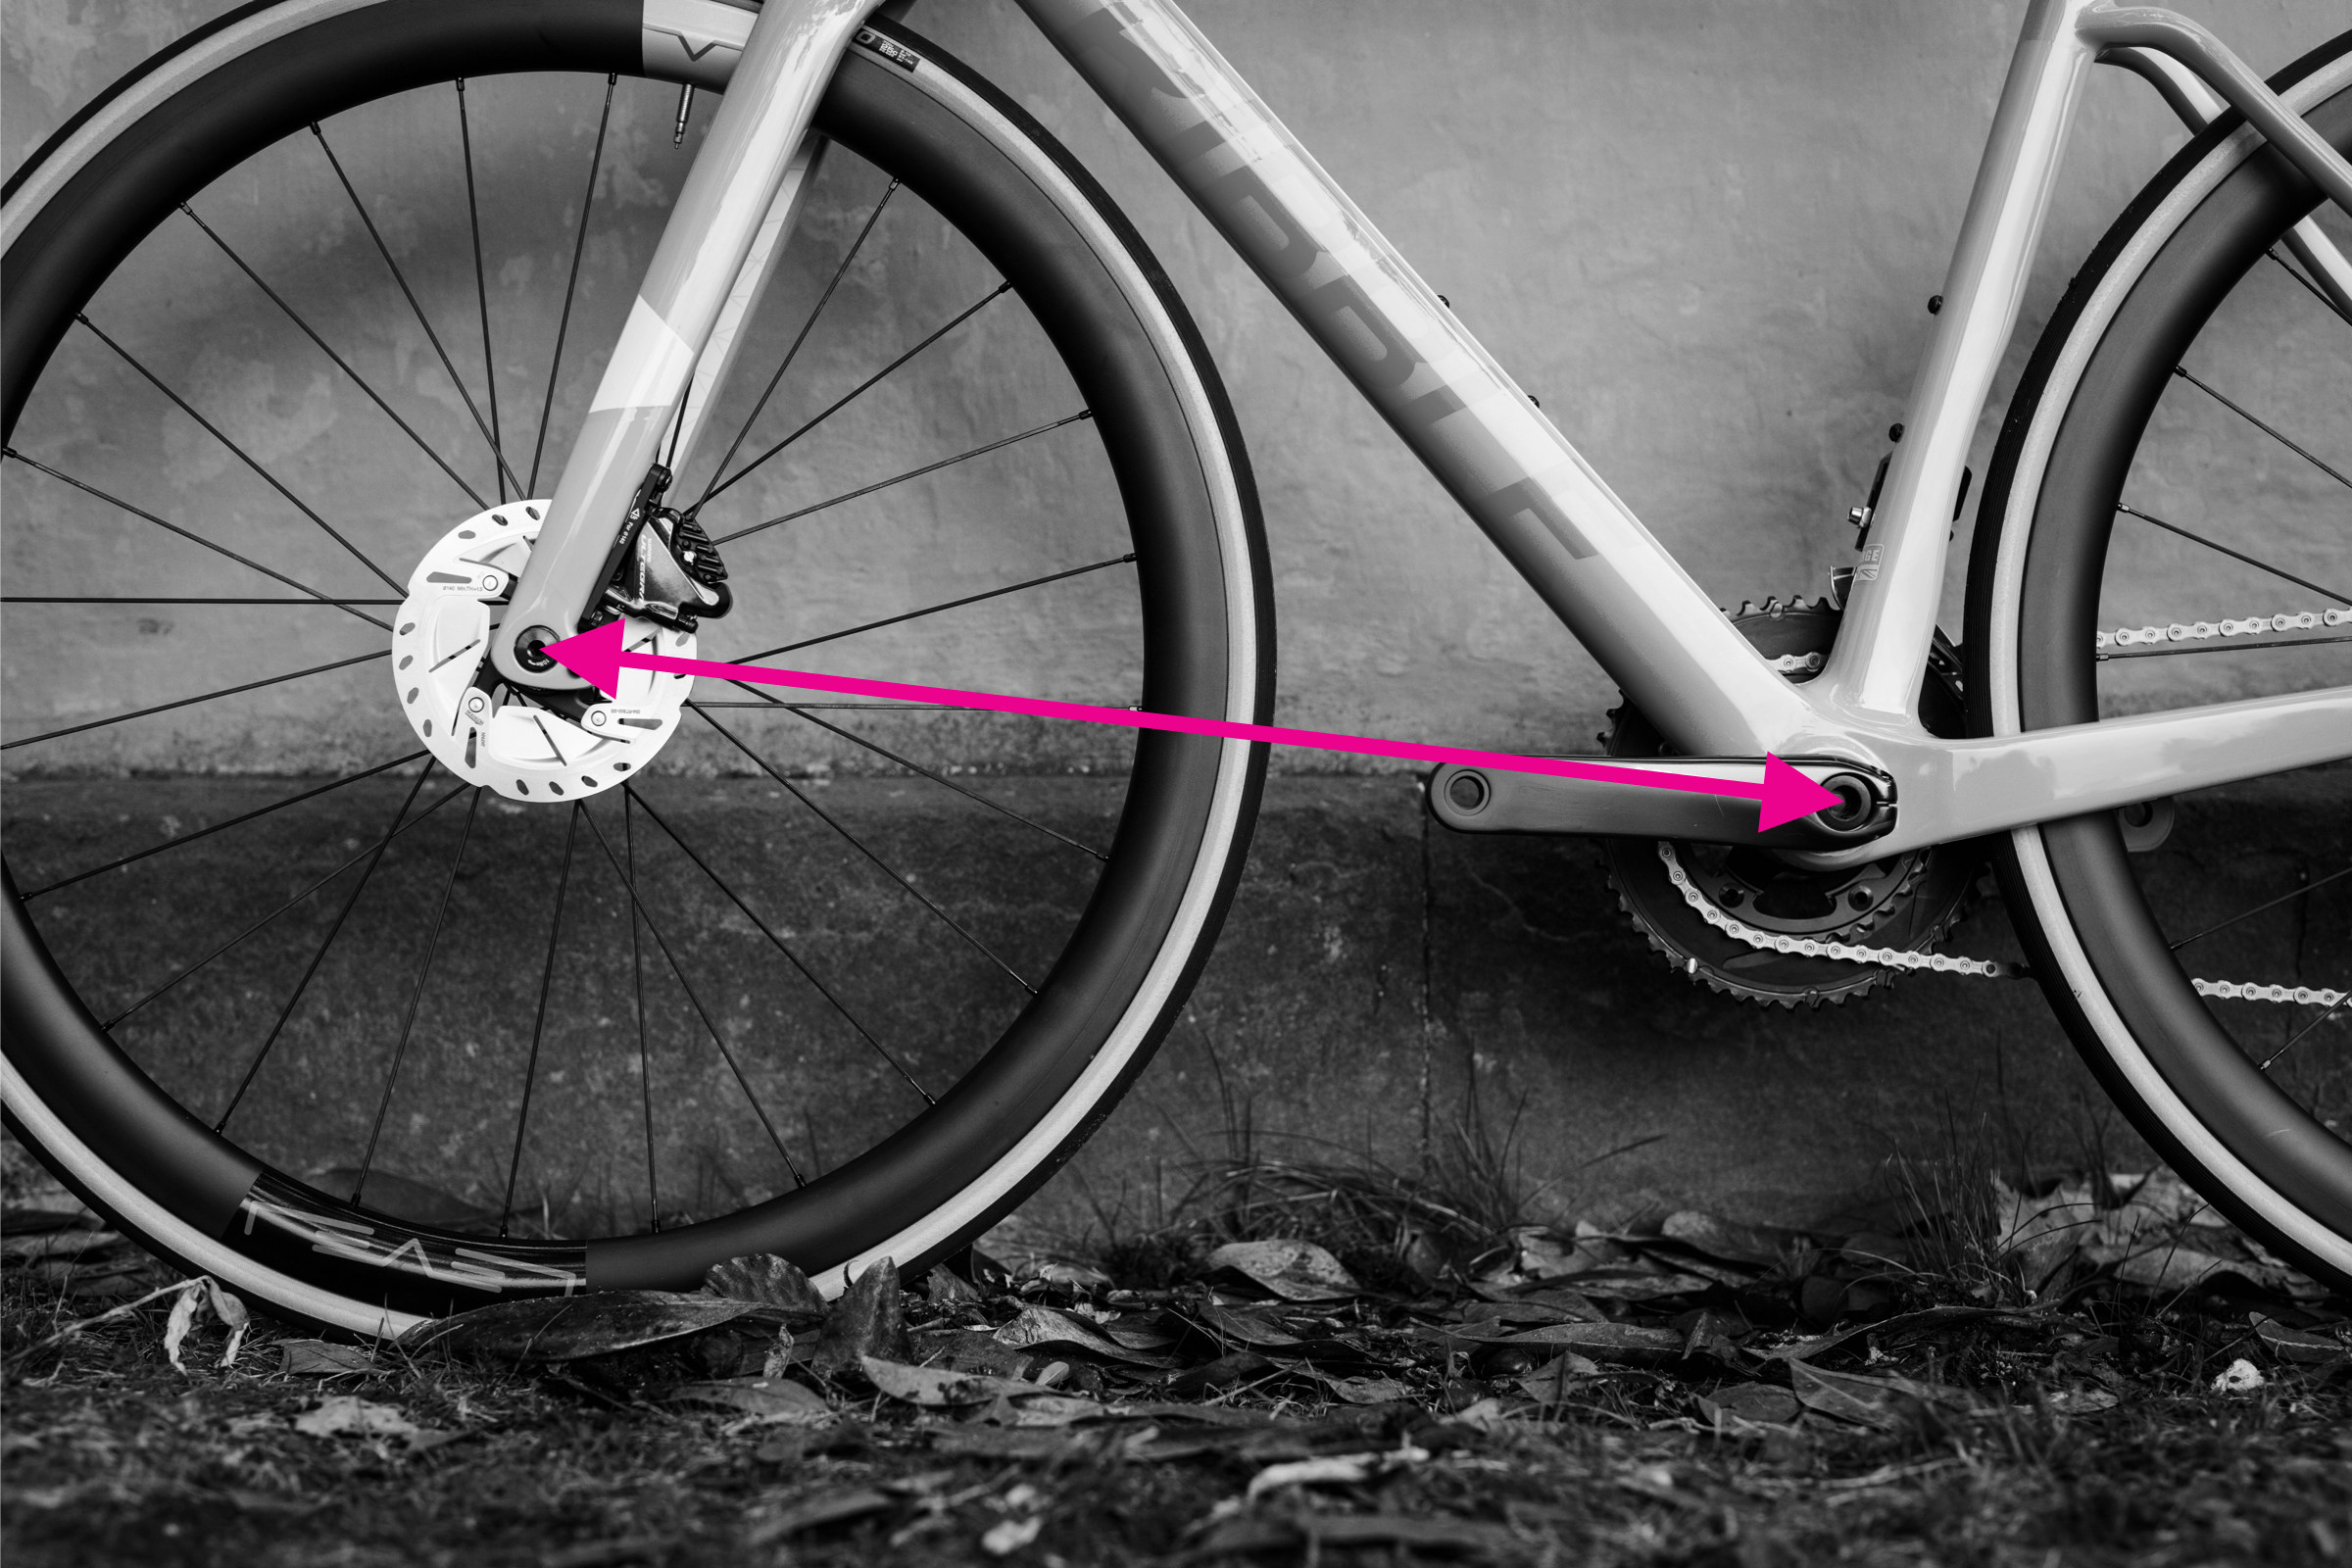
8. Chainstay Length: Measuring for Handling Characteristics
Chainstay length is one of the components that make up the wheelbase and significantly contributes to a frame’s handling characteristics.
8.1 How to Measure Chainstay Length
Measure the straight-line distance between the center of the bottom bracket axle and the center of the rear dropout using a ruler.
8.2 Impact on Handling
A frame with shorter chainstays typically feels more lively, while longer chainstays provide more stability.
 Chainstay length measurement demonstrated on a bike frame
9. Front Center: Measuring for Balance and Handling
The front center is the distance from the bottom bracket to the front axle. It affects handling and toe overlap with the front wheel.
9.1 How to Measure Front Center
Measure the distance from the center of the bottom bracket to the front dropout.
9.2 Importance of Front Center
While not always quoted by bike makers, the front center is essential for understanding the bike’s balance and handling characteristics.
 Front centre measurement demonstrated on a bike frame
10. Measuring Seat Tube and Head Tube Angles for Handling
The seat tube and head tube angles are critical factors in determining a bike’s handling characteristics. More upright tube angles typically lead to more nimble handling.
10.1 How to Measure Seat Tube Angle
If the seat tube is straight, use a clinometer app to measure the angle. Ensure the bike is vertical and standing on a horizontal surface.
10.2 Measuring Seat Tube Angle with Kinks
If there’s a kink in the seat tube, use a straight edge to follow the line between the bottom bracket shell and the top of the seat tube, then line up the phone with this.
10.3 How to Measure Head Tube Angle
Most newer bikes have tapered head tubes. Hold your phone at the angle of the centerline, or use a straight edge to line up with the centers of the top and bottom of the head tube.
10.4 Using Fork Legs
If you have straight fork legs, the angle of the legs will be the same as the head tube angle. You can measure this instead, ensuring the bike is standing vertically.
 Seat and head tube measurements demonstrated on a bike frame
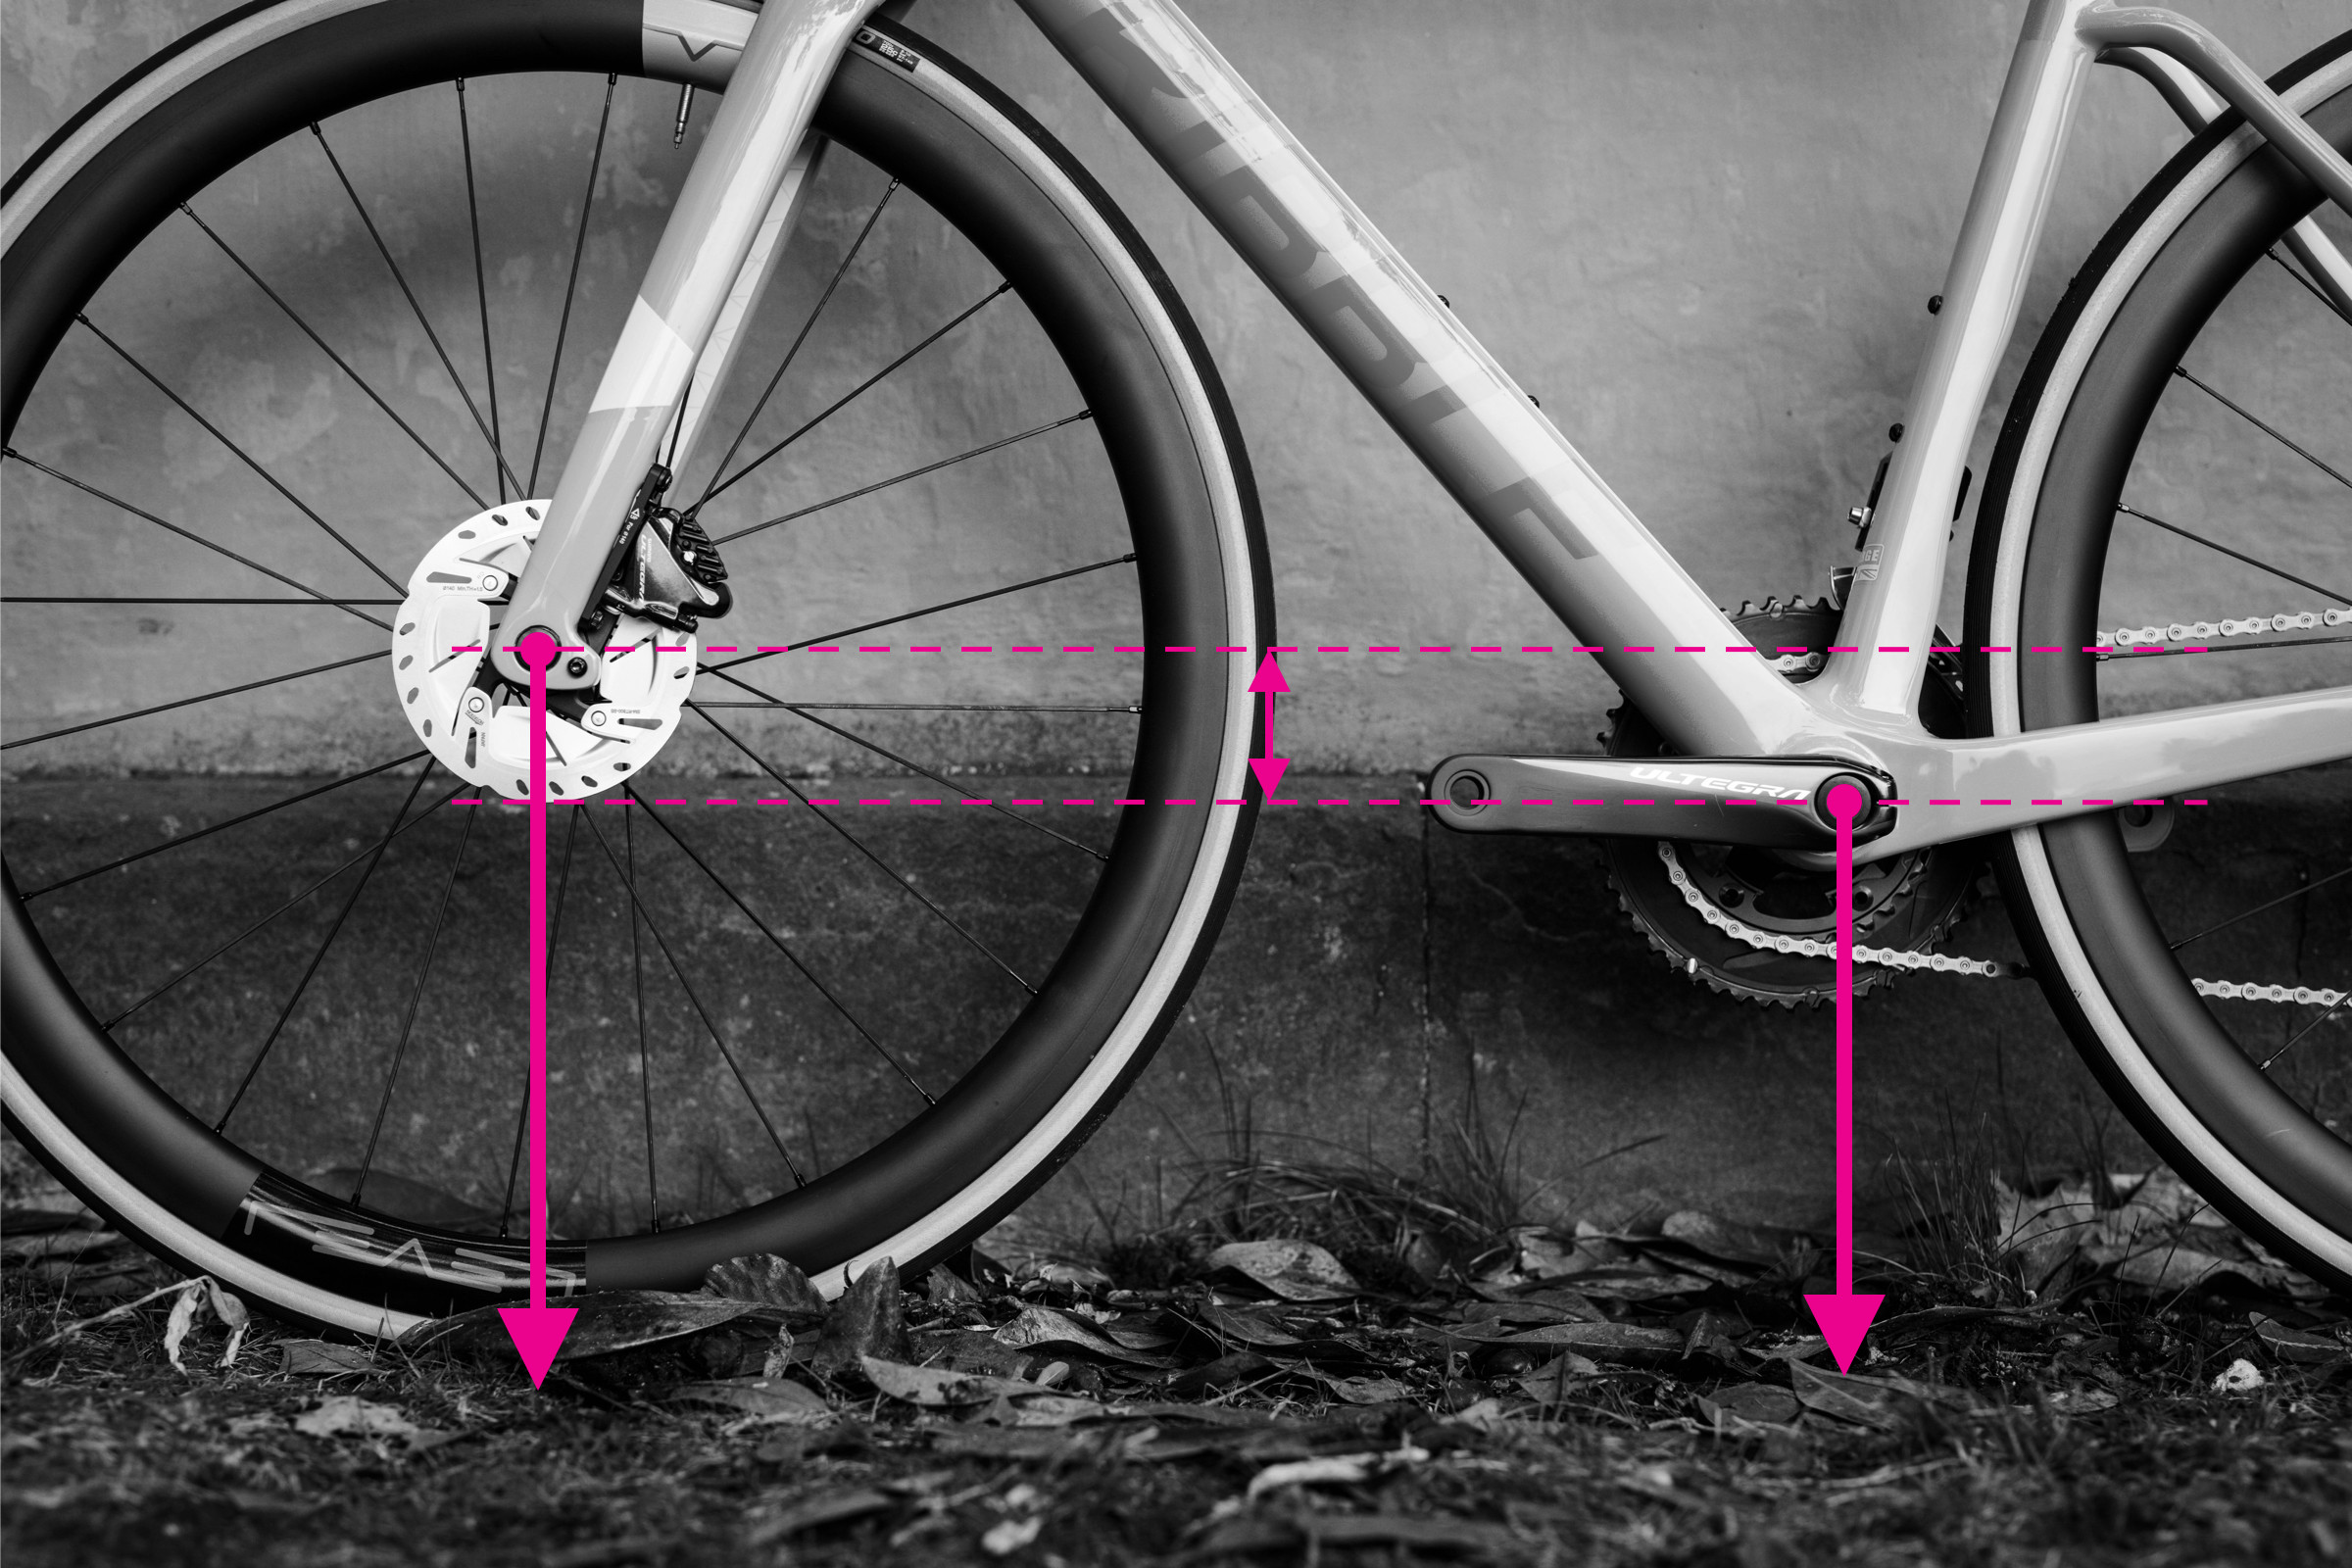
11. Bottom Bracket Drop: Measuring for Stability
The bottom bracket drop is the difference between the height of the wheel axles and the centerline of the crank axle.
11.1 How to Measure Bottom Bracket Drop
Measure the height of the rear axle and the height of the bottom bracket, then subtract one from the other.
11.2 Importance of Bottom Bracket Drop
Bottom bracket drop is a key measurement quoted by bike brands on their geometry charts, influencing the bike’s stability and handling.
 BB drop measurement demonstrated on a bike frame
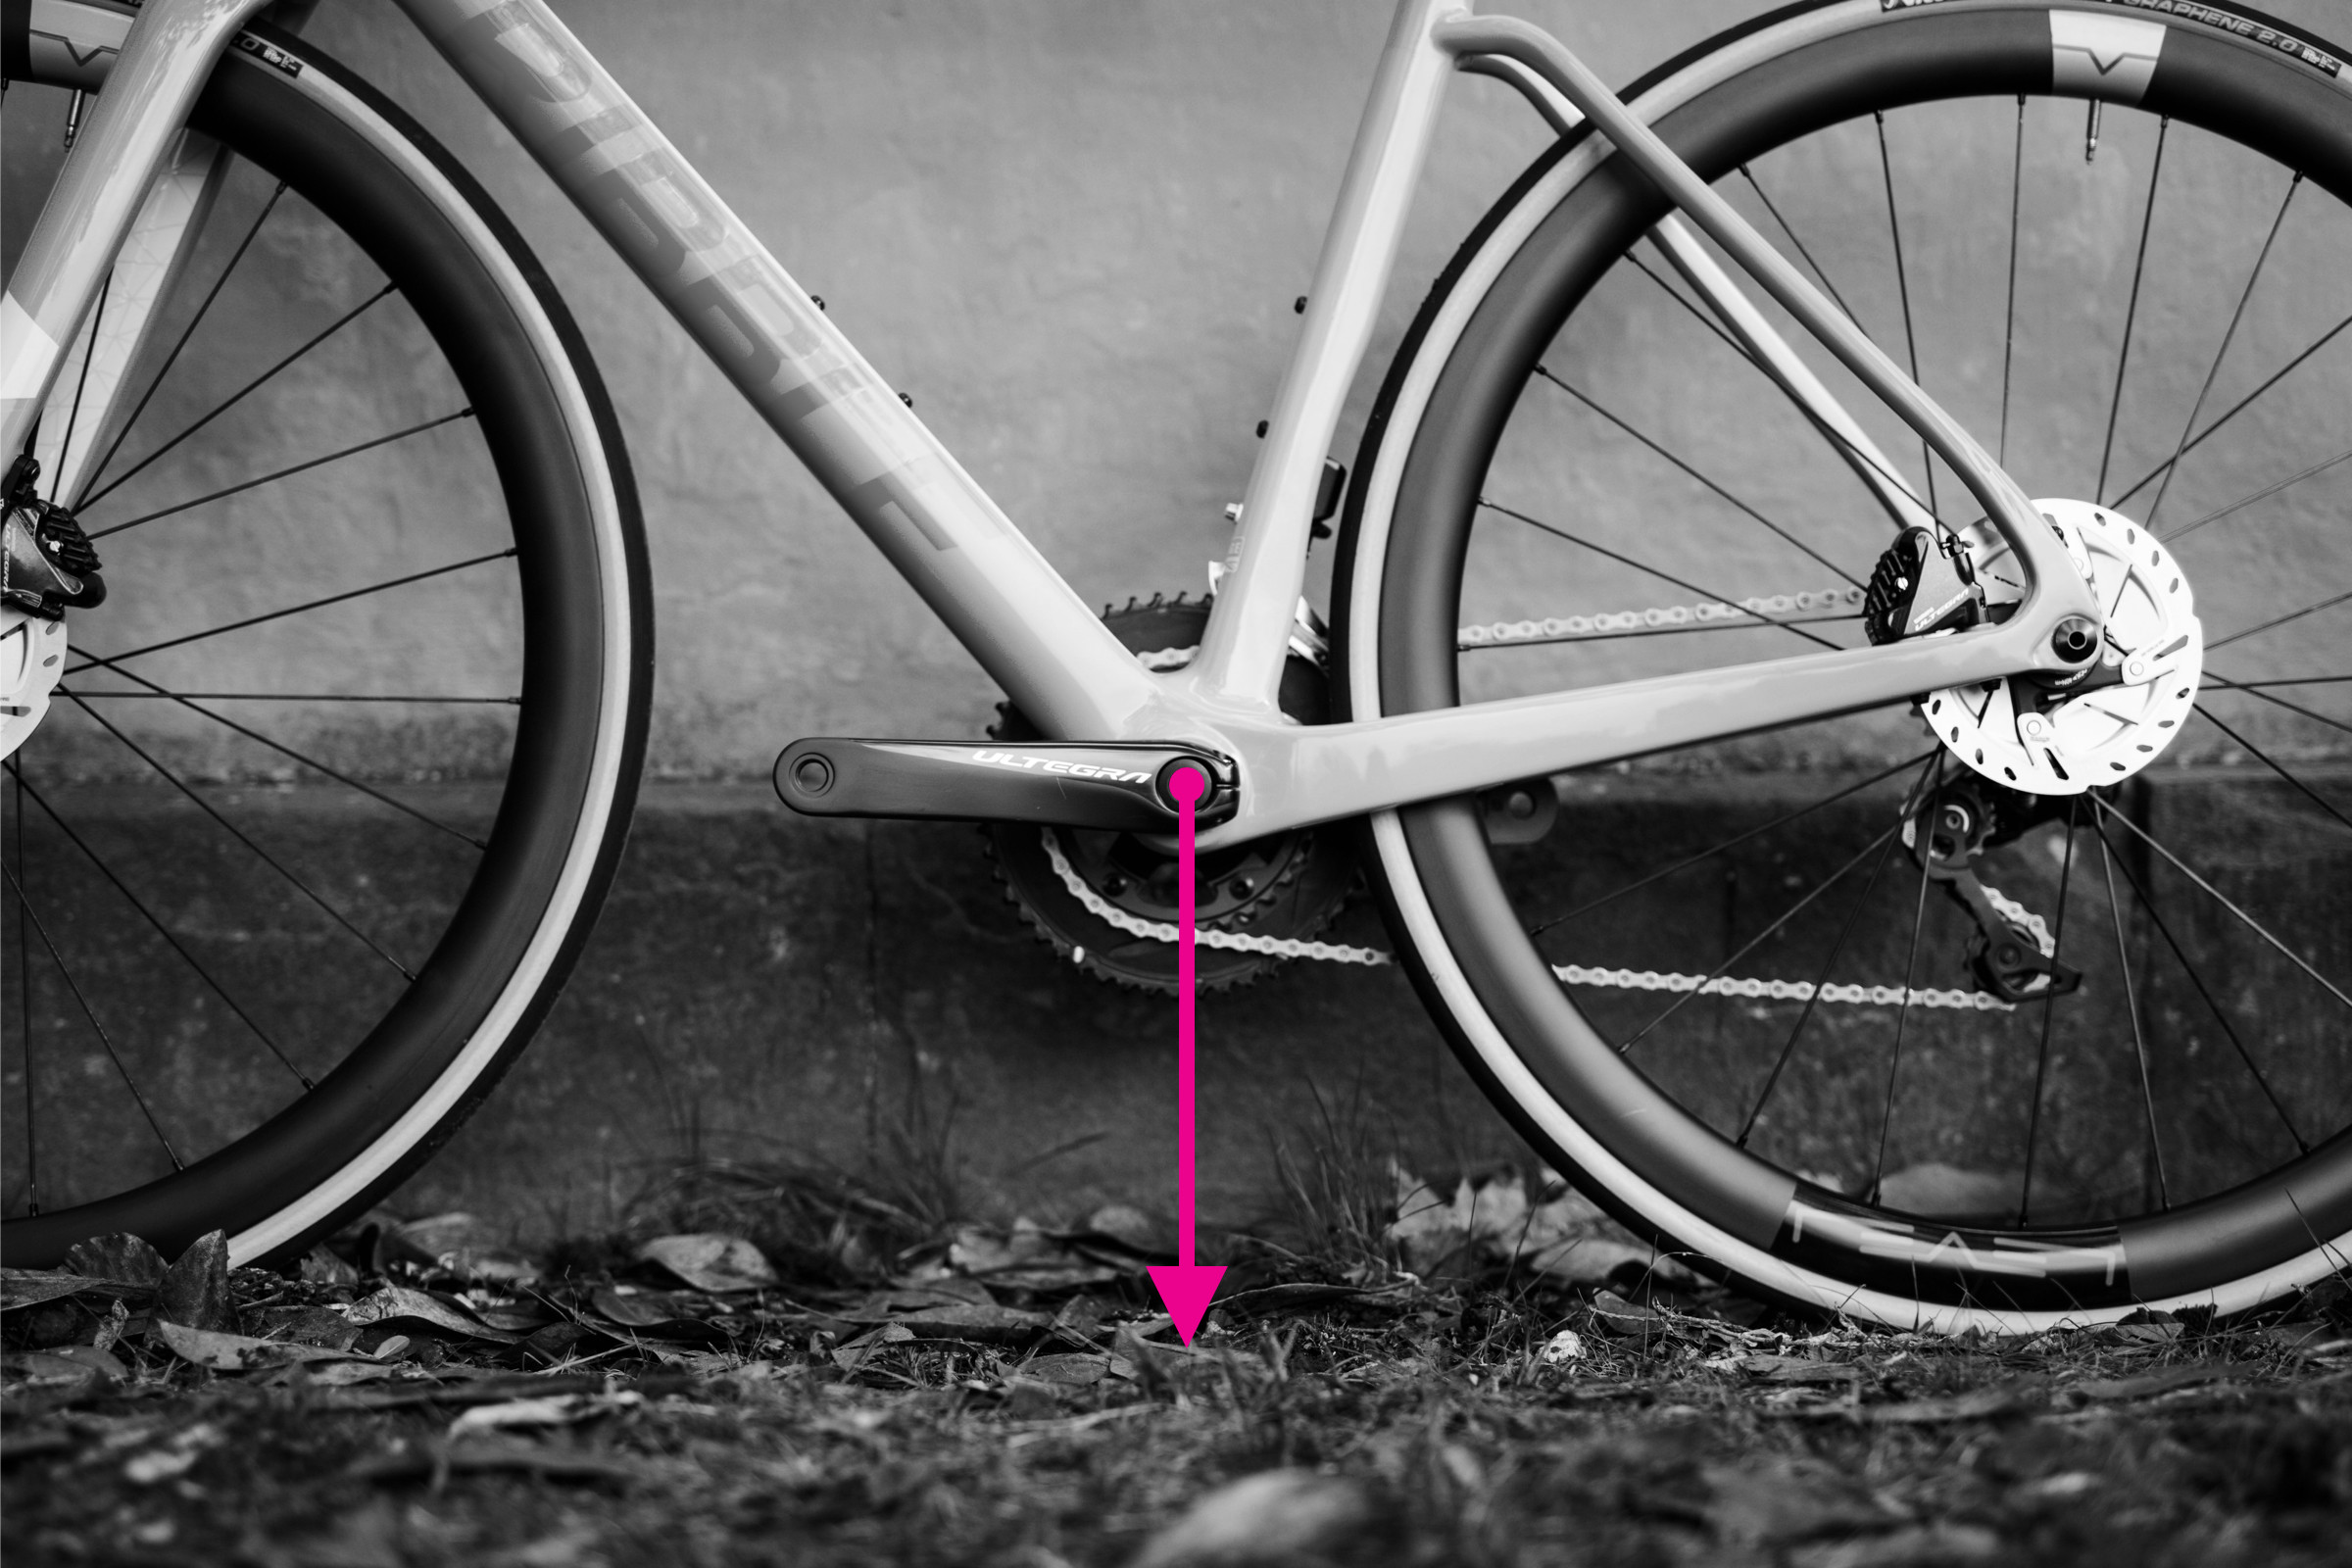
12. Bottom Bracket Height: Measuring Ground Clearance
The bottom bracket height is the distance from the ground to the center of the bottom bracket shell.
12.1 How to Measure Bottom Bracket Height
Measure the distance from the ground to the center of the bottom bracket shell, ensuring the bike is straight upright.
12.2 Considerations for Accuracy
Bottom bracket height can be slightly affected by your tires, so inflate them to your usual running pressure for an accurate reading.
 Bottom bracket height measurement demonstrated on bike frame
13. Understanding Bike Frame Sizes in Inches
While many manufacturers now use metric units, some still size mountain bikes in inches. Converting between units can be useful.
13.1 Converting Centimeters to Inches
To convert centimeters to inches, divide the centimeter measurement by 2.54.
13.2 Metric vs. Imperial
While metric measurements are becoming more standard, understanding inches can help when dealing with older bikes or certain manufacturers.
14. Practical Applications: Sizing Road Bikes, Mountain Bikes, and More
Measuring your bike frame is crucial for sizing various types of bikes, including road bikes, mountain bikes, and gravel bikes.
14.1 Road Bikes
Road bikes are often sized by top tube length. Knowing your ideal top tube length can help you choose the right frame size.
14.2 Mountain Bikes
Mountain bikes are commonly sized using S, M, L, etc. However, understanding the key measurements like reach and stack can help you fine-tune your fit.
14.3 Gravel Bikes
Gravel bikes, like road and mountain bikes, benefit from precise measurements. Knowing your ideal measurements ensures a comfortable and efficient ride on varied terrain.
15. Utilizing Geometry Charts for Frame Selection
Most manufacturers provide geometry charts for their bikes. These charts offer detailed measurements for each frame size, making it easier to compare different models.
15.1 Accessing Geometry Charts
You can usually find geometry charts on the manufacturer’s website. These charts provide accurate measurements for all frame sizes of current models.
15.2 Comparing Measurements
Use the geometry charts to compare measurements like reach, stack, top tube length, and seat tube angle. This will help you choose a frame that fits your body and riding style.
16. Common Mistakes to Avoid When Measuring a Bike Frame
Measuring a bike frame can be complex, and it’s easy to make mistakes. Here are some common pitfalls to avoid:
16.1 Incorrect Horizontal Alignment
Failing to ensure the tape measure is perfectly horizontal when measuring top tube length can lead to inaccurate results.
16.2 Ignoring Seat Tube Kinks
When measuring seat tube length, ignoring any kinks or bends in the tube can result in an overestimation of the measurement.
16.3 Misaligned Plumb Lines
When measuring reach and stack, a misaligned plumb line can significantly affect the accuracy of your measurements.
16.4 Neglecting Tire Pressure
When measuring bottom bracket height, neglecting to inflate your tires to their usual pressure can lead to slight inaccuracies.
17. The Role of Professional Bike Fitters
While it’s possible to measure your bike frame yourself, consulting a professional bike fitter can provide a more precise and personalized fit.
17.1 Expertise and Experience
Professional bike fitters have the expertise and experience to assess your body mechanics and riding style.
17.2 Advanced Tools
Bike fitters use advanced tools to measure your body and bike, ensuring the most accurate fit possible.
17.3 Customized Recommendations
A bike fitter can provide customized recommendations for adjusting your bike or choosing a new one that perfectly fits your needs.
18. How Bike Frame Measurements Impact Riding Comfort
The right bike frame measurements are crucial for riding comfort. An improperly sized bike can lead to discomfort, pain, and even injury.
18.1 Reach and Back Pain
A reach that is too long can cause you to overextend, leading to back pain and discomfort.
18.2 Stack and Neck Strain
A stack that is too low can cause neck strain as you have to bend over further to see the road.
18.3 Seat Tube Angle and Knee Pain
An incorrect seat tube angle can cause knee pain and reduce pedaling efficiency.
19. Factors Influencing Bike Frame Size Choice
Several factors influence the ideal bike frame size. Consider these when choosing a bike:
19.1 Body Measurements
Your height, inseam, and arm length are important factors in determining the right frame size.
19.2 Riding Style
Your riding style, whether it’s road racing, mountain biking, or casual riding, will influence the ideal frame geometry.
19.3 Flexibility
Your flexibility can affect your ability to comfortably reach the handlebars and maintain an efficient riding position.
20. Bike Frame Materials and Their Impact on Measurements
The material of the bike frame can also impact measurements and overall performance.
20.1 Aluminum Frames
Aluminum frames are lightweight and stiff, providing efficient power transfer.
20.2 Carbon Fiber Frames
Carbon fiber frames are even lighter and can be designed to absorb vibrations, providing a smoother ride.
20.3 Steel Frames
Steel frames offer a classic ride feel and are known for their durability.
21. Bike Frame Measurement Apps and Technology
Several apps and technologies can assist with measuring your bike frame.
21.1 Clinometer Apps
Clinometer apps use your smartphone’s sensors to measure angles accurately.
21.2 Virtual Bike Fit Apps
Virtual bike fit apps use your body measurements to recommend the ideal frame size and geometry.
22. Understanding Gender-Specific Bike Frame Differences
Gender-specific bikes are designed to better fit the proportions of male or female riders.
22.1 Women’s Bike Frames
Women’s bike frames often have shorter top tubes and higher stack heights to accommodate the shorter torso and longer legs of many female riders.
22.2 Men’s Bike Frames
Men’s bike frames typically have longer top tubes and lower stack heights to suit the longer torso and shorter legs of many male riders.
23. Maintaining Your Bike Frame Measurements Over Time
It’s important to maintain your bike frame measurements over time to ensure your bike continues to fit properly.
23.1 Regular Checks
Regularly check your bike frame measurements to ensure nothing has shifted or become misaligned.
23.2 Adjustments
Make adjustments to your saddle height, handlebar position, and stem length to maintain an optimal fit.
24. The Future of Bike Frame Measurement Technology
The future of bike frame measurement technology is evolving with new innovations.
24.1 3D Scanning
3D scanning technology can create a precise model of your body, allowing for highly customized bike fit recommendations.
24.2 Artificial Intelligence
AI algorithms can analyze your riding data and provide personalized recommendations for bike adjustments and frame selection.
25. How to Troubleshoot Common Bike Fit Issues
Troubleshooting common bike fit issues can help you optimize your riding experience.
25.1 Saddle Height Adjustments
Adjusting your saddle height can alleviate knee pain and improve pedaling efficiency.
25.2 Handlebar Adjustments
Adjusting your handlebar position can relieve back pain and improve comfort.
25.3 Stem Length Adjustments
Adjusting your stem length can improve reach and handling.
26. Custom Bike Frames: When and Why to Consider Them
Custom bike frames offer the ultimate in personalized fit and performance.
26.1 Unique Body Proportions
If you have unique body proportions that make it difficult to find a stock frame that fits, a custom frame may be a good option.
26.2 Specific Performance Goals
If you have specific performance goals, such as improved aerodynamics or handling, a custom frame can be designed to meet your needs.
27. Expert Tips for Measuring and Choosing the Right Bike Frame
Here are some expert tips to help you measure and choose the right bike frame:
27.1 Measure Twice, Cut Once
Always measure your bike frame multiple times to ensure accuracy.
27.2 Consult Geometry Charts
Consult geometry charts to compare measurements between different bike models.
27.3 Test Ride
Test ride different bikes to see how they feel before making a purchase.
28. Resources for Further Learning About Bike Frame Measurement
There are many resources available for further learning about bike frame measurement.
28.1 Online Forums
Online forums and communities can provide valuable insights and advice from experienced cyclists.
28.2 Books and Articles
Books and articles on bike fitting and geometry can offer in-depth information.
28.3 Local Bike Shops
Local bike shops often offer workshops and clinics on bike fitting and measurement.
29. How Bike Frame Measurements Affect Aerodynamics
Bike frame measurements can impact aerodynamics and overall speed.
29.1 Frame Design
Aerodynamic frame designs can reduce drag and improve speed.
29.2 Rider Position
The rider’s position on the bike also affects aerodynamics, so finding a comfortable and aerodynamic position is crucial.
30. The Importance of Test Riding Before Buying a Bike
Test riding a bike before buying is essential for ensuring it fits properly and feels comfortable.
30.1 Assessing Fit and Comfort
A test ride allows you to assess the bike’s fit and comfort in real-world conditions.
30.2 Evaluating Handling
A test ride also allows you to evaluate the bike’s handling and performance.
31. How to Measure Bike Frame for Different Riding Disciplines
Measuring a bike frame can vary depending on the riding discipline.
31.1 Road Biking
Road biking typically requires a more aggressive position with a longer reach and lower stack.
31.2 Mountain Biking
Mountain biking often requires a more upright position with a shorter reach and higher stack.
31.3 Hybrid Biking
Hybrid biking typically requires a more relaxed position with a medium reach and stack.
32. Factors Affecting Resale Value of Bike Frames
Several factors can affect the resale value of bike frames.
32.1 Condition
The condition of the frame is a major factor in determining its resale value.
32.2 Brand
The brand of the frame can also affect its resale value.
32.3 Material
The material of the frame can also impact its resale value.
33. Best Practices for Storing Your Bike Frame
Proper storage can help prolong the life of your bike frame.
33.1 Cleanliness
Keep your bike frame clean to prevent corrosion and damage.
33.2 Protection
Protect your bike frame from the elements by storing it indoors or covering it with a tarp.
34. How to Identify Damage to Your Bike Frame
Identifying damage to your bike frame is crucial for ensuring your safety.
34.1 Cracks
Check your frame for cracks, especially around welds and stress points.
34.2 Dents
Check your frame for dents, which can weaken the structure.
35. When to Replace Your Bike Frame
Knowing when to replace your bike frame is essential for your safety.
35.1 Significant Damage
If your frame has significant damage, such as cracks or dents, it should be replaced.
35.2 Old Age
If your frame is very old, it may be time to replace it, even if it doesn’t show any visible damage.
36. How to Measure Bike Frame for Optimal Performance
Measuring your bike frame correctly is essential for achieving optimal performance. By understanding the key measurements and following the steps outlined in this guide, you can ensure your bike fits properly and allows you to ride comfortably and efficiently.
37. DIY vs Professional Bike Fitting: Which is Right for You?
Deciding between a DIY bike fit and a professional bike fitting depends on your needs and expertise.
37.1 DIY Bike Fitting
DIY bike fitting is a good option for experienced cyclists who are comfortable making adjustments to their bike.
37.2 Professional Bike Fitting
Professional bike fitting is a better option for beginners or those with specific fit issues.
38. Maximizing Comfort on Long Rides Through Frame Measurement
Proper frame measurement is essential for maximizing comfort on long rides.
38.1 Reducing Strain
A properly fitted bike frame can reduce strain on your back, neck, and knees.
38.2 Improving Efficiency
A properly fitted bike frame can also improve pedaling efficiency, allowing you to ride further with less effort.
Measuring your bike frame accurately ensures a comfortable and efficient riding experience. With the right tools and techniques, you can optimize your bike fit and enjoy your rides to the fullest. For more information, expert advice, and a vibrant community, visit usabikers.net. Whether you’re a seasoned biker or just starting, our platform provides the resources and support you need to enhance your passion for motorcycles and the open road.
FAQ: How To Measure A Bike Frame Size In Inches
Q1: Why is measuring my bike frame size important?
Measuring your bike frame size is crucial because it ensures a comfortable and efficient riding experience. A properly sized bike reduces the risk of discomfort, pain, and injury.
Q2: What tools do I need to measure my bike frame?
You will need a tape measure, a clinometer (or smartphone app), a spirit level, and a plumb line (or string and weight).
Q3: How do I measure the top tube length of my bike?
Measure the horizontal distance between the center of the head tube and the center of the seatpost, using a spirit level to ensure the measurement is horizontal.
Q4: What is reach and stack, and why are they important?
Reach is the horizontal distance between the bottom bracket and the top of the head tube, while stack is the vertical distance. They are important because they provide a consistent way to compare frame sizes, independent of frame design.
Q5: How do I measure the seat tube length accurately?
Measure the straight-line distance between the center of the bottom bracket and the top of the seat tube. Be mindful of any kinks or extensions in the seat tube.
Q6: What is the wheelbase, and how do I measure it?
The wheelbase is the distance between the front and rear axles. Measure this distance, ensuring the fork is straight ahead for an accurate reading.
Q7: How do I measure the head tube angle and seat tube angle?
Use a clinometer app to measure the angles, ensuring the bike is vertical and standing on a horizontal surface.
Q8: What is bottom bracket drop, and how do I measure it?
The bottom bracket drop is the difference between the height of the wheel axles and the centerline of the crank axle. Measure the height of each and subtract to find the drop.
Q9: Should I convert bike frame measurements from centimeters to inches?
While many manufacturers use metric units, knowing how to convert centimeters to inches (divide by 2.54) can be helpful when dealing with older bikes or certain manufacturers.
Q10: Where can I find more information and expert advice on bike frame measurement?
Visit usabikers.net for expert advice, detailed guides, and a supportive community of fellow motorcycle enthusiasts.
Remember to visit usabikers.net for all your motorcycle needs! Find valuable insights, connect with fellow enthusiasts, and stay updated on the latest trends in the biker community. Join us and enhance your passion for motorcycles today Address: 801 Sturgis Main St, Sturgis, SD 57785, United States. Phone: +1 (605) 347-2000.