Choosing the right bike size is paramount for comfort, efficiency, and injury prevention, whether you’re buying your first bicycle or upgrading to a new model. Understanding bike frame measurements ensures you get a machine that fits your body and suits your riding style, be it leisurely road cycling or adventurous mountain biking. This guide will walk you through the essential steps to measure your bike size accurately.
Even if you’re planning to rent a bike for a ride, knowing your ideal frame measurements is incredibly helpful. It allows you to communicate your needs effectively and ensures that your rental bike can be adjusted for a comfortable and enjoyable experience.
It’s important to note that bike manufacturers don’t always use a standardized sizing system. Therefore, focusing on key frame measurements is crucial for making accurate comparisons across different brands and models. This guide will break down the fundamental measurements you need to know to properly size your road bike or mountain bike frame and achieve the optimal bike fit.
For a deeper dive into how these measurements influence your bike’s handling, we recommend exploring our comprehensive guide to mountain bike geometry. While tailored to mountain bikes, the principles and many of the measurements discussed are equally relevant to road bikes.
We also have dedicated resources to help you choose the right size frame for road bikes and mountain bikes, as well as specific advice for selecting women’s bikes.
Understanding Key Bike Geometry Measurements
Before we dive into the “how-to,” let’s familiarize ourselves with the crucial measurements that define your bike’s frame geometry. These dimensions dictate how the bike will feel and perform. Here’s a quick overview:
- Top Tube Length (Effective): This is the horizontal distance from the center of the head tube to the center of the seatpost. It’s a primary factor in determining the bike’s reach and overall riding position.
- Seat Tube Length: Measured from the center of the bottom bracket to the top of the seat tube, this measurement traditionally indicated frame size but is less relevant in modern bike sizing.
- Reach: Reach is the horizontal distance between the bottom bracket and the top of the head tube. It’s a crucial measurement for determining the bike’s cockpit length and rider position.
- Stack: Stack is the vertical distance between the bottom bracket and the top of the head tube. It indicates the bike’s front end height and influences rider posture.
- Wheelbase: The total distance between the front and rear axle. Wheelbase affects the bike’s stability and handling characteristics.
- Chainstay Length: This is the distance from the center of the bottom bracket to the rear axle (dropout). Chainstay length impacts the bike’s responsiveness and climbing ability.
- Front Center: The distance from the center of the bottom bracket to the front axle (dropout). Front center influences weight distribution and handling.
- Seat Tube Angle: The angle of the seat tube relative to the ground. Seat tube angle affects pedaling efficiency and rider position over the bottom bracket.
- Head Tube Angle: The angle of the head tube relative to the ground. Head tube angle influences steering responsiveness and stability.
- Bottom Bracket Drop: The vertical distance that the bottom bracket sits below the wheel axles. Bottom bracket drop affects stability and cornering ability.
- Bottom Bracket Height: The vertical distance from the ground to the center of the bottom bracket. Bottom bracket height impacts ground clearance and stability.
Tools You’ll Need to Measure Your Bike Frame
To accurately measure your bike frame, you’ll need to gather a few essential tools. These are readily available and will ensure precision in your measurements:
- Tape Measure: A standard tape measure, preferably metric, for measuring lengths.
- Clinometer (or Smartphone App): A clinometer measures angles. Many free smartphone apps are available that utilize your phone’s sensors to act as a clinometer.
- Spirit Level (or Straight Edge with Clinometer App): A long spirit level ensures horizontal and vertical measurements. Alternatively, a straight piece of wood or metal combined with a clinometer app can serve the same purpose.
- Plumb Line (or String and Weight): A plumb line is a vertical reference. You can create a makeshift plumb line using string and a small weight like a nut or washer.
While most modern bikes are measured using the metric system (centimeters and millimeters), some manufacturers, particularly in mountain biking, might still use inches. For consistency and ease of comparison, we recommend using metric units throughout the measuring process. If needed, you can convert centimeters to inches by dividing by 2.54.
Remember that geometry charts are often available on bike manufacturers’ websites for current models. If you’re measuring a relatively new bike, checking the manufacturer’s geometry chart is highly recommended. These charts are usually more precise than manual measurements and serve as a valuable reference.
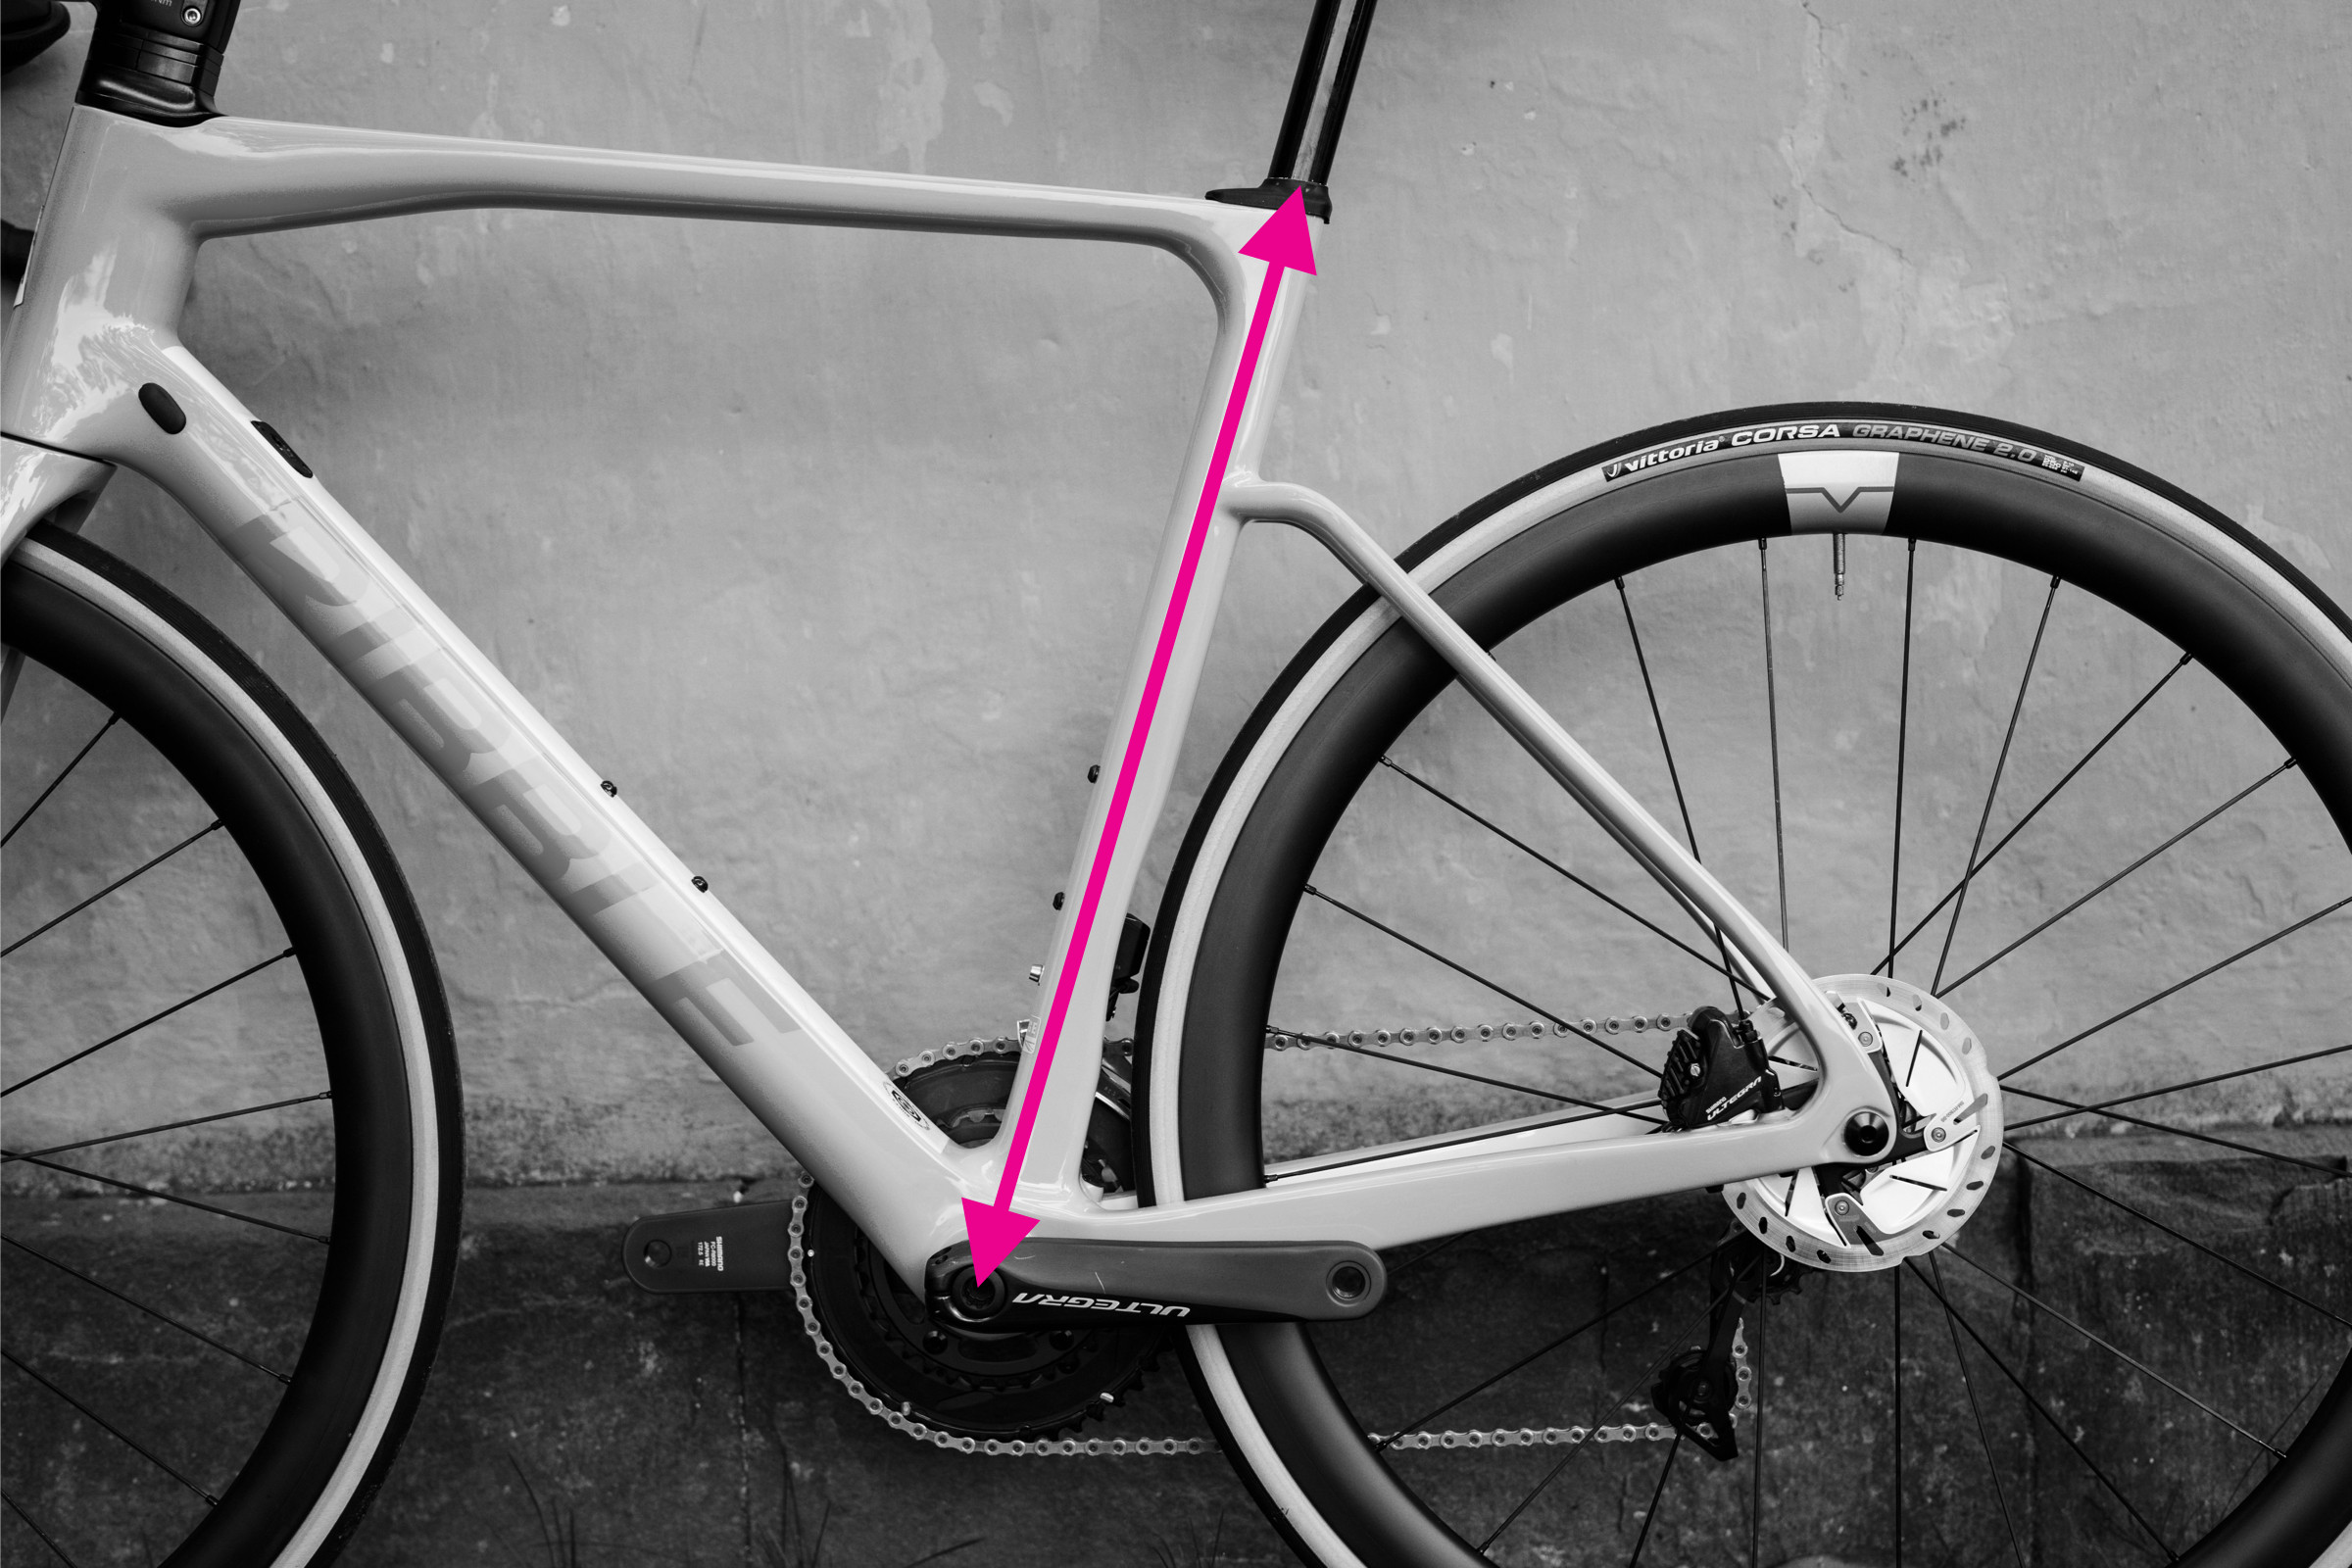
Step-by-Step Guide: Measuring Top Tube Length
 Top tube measurement demonstrated on a bike frame
Alt Text: Measuring the effective top tube length of a bicycle frame using a tape measure, showing the horizontal distance between the head tube and seat post center lines.
Historically, bike frames featured horizontal top tubes. However, modern bike designs often incorporate sloping top tubes for improved standover clearance and frame stiffness. When referring to geometry charts, you’ll typically find the “effective top tube length” listed. This measurement provides a consistent value regardless of the top tube’s slope.
The effective top tube length, also known as the virtual top tube length, is the horizontal distance between the center of the head tube and the center of the seatpost. Accurately measuring this requires ensuring your measurement is perfectly horizontal. This is where your spirit level or clinometer app becomes essential.
How to measure:
- Position your bike on a level surface.
- Identify the center of your head tube and the center of your seatpost.
- Place one end of your tape measure at the center of the head tube.
- Using your spirit level or clinometer app to ensure a horizontal line, extend the tape measure to the center of the seatpost.
- Record the measurement in centimeters.
It’s worth noting that road bike sizing is often based on top tube length, while mountain bikes typically use sizes like S, M, L, etc., although some road bike brands also adopt this system. However, frame sizing interpretations can vary significantly between brands. For example, a size S frame from one brand might have a top tube length comparable to a size M from another. Even the way virtual top tube length is measured can differ slightly among manufacturers.
Step-by-Step Guide: Measuring Seat Tube Length
 Seat tube measurement demonstrated on a bicycle frame
Alt Text: Measuring the seat tube length of a bicycle frame, showing the straight-line distance from the bottom bracket center to the top of the seat tube.
Seat tube length is measured as the straight-line distance from the center of the bottom bracket to the top of the seat tube. While seemingly straightforward, some bike designs can complicate this measurement.
Bikes like the Trek Madone, for instance, have seat tubes that extend considerably above the top tube junction. Others utilize seat masts, making direct comparisons challenging. Mountain bikes, in particular, often feature kinks or bends in the seat tube. It’s crucial to measure a straight line and not follow the curve of the tube itself, which would result in an inaccurate, longer measurement.
How to measure:
- Locate the center of your bottom bracket and the top of your seat tube.
- Align your straight edge (spirit level or similar) from the bottom bracket center to the top of the seat tube.
- Measure the straight-line distance along this edge using your tape measure.
- Record the measurement in centimeters.
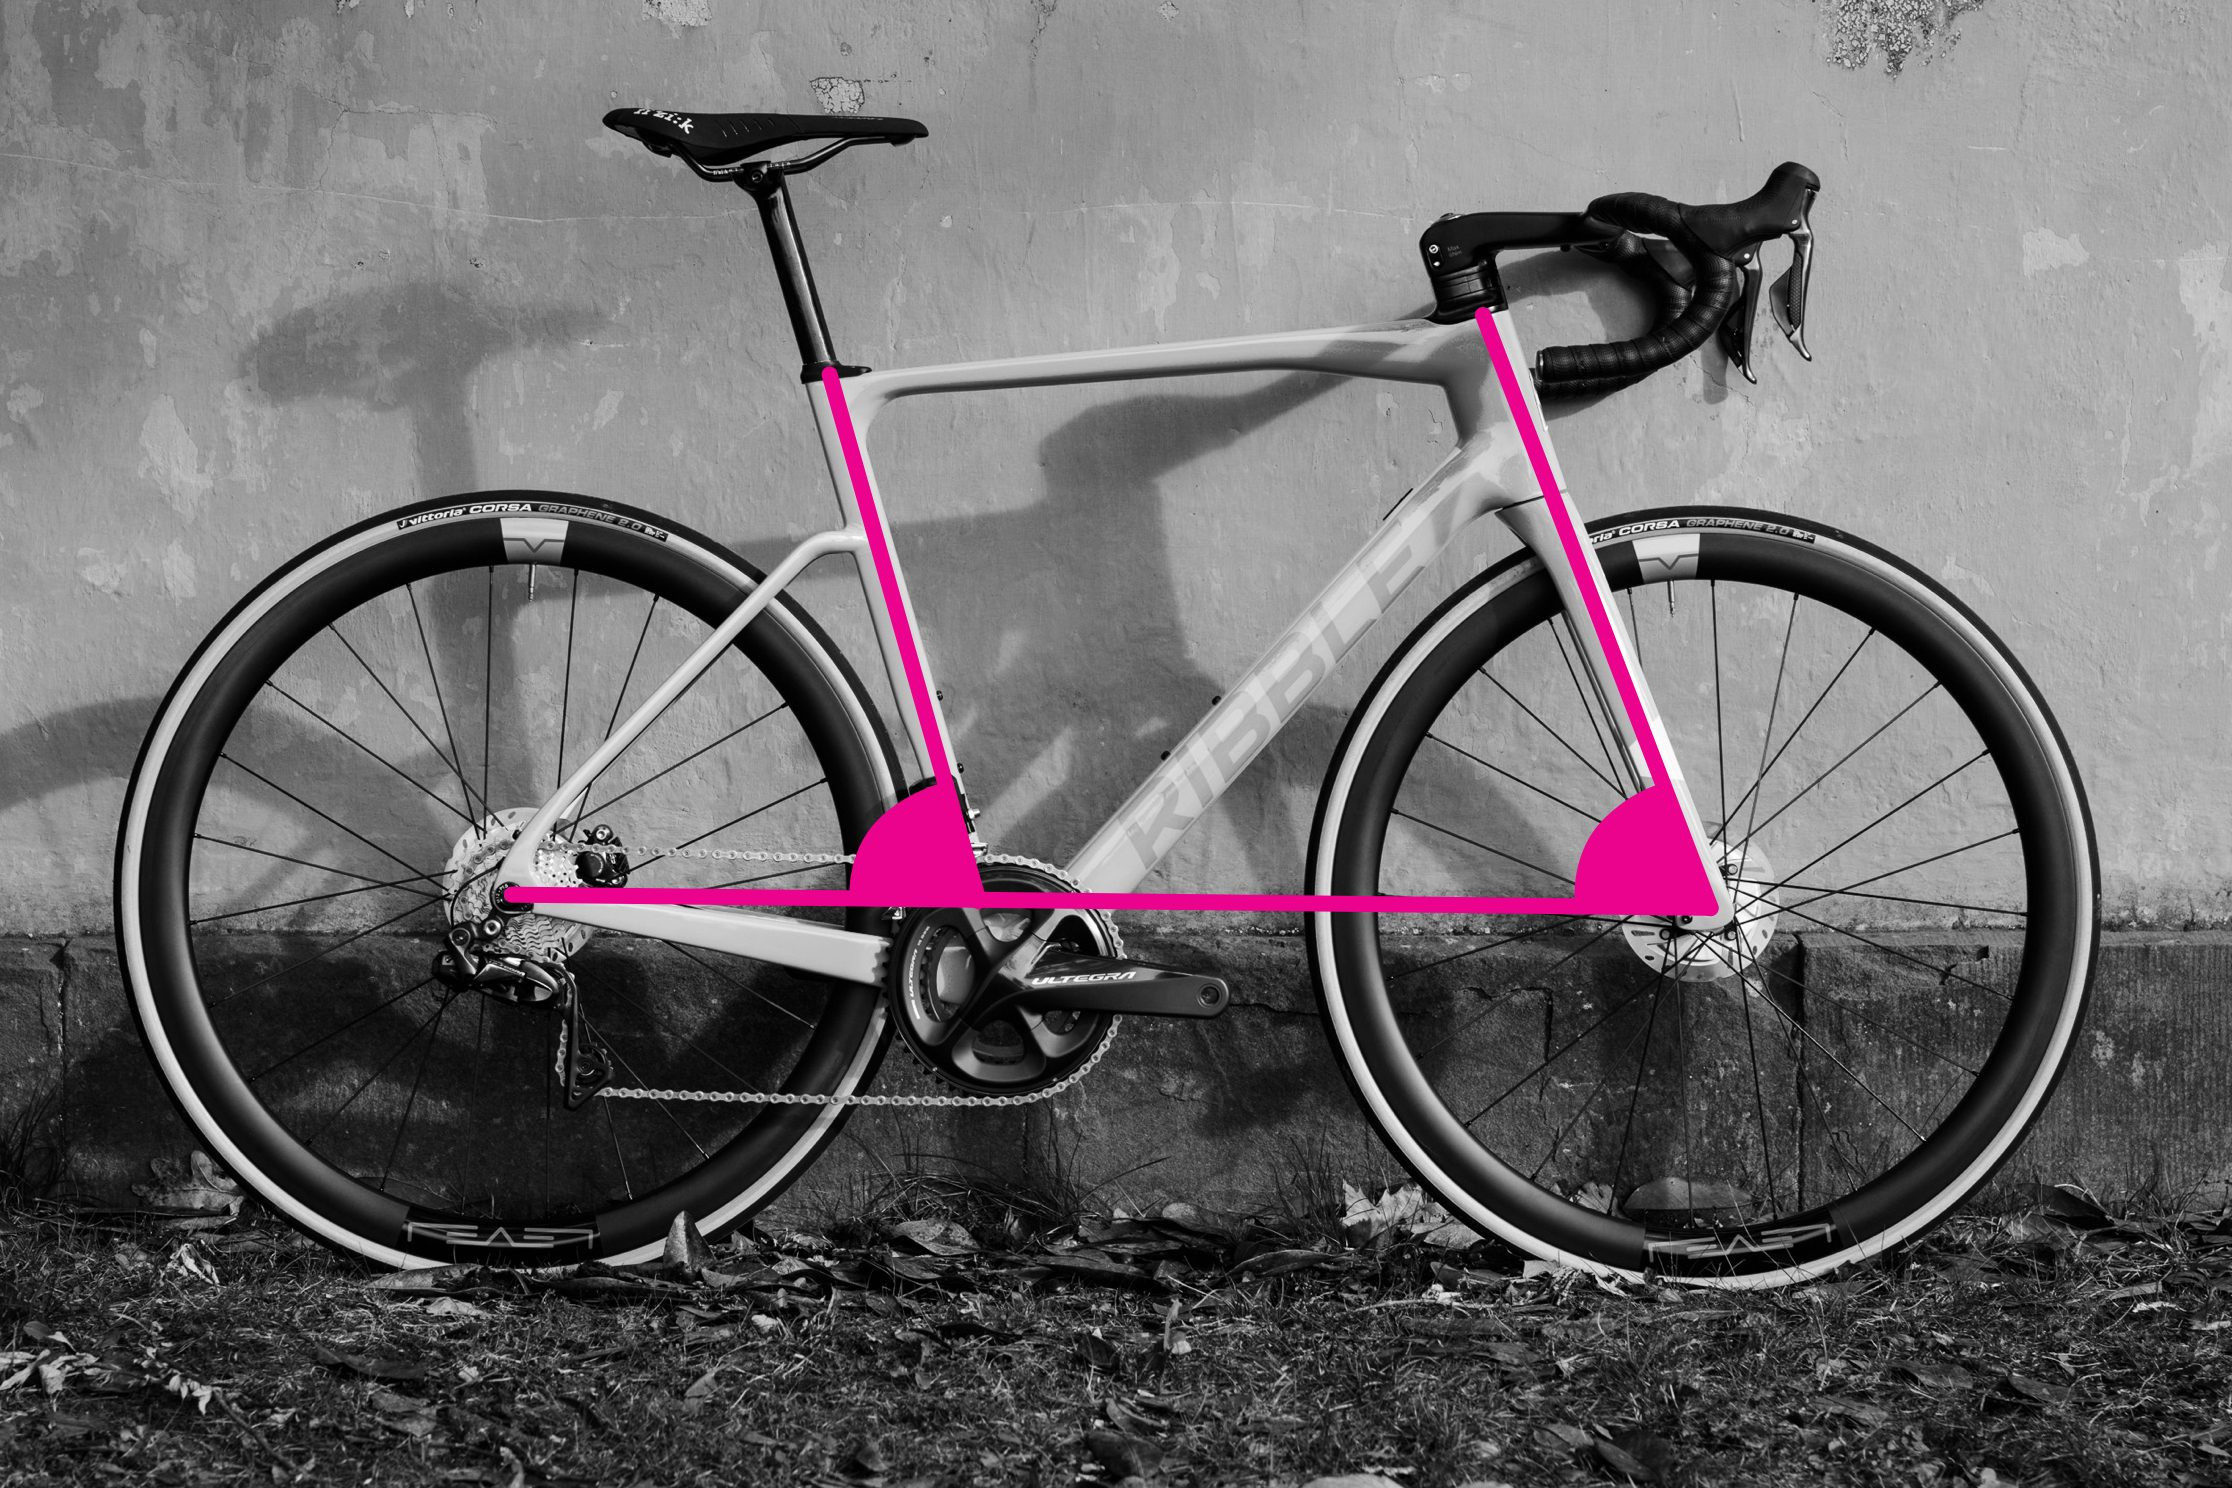
Step-by-Step Guide: Measuring Reach and Stack
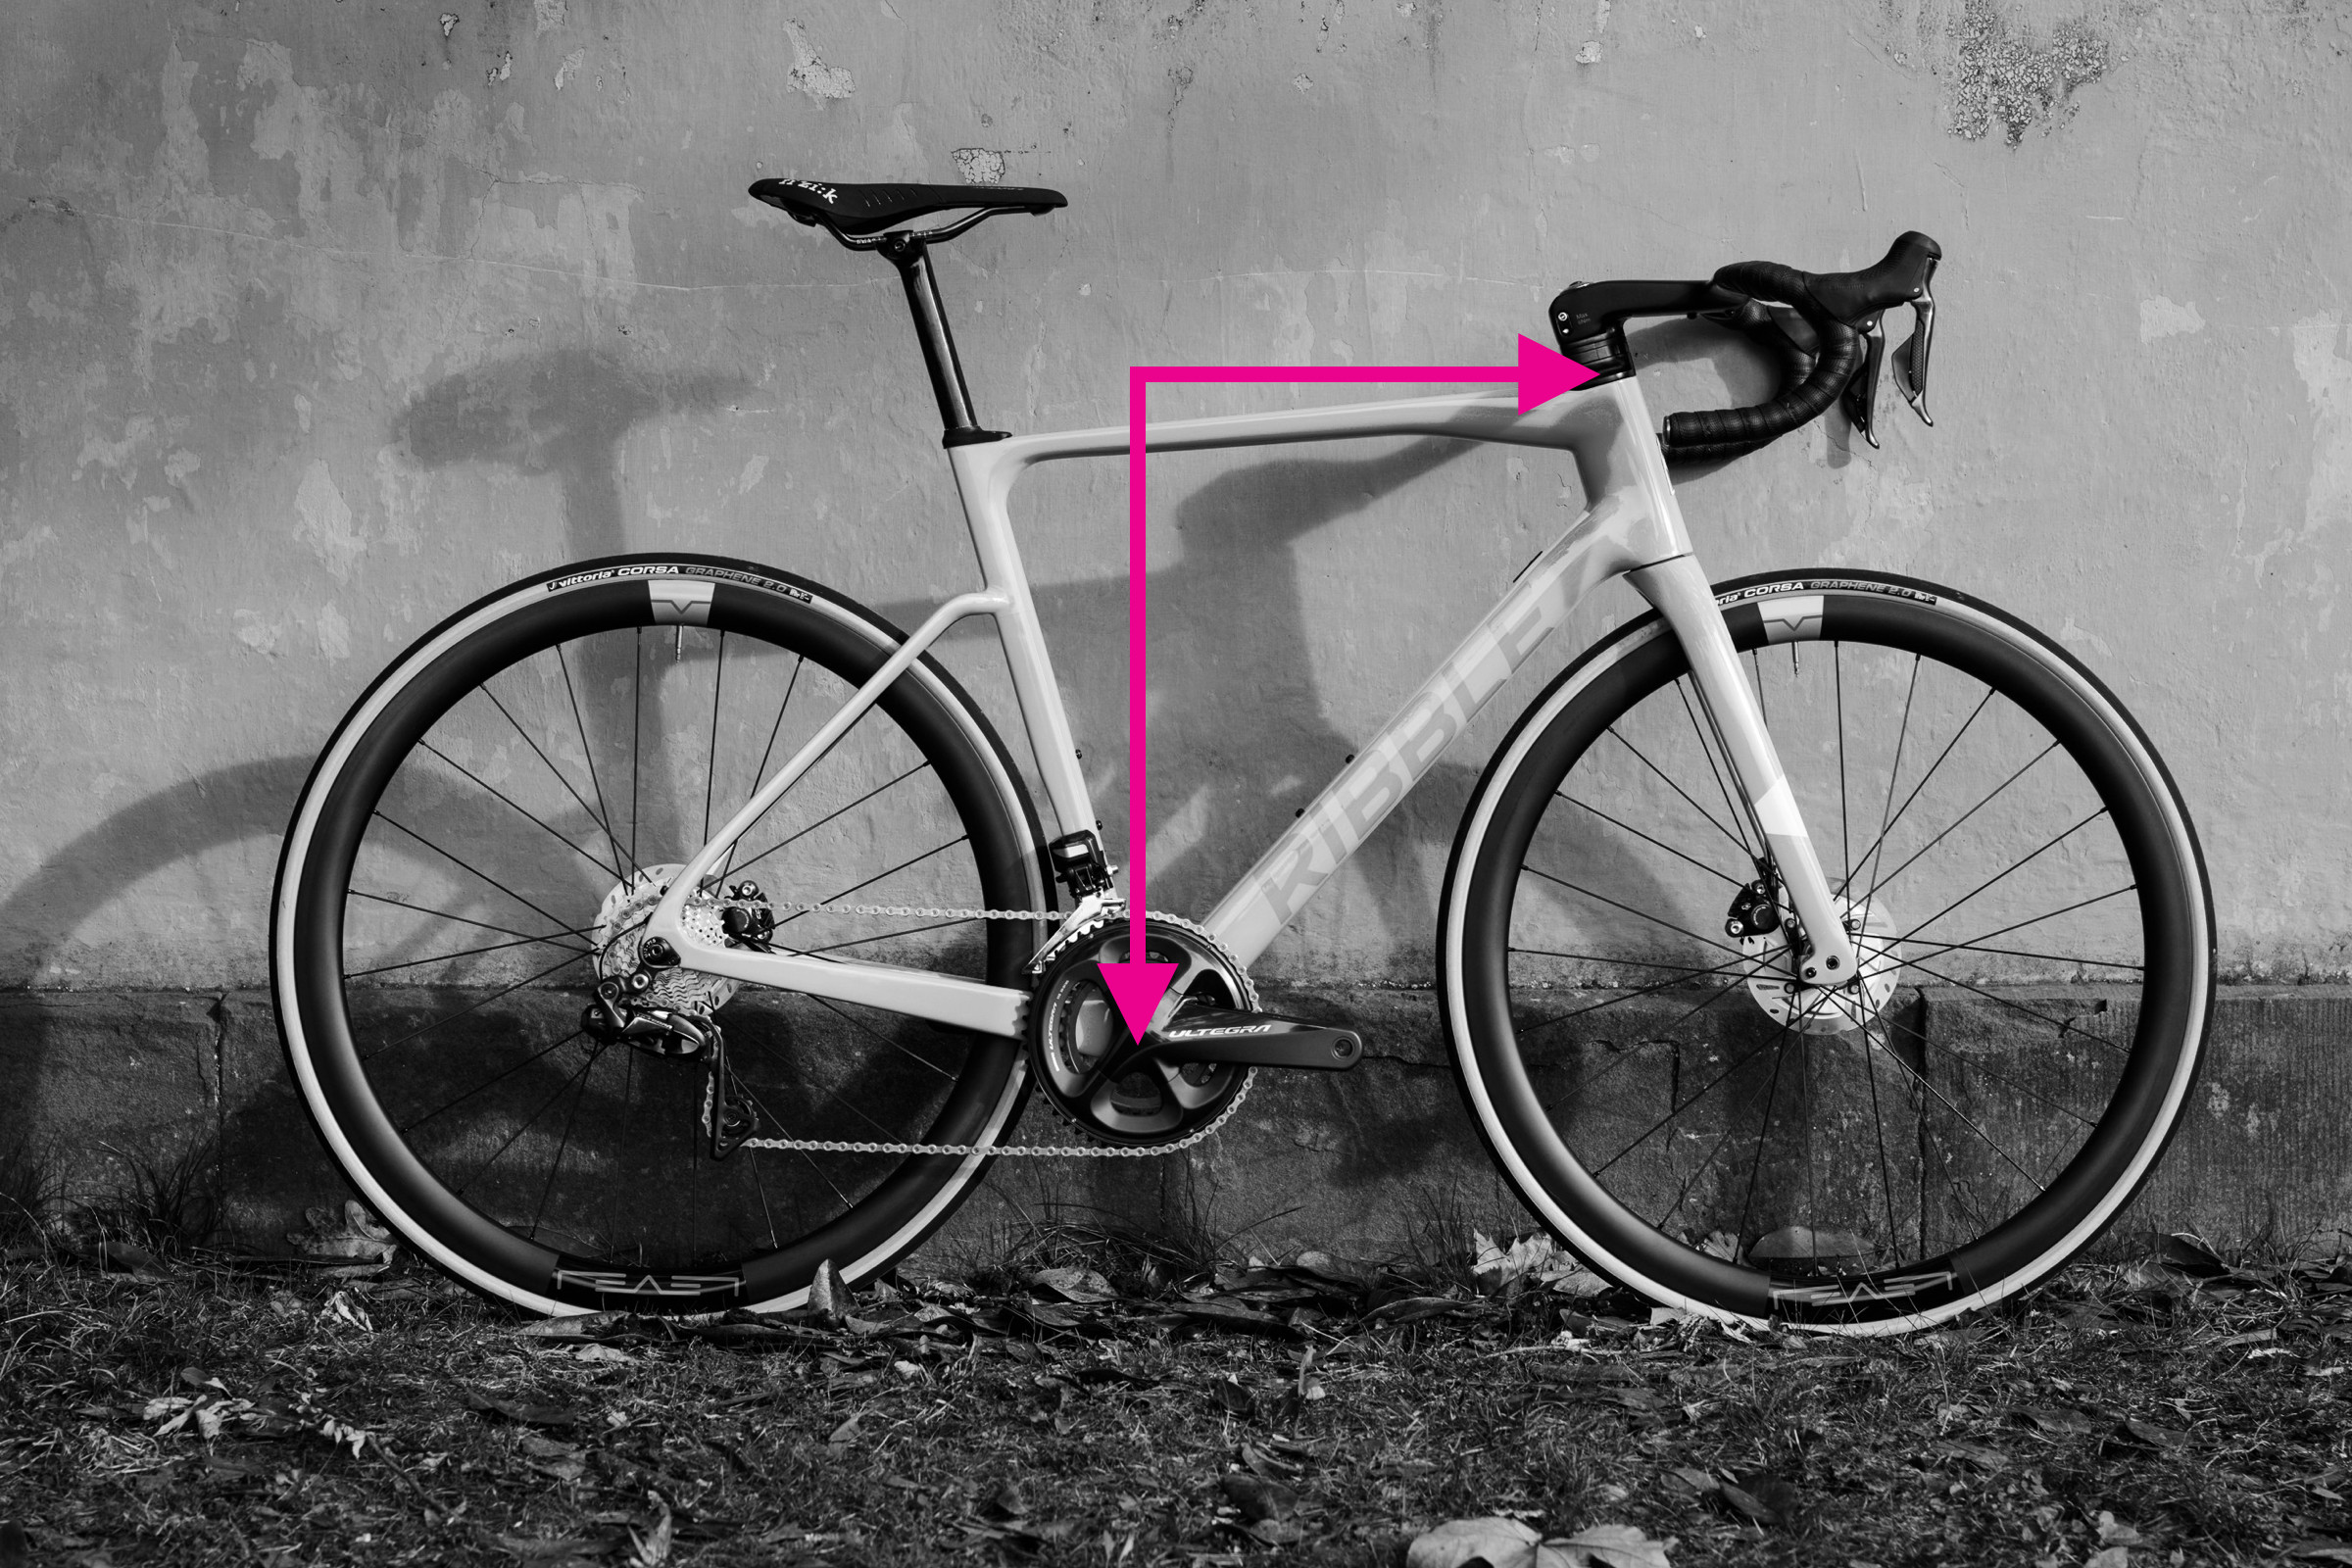 Stack and reach measurement demonstrated on a bike frame
Alt Text: Diagram illustrating stack and reach measurements on a bicycle frame, showing the vertical and horizontal distances from the bottom bracket to the top of the head tube.
For more consistent frame comparisons, especially across different designs, manufacturers increasingly provide “reach” and “stack” values. These measurements are independent of traditional frame geometry and offer a more standardized way to assess bike fit. Reach and stack measure the perpendicular distances between two key contact points: the bottom bracket and the top of the head tube.
Reach represents the horizontal distance, while stack represents the vertical distance. These measurements are crucial for determining the overall riding position and comfort. For a more in-depth explanation of the importance of reach and stack, refer to our article on why top tube length is irrelevant.
How to measure Reach:
- Position your bike upright.
- Attach a plumb line to one end of your spirit level. Ensure the weight on the plumb line hangs straight and symmetrically.
- Align the top edge of the spirit level with the center of the top of the head tube.
- Adjust the level until the plumb line intersects precisely with the center of the bottom bracket spindle.
- Measure the horizontal distance from the top of the plumb line to the head tube. This is your reach measurement.
Alternative Reach Measurement:
- Lean your bike against a wall, ensuring it’s stable and vertical.
- Measure the horizontal distance from the wall to the top of the head tube.
- Measure the horizontal distance from the wall to the bottom bracket.
- Subtract the second measurement from the first. Ensure your measurements are horizontal.
How to measure Stack:
- Once you have your setup for reach measurement (using the plumb line), the vertical distance from the spirit level (aligned with the top of the head tube) down to the bottom bracket’s horizontal plane is your stack. Alternatively:
- Measure the vertical distance from the ground to the top of your head tube.
- Measure the vertical distance from the ground to the center of your bottom bracket.
- Subtract the second measurement from the first to get your stack.
Measuring reach and stack can be a bit tricky and may require a second person to assist, especially with the plumb line method. Repeating the measurements a few times helps ensure consistency and accuracy.
Step-by-Step Guide: Measuring Wheelbase
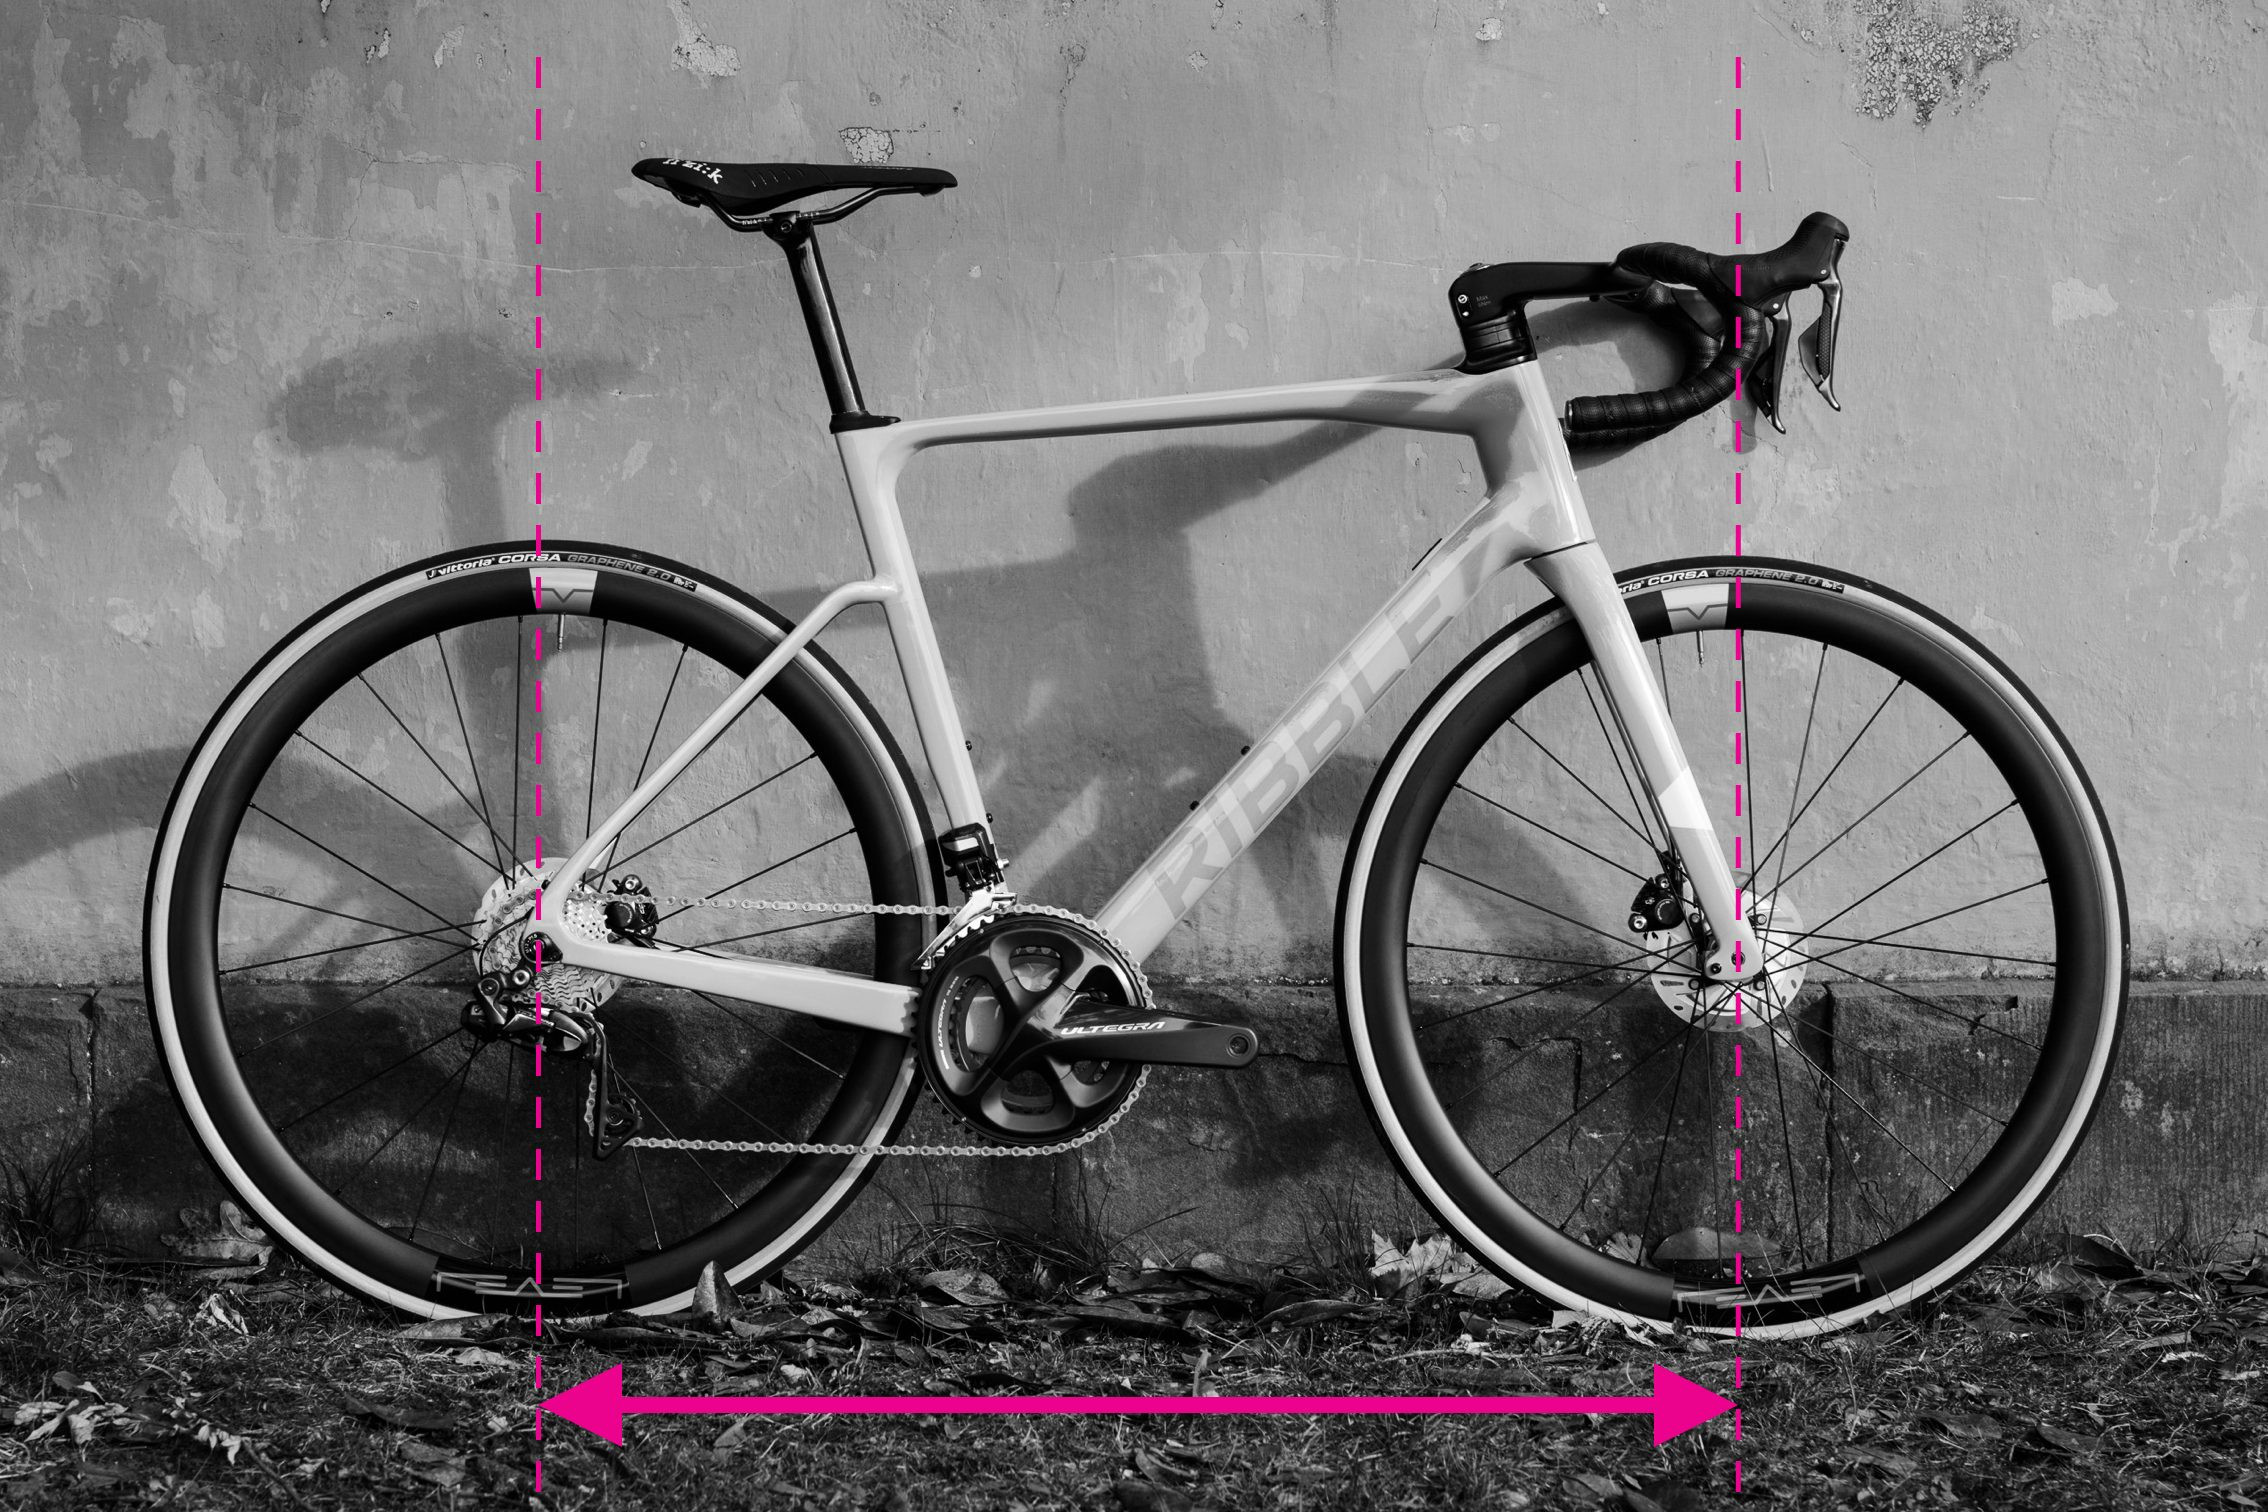 Wheelbase measurement demonstrated on a bike frame
Alt Text: Measuring the wheelbase of a bicycle, showing the distance between the front and rear axle centers using a tape measure.
The wheelbase is the distance between your bike’s front and rear axles. It’s a critical factor in determining the bike’s ride quality and varies with frame size. Wheelbase influences stability, handling agility, and overall ride feel.
How to measure:
- Ensure your front fork is pointing straight ahead.
- Place one end of your tape measure at the center of the front axle.
- Extend the tape measure to the center of the rear axle.
- Record the measurement in centimeters.
To enhance accuracy, especially if your fork alignment is slightly off, measure the wheelbase on both sides of the bike and calculate the average of the two measurements.
Step-by-Step Guide: Measuring Chainstay Length
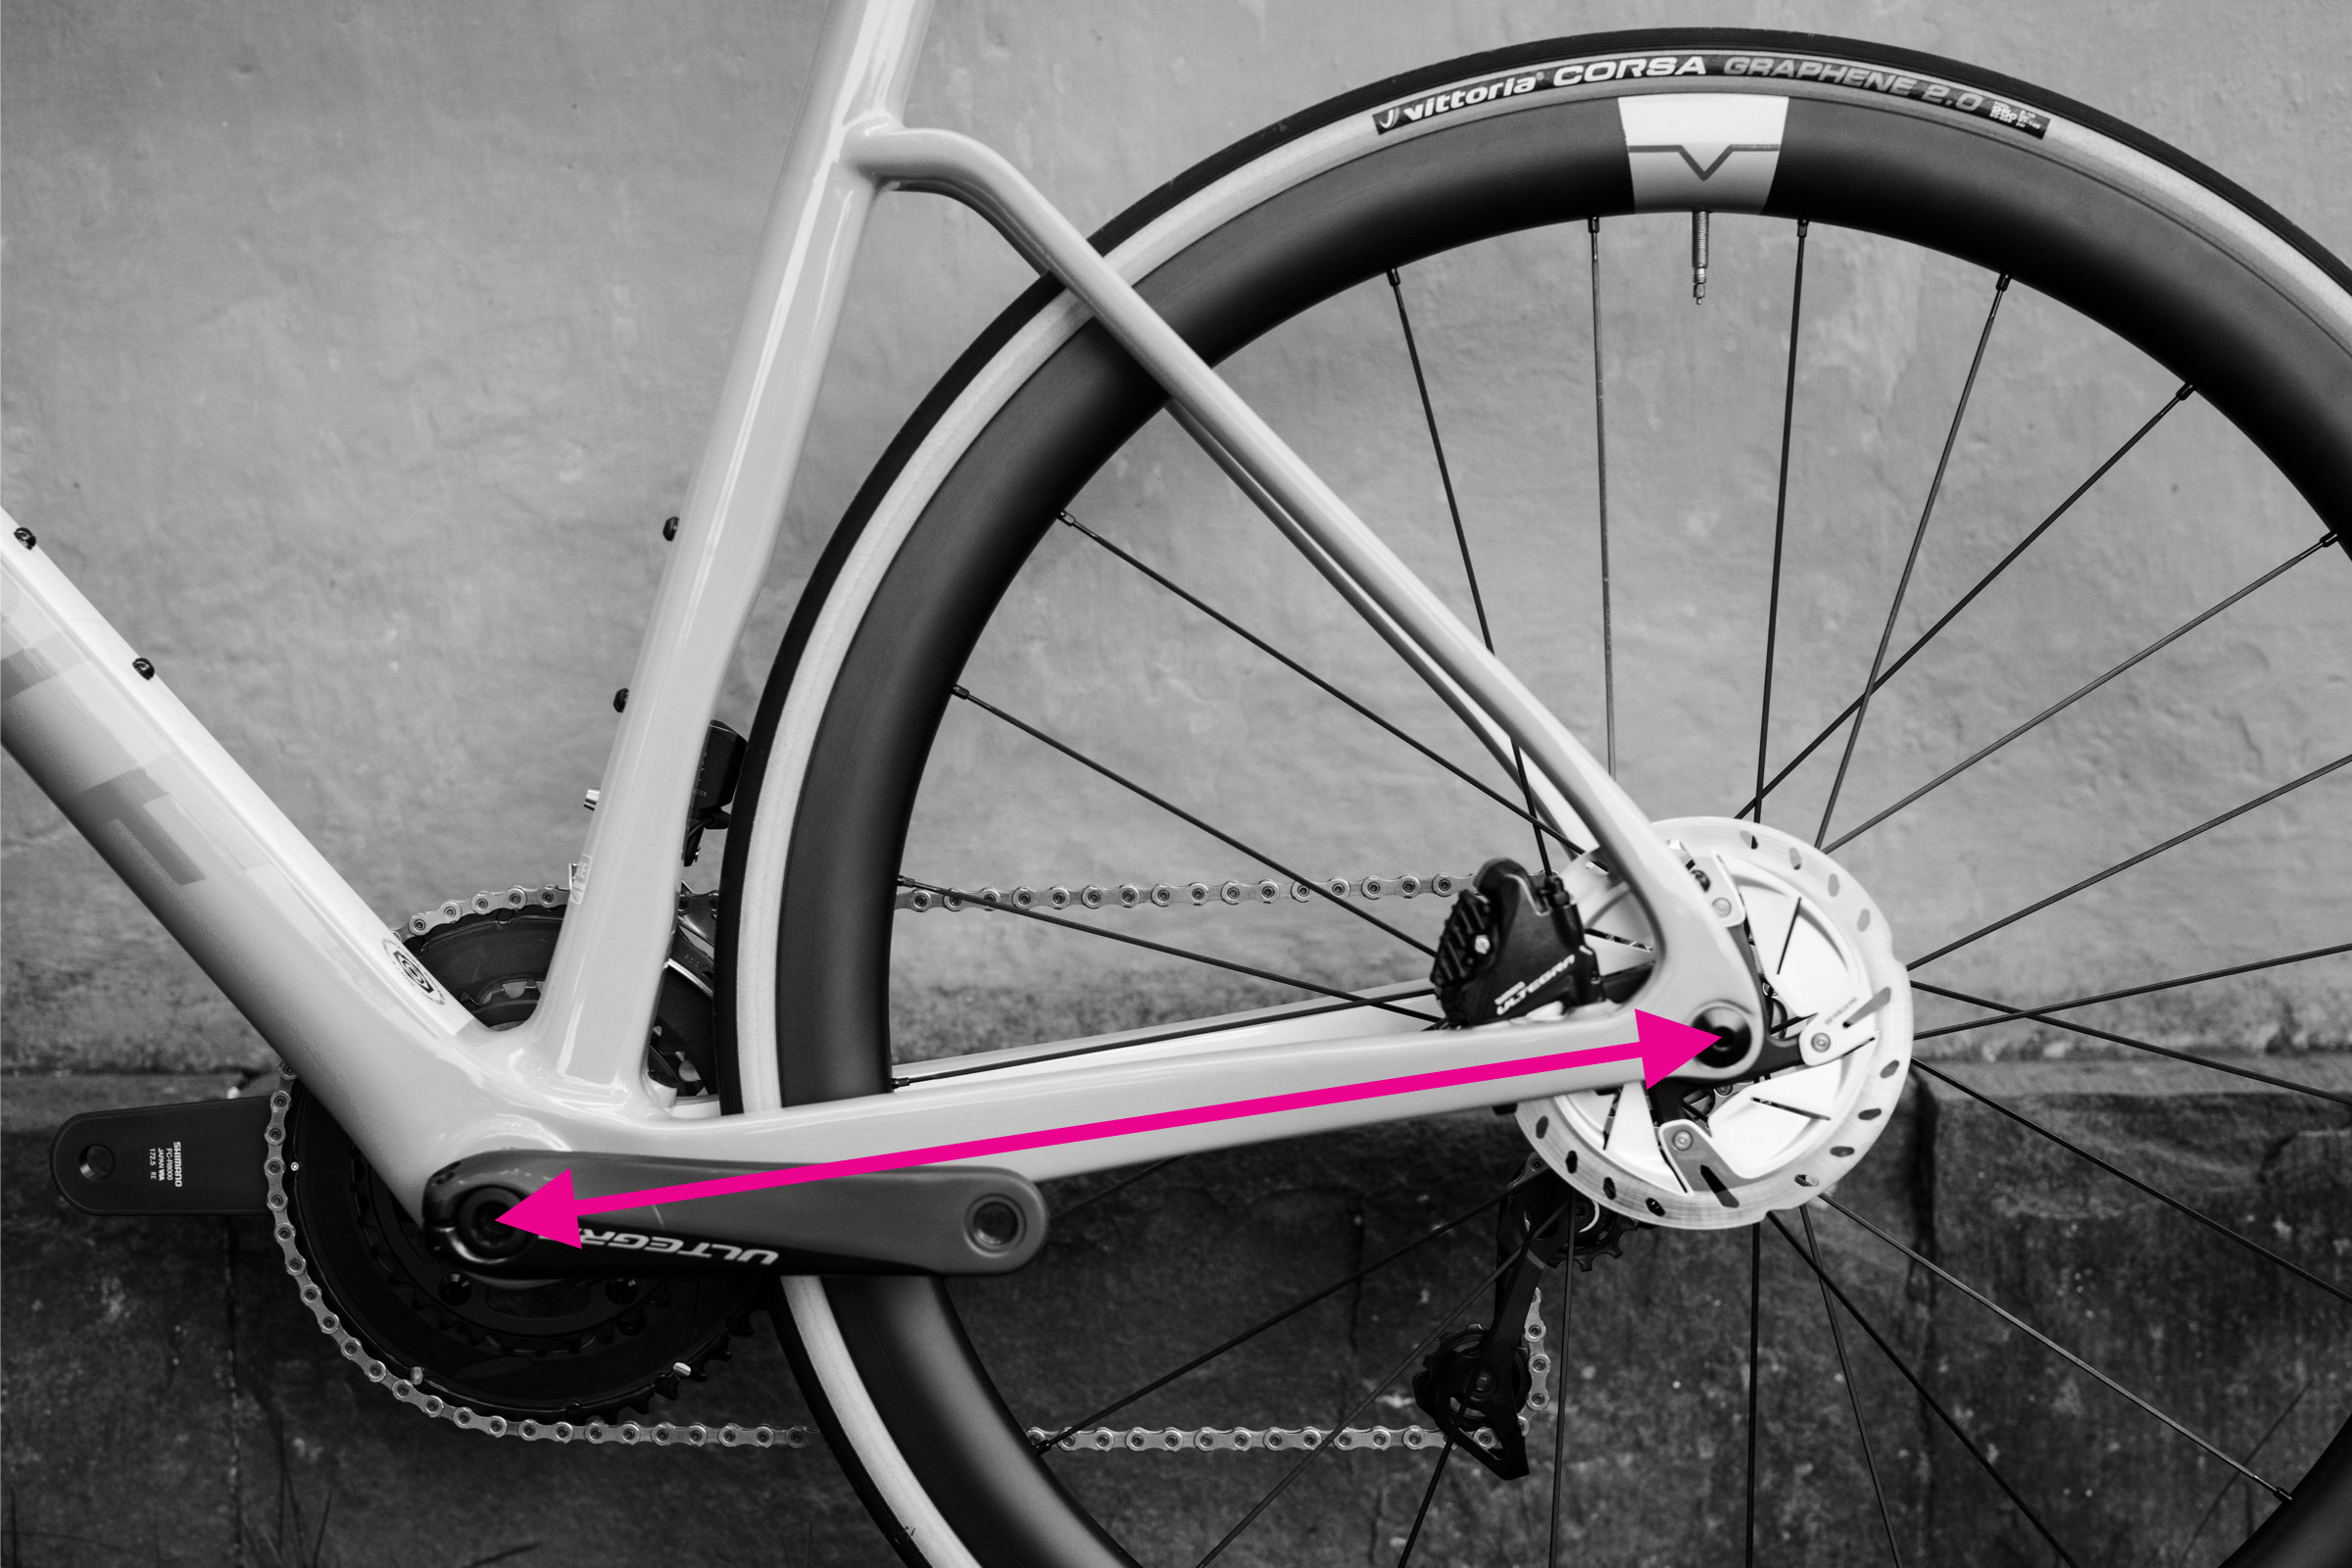 Chainstay length measurement demonstrated on a bike frame
Alt Text: Measuring the chainstay length of a bicycle frame, showing the straight-line distance from the bottom bracket center to the rear dropout.
Chainstay length is one of the two components that make up the wheelbase. It significantly contributes to your bike’s handling characteristics. Shorter chainstays generally result in a more responsive and nimble feel, while longer chainstays offer more stability.
Chainstay length is the straight-line distance from the center of the bottom bracket axle to the center of the rear dropout.
How to measure:
- Locate the center of your bottom bracket and the center of the rear dropout.
- Use your tape measure to measure the straight-line distance between these two points.
- Record the measurement in centimeters.
Step-by-Step Guide: Measuring Front Center
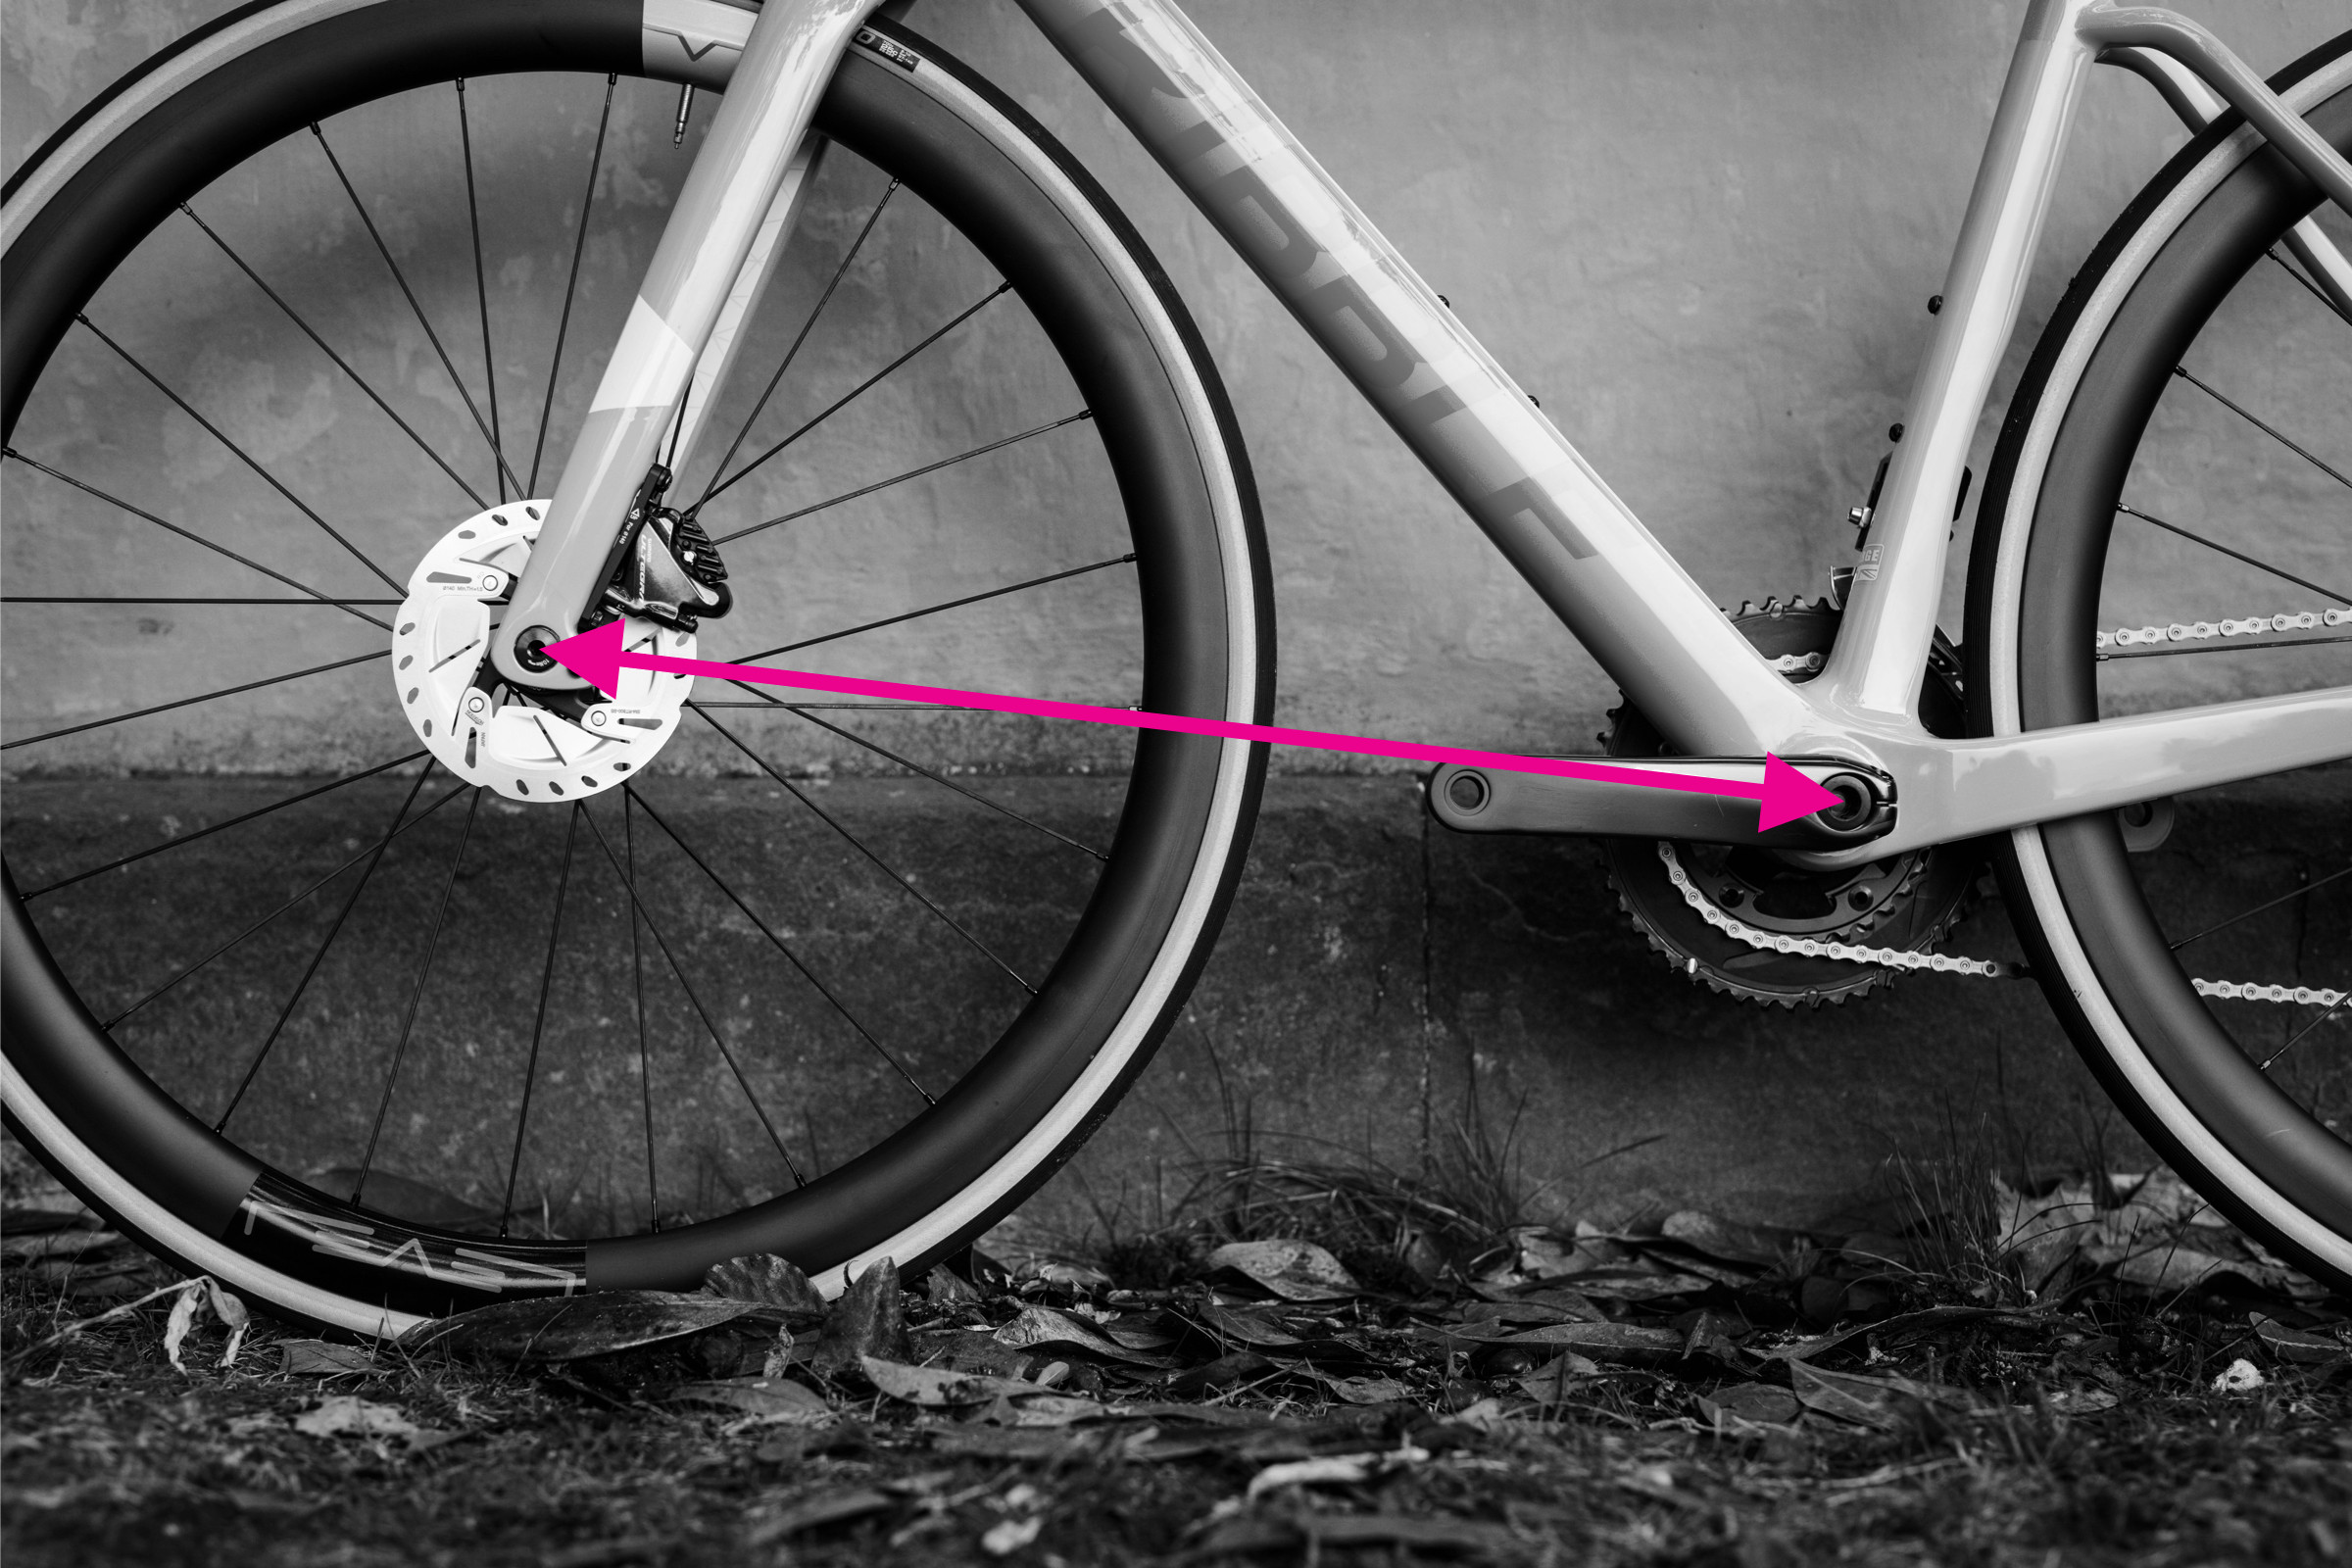 Front centre measurement demonstrated on a bike frame
Alt Text: Measuring the front center of a bicycle frame, showing the distance from the bottom bracket center to the front dropout.
The front center is the other component of the wheelbase, analogous to the chainstay length but measured to the front dropout. It affects handling and also influences toe overlap (where your shoe might hit the front wheel during tight turns). Although less frequently specified by manufacturers, some, like BMC, include front center measurements in their geometry charts.
How to measure:
- Locate the center of your bottom bracket and the center of the front dropout.
- Measure the straight-line distance between these points using your tape measure.
- Record the measurement in centimeters.
It’s important to note that the wheelbase is not simply the sum of the chainstay length and the front center because these measurements are not taken in a purely horizontal plane.
Step-by-Step Guide: Measuring Seat Tube and Head Tube Angles
 Seat and head tube measurements demonstrated on a bike frame
Alt Text: Measuring seat tube and head tube angles on a bicycle frame using a clinometer app on a smartphone, demonstrating angle measurement against the tubes.
Seat tube and head tube angles are fundamental to a bike’s handling. Steeper angles generally lead to quicker, more responsive handling, while slacker angles provide more stability, especially at higher speeds. Your clinometer app is the perfect tool for measuring these angles.
How to measure Seat Tube Angle:
- Ensure your bike is vertical and standing on a level surface.
- If your seat tube is straight, simply place your smartphone with the clinometer app directly against the seat tube.
- Read the angle measurement from the app.
If your seat tube has a kink or bend, use a straight edge to create a straight line from the bottom bracket shell to the top of the seat tube. Then, place your phone against this straight edge to measure the angle.
How to measure Head Tube Angle:
- Most modern bikes have tapered head tubes, meaning the front face angle isn’t the same as the centerline angle. To measure the centerline angle:
- Try to align your phone along the centerline of the head tube.
- Alternatively, use a straight edge to connect the centers of the top and bottom of the head tube and measure the angle against this edge.
- If your bike has straight fork legs (without a bend at the crown), you can measure the angle of the fork legs as a proxy for the head tube angle.
- Another method is to measure the angle of the steerer tube extension above the head tube, as it generally aligns with the head tube angle.
Ensure your bike is perfectly vertical for accurate angle measurements.
Step-by-Step Guide: Measuring Bottom Bracket Drop
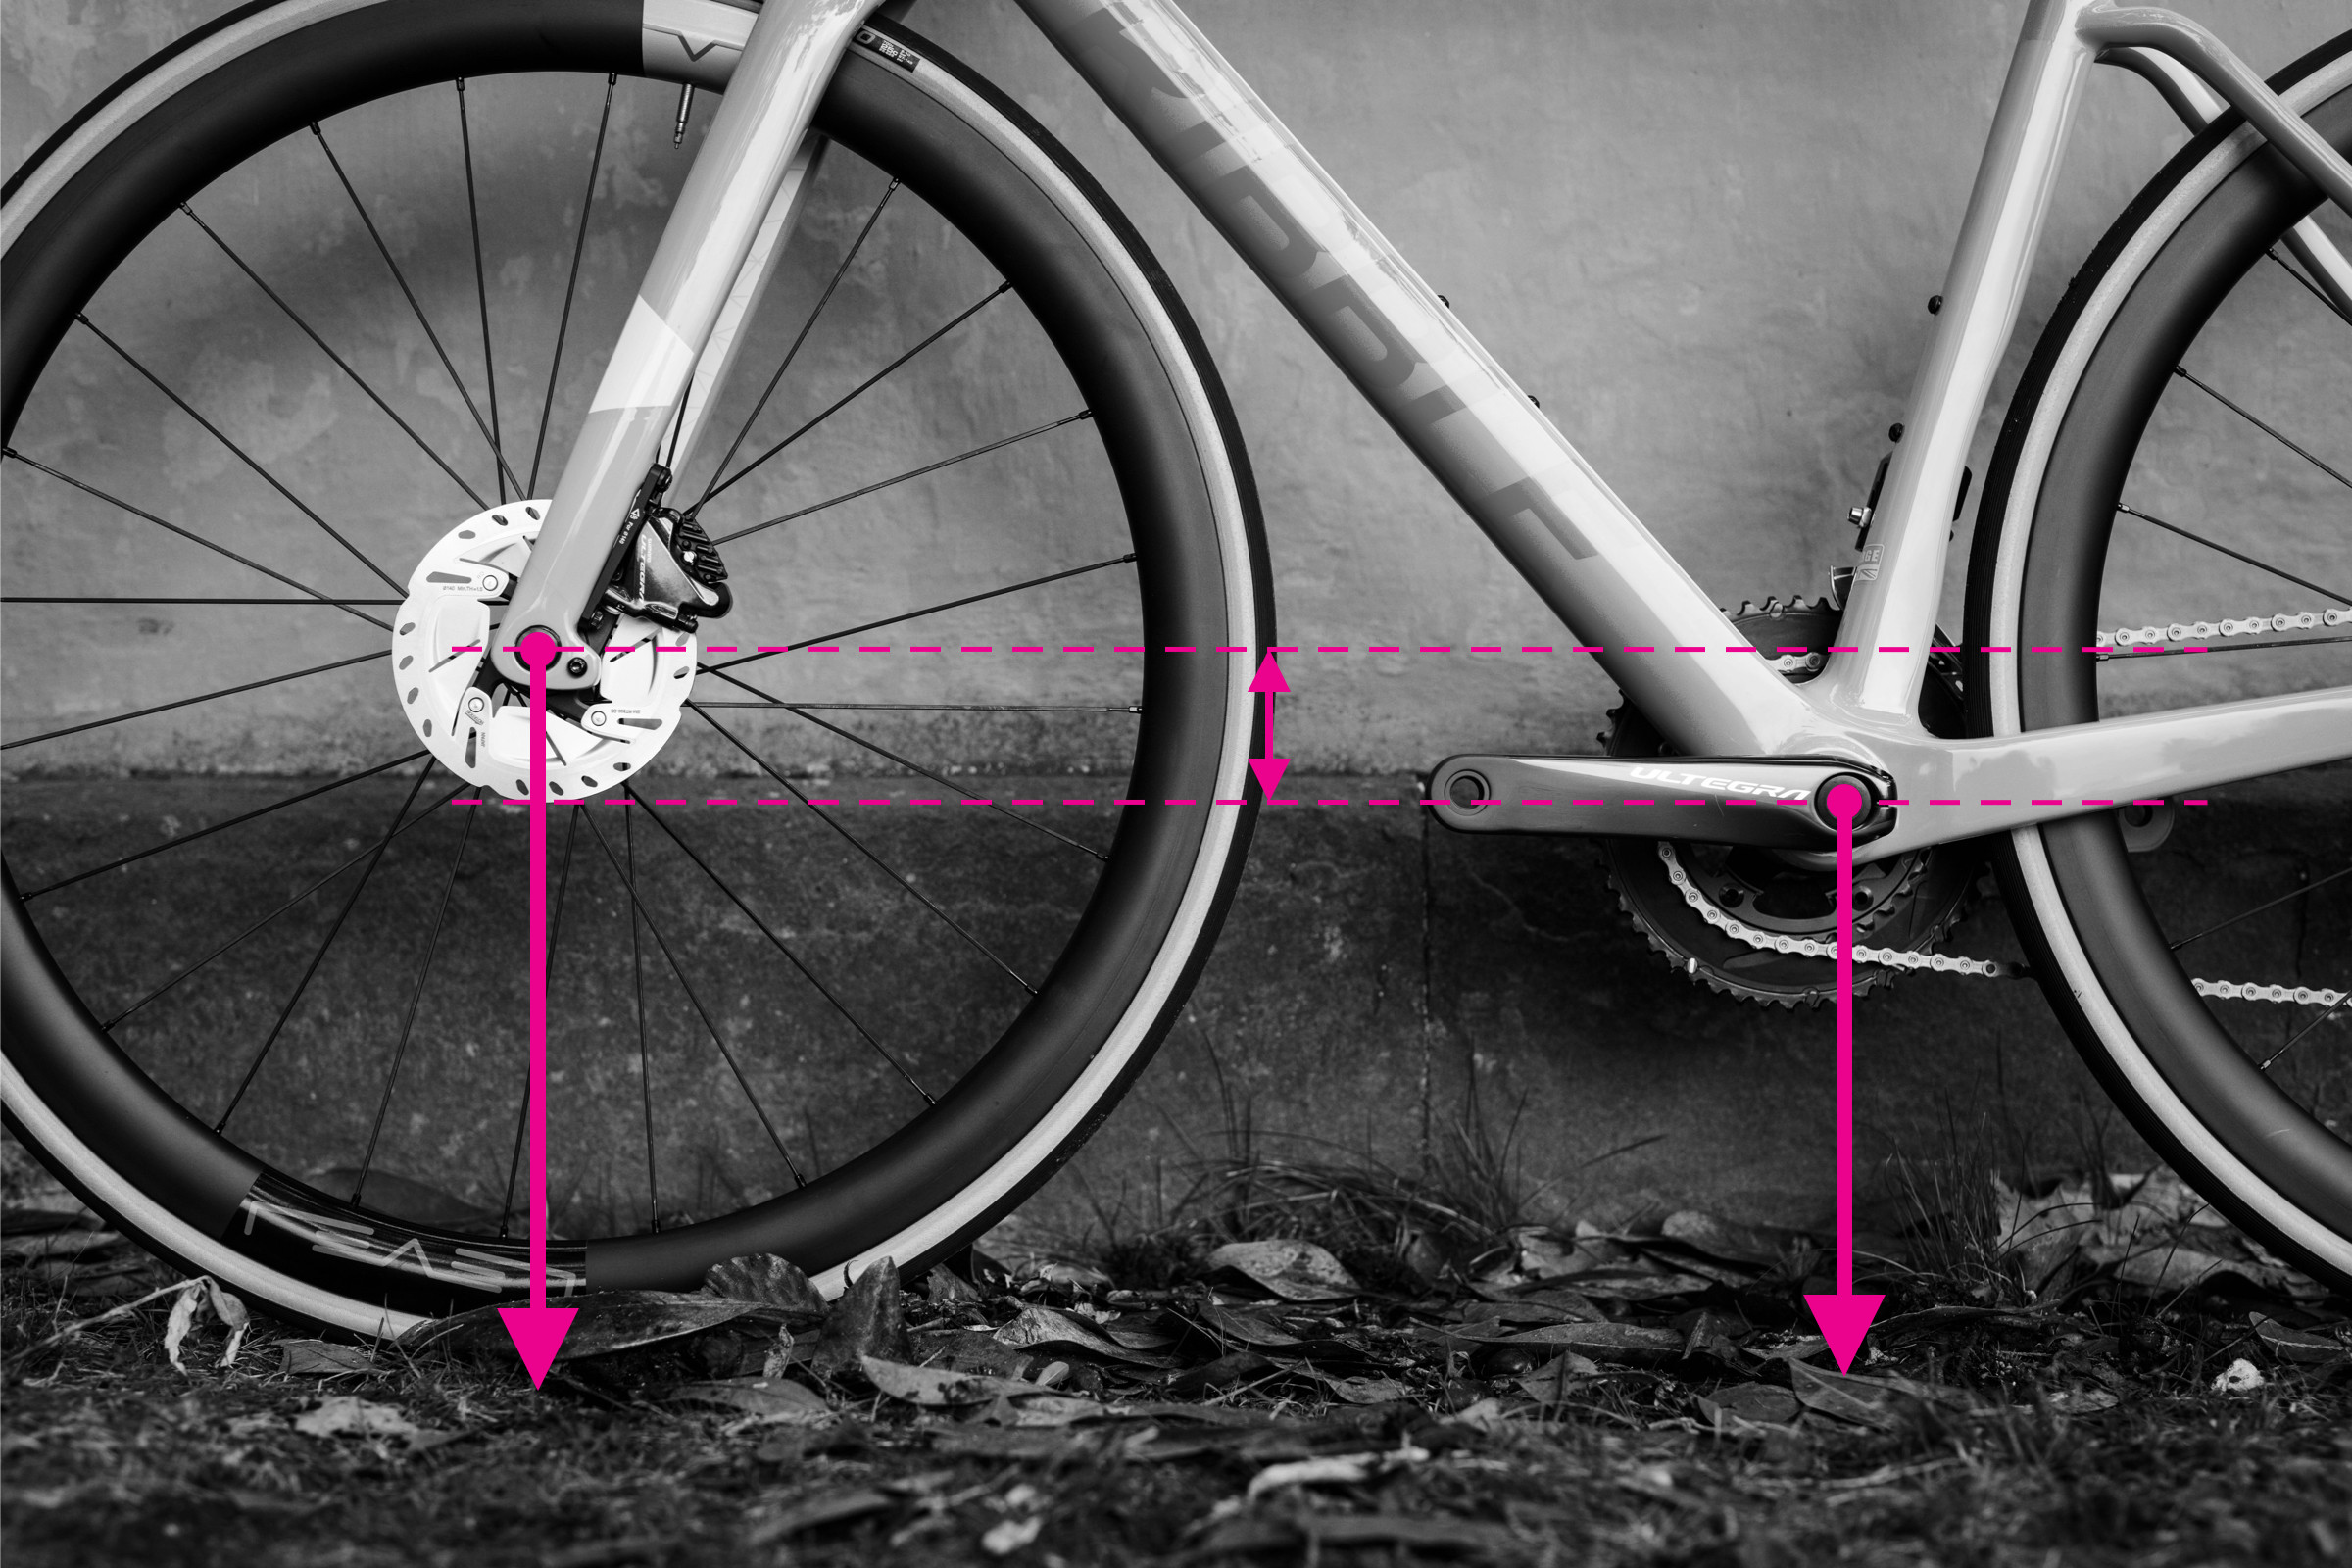 BB drop measurement demonstrated on a bike frame
Alt Text: Measuring the bottom bracket drop of a bicycle frame, showing the vertical distance difference between the wheel axle height and the bottom bracket center height.
Bottom bracket drop is the vertical distance that the bottom bracket sits below the wheel axles. It’s a key measurement influencing stability and cornering. A larger bottom bracket drop typically results in a lower center of gravity and enhanced stability.
How to measure:
- Measure the vertical distance from the ground to the rear wheel axle.
- Measure the vertical distance from the ground to the center of the bottom bracket.
- Subtract the first measurement (axle height) from the second measurement (bottom bracket height). The result is your bottom bracket drop.
Step-by-Step Guide: Measuring Bottom Bracket Height
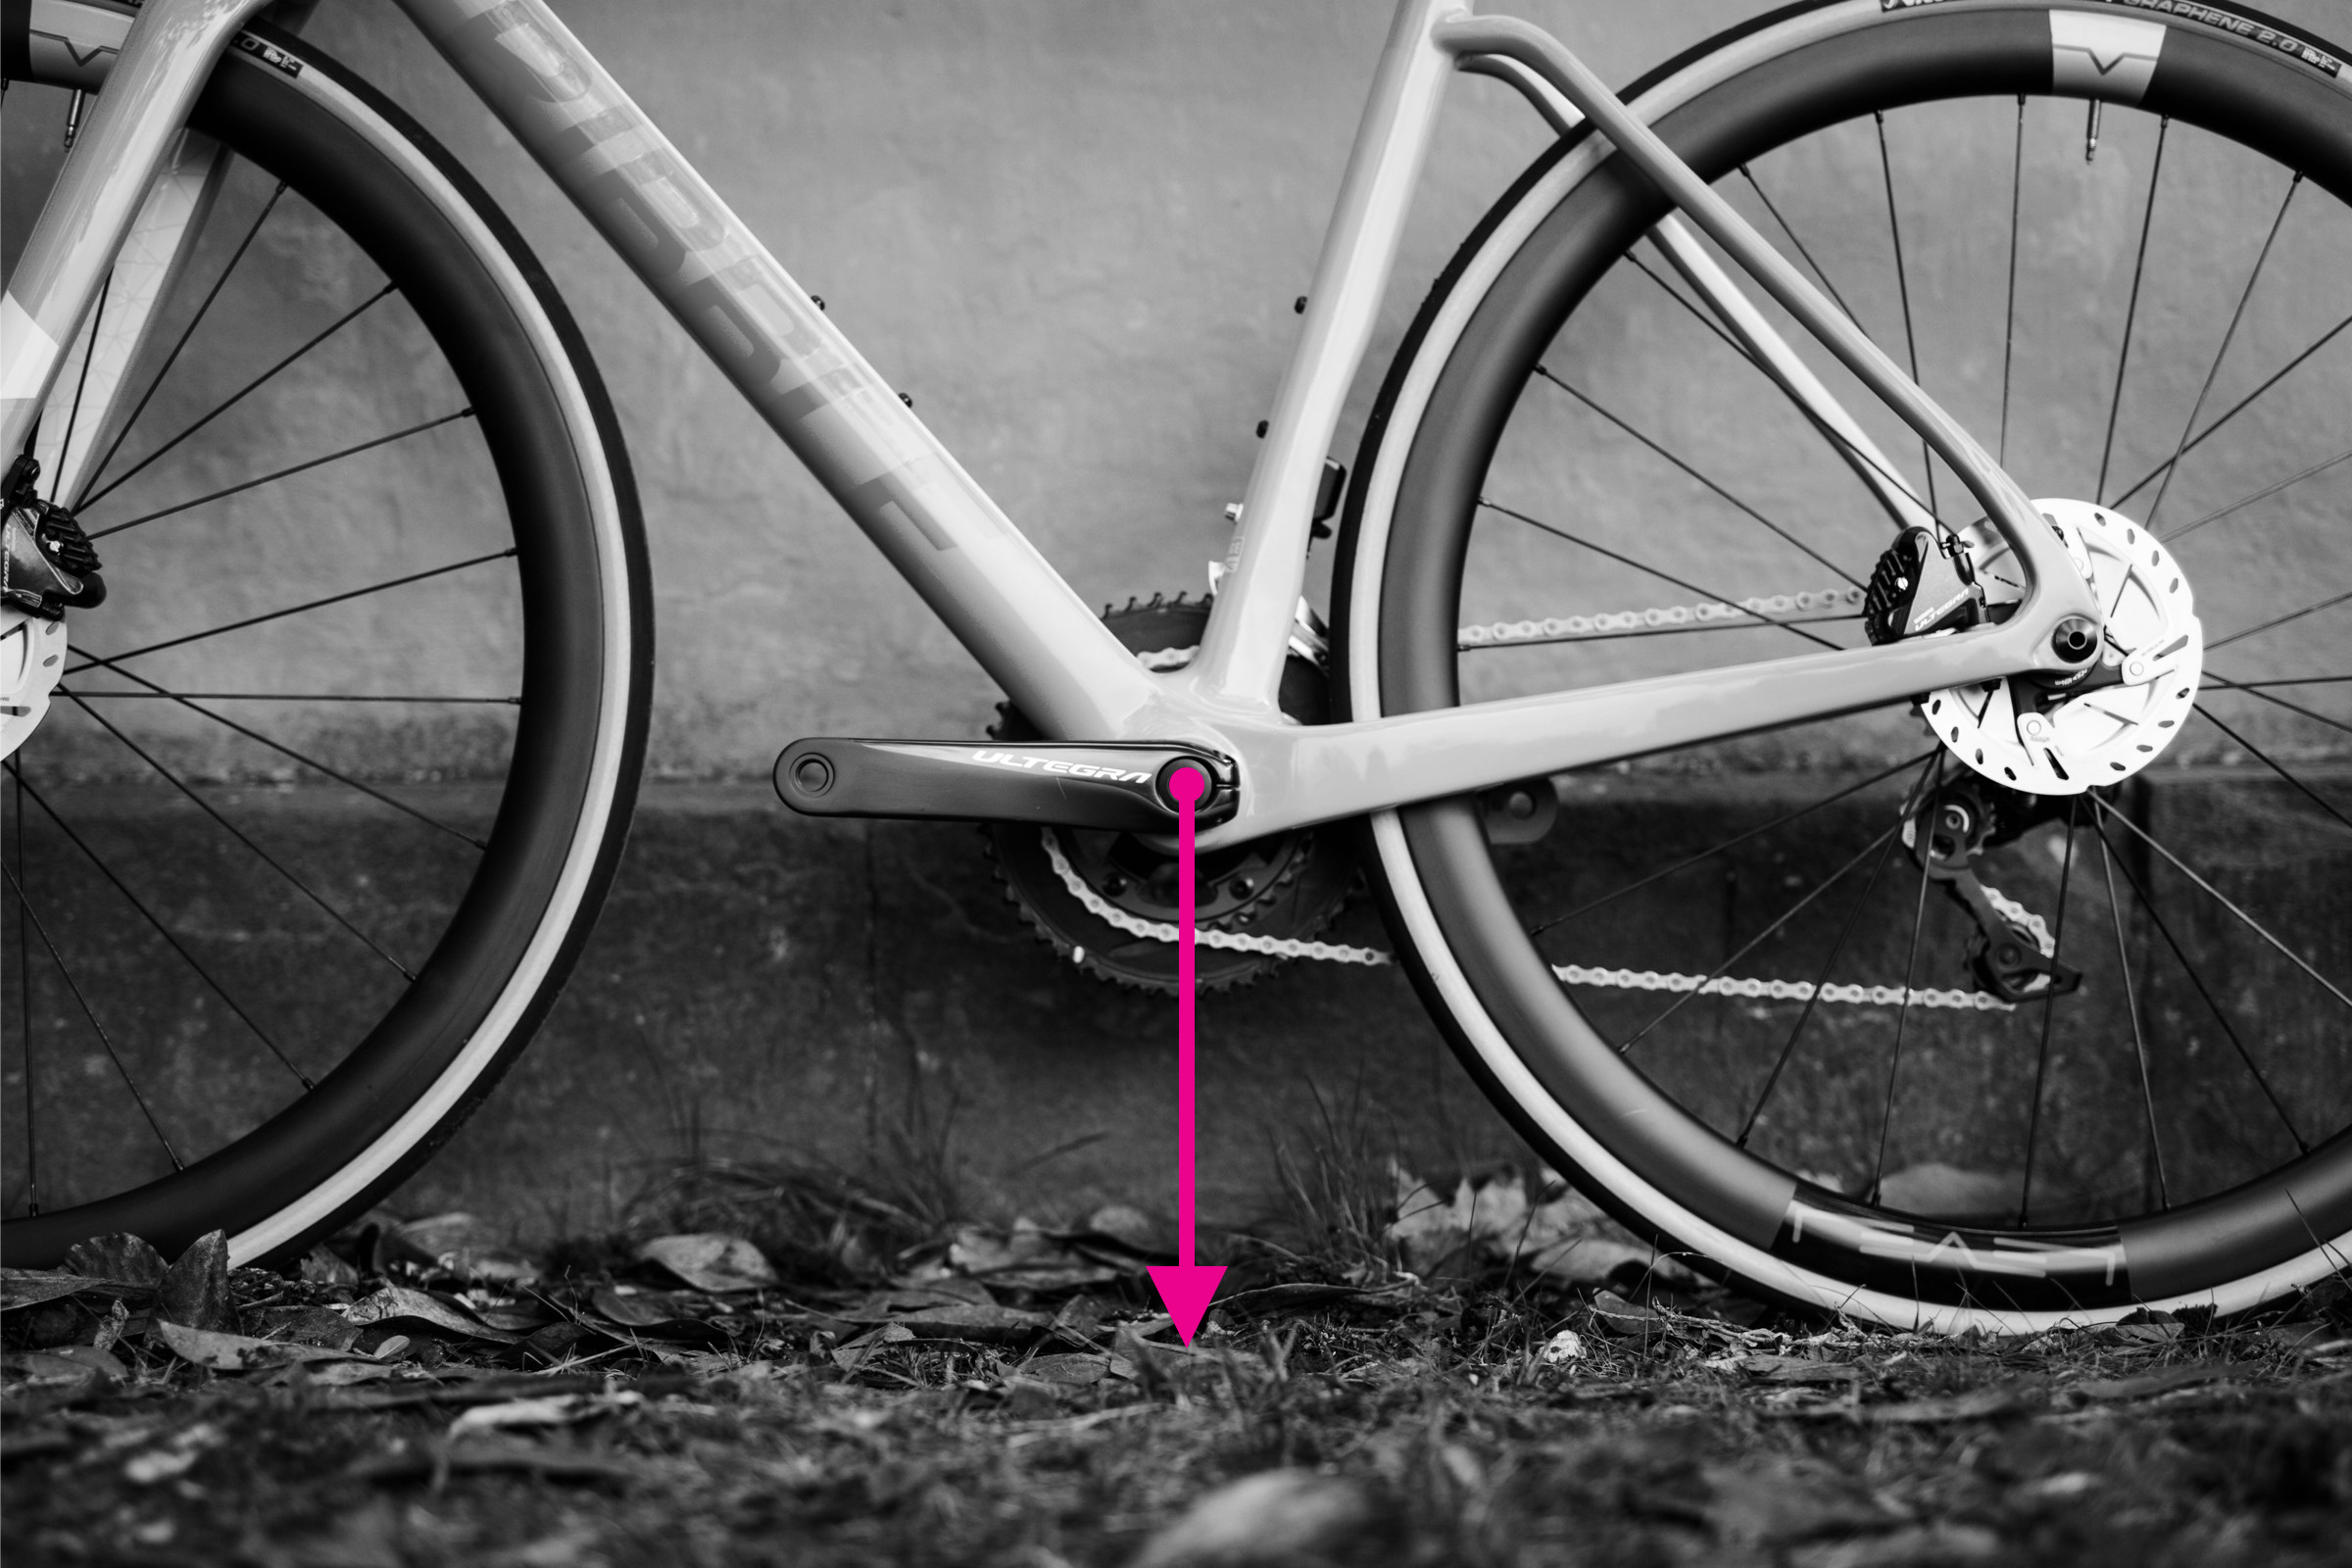 Bottom bracket height measurement demonstrated on bike frame
Alt Text: Measuring the bottom bracket height of a bicycle frame, showing the vertical distance from the ground to the bottom bracket center.
Bottom bracket height is simply the vertical distance from the ground to the center of the bottom bracket shell. It directly impacts ground clearance and stability.
How to measure:
- Ensure your bike is standing straight upright on a level surface.
- Measure the vertical distance from the ground to the center of the bottom bracket shell.
- Record the measurement in centimeters.
Keep in mind that bottom bracket height can be slightly affected by tire size and pressure. For consistent measurements, inflate your tires to your typical riding pressure.
By taking these measurements, you’ll have a comprehensive understanding of your bike’s geometry and size. These figures are invaluable when making future bike purchasing decisions, whether you’re considering a new or second-hand road bike, a commuting bike, or even a gravel bike. Store your measurements in a safe place for easy access when you need them!