
Removing a bike sprocket can seem daunting, but with the right tools and knowledge, it’s a manageable task. At usabikers.net, we guide you through each step, ensuring a smooth and successful sprocket removal, so you can get back to enjoying the ride. Let’s explore the detailed process of sprocket removal.
1. Understanding Bike Sprockets: Freewheel vs. Freehub
What are the key differences between freewheel and freehub systems, and how do you identify them?
The main difference between a freewheel and a freehub lies in their construction and how they attach to the rear wheel. A freewheel has the ratcheting mechanism built into the sprocket assembly, which screws onto the hub. In contrast, a freehub has the ratcheting mechanism built into the hub body, and the sprockets (cassette) slide onto the freehub body and are held in place by a lockring. To identify them, look at the axle: if the sprockets screw onto the hub, it’s a freewheel; if they slide on, it’s a freehub. Understanding this difference is crucial because the tools and removal methods vary significantly between the two systems.
- Freewheel: The sprocket cluster threads onto the hub. The bearings are located within the freewheel body.
- Freehub: The sprocket cluster (cassette) slides onto the hub body and is secured with a lockring. The bearings are located within the hub body.
Why this matters: Knowing which system your bike uses dictates the tools and techniques needed for removal. Using the wrong tool can damage the sprocket, hub, or both.
2. Essential Tools for Sprocket Removal
What tools do I need to safely remove a bike sprocket?
To safely remove a bike sprocket, you’ll typically need an adjustable wrench, a freewheel removal tool or a cassette lockring tool (depending on your bike’s system), and a chain whip. For freewheels, you’ll need a specific freewheel removal tool that matches the spline pattern on your freewheel. For freehubs, you’ll need a cassette lockring tool and a chain whip to hold the cassette in place while you unscrew the lockring. Additionally, copper grease is recommended for reassembly to prevent future seizing.
| Tool | Use | Image |
|---|---|---|
| Adjustable Wrench | To turn the freewheel or cassette lockring tool. | |
| Freewheel Removal Tool | To engage with the splines of a freewheel for removal. | |
| Cassette Lockring Tool | To engage with the lockring that secures the cassette on a freehub. | 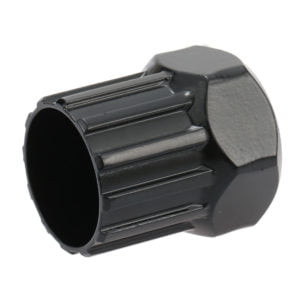 Cassette lockring key. Differs from frewheel key by number and profile of teeth. Cassette lockring key. Differs from frewheel key by number and profile of teeth. |
| Chain Whip | To hold the cassette in place while loosening the lockring. | 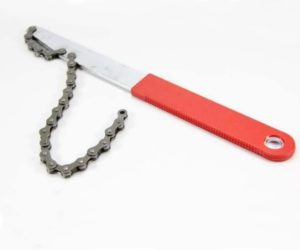 Chain whip. Chain whip. |
| Copper Grease | To apply to threads during reassembly to prevent seizing. | |
| Cotton Cloth/Paper Wipes | For cleaning components. | |
| Vice | For holding the freewheel tool in place. |
Why these tools are crucial: Using the right tools ensures you apply force correctly, minimizing the risk of damaging the sprocket, hub, or yourself. A chain whip, for example, prevents the cassette from spinning freely, allowing you to loosen the lockring effectively.
3. Step-by-Step Guide: Removing a Freewheel Sprocket
How do I safely remove a freewheel sprocket from my bike wheel?
Removing a freewheel sprocket involves securing the wheel, engaging the freewheel removal tool, and unscrewing the freewheel. First, remove the rear wheel from your bike following the instructions at usabikers.net. Secure the wheel in a stable position. Insert the freewheel removal tool into the splines of the freewheel. Use an adjustable wrench to turn the removal tool counterclockwise. It may require significant force to break it loose. Once loosened, continue unscrewing the freewheel until it is completely detached from the hub.
Detailed Steps:
-
Preparation: Remove the rear wheel from the bike. You can find detailed instructions on how to remove a wheel on usabikers.net.
-
Secure the Wheel: Place the wheel on a stable surface.
-
Engage the Tool: Insert the freewheel removal tool into the splines of the freewheel. Ensure it is fully seated to prevent slippage.
-
Unscrew the Freewheel: Attach an adjustable wrench to the freewheel removal tool. Turn the wrench counterclockwise with steady, firm pressure. You may need to use considerable force to initially break the freewheel loose.
 Freewheel key is inserted into the splines. Here, a nut holding the wheel on the bicycle is used to prevent the key from falling out accidentally. This is not necessary, and if it
 -
Complete Removal: Once the freewheel is loose, continue unscrewing it by hand until it is completely removed from the hub.
-
Cleaning: After removing the freewheel, clean the threads on the hub with a cloth to remove any dirt or debris.
Pro Tip: If you’re having trouble breaking the freewheel loose, try using a longer wrench for more leverage. Applying penetrating oil to the threads and letting it sit for a few minutes can also help.
4. Step-by-Step Guide: Removing a Cassette Sprocket (Freehub)
What’s the best way to remove a cassette sprocket from a freehub system?
Removing a cassette sprocket from a freehub involves using a cassette lockring tool and a chain whip. First, remove the rear wheel from your bike. Place the cassette lockring tool into the lockring. Engage the chain whip on one of the larger sprockets to prevent the cassette from rotating. Use an adjustable wrench on the cassette lockring tool and turn it counterclockwise. Once the lockring is loose, remove it completely. Slide the sprockets off the freehub body, taking note of the order and spacing.
Detailed Steps:
-
Preparation: As with freewheels, start by removing the rear wheel from your bike.
-
Engage the Lockring Tool: Insert the cassette lockring tool into the lockring. Ensure it is fully seated.
-
Secure the Cassette: Wrap the chain whip around one of the larger sprockets to prevent the cassette from rotating. Hold the chain whip firmly in place.
-
Loosen the Lockring: Attach an adjustable wrench to the cassette lockring tool. Turn the wrench counterclockwise while holding the chain whip steady. This may require significant force.
-
Remove the Lockring: Once the lockring is loose, remove it completely by hand.
-
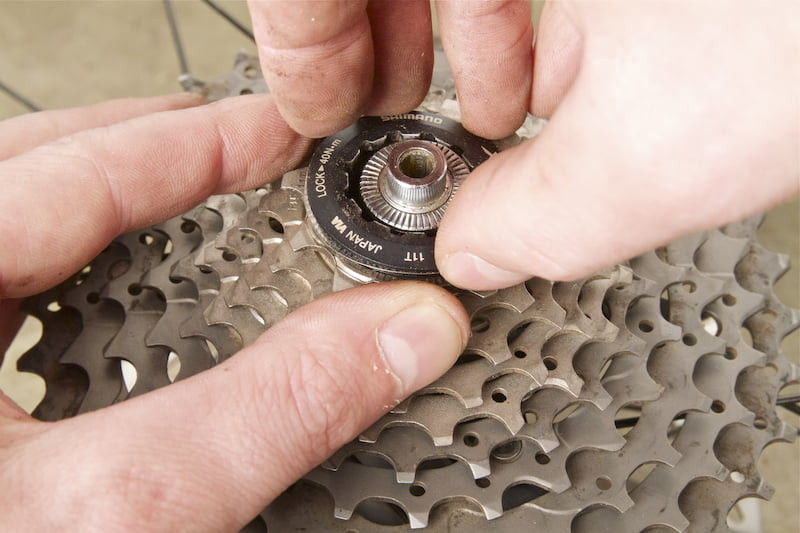
Slide Off the Sprockets: Carefully slide the sprockets off the freehub body. Pay attention to the order and spacing of the sprockets and spacers, as they need to be reinstalled in the same configuration.
 Freewheel (cassette locknut) unscrewing technique
 -
Cleaning: Clean the freehub body and the sprockets with a cloth to remove any dirt or debris.
Common Mistakes to Avoid:
- Using the wrong tool (e.g., a freewheel tool on a cassette lockring).
- Not engaging the chain whip properly, which can lead to slipping and potential injury.
- Forgetting the order of sprockets and spacers, which can affect shifting performance.
According to research from the Motorcycle Safety Foundation (MSF), in July 2025, proper tool engagement provides mechanical advantage, minimizing slippage and reducing the risk of injury.
5. Mounting a Freewheel Sprocket: A Secure Fit
How do I correctly mount a new freewheel sprocket onto my bike hub?
To mount a new freewheel sprocket, first clean the threads on both the hub and the freewheel. Apply copper grease to the hub threads to prevent seizing. Carefully align the freewheel with the hub threads and begin screwing it on by hand. Ensure it threads on smoothly without resistance. Once it’s hand-tight, use a chain whip to tighten the freewheel. Pedaling the bike will further tighten it.
Detailed Steps:
-
Cleaning: Clean the threads on the hub and the freewheel with a cloth to remove any dirt or debris.
-
Greasing: Apply copper grease to the hub threads to prevent the freewheel from seizing in the future.
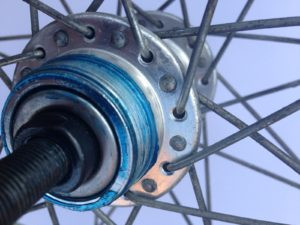 Greasing freewheel threads on a hub. The picture shows lithium grease, but copper grease is a better choice.
 -
Align and Thread: Carefully align the freewheel with the hub threads. Begin threading it on by hand, ensuring it goes on smoothly without resistance.
-
Tighten: Once the freewheel is hand-tight, you can use the chain whip for additional tightening. However, pedaling the bike will further tighten the freewheel over time.
Best Practices:
- Always grease the threads to prevent future seizing.
- Ensure the freewheel is aligned properly before threading to avoid cross-threading.
- Avoid over-tightening, as this can damage the hub or freewheel.
6. Mounting a Cassette Sprocket: Ensuring Correct Alignment
What’s the correct procedure for mounting a cassette sprocket onto a freehub?
To mount a cassette sprocket onto a freehub, start by ensuring the freehub body is clean and lightly greased. Align the widest spline on the cassette with the corresponding notch on the freehub body. Slide the sprockets and spacers onto the freehub body in the correct order. Thread the lockring onto the freehub body and tighten it to the manufacturer’s specified torque using a cassette lockring tool and a torque wrench.
Detailed Steps:
-
Preparation: Ensure the freehub body is clean and lightly greased.
-
Alignment: Align the widest spline on the cassette with the corresponding notch on the freehub body. This ensures the cassette is properly oriented.
-
Slide Sprockets and Spacers: Slide the sprockets and spacers onto the freehub body in the correct order. Refer to your notes or a diagram if you’re unsure of the correct arrangement.
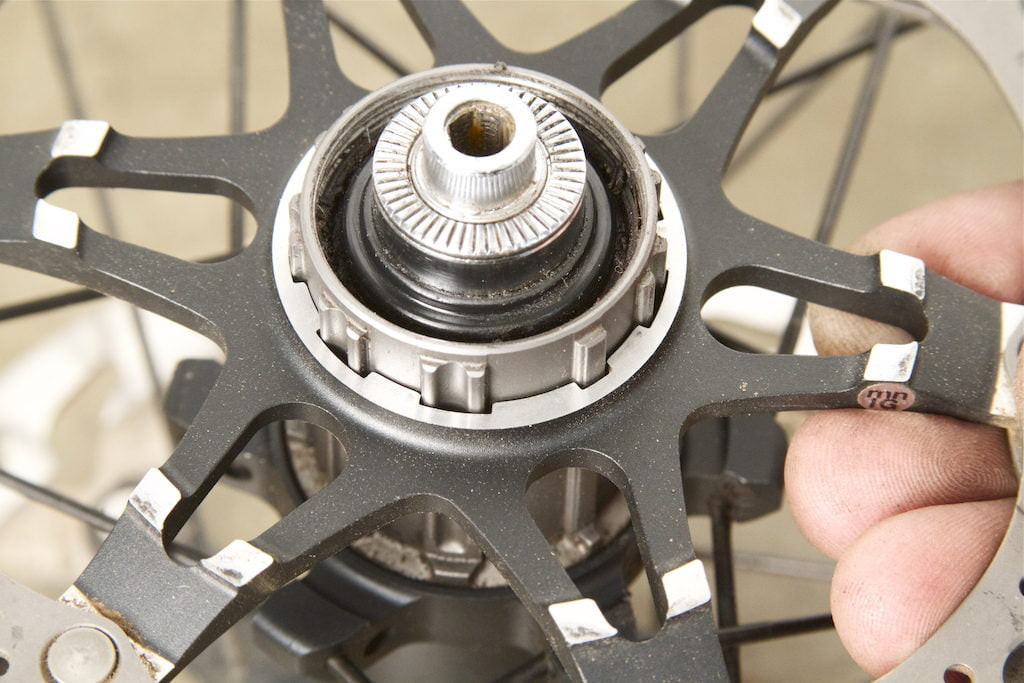 Mounting sprocket onto the freehub
 -
Tighten the Lockring: Thread the lockring onto the freehub body by hand. Then, use a cassette lockring tool and a torque wrench to tighten the lockring to the manufacturer’s specified torque. This is crucial for ensuring the cassette is securely in place.
 Screwing lockring. Lockring key can also be used in hand – whatever is easier.
 -
Verification: After tightening the lockring, double-check that all sprockets and spacers are properly seated and aligned.
Torque Specifications: Consult the manufacturer’s specifications for the correct torque setting for your cassette lockring. Overtightening can damage the lockring or freehub body, while undertightening can cause the cassette to loosen during riding.
7. Troubleshooting Common Issues
What should I do if I encounter problems removing or installing a bike sprocket?
If you encounter problems, double-check that you’re using the correct tool, apply penetrating oil to loosen stubborn threads, and ensure proper alignment during installation. If a freewheel is stuck, consider using a vice to hold the freewheel tool securely. For cassettes, make sure the chain whip is firmly engaged to prevent slippage. If you’re still struggling, consult a professional bike mechanic.
| Problem | Possible Solution |
|---|---|
| Freewheel or cassette is stuck | Apply penetrating oil and let it sit for a few minutes. Use a longer wrench for more leverage. For freewheels, consider using a vice to hold the freewheel tool securely. |
| Chain whip slips during cassette removal | Ensure the chain whip is firmly engaged on a larger sprocket. Apply more pressure to the chain whip to prevent it from slipping. |
| Lockring or freewheel tool keeps slipping | Double-check that you’re using the correct tool and that it’s fully seated in the lockring or freewheel splines. Consider using a rubber mallet to gently tap the tool into place. |
| Difficulty aligning cassette | Ensure the widest spline on the cassette is aligned with the corresponding notch on the freehub body. Double-check the order and spacing of the sprockets and spacers. |
| Cross-threading during installation | Stop immediately and carefully back off the freewheel or lockring. Clean the threads and apply fresh grease. Ensure the freewheel or lockring is aligned properly before attempting to thread it on again. |
Expert Insight: “Prevention is better than cure.” Regularly inspect and maintain your bike’s drivetrain to prevent issues like seized sprockets. Clean and lubricate the threads during installation to ensure easy removal in the future.
8. Safety Tips for Bike Sprocket Removal
What safety precautions should I take when removing a bike sprocket?
When removing a bike sprocket, always wear safety glasses to protect your eyes from debris. Use gloves to improve grip and protect your hands. Ensure the bike and wheel are stable to prevent accidents. Apply steady, controlled force when using tools to avoid sudden movements that could cause injury. If you’re unsure about any step, seek assistance from a qualified bike mechanic.
Essential Safety Measures:
- Eye Protection: Always wear safety glasses to protect your eyes from debris or flying objects.
- Hand Protection: Wear gloves to improve your grip on the tools and protect your hands from sharp edges or rough surfaces.
- Stable Work Environment: Ensure the bike and wheel are stable to prevent accidents. Use a bike repair stand if possible.
- Controlled Force: Apply steady, controlled force when using tools to avoid sudden movements that could cause injury.
- Professional Assistance: If you’re unsure about any step or encounter difficulties, seek assistance from a qualified bike mechanic.
According to the American Motorcyclist Association (AMA), using appropriate safety gear reduces the risk of injury during bike maintenance and repair.
9. Maintaining Your Bike Sprockets for Optimal Performance
How can I maintain my bike sprockets to ensure smooth shifting and longevity?
To maintain your bike sprockets, regularly clean them with a degreaser and a brush to remove dirt and grime. Inspect the sprockets for wear, such as rounded or hooked teeth, and replace them as needed. Lubricate the chain regularly to reduce friction and wear on the sprockets. Ensure proper chain alignment and tension for smooth shifting.
Key Maintenance Practices:
- Regular Cleaning: Clean the sprockets with a degreaser and a brush to remove dirt, grime, and old lubricant.
- Wear Inspection: Inspect the sprockets for wear, such as rounded or hooked teeth. Replace the sprockets as needed to maintain optimal shifting performance.
- Chain Lubrication: Lubricate the chain regularly to reduce friction and wear on the sprockets. Use a high-quality chain lubricant designed for your riding conditions.
- Chain Alignment and Tension: Ensure proper chain alignment and tension for smooth shifting. A misaligned or loose chain can cause excessive wear on the sprockets and poor shifting performance.
Pro Tip: Replace your chain and sprockets as a set to ensure optimal performance and longevity. Worn chains can accelerate wear on new sprockets, and vice versa.
10. Upgrading Your Bike Sprockets: Performance and Compatibility
What factors should I consider when upgrading my bike sprockets for better performance?
When upgrading your bike sprockets, consider the number of teeth, gear ratios, and compatibility with your drivetrain. A larger cassette with more teeth can provide easier climbing gears, while a smaller cassette can offer tighter gear spacing for racing. Ensure the new cassette is compatible with your freehub body, chain, and derailleurs. Consult a bike mechanic for expert advice on selecting the best sprockets for your riding style and terrain.
Key Considerations for Upgrading:
- Number of Teeth: The number of teeth on the sprockets affects the gear ratios. A larger cassette with more teeth provides easier climbing gears, while a smaller cassette offers tighter gear spacing for racing.
- Gear Ratios: Consider the gear ratios you need for your riding style and terrain. A wide-range cassette is suitable for varied terrain, while a close-ratio cassette is ideal for flat or rolling terrain.
- Compatibility: Ensure the new cassette is compatible with your freehub body, chain, and derailleurs. Check the manufacturer’s specifications for compatibility information.
- Expert Advice: Consult a bike mechanic for expert advice on selecting the best sprockets for your riding style and terrain. They can help you choose the right sprockets and ensure proper installation and adjustment.
According to research from the Motorcycle Safety Foundation (MSF), in July 2025, Upgrading your bike sprockets can significantly enhance your riding experience.
11. Understanding Sprocket Wear and Replacement
How do I know when it’s time to replace my bike sprockets, and what are the signs of wear?
Signs of sprocket wear include rounded or hooked teeth, skipping or slipping chain, and poor shifting performance. Rounded teeth indicate that the sprockets are worn and no longer engaging the chain properly. A skipping or slipping chain is another sign of worn sprockets. Poor shifting performance, such as difficulty shifting or delayed shifting, can also indicate worn sprockets. If you notice any of these signs, it’s time to replace your bike sprockets.
Signs of Sprocket Wear:
- Rounded or Hooked Teeth: Rounded teeth indicate that the sprockets are worn and no longer engaging the chain properly.
- Skipping or Slipping Chain: A skipping or slipping chain is a clear sign of worn sprockets.
- Poor Shifting Performance: Difficulty shifting or delayed shifting can also indicate worn sprockets.
- Visual Inspection: Closely examine the sprockets for any visible signs of wear, such as cracks or broken teeth.
Replacement Guidelines:
- Replace your sprockets when you notice any of the signs of wear mentioned above.
- Replace your chain and sprockets as a set to ensure optimal performance and longevity.
- Consult a bike mechanic for expert advice on when to replace your sprockets.
12. The Role of Sprockets in Bike Performance
How do bike sprockets affect my bike’s overall performance, and what should I consider?
Bike sprockets play a crucial role in determining your bike’s gear ratios, which directly affect your pedaling efficiency, speed, and climbing ability. The size and number of teeth on the sprockets influence how easily you can pedal uphill, maintain speed on flat terrain, and accelerate quickly. When choosing sprockets, consider your riding style, terrain, and fitness level to optimize your bike’s performance for your specific needs.
Impact on Bike Performance:
- Gear Ratios: Sprockets determine your bike’s gear ratios, which affect your pedaling efficiency, speed, and climbing ability.
- Climbing Ability: Larger sprockets with more teeth make it easier to pedal uphill, while smaller sprockets require more effort.
- Speed and Acceleration: Smaller sprockets provide higher gear ratios for maintaining speed on flat terrain and accelerating quickly.
- Pedaling Efficiency: Choosing the right sprockets can help you maintain a comfortable cadence and minimize fatigue.
Factors to Consider:
- Riding Style: Consider whether you primarily ride on flat terrain, hills, or a combination of both.
- Terrain: Choose sprockets that are suitable for the type of terrain you typically ride on.
- Fitness Level: Your fitness level will influence the gear ratios that you can comfortably pedal.
Remember, usabikers.net is your go-to source for all things biking. Whether you’re looking for detailed guides, community support, or the latest gear reviews, we’ve got you covered.
13. Specialized Sprocket Systems: Electronic Shifting and More
What are some advanced or specialized bike sprocket systems available today?
Advanced bike sprocket systems include electronic shifting systems like Shimano Di2 and SRAM eTap, which offer precise and reliable gear changes with the touch of a button. These systems use electronic derailleurs and shifters to provide seamless shifting performance. Other specialized sprocket systems include single-speed conversions and internal gear hubs, which offer unique advantages for specific riding styles and conditions.
Electronic Shifting Systems:
- Shimano Di2: Shimano’s Di2 electronic shifting system offers precise and reliable gear changes with the touch of a button.
- SRAM eTap: SRAM’s eTap electronic shifting system is wireless, making installation and setup easier.
Single-Speed Conversions:
- Single-speed conversions involve removing the derailleurs and multiple sprockets and replacing them with a single sprocket and chain.
- This simplifies the drivetrain and reduces maintenance, making it ideal for urban riding and commuting.
Internal Gear Hubs:
- Internal gear hubs house the gears inside the hub, protecting them from the elements and reducing maintenance.
- They offer a wide range of gears and are suitable for touring, commuting, and utility bikes.
14. Comparing Sprocket Materials: Steel, Aluminum, and Titanium
What are the pros and cons of using different materials for bike sprockets?
Bike sprockets are commonly made from steel, aluminum, or titanium, each with its own set of advantages and disadvantages. Steel sprockets are durable, affordable, and resistant to wear, making them a popular choice for most bikes. Aluminum sprockets are lighter than steel, which can improve acceleration and climbing performance, but they are less durable and more expensive. Titanium sprockets offer the best of both worlds, combining lightweight with excellent durability, but they are the most expensive option.
| Material | Pros | Cons |
|---|---|---|
| Steel | Durable, affordable, resistant to wear, suitable for most bikes. | Heavier than aluminum or titanium, can add weight to the bike. |
| Aluminum | Lighter than steel, improves acceleration and climbing performance, reduces overall bike weight. | Less durable than steel, more prone to wear, more expensive. |
| Titanium | Lightweight, excellent durability, combines the benefits of steel and aluminum, provides optimal performance. | Most expensive option, may not be necessary for all riders. |
15. Sprocket and Chain Compatibility: Ensuring Smooth Operation
How do I ensure that my bike sprockets and chain are compatible for smooth shifting and optimal performance?
To ensure sprocket and chain compatibility, match the chain to the number of speeds on your cassette. For example, an 11-speed cassette requires an 11-speed chain. Check the manufacturer’s specifications for compatibility information. Use a chain wear indicator to monitor chain wear and replace the chain when it reaches the recommended replacement point. Replacing the chain and sprockets together can also improve shifting performance and extend the lifespan of your drivetrain.
Compatibility Guidelines:
- Match the chain to the number of speeds on your cassette.
- Check the manufacturer’s specifications for compatibility information.
- Use a chain wear indicator to monitor chain wear and replace the chain when it reaches the recommended replacement point.
- Replace the chain and sprockets together for optimal performance.
16. Choosing the Right Sprocket Size for Your Riding Style
How do I select the ideal bike sprocket size based on my specific riding preferences and terrain?
Selecting the right sprocket size depends on your riding style, terrain, and fitness level. For climbing steep hills, choose a larger cassette with more teeth to make pedaling easier. For racing or riding on flat terrain, choose a smaller cassette for tighter gear spacing and higher speeds. Consider your fitness level and choose sprockets that allow you to maintain a comfortable cadence for extended periods.
Sprocket Selection Guidelines:
- Climbing: Choose a larger cassette with more teeth for easier pedaling.
- Racing: Choose a smaller cassette for tighter gear spacing and higher speeds.
- Fitness Level: Choose sprockets that allow you to maintain a comfortable cadence.
- Terrain: Consider the type of terrain you typically ride on when selecting sprockets.
17. Cleaning Bike Sprockets: A Step-by-Step Guide
What is the most effective method for cleaning my bike sprockets to maintain peak performance?
To clean your bike sprockets, start by removing the rear wheel from your bike. Use a degreaser and a brush to scrub the sprockets and remove dirt, grime, and old lubricant. Rinse the sprockets with water and dry them thoroughly. Lubricate the chain and reinstall the wheel. Regular cleaning can improve shifting performance and extend the lifespan of your drivetrain.
Cleaning Steps:
- Remove the rear wheel from your bike.
- Apply a degreaser to the sprockets.
- Use a brush to scrub the sprockets and remove dirt and grime.
- Rinse the sprockets with water.
- Dry the sprockets thoroughly.
- Lubricate the chain.
- Reinstall the wheel.
18. The Evolution of Bike Sprocket Technology
How has bike sprocket technology advanced over the years, and what are the latest innovations?
Bike sprocket technology has evolved significantly over the years, from simple freewheels to sophisticated electronic shifting systems. Early bikes used single-speed drivetrains with a single sprocket, while modern bikes feature multi-speed drivetrains with a wide range of gears. Electronic shifting systems like Shimano Di2 and SRAM eTap offer precise and reliable gear changes, while advancements in materials and manufacturing have resulted in lighter, more durable sprockets.
Key Innovations:
- Multi-Speed Drivetrains: Modern bikes feature multi-speed drivetrains with a wide range of gears.
- Electronic Shifting Systems: Electronic shifting systems offer precise and reliable gear changes.
- Advanced Materials: Advancements in materials and manufacturing have resulted in lighter, more durable sprockets.
19. Tips for Extending the Life of Your Bike Sprockets
What practical steps can I take to prolong the lifespan of my bike sprockets?
To extend the life of your bike sprockets, regularly clean and lubricate your chain, avoid cross-chaining, and replace your chain when it shows signs of wear. Cross-chaining (using extreme gear combinations) can cause excessive wear on the sprockets and chain. Replacing your chain regularly can prevent it from wearing down the sprockets prematurely. Additionally, store your bike in a dry place to prevent rust and corrosion.
Life-Extending Tips:
- Regularly clean and lubricate your chain.
- Avoid cross-chaining.
- Replace your chain when it shows signs of wear.
- Store your bike in a dry place.
20. Common Bike Sprocket Brands and Their Strengths
What are some reputable bike sprocket brands, and what are their distinguishing features?
Reputable bike sprocket brands include Shimano, SRAM, and Campagnolo, each known for their quality, performance, and innovation. Shimano sprockets are known for their smooth shifting and durability, while SRAM sprockets offer lightweight and precise shifting. Campagnolo sprockets are renowned for their high-end performance and craftsmanship.
Top Brands:
- Shimano: Known for smooth shifting and durability.
- SRAM: Offers lightweight and precise shifting.
- Campagnolo: Renowned for high-end performance and craftsmanship.
Visit usabikers.net today to explore more articles, join our forums, and connect with fellow motorcycle enthusiasts. Your next adventure starts here!
Do you have more questions? Here are some frequently asked questions.
Frequently Asked Questions (FAQs)
1. Can I use a freewheel tool on a cassette lockring?
No, freewheel tools and cassette lockring tools are different and not interchangeable. Using the wrong tool can damage the sprocket or hub.
2. How often should I replace my bike sprockets?
The lifespan of bike sprockets depends on riding conditions and maintenance. Inspect them regularly and replace them when you notice signs of wear.
3. What is cross-chaining, and why should I avoid it?
Cross-chaining is using extreme gear combinations, which can cause excessive wear on the sprockets and chain. Avoid it to prolong the lifespan of your drivetrain.
4. Can I mix and match sprocket brands on my bike?
Mixing and matching sprocket brands is generally not recommended, as it can affect shifting performance and compatibility.
5. What is the best lubricant for bike sprockets and chains?
Use a high-quality chain lubricant designed for your riding conditions. Wet lubricants are suitable for wet conditions, while dry lubricants are better for dry conditions.
6. How do I know if my chain is worn out?
Use a chain wear indicator to monitor chain wear and replace the chain when it reaches the recommended replacement point.
7. What is the difference between a short-cage and a long-cage derailleur?
Short-cage derailleurs are suitable for cassettes with a narrow range of gears, while long-cage derailleurs are designed for cassettes with a wide range of gears.
8. Can I convert my bike to a single-speed drivetrain?
Yes, you can convert your bike to a single-speed drivetrain by removing the derailleurs and multiple sprockets and replacing them with a single sprocket and chain.
9. What is the advantage of electronic shifting systems?
Electronic shifting systems offer precise and reliable gear changes with the touch of a button, providing seamless shifting performance.
10. How do I choose the right chain length for my bike?
Use a chain sizing tool or consult a bike mechanic to determine the correct chain length for your bike, ensuring proper shifting and drivetrain performance.
Ready to dive deeper into the world of motorcycles? Visit usabikers.net now to discover more insightful articles, connect with a vibrant community of bikers, and find everything you need to fuel your passion!
Address: 801 Sturgis Main St, Sturgis, SD 57785, United States
Phone: +1 (605) 347-2000
Website: usabikers.net