
Maintaining a clean bike is crucial for optimal performance and longevity. Regular washing not only keeps your bicycle looking its best, but also prevents the build-up of dirt and grime that can lead to premature wear and tear on components. This guide will walk you through the essential steps and best practices for effectively washing your bike at home, ensuring it remains in top condition for every ride.
Gather Your Bike Washing Supplies
Before you begin, gather all the necessary supplies to make the washing process smooth and efficient. Having everything at hand will prevent interruptions and ensure you don’t miss any crucial steps. Here’s what you’ll need:
- Bucket: A standard bucket to hold your soapy water.
- Hose & Nozzle: For rinsing your bike, a hose with a shower setting is ideal.
- Bike-Specific Cleaner or Dish Soap: A mild detergent to safely clean your bike’s surfaces. Bike-specific cleaners are formulated to be gentle yet effective on bicycle components.
- Bike-Specific Degreaser: Essential for cleaning the drivetrain, removing stubborn grease and grime.
- Brush Kit: A set of brushes designed for bikes, including various shapes and sizes to reach different areas.
- Rags: Soft cloths for drying and polishing your bike. Microfiber cloths are excellent for this purpose.
- Chain Lube: To lubricate your chain after washing, ensuring smooth shifting and preventing rust.
- General Bike Grease: For re-greasing parts that may require it after frequent washing.
- Rubbing Alcohol (Isopropyl Alcohol): Particularly important if you have disc brakes, for cleaning rotors if they become contaminated.
- Bike Polish (Optional): To give your bike an extra shine and showroom finish.
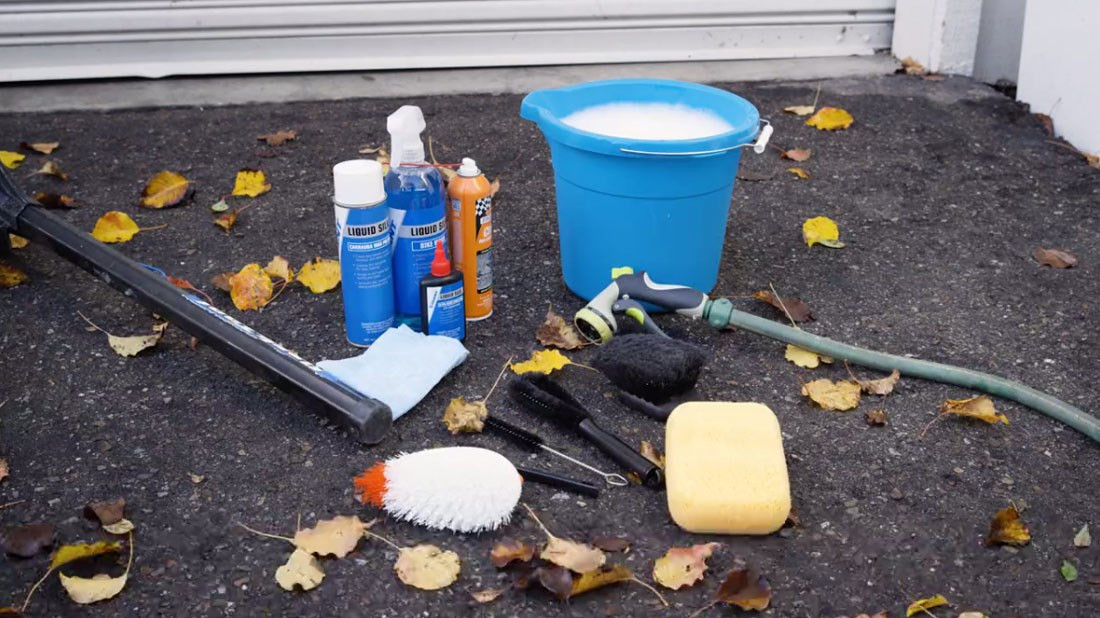 Bike washing supplies including bucket, soap, brushes, hose, and rags
Step-by-Step Bike Washing Instructions
1. Prepare Your Wash Area and Soapy Water.
Fill your bucket with clean water and add bike-specific cleaner or a mild dish soap. Mix the soap and water to create a soapy solution. Choose a shaded area to wash your bike if possible. Washing in direct sunlight can cause the soap to dry too quickly, potentially leaving spots or streaks.
2. Rinse Your Bike Thoroughly.
Using your hose with the “shower” setting, thoroughly rinse your entire bike. This initial rinse will remove loose dirt, mud, and debris before you start scrubbing.
Important DO and DON’T for Rinsing:
- DO: Use a gentle “shower” setting to effectively rinse away dirt without applying excessive pressure.
- DO NOT: Use high-pressure settings like “jet” or a power washer. High pressure can force water and dirt into sensitive areas like bearings (bottom bracket, headset, hubs, pivots) and wash away essential grease that protects these components.
3. Apply Degreaser to the Drivetrain.
The drivetrain (cassette, derailleurs, chain, chainrings) typically accumulates the most grease and grime. Apply a bike-specific degreaser liberally to all drivetrain components. Allow the degreaser to soak in for at least 5 minutes. This soaking time allows the degreaser to effectively break down the grease and grime, making it easier to scrub away.
Important DO and DON’T for Degreaser:
- DO: Use a bike-specific degreaser designed for bicycle drivetrains.
- DO NOT: Spray degreaser on brake calipers, brake pads, or rotors, especially if you have disc brakes. Degreaser contamination can lead to squeaky and less effective brakes. If degreaser accidentally gets on these parts, clean them immediately with rubbing alcohol.
4. Scrub the Bike Frame and Components (Excluding Drivetrain).
While the degreaser is working on the drivetrain, use your brush kit and soapy water to scrub the rest of your bike. Keep your “drivetrain brushes” separate from your “frame brushes” to avoid transferring grease to clean areas. Dip your brushes into the soapy water frequently as you scrub.
A good brush kit includes brushes of different shapes and sizes, allowing you to effectively clean all parts of your bike, including hard-to-reach areas and crevices. Use softer bristled brushes for painted frame surfaces to prevent scratches, and firmer brushes can be used for components less prone to scratching.
5. Clean the Drivetrain with Drivetrain Brushes.
Now, revisit the drivetrain. Using your dedicated “drivetrain brushes,” thoroughly scrub the entire drivetrain, including the cassette, derailleurs (front and rear), chainrings, chain, and even the pulleys on the rear derailleur cage. For the chain, a helpful technique is to hold a sponge or rag soaked in soapy water on the chain while pedaling backwards. This effectively cleans all sides of the chain links.
6. Rinse the Entire Bike Again.
Once you’re satisfied with your scrubbing, use the “shower” setting on your hose again to rinse off all the soapy water and degreaser from the entire bike. Ensure you rinse thoroughly to remove all soap residue.
7. Remove Excess Water.
Take your bike off the bike stand or flip it upside down (if safe and appropriate for your bike type) and bounce it gently on the tires to shake off excess water. This helps speed up the drying process and prevents water spots.
8. Dry Your Bike.
If it’s a sunny and breezy day, you can let your bike air dry for about 5-10 minutes. However, for a more thorough and quicker drying process, especially if the conditions aren’t ideal, use clean rags to dry your bike. Pay particular attention to drying bolts, the drivetrain, and any areas where water tends to collect. To dry the drivetrain, wipe down the derailleur cage and chainrings, and use a rag on the chain while pedaling backwards, similar to the cleaning process.
9. Lubricate Your Chain.
After drying the drivetrain, it’s essential to re-lubricate your chain. Washing removes the old lubricant, and a dry chain will lead to increased wear, friction, and poor shifting performance. Apply chain lube to the entire length of the chain. Pedal backwards for several rotations while applying lube to ensure even coverage. Allow the lube to soak into the chain for about 5 minutes.
Choosing the Right Chain Lube: There are various types of chain lubes available, including wet, dry, and ceramic lubes. Wet lubes are better for wet and muddy conditions, while dry lubes are suitable for dry and dusty environments. Ceramic lubes offer a balance of performance in various conditions. Consult your local bike shop for recommendations based on your typical riding conditions.
10. Wipe Off Excess Chain Lube.
After allowing the lube to penetrate, wipe away any excess lube from the outside of the chain with a rag. Excess lube attracts dirt and grime, which counteracts the benefits of cleaning and lubrication.
11. Clean Disc Brake Rotors (If Necessary).
If you suspect your disc brake rotors may have been contaminated with degreaser or other substances during the washing process, clean them with rubbing alcohol. Apply rubbing alcohol to a clean rag and wipe down the rotors thoroughly. This removes any contaminants and ensures optimal braking performance.
12. Re-grease Parts (Periodically).
With frequent bike washing, some parts may require fresh grease to prevent squeaking or seizing. These components include:
- Saddle rail clamp bolts
- Seat post
- Seat post clamp
- Headset
- Stem bolts
- Thru-axles
- Pedal threads
- Bottom bracket bearings
- Derailleur pulleys
Re-greasing these parts periodically, especially after many washes or after riding in wet conditions, will ensure smooth operation and prevent corrosion.
13. Apply Bike Polish (Optional for Showroom Shine).
For an extra level of bike care and a showroom finish, you can apply bike polish. Spray a small amount of bike polish onto a clean, dry rag and wipe down the frame and other shiny components. Be careful to avoid polishing braking surfaces like rim brake tracks or disc brake rotors.
14. All Done! Enjoy Your Clean Bike.
Congratulations, your bike is now clean and ready for your next ride! Regular bike washing and maintenance will not only keep your bike looking great but also extend the lifespan of its components and ensure a smoother, more enjoyable riding experience.
***
Disclaimer: For road bikes, if you prefer a quicker clean, you can often skip the hose. Use a速dry degreaser that doesn’t require rinsing and wipe down the frame with a soft cloth and protective polish.

