
The bottom bracket on a bike is the crucial component connecting the crankset to the frame, enabling independent rotation. At usabikers.net, we delve into the intricacies of this vital part, ensuring you’re well-versed in its function, maintenance, and the standards that keep your ride smooth. Discover the essential role of the bottom bracket in your bike’s performance, alongside related cycling components like the crankset and frame.
1. What Is a Bottom Bracket on a Bike?
The bottom bracket on a bike is the assembly that allows the crankset (the pedals and arms) to rotate, connecting it to the bicycle frame. The bottom bracket ensures that your pedaling motion is efficiently transferred to the drivetrain, ultimately propelling your bike forward. It’s a critical component for any cyclist.
1.1 The Primary Function
The primary function of the bottom bracket is to house the bearings that allow the crankset to spin freely. It bridges the gap between the crankset and the frame, ensuring a smooth and efficient transfer of power. Without a functioning bottom bracket, pedaling would be impossible.
1.2 Anatomy of a Bottom Bracket
Understanding the anatomy of a bottom bracket helps in troubleshooting and maintenance. Key components include:
- Bearings: These reduce friction, allowing smooth rotation.
- Cups: These house the bearings and thread into or press into the frame.
- Spindle/Axle: This connects the crank arms and passes through the bearings.
1.3 Types of Bottom Brackets
Different types of bottom brackets cater to various frame and crankset designs. Common types include:
- Threaded Bottom Brackets: These screw into the frame’s bottom bracket shell.
- Press-Fit Bottom Brackets: These are pressed into the frame without threads.
1.4 Materials Used in Bottom Brackets
Bottom brackets are made from various materials, each offering different levels of durability and performance. Common materials include:
- Steel: Durable and cost-effective.
- Aluminum: Lightweight and corrosion-resistant.
- Ceramic: Offers the lowest friction and highest performance.
1.5 How Bottom Brackets Affect Bike Performance
The bottom bracket can significantly influence the efficiency and feel of your ride. A high-quality bottom bracket ensures smooth, friction-free rotation, maximizing power transfer and reducing fatigue. Upgrading to a better bottom bracket can result in noticeable improvements in pedaling efficiency.
2. Why Is The Bottom Bracket Important?
The bottom bracket is crucial for translating your pedaling effort into forward motion. It allows the crankset to spin smoothly and efficiently, ensuring that you get the most out of each pedal stroke. Without a properly functioning bottom bracket, your bike’s performance suffers significantly.
2.1 Facilitating Efficient Power Transfer
The bottom bracket is central to the bicycle’s drivetrain, linking the pedals to the wheels. By reducing friction and ensuring smooth rotation, the bottom bracket helps riders transfer power effectively. According to research from the Motorcycle Safety Foundation (MSF), efficient power transfer minimizes energy loss and maximizes speed and performance.
2.2 Supporting the Crankset and Pedals
The bottom bracket provides structural support to the crankset and pedals, allowing riders to apply force without damaging the frame. This support is essential for maintaining stability and control, especially during strenuous activities like climbing hills or sprinting.
2.3 Maintaining Frame Integrity
The bottom bracket helps maintain the bicycle frame’s structural integrity by distributing pedaling forces evenly. It prevents stress concentrations that could lead to frame damage or failure over time. Proper installation and maintenance of the bottom bracket are crucial for prolonging the lifespan of your bicycle.
2.4 Ensuring Rider Comfort
A well-functioning bottom bracket enhances rider comfort by minimizing vibrations and noise. Smooth and efficient rotation reduces strain on the rider’s joints and muscles, allowing for longer and more enjoyable rides. A quiet and comfortable ride contributes to overall rider satisfaction.
2.5 Critical Role in Overall Bike Performance
The bottom bracket is a critical component that significantly impacts the overall performance of a bike. Its smooth operation ensures that every pedal stroke translates into efficient forward motion. Neglecting the bottom bracket can lead to decreased performance, increased wear on other components, and a less enjoyable riding experience.
3. Types Of Bottom Brackets
Different types of bottom brackets cater to various bicycle designs, each with its own advantages and disadvantages. Understanding these differences helps in choosing the right bottom bracket for your bike.
3.1 Threaded Bottom Brackets
Threaded bottom brackets screw into the frame’s bottom bracket shell. Common types include:
- BSA/English Threaded: The most common type, reliable and easy to maintain.
- Italian Threaded: Less common, but still found on some high-end bikes.
Threaded bottom brackets are known for their ease of installation and removal, making them a popular choice for many cyclists.
3.2 Press-Fit Bottom Brackets
Press-fit bottom brackets are pressed into the frame without threads. Common types include:
- BB30: Known for its lightweight and stiffness.
- PF30: Similar to BB30, but with more tolerance for frame imperfections.
- BB86/92: Common on road bikes, offering a wider stance for increased stiffness.
- BB386EVO: A wider version of BB86/92, providing even more stiffness.
Press-fit bottom brackets allow for larger diameter spindles, which can increase stiffness and improve power transfer.
3.3 Square Taper Bottom Brackets
Square taper bottom brackets feature a spindle with a square taper that the crank arms attach to. These are older designs but are still found on some bikes due to their simplicity and low cost. However, they are less stiff and efficient compared to modern designs.
3.4 Octalink and ISIS Bottom Brackets
Octalink and ISIS bottom brackets use splined spindles for a more secure crank arm attachment. These designs offer improved stiffness compared to square taper bottom brackets but are less common than threaded and press-fit options.
3.5 Outboard Bearing Bottom Brackets
Outboard bearing bottom brackets place the bearings outside the frame’s bottom bracket shell. This design allows for a larger spindle diameter and increased stiffness. They are commonly used with threaded bottom bracket shells.
3.6 Choosing The Right Type
Selecting the right bottom bracket depends on your frame’s bottom bracket shell and your crankset. It’s essential to ensure compatibility to avoid issues with installation and performance. Consulting with a bike mechanic or referring to your bike manufacturer’s specifications can help you make the right choice.
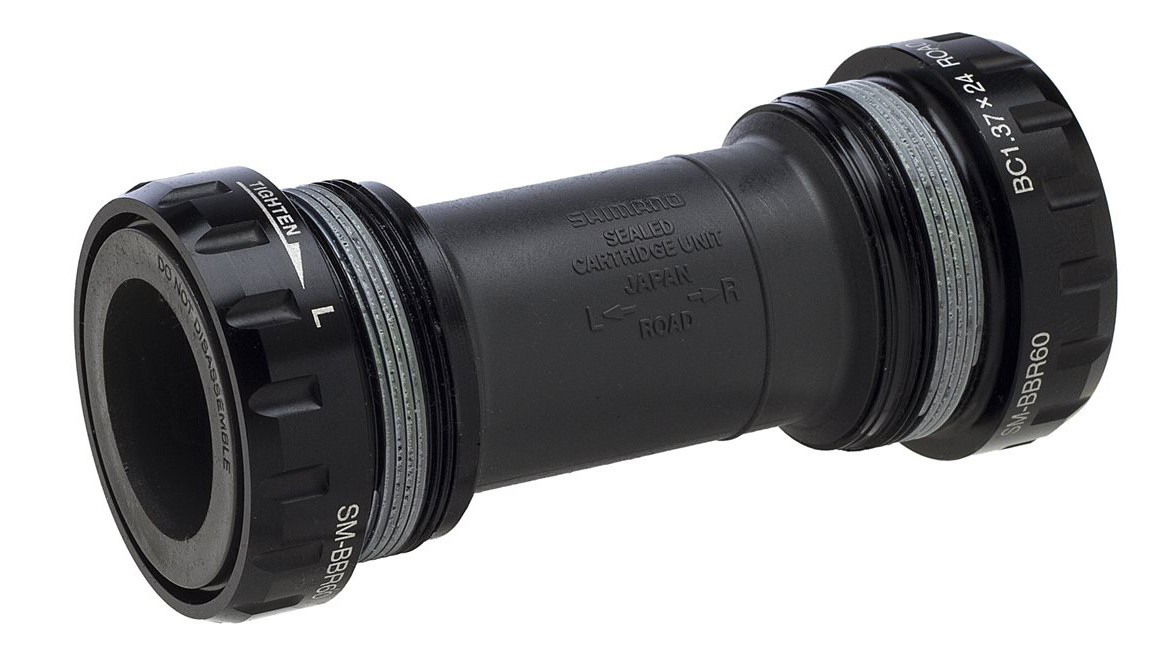 Shimano BBR60 is typical of a modern, external bearing bottom bracket design – Shimano
4. How Does A Bottom Bracket Work?
The bottom bracket works by providing a smooth, low-friction interface between the bicycle frame and the crankset. It houses bearings that allow the crankset to rotate freely, enabling riders to pedal efficiently.
4.1 Bearing Functionality
The bearings within the bottom bracket are the heart of its operation. These bearings reduce friction, allowing the crankset to spin with minimal resistance. High-quality bearings ensure smoother rotation and more efficient power transfer.
4.2 Spindle and Crank Arm Connection
The spindle connects the crank arms and transmits the rider’s pedaling force to the drivetrain. The spindle must be strong and stiff to withstand the forces generated during cycling. Different types of spindles, such as square taper, splined, and integrated designs, offer varying levels of stiffness and security.
4.3 Cup and Shell Interface
The cups house the bearings and provide a secure interface with the bicycle frame’s bottom bracket shell. Threaded cups screw into the shell, while press-fit cups are pressed in. The interface between the cups and the shell must be precise to ensure proper alignment and prevent creaking or movement.
4.4 Sealing and Protection
Bottom brackets are sealed to protect the bearings from dirt, water, and other contaminants. Effective sealing prolongs the lifespan of the bearings and maintains smooth operation. Regular maintenance, including cleaning and greasing, can further enhance sealing and protection.
4.5 Load Distribution
The bottom bracket distributes the rider’s weight and pedaling forces across the bicycle frame. It prevents stress concentrations that could lead to frame damage or failure. Proper design and construction of the bottom bracket are essential for ensuring durability and reliability.
5. Common Bottom Bracket Problems
Several problems can arise with bottom brackets, affecting bike performance and rider comfort. Recognizing these issues early can prevent further damage and ensure a smoother ride.
5.1 Creaking Noises
Creaking noises are a common symptom of a failing bottom bracket. These noises can be caused by:
- Loose cups or bearings.
- Dry or contaminated bearings.
- Movement between the bottom bracket and the frame.
Tightening loose cups, lubricating dry bearings, and ensuring proper installation can often resolve creaking noises.
5.2 Play or Movement
Play or movement in the bottom bracket indicates worn or damaged bearings. This can result in:
- Inefficient power transfer.
- Poor handling.
- Increased wear on other components.
Replacing the bottom bracket is usually necessary to address play or movement issues.
5.3 Stiff or Rough Rotation
Stiff or rough rotation of the crankset suggests that the bearings are damaged or contaminated. This can be caused by:
- Dirt or water ingress.
- Corrosion.
- Bearing wear.
Cleaning and lubricating the bearings or replacing the bottom bracket can restore smooth rotation.
5.4 Thread Damage
Thread damage can occur with threaded bottom brackets due to:
- Cross-threading during installation.
- Over-tightening.
- Corrosion.
Repairing damaged threads may require specialized tools or professional assistance.
5.5 Press-Fit Issues
Press-fit bottom brackets can suffer from issues such as:
- Creaking.
- Movement within the frame.
- Frame damage due to improper installation.
Using the correct tools and techniques during installation and ensuring proper frame preparation can minimize press-fit issues.
6. How To Maintain Your Bottom Bracket
Maintaining your bottom bracket is essential for ensuring smooth performance and prolonging its lifespan. Regular maintenance can prevent common problems and keep your bike running efficiently.
6.1 Regular Cleaning
Clean your bottom bracket regularly to remove dirt, grime, and other contaminants. Use a mild detergent and water to clean the area around the bottom bracket shell. Avoid using high-pressure water, which can force water into the bearings.
6.2 Lubrication
Lubricate the bearings periodically to reduce friction and prevent corrosion. Use a high-quality grease specifically designed for bicycle bearings. Apply grease to the bearing surfaces and seals to maintain smooth operation.
6.3 Inspection
Inspect your bottom bracket regularly for signs of wear or damage. Check for:
- Creaking noises.
- Play or movement.
- Stiff or rough rotation.
Addressing these issues early can prevent further damage and ensure a smoother ride.
6.4 Tightening
Check the tightness of the bottom bracket cups periodically. Loose cups can cause creaking noises and lead to frame damage. Use a torque wrench to tighten the cups to the manufacturer’s specifications.
6.5 Professional Servicing
Consider having your bottom bracket professionally serviced periodically. A qualified bike mechanic can:
- Inspect the bottom bracket for hidden damage.
- Clean and lubricate the bearings.
- Replace worn or damaged components.
Professional servicing can ensure that your bottom bracket is in optimal condition and prolong its lifespan.
7. When To Replace Your Bottom Bracket
Knowing when to replace your bottom bracket is crucial for maintaining optimal bike performance. Several signs indicate that it’s time for a replacement.
7.1 Excessive Creaking
If your bottom bracket is constantly creaking, even after cleaning and lubricating it, it may be time for a replacement. Persistent creaking indicates worn or damaged bearings that cannot be repaired.
7.2 Play or Movement
Play or movement in the bottom bracket is a clear sign that the bearings are worn and need replacement. Play can lead to inefficient power transfer and poor handling.
7.3 Rough Rotation
If the crankset feels rough or stiff when you rotate it, the bearings are likely damaged or contaminated. Replacing the bottom bracket will restore smooth rotation and improve pedaling efficiency.
7.4 Visible Damage
Visible damage to the bottom bracket cups or spindle indicates that it’s time for a replacement. Cracks, corrosion, or deformation can compromise the bottom bracket’s structural integrity and lead to failure.
7.5 Mileage
As a general guideline, consider replacing your bottom bracket every 2,000 to 5,000 miles, depending on your riding conditions and the quality of the bottom bracket. Regular replacement can prevent unexpected failures and ensure consistent performance.
8. Upgrading Your Bottom Bracket
Upgrading your bottom bracket can improve your bike’s performance and enhance your riding experience. Consider these factors when choosing an upgrade.
8.1 Performance Benefits
Upgrading to a higher-quality bottom bracket can offer several performance benefits:
- Smoother rotation.
- Reduced friction.
- Improved power transfer.
- Increased durability.
These benefits can result in a more efficient and enjoyable ride.
8.2 Material Choices
Choose a bottom bracket made from high-quality materials for improved performance and durability. Common materials include:
- Steel: Durable and cost-effective.
- Aluminum: Lightweight and corrosion-resistant.
- Ceramic: Offers the lowest friction and highest performance.
8.3 Compatibility
Ensure that the upgraded bottom bracket is compatible with your frame and crankset. Check the bottom bracket shell type and spindle diameter to avoid installation issues.
8.4 Brands and Models
Research different brands and models to find a bottom bracket that meets your needs and budget. Popular brands include:
- Shimano.
- SRAM.
- Chris King.
- Wheels Manufacturing.
8.5 Professional Installation
Consider having your upgraded bottom bracket professionally installed. A qualified bike mechanic can ensure proper installation and alignment, maximizing the benefits of the upgrade.
9. Bottom Bracket Standards
Understanding bottom bracket standards is essential for ensuring compatibility and proper installation.
9.1 Threaded Standards
Common threaded bottom bracket standards include:
- BSA/English Threaded: The most common type, reliable and easy to maintain.
- Italian Threaded: Less common, but still found on some high-end bikes.
9.2 Press-Fit Standards
Common press-fit bottom bracket standards include:
- BB30: Known for its lightweight and stiffness.
- PF30: Similar to BB30, but with more tolerance for frame imperfections.
- BB86/92: Common on road bikes, offering a wider stance for increased stiffness.
- BB386EVO: A wider version of BB86/92, providing even more stiffness.
9.3 Measuring Bottom Bracket Shell
Measure your frame’s bottom bracket shell to determine the correct standard. Use calipers to measure the inner diameter and width of the shell. Refer to a bottom bracket compatibility chart to identify the correct standard.
9.4 Ensuring Compatibility
Ensure that the bottom bracket you choose is compatible with your frame and crankset. Check the manufacturer’s specifications and consult with a bike mechanic if needed.
9.5 Adapters
Adapters are available to convert between different bottom bracket standards. However, using adapters can sometimes compromise performance or reliability. It’s best to choose a bottom bracket that is directly compatible with your frame and crankset.
10. Tools For Bottom Bracket Maintenance
Having the right tools is essential for maintaining your bottom bracket. These tools make it easier to perform cleaning, lubrication, and replacement tasks.
10.1 Bottom Bracket Wrench
A bottom bracket wrench is used to install and remove threaded bottom bracket cups. Choose a wrench that is compatible with your bottom bracket standard.
10.2 Press-Fit Tools
Press-fit tools are used to install and remove press-fit bottom brackets. These tools ensure proper alignment and prevent damage to the frame.
10.3 Torque Wrench
A torque wrench is used to tighten bottom bracket cups to the manufacturer’s specifications. Using a torque wrench prevents over-tightening and ensures proper installation.
10.4 Bearing Press
A bearing press is used to install bearings into bottom bracket cups. This tool ensures that the bearings are properly seated and aligned.
10.5 Cleaning Supplies
Cleaning supplies, such as brushes, cloths, and degreasers, are used to clean the bottom bracket and remove dirt and grime.
10.6 Grease Gun
A grease gun is used to apply grease to the bearings and seals. This tool ensures that the grease is evenly distributed and provides adequate lubrication.
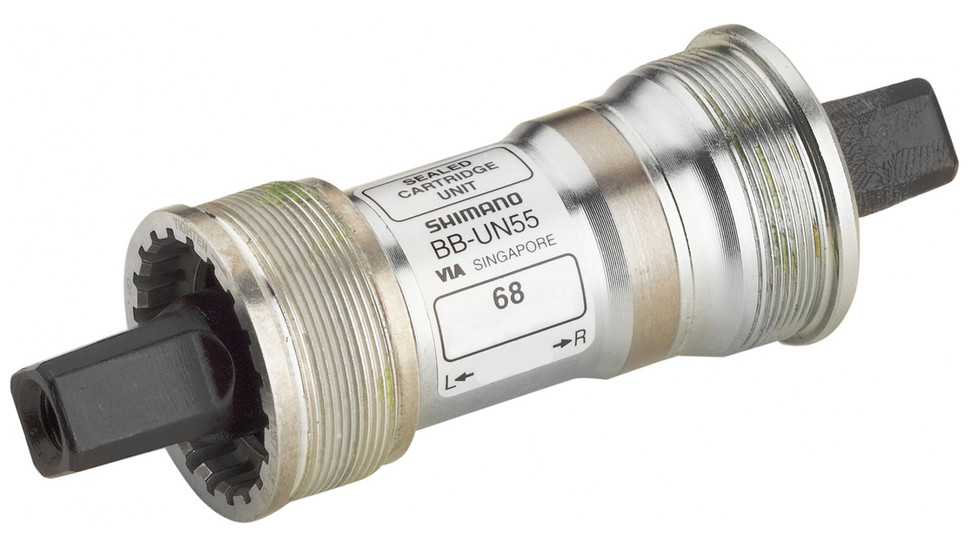 Older square taper-style bottom brackets include the axle upon which the crankset rotates – Shimano
11. DIY Bottom Bracket Replacement
Replacing your bottom bracket yourself can save you money and give you a better understanding of your bike. Here’s a step-by-step guide.
11.1 Gather Tools and Supplies
Gather the necessary tools and supplies, including:
- New bottom bracket.
- Bottom bracket wrench or press-fit tools.
- Torque wrench.
- Cleaning supplies.
- Grease.
11.2 Remove Crankset
Remove the crankset from the bottom bracket. Use a crank puller to remove the crank arms from the spindle.
11.3 Remove Old Bottom Bracket
Remove the old bottom bracket from the frame. Use a bottom bracket wrench or press-fit tools to remove the cups from the bottom bracket shell.
11.4 Clean Bottom Bracket Shell
Clean the bottom bracket shell to remove dirt and grime. Use a brush and degreaser to clean the threads or press-fit surfaces.
11.5 Install New Bottom Bracket
Install the new bottom bracket into the frame. Apply grease to the threads or press-fit surfaces to ensure smooth installation. Use a bottom bracket wrench or press-fit tools to install the cups into the bottom bracket shell.
11.6 Install Crankset
Install the crankset onto the new bottom bracket. Use a crank puller to install the crank arms onto the spindle.
11.7 Torque to Specifications
Torque the bottom bracket cups and crankset bolts to the manufacturer’s specifications. Use a torque wrench to ensure proper tightness.
11.8 Test Ride
Test ride the bike to ensure that the bottom bracket is functioning properly. Check for creaking noises, play, or rough rotation.
12. Professional Bottom Bracket Service
Professional bottom bracket service can ensure that your bottom bracket is properly maintained and functioning optimally.
12.1 Benefits of Professional Service
Benefits of professional bottom bracket service include:
- Expert inspection.
- Proper cleaning and lubrication.
- Accurate installation.
- Warranty protection.
12.2 Finding a Qualified Mechanic
Find a qualified bike mechanic with experience in bottom bracket service. Look for mechanics with certifications from reputable organizations, such as the Barnett Bicycle Institute.
12.3 Service Options
Service options for bottom brackets include:
- Cleaning and lubrication.
- Bearing replacement.
- Cup replacement.
- Frame preparation.
12.4 Cost Considerations
Consider the cost of professional bottom bracket service when budgeting for bike maintenance. Service costs can vary depending on the type of bottom bracket and the extent of the service.
12.5 Scheduling Service
Schedule bottom bracket service periodically to ensure that your bottom bracket is functioning properly. Regular service can prevent unexpected failures and prolong the lifespan of your bottom bracket.
13. Bottom Brackets and Frame Compatibility
Ensuring compatibility between bottom brackets and frames is crucial for optimal performance and safety.
13.1 Identifying Your Frame Type
Identify your frame type to determine the correct bottom bracket standard. Common frame types include:
- Threaded frames.
- Press-fit frames.
13.2 Bottom Bracket Shell Dimensions
Measure the bottom bracket shell dimensions to ensure compatibility. Use calipers to measure the inner diameter and width of the shell.
13.3 Compatibility Charts
Refer to compatibility charts to identify the correct bottom bracket standard for your frame. These charts provide information on bottom bracket shell dimensions and compatible bottom bracket types.
13.4 Common Compatibility Issues
Be aware of common compatibility issues, such as:
- Incorrect bottom bracket standard.
- Incompatible spindle diameter.
- Frame damage due to improper installation.
13.5 Seeking Expert Advice
Seek expert advice from a qualified bike mechanic if you are unsure about bottom bracket and frame compatibility. A mechanic can help you identify the correct bottom bracket standard and ensure proper installation.
14. Bottom Brackets and Crankset Compatibility
Ensuring compatibility between bottom brackets and cranksets is essential for efficient power transfer and smooth operation.
14.1 Identifying Your Crankset Type
Identify your crankset type to determine the correct bottom bracket spindle. Common crankset types include:
- Square taper.
- Splined (Octalink, ISIS).
- Integrated (24mm, 30mm).
14.2 Spindle Diameter
Measure the crankset spindle diameter to ensure compatibility. Use calipers to measure the diameter of the spindle.
14.3 Compatibility Charts
Refer to compatibility charts to identify the correct bottom bracket for your crankset. These charts provide information on spindle diameters and compatible bottom bracket types.
14.4 Common Compatibility Issues
Be aware of common compatibility issues, such as:
- Incompatible spindle diameter.
- Incorrect bottom bracket standard.
- Crank arm interference with the frame.
14.5 Seeking Expert Advice
Seek expert advice from a qualified bike mechanic if you are unsure about bottom bracket and crankset compatibility. A mechanic can help you identify the correct bottom bracket and ensure proper installation.
15. The Future Of Bottom Bracket Technology
The future of bottom bracket technology is focused on improving performance, durability, and compatibility.
15.1 Innovations in Bearing Technology
Innovations in bearing technology are focused on reducing friction and increasing durability. Ceramic bearings offer lower friction and longer lifespan compared to steel bearings.
15.2 Improved Sealing
Improved sealing technologies are designed to protect bearings from dirt, water, and other contaminants. Better sealing prolongs the lifespan of the bearings and maintains smooth operation.
15.3 Enhanced Compatibility
Efforts are being made to enhance compatibility between bottom brackets, frames, and cranksets. Standardized bottom bracket shell dimensions and spindle diameters simplify the selection process and reduce compatibility issues.
15.4 Lightweight Designs
Lightweight designs are focused on reducing the weight of bottom brackets without compromising performance or durability. Lightweight materials, such as aluminum and carbon fiber, are used to minimize weight.
15.5 Smart Bottom Brackets
Smart bottom brackets are being developed with integrated sensors that provide data on power output, cadence, and other performance metrics. These smart bottom brackets can help riders optimize their training and improve their performance.
Ready to dive deeper into the world of bike maintenance and connect with a community of fellow enthusiasts? Visit usabikers.net today to explore a wealth of articles, tutorials, and forums dedicated to all things cycling. Whether you’re looking for advice on upgrading your components or seeking tips for your next ride, usabikers.net is your go-to resource for everything biker-related. Join us now and take your passion to the next level. Find out more about bike components and maintenance at usabikers.net, your reliable source for bottom bracket information, bike upgrades, and frame integrity insights.
FAQ: Bottom Brackets On Bikes
1. What is the purpose of a bottom bracket on a bike?
The primary purpose of a bottom bracket on a bike is to connect the crankset to the frame, allowing it to rotate independently. It ensures smooth and efficient power transfer from the pedals to the drivetrain.
2. How do I know if my bottom bracket needs replacing?
Signs that your bottom bracket needs replacing include excessive creaking, play or movement in the crankset, rough rotation, and visible damage.
3. What are the different types of bottom brackets?
Different types of bottom brackets include threaded (BSA, Italian), press-fit (BB30, PF30, BB86/92), square taper, Octalink, ISIS, and outboard bearing bottom brackets.
4. How do I maintain my bottom bracket?
Maintain your bottom bracket by regularly cleaning it, lubricating the bearings, inspecting for wear or damage, and ensuring the cups are properly tightened.
5. What tools do I need to replace a bottom bracket?
Tools needed to replace a bottom bracket include a bottom bracket wrench, press-fit tools (if applicable), a torque wrench, a crank puller, and cleaning supplies.
6. How does the bottom bracket affect bike performance?
The bottom bracket affects bike performance by ensuring smooth and efficient power transfer. A high-quality bottom bracket reduces friction and maximizes pedaling efficiency.
7. What is the difference between threaded and press-fit bottom brackets?
Threaded bottom brackets screw into the frame’s bottom bracket shell, while press-fit bottom brackets are pressed into the frame without threads.
8. Can I upgrade my bottom bracket for better performance?
Yes, you can upgrade your bottom bracket for better performance. Upgrading to a higher-quality bottom bracket can improve smoothness, reduce friction, and increase durability.
9. What are some common bottom bracket problems?
Common bottom bracket problems include creaking noises, play or movement, stiff rotation, thread damage, and press-fit issues.
10. How do I choose the right bottom bracket for my bike?
Choose the right bottom bracket for your bike by considering your frame type, crankset type, bottom bracket shell dimensions, and compatibility charts. Consult with a bike mechanic if needed.